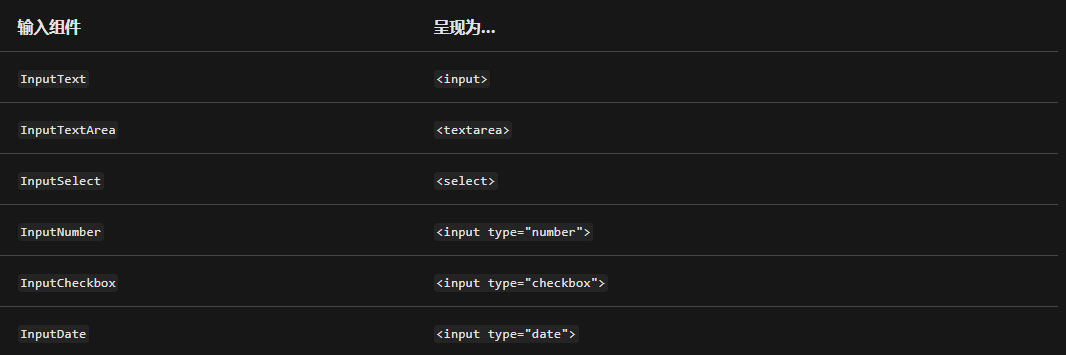
blazor 提供一组输入组件。 输入组件会将绑定字段数据处理到模型,并在提交窗体时验证用户输入。
下表显示了可用的输入组件:
editform
editform 组件通过 editcontext 包装这些输入组件并协调验证过程。 创建 editform 时,可以使用 model 参数指
定要绑定到的模型实例。 验证通常是使用数据批注完成的,并且可以进行扩展。 若要启用基于数据批注的验证,请
将 dataannotationsvalidator 组件添加为 editform 的子组件。 editform 组件提供了一个用于处理有效(
onvalidsubmit )和无效( oninvalidsubmit )提交的方便事件。 还有一个更通用的 onsubmit 事件,可让你自行触发
和处理验证。若要显示验证错误摘要,请使用 validationsummary 组件。
dataannotationsvalidator
dataannotationsvalidator 组件使用数据注释将验证支持附加到级联的 editcontext。
- 当用户从某个字段中跳出时,将执行字段验证。 在字段验证期间,dataannotationsvalidator 组件将报告的所有验证结果与该字段相关联。
- 当用户提交窗体时,将执行模型验证。 在模型验证期间,dataannotationsvalidator 组件尝试根据验证结果报告的成员名称来确定字段。 与单个成员无关的验证结果将与模型而不是字段相关联。
validationsummary
validationsummary 组件用于汇总所有验证消息。
验证
下面示例演示一个editform验证model参数 (为了便于测试,这里将实体模型写在了@code { } 当中)。
- 在@code{} 当中,创建一个 student类型,提供code与name属性
- 在页面中定义editform, 绑定model 与验证提交的方法handlevalidsubmit
- editform中定义两个inputtext用于接受输入内容
- button按钮用于提交整个模型的数据
@page "/"
@using microsoft.aspnetcore.components.forms

    <editform model="@student" onvalidsubmit="handlevalidsubmit">
        <dataannotationsvalidator />
        <validationsummary />
        <inputtext  @bind-value="@student.code" />
        <inputtext  @bind-value="@student.name" />
        <button type="submit">submit</button>
    </editform>

@code {
    @using system.componentmodel.dataannotations;

    private student student = new student();
    private void handlevalidsubmit()
    {
        // save the data
    }

    public class student
    {
        [required(allowemptystrings = false, errormessage = "必填项!")]
        public string name { get; set; }

        [stringlength(2, errormessage = "超出规定长度!")]
        public string code { get; set; }
    }
}
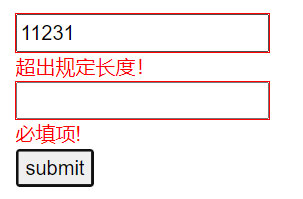
- 错误效果

若要显示验证错误摘要,请使用 validationsummary 组件。 若要显示特定输入字段的验证消息,请使用validationmessage 组件,并为指向相应模型成员的 for 参数指定 lambda 表达式。
基于上面的进行改造,如下所示。 (如果只是针对每个字段进行验证, 则无需在editform子集添加 validationsummary)
 <editform model="@student" onvalidsubmit="handlevalidsubmit">
        <dataannotationsvalidator />
        @*<validationsummary />*@
        <inputtext @bind-value="@student.code" />
        <validationmessage for="()=>student.code" />


        <inputtext @bind-value="@student.name" />
        <validationmessage for="()=>student.name" />

        <button type="submit">submit</button>
    </editform>
- 错误效果

嵌套验证
对于上面的单个实体验证,可以按照上面的做法进行, 但是考虑到实体中还包含其他类型的对象需要验证。
官方文档解释: 若要验证绑定模型的整个对象图(包括集合类型和复杂类型的属性),请使用试验性 microsoft.aspnetcore.components.dataannotations.validation 包
安装nuget包
install-package microsoft.aspnetcore.components.dataannotations.validation
实验
- 创建测试嵌套类型student /child
- editform子集添加 objectgraphdataannotationsvalidator
- 改造后完整代码如下所示:
    @page "/"
<editform model="@student" onvalidsubmit="handlevalidsubmit">
    <objectgraphdataannotationsvalidator />
    <inputtext @bind-value="@student.child.code" />
    <validationmessage for="()=>student.child.code" />

    <inputtext @bind-value="@student.child.name" />
    <validationmessage for="()=>student.child.name" />

    <button type="submit">submit</button>
</editform>

@code {
    @using system.componentmodel.dataannotations;

    private student student = new student();
    private void handlevalidsubmit()
    {
        // save the data
    }

    public class student
    {
        [validatecomplextype]
        public child child { get; set; } = new child();
    }

    public class child
    {
        [required(allowemptystrings = false, errormessage = "必填项!")]
        public string name { get; set; }

        [stringlength(2, errormessage = "超出规定长度!")]
        public string code { get; set; }
    }
}
注意: 子集必须保证为实例, 否则会报异常提示。 如上: =new child();
- 测试效果:
到此这篇关于blazor实现数据验证的文章就介绍到这了。希望对大家的学习有所帮助,也希望大家多多支持代码网。
发表评论