
 我要评论
我要评论springboot集成jasypt做配置加密,核心思路就是:把数据库密码、redis密码这类敏感信息用 enc(密文) 包起来写进配置文件,应用启动时jasypt自动解密注入,业务代码完全无感。
一.集成 springboot集成jasypt
1.第一步依赖
- jasypt的github的地址为:https://github.com/ulisesbocchio/jasypt-spring-boot
maven 地址如下:https://mvnrepository.com/artifact/com.github.ulisesbocchio/jasypt-spring-boot-starter
官网地址为:
http://www.jasypt.org/cli.html
不同的版本由不同的加密算法和加密方式组成,使用时请注意按需区分
2.拿版本2.1.1做举例
 <dependency>
            <groupid>com.github.ulisesbocchio</groupid>
            <artifactid>jasypt-spring-boot-starter</artifactid>
            <version>2.1.1</version>
        </dependency>
2.1如果项目使用@springbootapplication或@enableautoconfiguration注解,在pom中加入上面的依赖即可对整个spring的环境的配置信息进行加密解密。
2.2 ## jasypt-spring-boot 如果项目不使用@springbootapplication或@enableautoconfiguration注解,我们就使用下面的依赖,然后在配置java类中加上注解@enableencryptableproperties。
<dependency>
  <groupid>com.github.ulisesbocchio</groupid>
  <artifactid>jasypt-spring-boot</artifactid>
  <version>2.1.1</version>
</dependency>
@configuration
@enableencryptableproperties
public class myjasyptconfig {
2.3 只对特定配置加密解密 如果不想使用以上两种方式对所有配置信息都进行加密解密的话,可以使用注解@encryptablepropertysource指定配置文件,依赖如下:
<dependency>
  <groupid>com.github.ulisesbocchio</groupid>
  <artifactid>jasypt-spring-boot</artifactid>
  <version>2.1.1</version>
</dependency>
@configuration
@encryptablepropertysource(name = "你要指定的配置文件名称", value = "classpath:你要指定的配置文件路径")
public class myjasyptconfig {
}
2.4使用@springbootapplication或@enableautoconfiguration注解
第一步:application.java上增加注解@enableencryptableproperties(jasypt-spring-boot-starter包不需要该配置);
第二步在配置文件中加入jasypt.encryptor.password =你自己定义的加密秘钥,这是加密的秘钥;
第三步配置文件中所有明文密码替换为enc(加密后字符串),例如enc(xw2daxuatftq+f2iypqu0g==);
第四步引入一个maven依赖;
<dependency>
  <groupid>com.github.ulisesbocchio</groupid>
  <artifactid>jasypt-spring-boot</artifactid>
  <version>2.1.1</version>
</dependency>
3.加密方式的使用
1.第一种:进入你下载好的jar目录里运行
java -cp jasypt-1.9.3.jar org.jasypt.intf.cli.jasyptpbestringencryptioncli input="123456" password=你自己定义的加密秘钥 algorithm=pbewithmd5anddes(加密方式,根据使用版本区分)
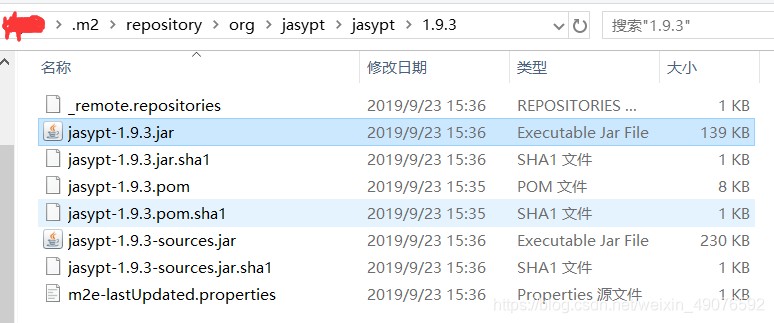
一般来讲jsypt 会自动被下载到 m2 仓库中,默认的地址为 c:\users\【用户名】.m2\repository\org\jasypt\jasypt\1.9.3

结果:
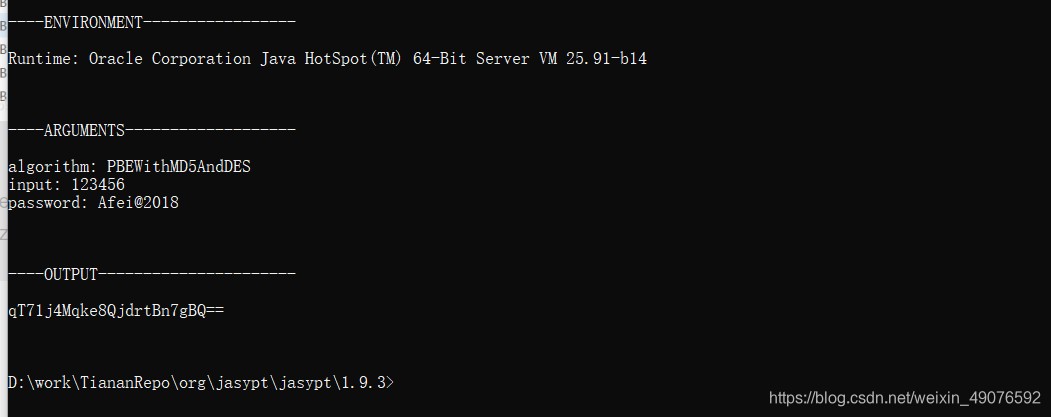
- input的值就是原密码。
- password的值就是配置文件中jasypt.encryptor.password指定的值,即秘钥。注意:你命令中的password要和你在配置文件中指定的jasypt.encryptor.password要一致。
- algorithm:加密方式,根据使用版本的区分,本例子使用的2.x版本默认的加密方式
- output:加密后的加密串
使用方式:
spring:
 datasource:
  url: jdbc:sqlserver:数据库地址
  username: 数据库用户名
  password: enc(加密串)
使用格式即为enc(你得到的加密字符串)
enc前缀可改变,即由你自己定义格式
jasypt:
 encryptor:
  property:
   prefix: "abc["
   suffix: "]"
使用格式即为abc(你得到的加密字符串)
2.第二种使用自定义配置进行加密,直接贴代码了。
@slf4j
public class jasyptutil {
    /**
     * jasypt生成加密结果
     * @param password 配置文件中设定的加密密码 jasypt.encryptor.password
     * @param value 待加密值
     * @return
     */
    public static string encyptpwd(string password,string value){
        pooledpbestringencryptor encryptor = new pooledpbestringencryptor();
        encryptor.setconfig(customconfigurationjasypt(password));
        string result = encryptor.encrypt(value);
        return result;
    }
    /**
     * 解密
     * @param password 设置盐值(加密解密密钥) jasypt.encryptor.password
     * @param value 待解密密文
     * @return
     */
    public static string decyptpwd(string password,string value){
        pooledpbestringencryptor encryptor = new pooledpbestringencryptor();
        encryptor.setconfig(customconfigurationjasypt(password));
        encryptor.decrypt(value);
        string result = encryptor.decrypt(value);
        return result;
    }
    public static simplestringpbeconfig customconfigurationjasypt(string password){
        simplestringpbeconfig config = new simplestringpbeconfig();
        config.setpassword(password);
        config.setalgorithm("pbewithmd5anddes");//  pbewithhmacsha512andaes_256 3.x使用
        config.setkeyobtentioniterations("1000");
        config.setpoolsize(1);
        config.setprovidername("sunjce");
        config.setsaltgeneratorclassname("org.jasypt.salt.randomsaltgenerator");
        config.setivgeneratorclassname("org.jasypt.salt.noopivgenerator"); //org.jasypt.iv.randomivgenerator 3.x使用
        config.setstringoutputtype("base64");
        return config;
    }
    public static void main(string[] args){
        //加密 若修改了第一个参数加密password记得在配置文件同步修改
        system.out.println("加密后:"+encyptpwd("ny_miyao","123456"));
        //解密
        system.out.println("解密后:"+decyptpwd("ny_miyao","aw0erevf9olesbm8tvjgiq=="));
    }
}
二.说说遇到的坑
1.版本问题
如果想用使用自定义的jasypt配置实现加密,那么必须注意你所使用的版本
注意区分旧和新版本
先上一段自定义的配置:
public static simplestringpbeconfig customconfigurationjasypt(string password){
        simplestringpbeconfig config = new simplestringpbeconfig();
        config.setpassword(password);
        config.setalgorithm("pbewithhmacsha512andaes_256");
        config.setkeyobtentioniterations("1000");
        config.setpoolsize(1);
        config.setprovidername("sunjce");
        config.setsaltgeneratorclassname("org.jasypt.salt.randomsaltgenerator");
        config.setivgeneratorclassname("org.jasypt.iv.randomivgenerator");
        config.setstringoutputtype("base64");
        return config;
    }
上述配置版本为
<dependency>
            <groupid>com.github.ulisesbocchio</groupid>
            <artifactid>jasypt-spring-boot-starter</artifactid>
            <version>3.0.0</version>
        </dependency>
public static simplestringpbeconfig cryptor(string password){
simplestringpbeconfig config = new simplestringpbeconfig();
config.setpassword(password);
config.setalgorithm("pbewithmd5anddes");// pbewithhmacsha512andaes_256
config.setkeyobtentioniterations("1000");
config.setpoolsize(1);
config.setprovidername("sunjce");
config.setsaltgeneratorclassname("org.jasypt.salt.randomsaltgenerator");
config.setivgeneratorclassname("org.jasypt.salt.noopivgenerator");
config.setstringoutputtype("base64");
return config;
}上述配置版本:
 <dependency>
            <groupid>com.github.ulisesbocchio</groupid>
            <artifactid>jasypt-spring-boot-starter</artifactid>
            <version>2.1.1</version>
        </dependency>
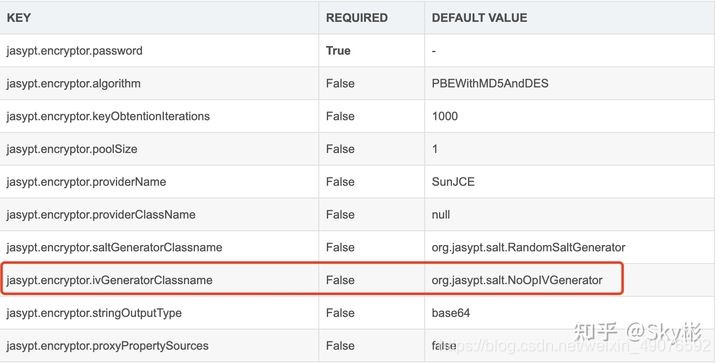
配置信息只有 jasypt.encryptor.password 是必须的,配置项有:
下图中的版本的配置项为旧版本使用,如果你使用的自定义配置那么需要注意你版本的默认的vgeneratorclassname的参数名字
2.x的一般 默认为org.jasypt.salt.noopivgenerator,如果版本的默认名字不匹配,运行时就会报输入的参数类找不到的问题
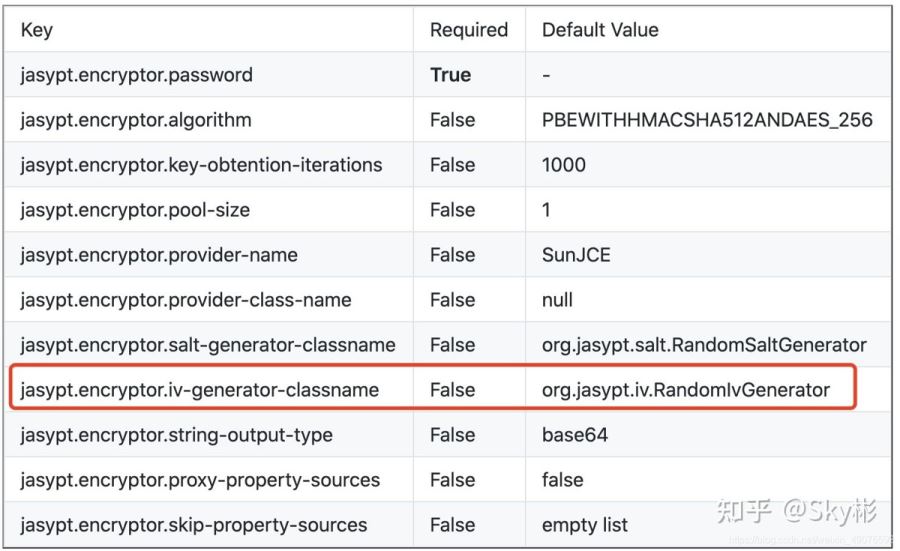
新版本的如3.x的默认基本是和下图的一致,如果不行那具体要根据使用的具体版本去确认。
2.encryptionoperationnotpossibleexception异常
1.第一个原因2.x和3.x使用的加密算法不同,解密自然是需要其匹配相对应的算法去解密,所以如果使用你自定义配置的是话注意区分2.x的pbewithmd5anddes加密算法,和3.xpbewithhmacsha512andaes_256加密算法,如果不匹配解密就会报这个异常。
2.第二个原因可能是你需要解密的加密字符串和解密需要的加密串不匹配,说穿了还是算法不一致的问题,首先要自己加密一遍,用加密得到的结果去进行解密。
3.权限问题
encryption raised an exception. a possible cause is you are using strong encryption algorithms and you
have not installed the java cryptography extension jce unlimited strength jurisdiction policyf
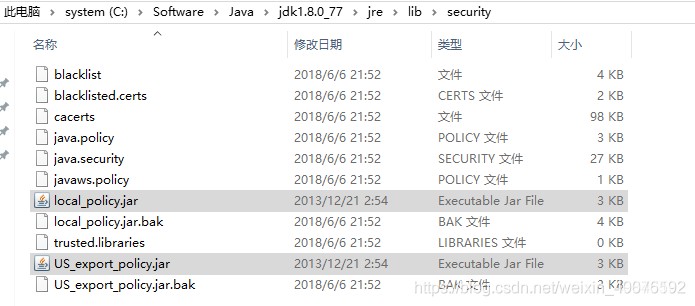
这个问题是jdk的无限强度管辖权政策权限不够(jce),去下载一个jce替换一下jre下的权限包就好。
6,7,8版本下载地址:https://www.oracle.com/technetwork/java/javase/downloads/jce-all-download-5170447.html
方式:
将下载好的压缩包里的 local_policy.jar和us_export_policy.jar替换掉java\jdk1.8.0_77\jre\lib\security\路径下的jar包
这里借用下别人的图
铭感信息明文存储会带有一定的安全隐患,加密秘钥的使用尽量还是放到内部代码里或者进行外部传入使用,而不是直接配置到配置文件里定义。
到此这篇关于spring boot集成jasypt配置加密实战:从接入到避坑的文章就介绍到这了,更多相关springboot集成jasypt配置信息加密内容请搜索代码网以前的文章或继续浏览下面的相关文章希望大家以后多多支持代码网!





发表评论