
 我要评论
我要评论你以为登录就是"用户名密码换一个token"?当你的系统需要"踢人下线"、“单设备登录”、"token无感刷新"时,一切都变了。
—— 一篇用代码流程拆解双token认证体系的实战手册
阅读时间:约45分钟 | 涵盖:双token原理 / spring security过滤链 / jwt生成与校验 / redis黑名单 / rbac权限 / token刷新 / 安全实践
🎬 序章:为什么需要双token?
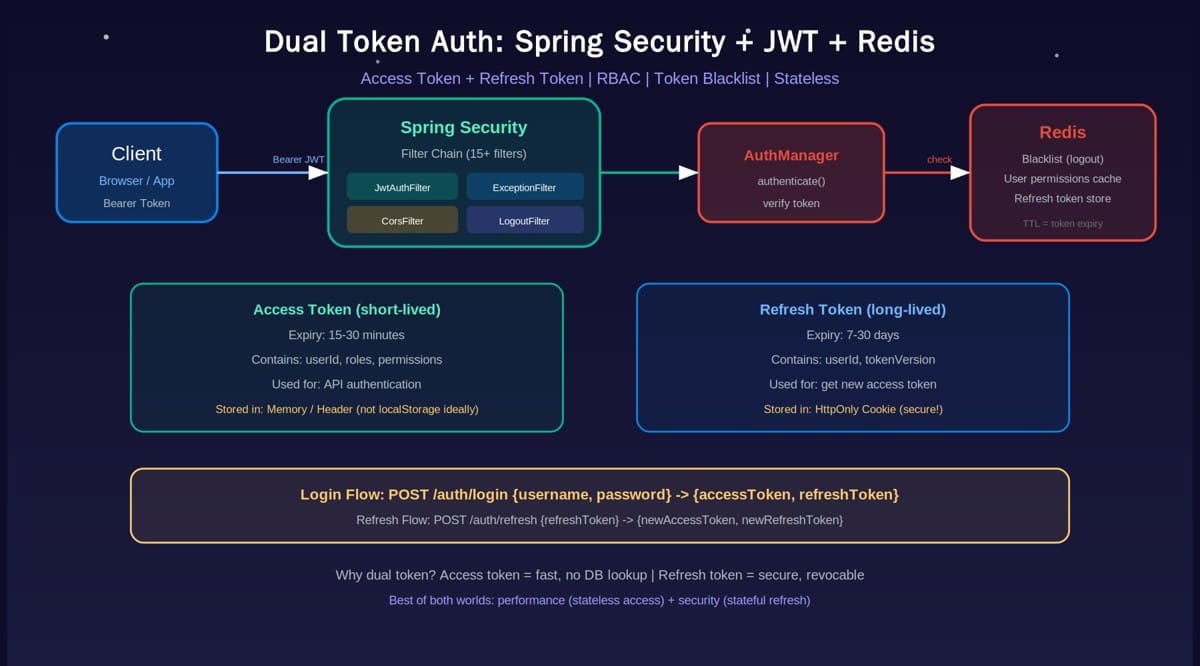
传统认证方案的困境
方案一:session认证
用户登录 -> 服务端创建session -> 返回sessionid(cookie)
每次请求 -> 带cookie -> 服务端查session
问题:
- 有状态:服务端要存session,分布式环境下要共享session(粘性session/redis session)
- csrf风险:cookie会被自动携带,容易被跨站请求伪造
- 跨域困难:cookie有域限制,前后端分离架构不方便
方案二:单token(一个jwt搞定一切)
用户登录 -> 返回一个jwt(有效期30天)
每次请求 -> 带jwt -> 服务端验签
问题:
- 安全与体验的矛盾:
- token有效期长(如30天)→ 用户体验好,但token泄露后30天内无法撤销
- token有效期短(如15分钟)→ 安全,但用户每15分钟就要重新登录
- 无法踢人下线:jwt一旦签发,在有效期内无法使其失效
双token方案:两全其美
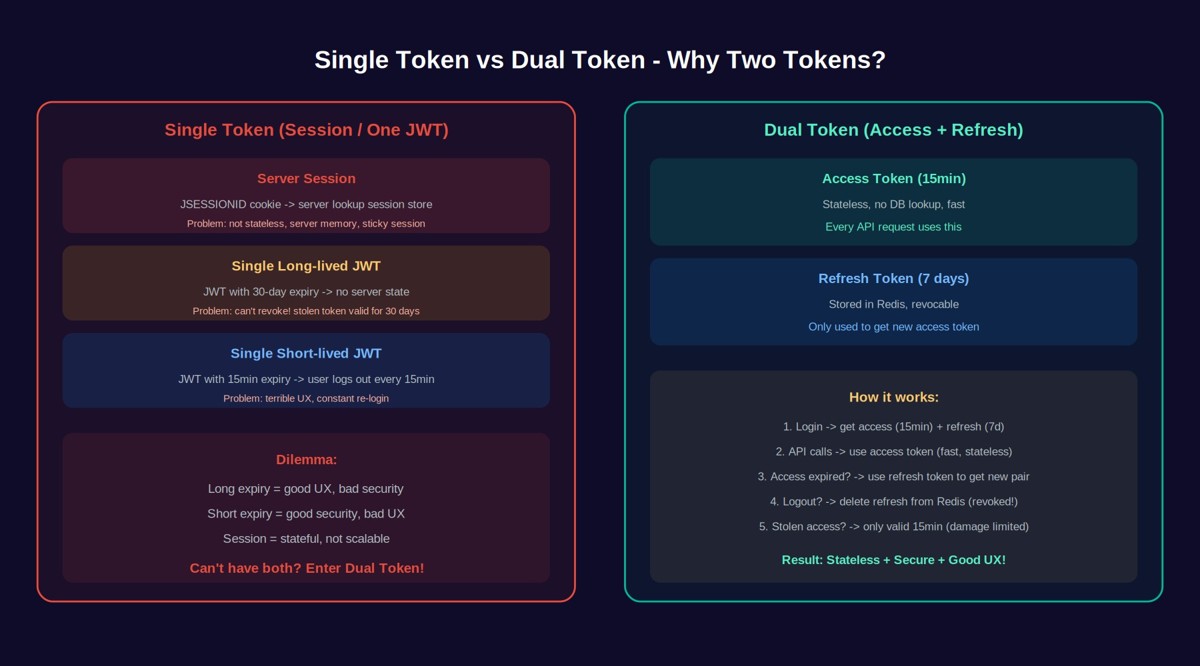
| token | 有效期 | 存储方式 | 状态 | 用途 |
|---|---|---|---|---|
| access token | 15-30分钟 | 内存/header | 无状态 | 每次api请求携带 |
| refresh token | 7-30天 | httponly cookie + redis | 有状态(redis) | 仅用于刷新access token |
核心思想:
- access token短命 → 泄露危害有限(最多15分钟)
- refresh token长命 → 用户体验好(7天免登录)
- refresh token存在redis → 可以随时撤销(踢人下线)
- access token无状态 → 性能好(不需要查redis)
🎯 一句话总结: access token负责"快"(无状态,o(1)验证),refresh token负责"可控"(有状态,可撤销)。两者配合,实现安全与性能的最优平衡。
🔑 第一幕:jwt基础 — token长什么样
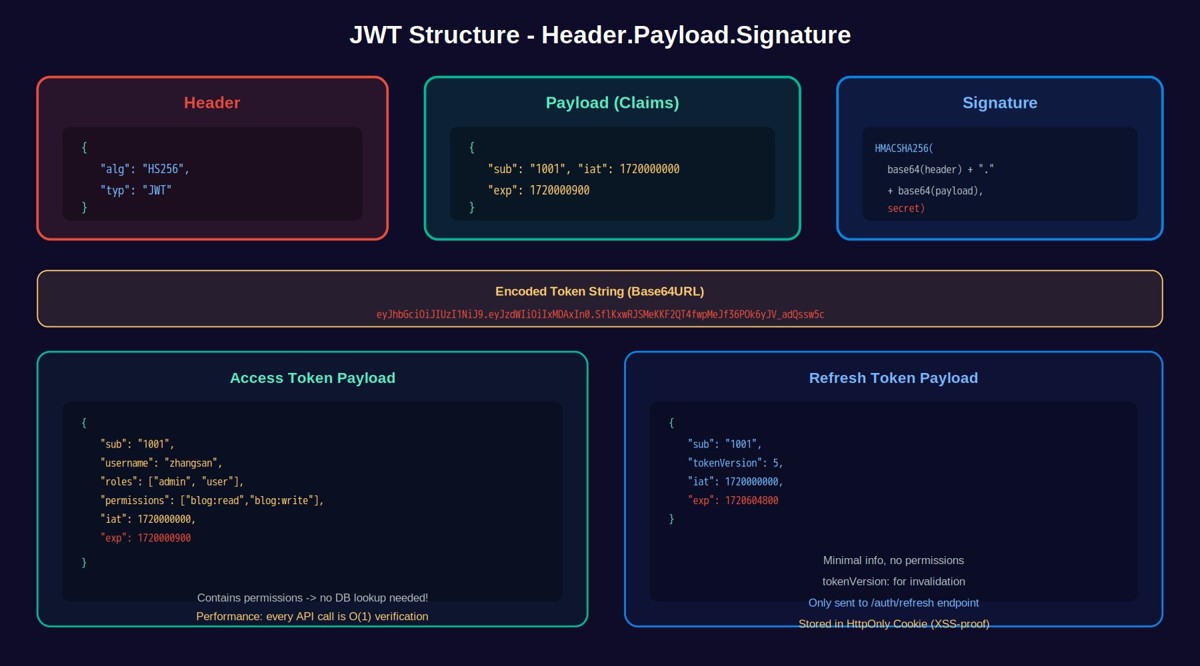
1.1 jwt的三个部分
jwt(json web token)由三部分组成,用 . 连接:
eyjhbgcioijiuzi1nij9.eyjzdwiioiixmdaxin0.sflkxwrjsmekkf2qt4fwpmejf36pok6yjv_adqssw5c
|______header________|______payload________|____________signature________________|
① header(头部)
{
  "alg": "hs256",   // 签名算法
  "typ": "jwt"      // token类型
}
② payload(载荷)
access token的payload:
{
  "sub": "1001",                    // 用户id
  "username": "zhangsan",           // 用户名
  "roles": ["admin", "user"],       // 角色列表
  "permissions": ["blog:read", "blog:write", "user:manage"],  // 权限列表
  "iat": 1720000000,                // 签发时间
  "exp": 1720000900,                // 过期时间(15分钟后)
  "jti": "a1b2c3d4-e5f6-7890"      // jwt唯一id(用于黑名单)
}
refresh token的payload(精简):
{
  "sub": "1001",                    // 用户id
  "tokenversion": 5,                // token版本(用于批量失效)
  "iat": 1720000000,
  "exp": 1720604800                 // 过期时间(7天后)
}
③ signature(签名)
hmacsha256(
  base64urlencode(header) + "." + base64urlencode(payload),
  secret_key
)
签名的作用:防篡改。任何人修改了header或payload,签名就对不上了。
1.2 access token vs refresh token 设计原则
| 维度 | access token | refresh token |
|---|---|---|
| 包含信息 | 用户id、角色、权限(尽量丰富) | 用户id、tokenversion(尽量少) |
| 有效期 | 15-30分钟 | 7-30天 |
| 传输方式 | authorization: bearer header | httponly cookie |
| 存储位置 | 前端内存/变量 | httponly cookie(前端不可见) |
| 是否存redis | ❌ 不存(无状态) | ✅ 存(有状态,可撤销) |
| 验证方式 | 验签+检查过期+检查黑名单 | 验签+检查redis是否存在 |
| 性能 | 极快(不查库) | 较快(只查一次redis) |
🏗️ 第二幕:双token架构设计
2.1 整体架构
┌─────────────┐     ┌──────────────────┐     ┌─────────┐
│   frontend   │────>│  spring boot     │────>│  redis  │
│  vue / react │<────│  spring security │<────│         │
└─────────────┘     └──────────────────┘     └─────────┘
                           │
                           v
                     ┌──────────┐
                     │  mysql   │
                     │ (users)  │
                     └──────────┘
2.2 jwtutil完整实现
@component
public class jwtutil {

    @value("${jwt.secret}")
    private string secret;

    @value("${jwt.access-token-expiry}")
    private long accesstokenexpiry; // 15 * 60 * 1000 (15分钟)

    @value("${jwt.refresh-token-expiry}")
    private long refreshtokenexpiry; // 7 * 24 * 3600 * 1000 (7天)

    /**
     * 生成access token
     */
    public string generateaccesstoken(long userid, string username,
                                       list<string> roles, list<string> permissions) {
        map<string, object> claims = new hashmap<>();
        claims.put("sub", string.valueof(userid));
        claims.put("username", username);
        claims.put("roles", roles);
        claims.put("permissions", permissions);
        claims.put("jti", uuid.randomuuid().tostring());

        return jwts.builder()
            .setclaims(claims)
            .setissuedat(new date())
            .setexpiration(new date(system.currenttimemillis() + accesstokenexpiry))
            .signwith(signaturealgorithm.hs256, secret)
            .compact();
    }

    /**
     * 生成refresh token
     */
    public string generaterefreshtoken(long userid, int tokenversion) {
        map<string, object> claims = new hashmap<>();
        claims.put("sub", string.valueof(userid));
        claims.put("tokenversion", tokenversion);
        claims.put("jti", uuid.randomuuid().tostring());

        return jwts.builder()
            .setclaims(claims)
            .setissuedat(new date())
            .setexpiration(new date(system.currenttimemillis() + refreshtokenexpiry))
            .signwith(signaturealgorithm.hs256, secret)
            .compact();
    }

    /**
     * 解析token(验证签名+过期)
     */
    public claims parsetoken(string token) {
        return jwts.parser()
            .setsigningkey(secret)
            .parseclaimsjws(token)
            .getbody();
    }

    /**
     * 判断token是否过期
     */
    public boolean istokenexpired(string token) {
        try {
            claims claims = parsetoken(token);
            return claims.getexpiration().before(new date());
        } catch (expiredjwtexception e) {
            return true;
        }
    }

    public string extractuserid(string token) {
        return parsetoken(token).getsubject();
    }

    public string extractjti(string token) {
        return parsetoken(token).getid();
    }
}
2.3 loginuser — 自定义userdetails
@data
public class loginuser implements userdetails {

    private long id;
    private string username;
    private string password;
    private list<string> roles;
    private list<string> permissions;
    private integer status;

    public loginuser(user user, list<string> roles, list<string> permissions) {
        this.id = user.getid();
        this.username = user.getusername();
        this.password = user.getpassword();
        this.roles = roles;
        this.permissions = permissions;
        this.status = user.getstatus();
    }

    @override
    public collection<? extends grantedauthority> getauthorities() {
        list<grantedauthority> authorities = new arraylist<>();
        roles.foreach(r -> authorities.add(new simplegrantedauthority("role_" + r)));
        permissions.foreach(p -> authorities.add(new simplegrantedauthority(p)));
        return authorities;
    }

    @override
    public string getpassword() { return password; }

    @override
    public string getusername() { return username; }

    @override
    public boolean isaccountnonexpired() { return true; }

    @override
    public boolean isaccountnonlocked() { return status == 1; }

    @override
    public boolean iscredentialsnonexpired() { return true; }

    @override
    public boolean isenabled() { return status == 1; }
}
2.4 核心组件清单
表1:双token认证体系核心组件
| 组件 | 类 | 职责 |
|---|---|---|
| jwtutil | 工具类 | jwt生成、解析、验证 |
| jwtauthenticationfilter | onceperrequestfilter | 从请求中提取jwt并认证 |
| securityconfig | @configuration | 配置spring security过滤链 |
| authenticationcontroller | @restcontroller | 登录、刷新、登出接口 |
| userdetailsserviceimpl | userdetailsservice | 从数据库加载用户信息 |
| redisservice | service | token黑名单、refresh token存储 |
| user | entity | 用户实体(含角色、权限) |
2.5 redis key设计
# 1. refresh token存储(用户维度)
key: auth:refresh:{userid}
value: refreshtokenstring
ttl: 7天
# 2. access token黑名单(token维度,用于登出后使token失效)
key: auth:blacklist:{jti}
value: 1
ttl: access token剩余有效期(最多30分钟)
# 3. token版本号(用户维度,用于批量失效所有token)
key: auth:token:version:{userid}
value: versionnumber
ttl: 30天
# 4. 登录失败计数(用于防 暴 力 破 解)
key: auth:login:fail:{username}
value: failcount
ttl: 15分钟
🔐 第三幕:登录流程完整拆解
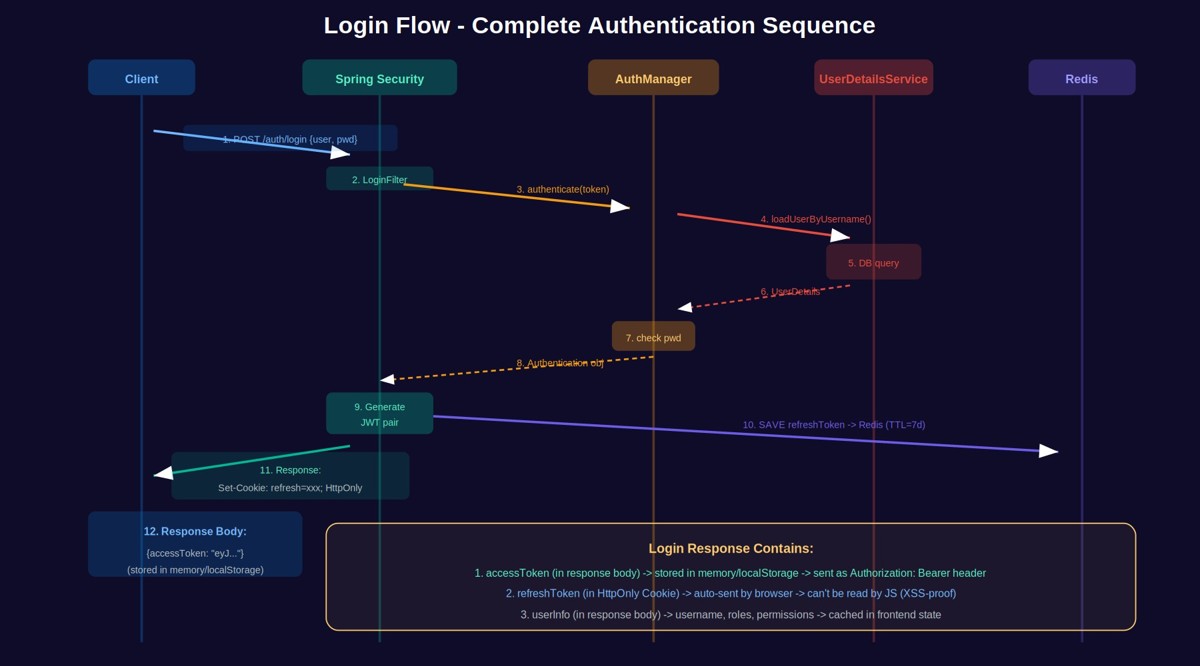
3.1 完整登录流程(12步)
step 1:前端发送登录请求
post /auth/login
content-type: application/json
{
  "username": "zhangsan",
  "password": "***"
}
step 2:spring security过滤链拦截
请求经过多个filter,最终到达 usernamepasswordauthenticationfilter(或者我们自定义的登录端点)。
step 3:构建authentication对象
usernamepasswordauthenticationtoken authrequest =
    new usernamepasswordauthenticationtoken(username, password);
step 4:调用authenticationmanager.authenticate()
authentication authentication = authenticationmanager.authenticate(authrequest);
step 5:authenticationmanager委托给authenticationprovider
默认使用 daoauthenticationprovider。
step 6:调用userdetailsservice.loaduserbyusername()
@override
public userdetails loaduserbyusername(string username) {
    user user = usermapper.selectbyusername(username);
    if (user == null) {
        throw new usernamenotfoundexception("用户不存在");
    }
    // 查询用户的角色和权限
    list<string> permissions = permissionmapper.selectbyuserid(user.getid());
    return new loginuser(user, permissions);
}
step 7:密码校验
// daoauthenticationprovider内部调用
passwordencoder.matches(rawpassword, encodedpassword)
// bcrypt加密,每次结果不同(加盐),不可逆
step 8:认证成功,生成双token
// 生成access token(有效期15分钟)
string accesstoken = jwtutil.generateaccesstoken(user.getid(),
    user.getusername(), roles, permissions);

// 生成refresh token(有效期7天)
string refreshtoken = jwtutil.generaterefreshtoken(user.getid());
step 9:将refresh token存入redis
redistemplate.opsforvalue().set(
    "auth:refresh:" + user.getid(),
    refreshtoken,
    7, timeunit.days
);
step 10:设置httponly cookie(refresh token)
responsecookie refreshcookie = responsecookie.from("refreshtoken", refreshtoken)
    .httponly(true)      // js无法读取(防xss)
    .secure(true)        // 只在https下传输
    .samesite("strict")  // 防csrf
    .path("/")
    .maxage(7 * 24 * 3600)
    .build();
response.addheader("set-cookie", refreshcookie.tostring());
step 11:返回access token + 用户信息(响应体)
{
  "code": 200,
  "data": {
    "accesstoken": "eyjhbgcioijiuzi1niis...",
    "user": {
      "id": 1001,
      "username": "zhangsan",
      "roles": ["admin", "user"],
      "permissions": ["blog:read", "blog:write", "user:manage"]
    }
  }
}
step 12:前端存储
// access token存在内存变量中(刷新页面会丢失,需要重新用refresh token获取)
const accesstoken = response.data.accesstoken;

// refresh token在httponly cookie中(前端代码无法访问,但浏览器会自动携带)
// 前端不需要做任何处理!
3.3 完整authenticationcontroller
下面是完整的controller代码,包含登录、刷新、登出、全设备登出、获取当前用户等所有端点:
@restcontroller
@requestmapping("/auth")
@slf4j
public class authenticationcontroller {

    @autowired
    private authenticationmanager authenticationmanager;
    @autowired
    private jwtutil jwtutil;
    @autowired
    private userservice userservice;
    @autowired
    private redistemplate<string, string> redistemplate;

    private static final int max_login_fail = 5;
    private static final int login_fail_lock_minutes = 15;

    @postmapping("/login")
    public result<loginvo> login(@requestbody logindto dto, httpservletresponse response) {
        // 1. 检查登录失败次数
        string failkey = "auth:login:fail:" + dto.getusername();
        string failcount = redistemplate.opsforvalue().get(failkey);
        if (failcount != null && integer.parseint(failcount) >= max_login_fail) {
            return result.fail("登录失败次数过多,请稍后重试");
        }
        // 2. 认证
        authentication authentication;
        try {
            authentication = authenticationmanager.authenticate(
                new usernamepasswordauthenticationtoken(dto.getusername(), dto.getpassword()));
        } catch (badcredentialsexception e) {
            redistemplate.opsforvalue().increment(failkey);
            redistemplate.expire(failkey, login_fail_lock_minutes, timeunit.minutes);
            return result.fail("用户名或密码错误");
        }
        redistemplate.delete(failkey);
        // 3. 生成token对
        loginuser loginuser = (loginuser) authentication.getprincipal();
        int version = gettokenversion(loginuser.getid());
        string accesstoken = jwtutil.generateaccesstoken(loginuser.getid(),
            loginuser.getusername(), loginuser.getroles(), loginuser.getpermissions());
        string refreshtoken = jwtutil.generaterefreshtoken(loginuser.getid(), version);
        // 4. 存redis + 设cookie
        redistemplate.opsforvalue().set("auth:refresh:" + loginuser.getid(), refreshtoken, 7, timeunit.days);
        setrefreshtokencookie(response, refreshtoken);
        return result.ok(new loginvo(accesstoken, loginuser.touserinfovo()));
    }

    @postmapping("/refresh")
    public result<tokenvo> refresh(
            @cookievalue(value = "refreshtoken", required = false) string refreshtoken,
            httpservletresponse response) {
        if (refreshtoken == null) return result.fail(401, "缺少refresh token");
        claims claims;
        try { claims = jwtutil.parsetoken(refreshtoken); }
        catch (expiredjwtexception e) { return result.fail(401, "refresh token已过期"); }
        catch (exception e) { return result.fail(401, "refresh token无效"); }
        string userid = claims.getsubject();
        string stored = redistemplate.opsforvalue().get("auth:refresh:" + userid);
        if (stored == null || !stored.equals(refreshtoken)) return result.fail(401, "token已被撤销");
        integer currentver = gettokenversion(long.parselong(userid));
        if (!currentver.equals(claims.get("tokenversion", integer.class))) return result.fail(401, "版本不匹配");
        loginuser user = userservice.loaduserbyid(long.parselong(userid));
        string newaccess = jwtutil.generateaccesstoken(user.getid(), user.getusername(), user.getroles(), user.getpermissions());
        string newrefresh = jwtutil.generaterefreshtoken(user.getid(), currentver);
        redistemplate.opsforvalue().set("auth:refresh:" + userid, newrefresh, 7, timeunit.days);
        setrefreshtokencookie(response, newrefresh);
        return result.ok(new tokenvo(newaccess));
    }

    @postmapping("/logout")
    public result<void> logout(httpservletrequest request, httpservletresponse response) {
        string header = request.getheader("authorization");
        if (header != null && header.startswith("bearer ")) {
            try {
                claims claims = jwtutil.parsetoken(header.substring(7));
                long remaining = claims.getexpiration().gettime() - system.currenttimemillis();
                if (remaining > 0) redistemplate.opsforvalue().set("auth:blacklist:" + claims.getid(), "1", remaining, timeunit.milliseconds);
                redistemplate.delete("auth:refresh:" + claims.getsubject());
            } catch (exception ignored) {}
        }
        clearrefreshtokencookie(response);
        return result.ok();
    }

    @postmapping("/logout-all")
    @preauthorize("isauthenticated()")
    public result<void> logoutall() {
        string userid = securitycontextholder.getcontext().getauthentication().getprincipal().tostring();
        redistemplate.opsforvalue().increment("auth:token:version:" + userid);
        redistemplate.expire("auth:token:version:" + userid, 30, timeunit.days);
        redistemplate.delete("auth:refresh:" + userid);
        return result.ok();
    }

    private int gettokenversion(long userid) {
        string v = redistemplate.opsforvalue().get("auth:token:version:" + userid);
        return v != null ? integer.parseint(v) : 0;
    }

    private void setrefreshtokencookie(httpservletresponse response, string token) {
        response.addheader("set-cookie",
            responsecookie.from("refreshtoken", token)
                .httponly(true).secure(true).samesite("strict").path("/").maxage(7*24*3600).tostring());
    }

    private void clearrefreshtokencookie(httpservletresponse response) {
        response.addheader("set-cookie",
            responsecookie.from("refreshtoken", "")
                .httponly(true).secure(true).samesite("strict").path("/").maxage(0).tostring());
    }
}
3.4 前端auth store(pinia + axios拦截器)
// stores/auth.ts
import { definestore } from 'pinia';
import axios from 'axios';

export const useauthstore = definestore('auth', {
  state: () => ({
    accesstoken: null as string | null,  // 内存变量,刷新页面丢失
    user: null as any,
    isrefreshing: false,
    failedqueue: [] as array<{ resolve: function; reject: function }>,
  }),
  getters: {
    isauthenticated: (s) => !!s.accesstoken,
    hasrole: (s) => (role: string) => s.user?.roles?.includes(role) ?? false,
    haspermission: (s) => (perm: string) => s.user?.permissions?.includes(perm) ?? false,
  },
  actions: {
    async login(username: string, password: string) {
      const res = await axios.post('/auth/login', { username, password });
      this.accesstoken = res.data.data.accesstoken;
      this.user = res.data.data.userinfo;
      axios.defaults.headers.common['authorization'] = `bearer ${this.accesstoken}`;
    },
    async refreshtoken() {
      const res = await axios.post('/auth/refresh');
      this.accesstoken = res.data.data.accesstoken;
      axios.defaults.headers.common['authorization'] = `bearer ${this.accesstoken}`;
      return this.accesstoken;
    },
    async logout() {
      try { await axios.post('/auth/logout'); } catch {}
      this.accesstoken = null;
      this.user = null;
      delete axios.defaults.headers.common['authorization'];
    },
    processqueue(error: any, token: string | null) {
      this.failedqueue.foreach(({ resolve, reject }) => error ? reject(error) : resolve(token));
      this.failedqueue = [];
    },
  },
});

// axios拦截器配置(在main.ts中初始化)
let isrefreshing = false;
axios.interceptors.response.use(
  (res) => res,
  async (error) => {
    const original = error.config;
    if (error.response?.status === 401 && !original._retry && original.url !== '/auth/refresh') {
      if (isrefreshing) {
        return new promise((resolve, reject) => {
          useauthstore().failedqueue.push({ resolve, reject });
        }).then((token) => {
          original.headers.authorization = `bearer ${token}`;
          return axios(original);
        });
      }
      original._retry = true;
      isrefreshing = true;
      try {
        const newtoken = await useauthstore().refreshtoken();
        useauthstore().processqueue(null, newtoken);
        original.headers.authorization = `bearer ${newtoken}`;
        return axios(original);
      } catch (e) {
        useauthstore().processqueue(e, null);
        useauthstore().logout();
        window.location.href = '/login';
        return promise.reject(e);
      } finally {
        isrefreshing = false;
      }
    }
    return promise.reject(error);
  }
);
3.5 关键设计决策
表3:双token设计关键决策
| 决策 | 选择 | 理由 |
|---|---|---|
| access token存储位置 | js内存变量 | xss无法读取(除非有xss漏洞) |
| refresh token存储位置 | httponly cookie | js完全无法访问,防xss |
| refresh token是否存redis | 是 | 可撤销,可检查是否被盗用 |
| access token是否存redis | 否(仅黑名单) | 无状态验证,性能最优 |
| 密码加密方式 | bcrypt(cost=12) | 不可逆,加盐,抗 暴 力 破 解 |
| 登录失败限制 | 5次/15分钟 | 防 暴 力 破 解,不影响正常用户 |
| refresh token rotation | 是 | 防止token被盗用后持续使用 |
| csrf防护 | samesite=strict | cookie不随跨站请求发送 |
🔍 第四幕:请求认证 — filter chain执行流程
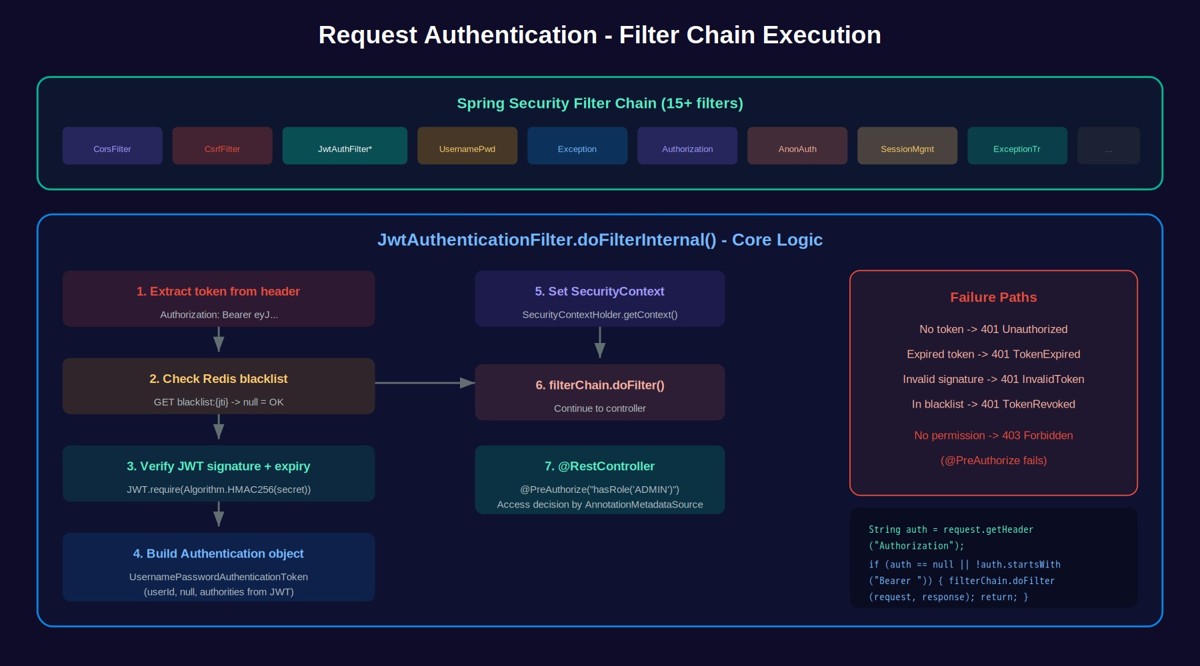
4.1 spring security filter chain
spring security的核心是一个过滤器链(filter chain),每个请求都要经过这个链上的所有过滤器。
表2:spring security核心过滤器(按执行顺序)
| 过滤器 | 职责 | 是否需要自定义 |
|---|---|---|
| securitycontextpersistencefilter | 维护securitycontext | ❌ |
| corsfilter | 处理跨域请求 | ✅ 配置允许的域 |
| csrffilter | csrf防护 | ❌ jwt通常禁用 |
| **jwtauthenticationfilter** | jwt认证(自定义) | ✅ 核心 |
| usernamepasswordauthenticationfilter | 表单登录 | ❌ api登录不用这个 |
| exceptiontranslationfilter | 处理认证/授权异常 | ✅ 自定义错误响应 |
| filtersecurityinterceptor | url级别的权限判断 | ✅ 配置url权限 |
4.2 jwtauthenticationfilter — 核心认证逻辑
@component
public class jwtauthenticationfilter extends onceperrequestfilter {

    @autowired
    private jwtutil jwtutil;
    @autowired
    private redistemplate<string, string> redistemplate;

    @override
    protected void dofilterinternal(httpservletrequest request,
                                     httpservletresponse response,
                                     filterchain filterchain)
            throws servletexception, ioexception {

        // 1. 提取token
        string authheader = request.getheader("authorization");
        if (authheader == null || !authheader.startswith("bearer ")) {
            filterchain.dofilter(request, response);  // 没有token,放行(后续过滤器处理)
            return;
        }
        string token = authheader.substring(7);

        try {
            // 2. 解析token(验签 + 检查过期)
            claims claims = jwtutil.parsetoken(token);
            string jti = claims.getid();
            string userid = claims.getsubject();

            // 3. 检查redis黑名单(是否已登出)
            if (boolean.true.equals(redistemplate.haskey("auth:blacklist:" + jti))) {
                throw new runtimeexception("token已被撤销");
            }

            // 4. 提取权限信息
            list<string> roles = claims.get("roles", list.class);
            list<string> permissions = claims.get("permissions", list.class);
            list<grantedauthority> authorities = new arraylist<>();
            roles.foreach(r -> authorities.add(new simplegrantedauthority("role_" + r)));
            permissions.foreach(p -> authorities.add(new simplegrantedauthority(p)));

            // 5. 构建authentication对象
            usernamepasswordauthenticationtoken authentication =
                new usernamepasswordauthenticationtoken(userid, null, authorities);
            authentication.setdetails(claims);

            // 6. 设置到securitycontext
            securitycontextholder.getcontext().setauthentication(authentication);

        } catch (exception e) {
            // token无效,不设置authentication,后续会返回401
            log.warn("jwt验证失败: {}", e.getmessage());
        }

        // 7. 继续执行过滤链
        filterchain.dofilter(request, response);
    }
}
关键点:
- 此filter在 usernamepasswordauthenticationfilter 之前执行
- 没有token时直接放行(permitall的路径不需要token)
- token无效时也放行,但不设置securitycontext → 后续会返回401
- 有token且有效时,设置securitycontext → 后续controller可以获取当前用户
4.3 认证流程图
请求到达
    │
    ▼
有authorization头?
    │
    ├── 否 → 直接放行(后续检查是否permitall)
    │
    ▼ 是
解析jwt
    │
    ├── 解析失败(签名错误/格式错误)→ 不设置认证,放行 → 401
    │
    ├── token过期 → 不设置认证,放行 → 401 token_expired
    │
    ├── 在redis黑名单中 → 不设置认证,放行 → 401 token_revoked
    │
    ▼ 有效
提取用户信息 + 权限
    │
    ▼
创建authentication对象,放入securitycontext
    │
    ▼
继续执行过滤链 → controller处理请求
    │
    ▼
@preauthorize检查权限 → 通过则返回数据 / 不通过则403
🔄 第五幕:token刷新机制
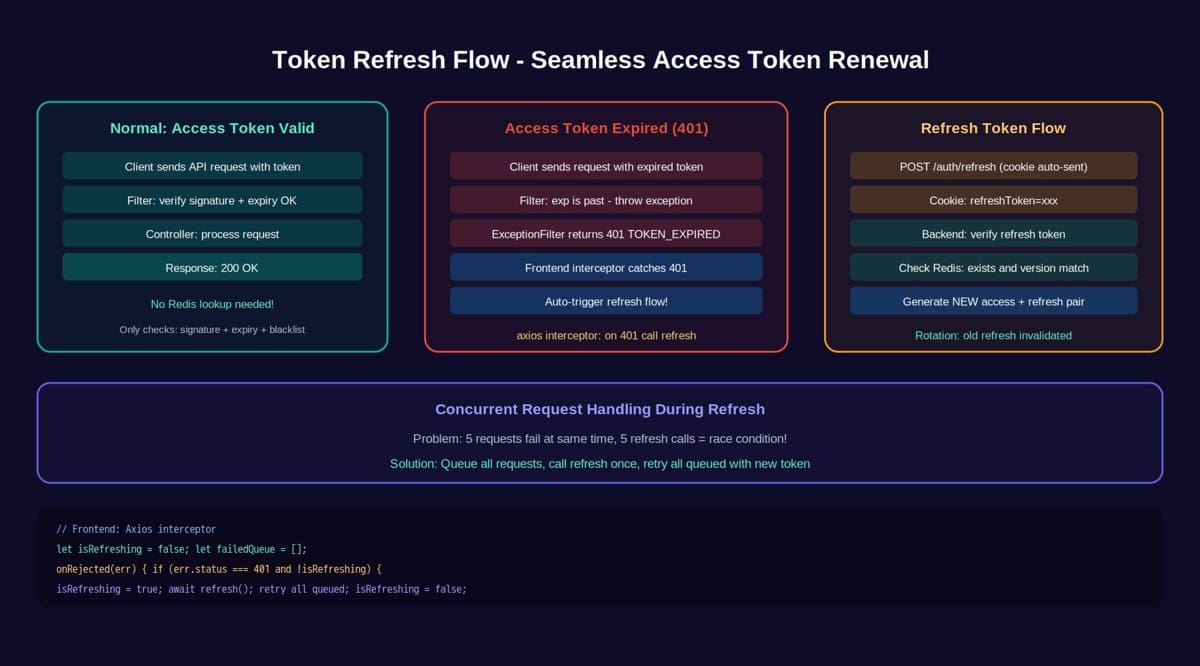
5.1 刷新流程
post /auth/refresh
cookie: refreshtoken=eyjhbgcioijiuzi1niis...
后端处理逻辑:
@postmapping("/auth/refresh")
public result<tokenvo> refreshtoken(
        @cookievalue("refreshtoken") string refreshtoken,
        httpservletresponse response) {

    // 1. 验证refresh token签名和过期
    claims claims;
    try {
        claims = jwtutil.parsetoken(refreshtoken);
    } catch (expiredjwtexception e) {
        return result.fail(401, "refresh token已过期,请重新登录");
    } catch (exception e) {
        return result.fail(401, "refresh token无效");
    }

    string userid = claims.getsubject();

    // 2. 检查redis中是否存在(是否被撤销)
    string storedtoken = redistemplate.opsforvalue().get("auth:refresh:" + userid);
    if (storedtoken == null || !storedtoken.equals(refreshtoken)) {
        return result.fail(401, "refresh token已被撤销");
    }

    // 3. 检查tokenversion(是否被批量撤销)
    integer currentversion = redistemplate.opsforvalue().get("auth:token:version:" + userid);
    integer tokenversion = claims.get("tokenversion", integer.class);
    if (currentversion != null && !currentversion.equals(tokenversion)) {
        return result.fail(401, "token版本不匹配,请重新登录");
    }

    // 4. 生成新的token对(rotation:轮转)
    user user = userservice.getbyid(long.parselong(userid));
    string newaccesstoken = jwtutil.generateaccesstoken(user);
    string newrefreshtoken = jwtutil.generaterefreshtoken(user);

    // 5. 更新redis(旧的refresh token自动失效)
    redistemplate.opsforvalue().set(
        "auth:refresh:" + userid,
        newrefreshtoken,
        7, timeunit.days
    );

    // 6. 设置新的cookie
    setrefreshtokencookie(response, newrefreshtoken);

    // 7. 返回新的access token
    return result.ok(new tokenvo(newaccesstoken));
}
5.2 前端无感刷新实现
// axios响应拦截器
let isrefreshing = false;
let failedqueue = [];

const processqueue = (error, token = null) => {
    failedqueue.foreach(prom => {
        if (error) {
            prom.reject(error);
        } else {
            prom.resolve(token);
        }
    });
    failedqueue = [];
};

axios.interceptors.response.use(
    response => response,
    async error => {
        const originalrequest = error.config;

        // 如果是401且不是刷新请求本身,且没有重试过
        if (error.response?.status === 401
            && !originalrequest._retry
            && originalrequest.url !== '/auth/refresh') {

            if (isrefreshing) {
                // 正在刷新中,将请求加入队列
                return new promise((resolve, reject) => {
                    failedqueue.push({ resolve, reject });
                }).then(token => {
                    originalrequest.headers.authorization = 'bearer ' + token;
                    return axios(originalrequest);
                });
            }

            originalrequest._retry = true;
            isrefreshing = true;

            try {
                // 调用刷新接口
                const res = await axios.post('/auth/refresh');
                const newtoken = res.data.data.accesstoken;

                // 更新内存中的token
                store.setaccesstoken(newtoken);

                // 重试队列中的请求
                processqueue(null, newtoken);

                // 重试原始请求
                originalrequest.headers.authorization = 'bearer ' + newtoken;
                return axios(originalrequest);

            } catch (refresherror) {
                processqueue(refresherror, null);
                // refresh token也过期了,跳转登录页
                store.logout();
                router.push('/login');
                return promise.reject(refresherror);
            } finally {
                isrefreshing = false;
            }
        }

        return promise.reject(error);
    }
);
5.3 refresh token轮转(rotation)
为什么每次刷新都要换一个新的refresh token?
这叫"refresh token rotation",防止refresh token被盗用:
正常流程:
rt1 (redis中) -> 刷新 -> 返回at2 + rt2 -> rt1从redis删除,rt2存入redis攻击场景:
用户的rt1被攻击者窃取
用户用rt1刷新 -> 得到at2 + rt2 -> rt1失效
攻击者用rt1刷新 -> 发现rt1已失效(已被删除)-> 刷新失败!
如果不用rotation,攻击者和用户可以同时使用同一个refresh token,直到它过期。
5.4 并发请求的token刷新队列
当前端同时发出5个请求,且access token恰好过期时,5个请求都会收到401。如果每个都触发一次刷新,就会产生竞态条件。解决方案是请求队列:
// 核心逻辑(已在3.4节的axios拦截器中实现)
// 1. 第一个401到达时,isrefreshing = true,开始刷新
// 2. 后续401到达时,不触发刷新,而是加入failedqueue等待
// 3. 刷新成功后,用新token重试所有排队的请求
// 4. 刷新失败时,reject所有排队的请求,跳转登录页// 时序图:
// request1 -> 401 -> refresh() -> 新token -> 重试request1
// request2 -> 401 -> 加入队列 -> 等待 -> 用新token重试
// request3 -> 401 -> 加入队列 -> 等待 -> 用新token重试
// request4 -> 401 -> 加入队列 -> 等待 -> 用新token重试
// request5 -> 401 -> 加入队列 -> 等待 -> 用新token重试
//
// 总共只刷新了1次!避免了竞态条件。
5.5 token续期的用户体验优化
| 场景 | 处理方式 | 用户感知 |
|---|---|---|
| access token未过期 | 直接请求 | 无感知 |
| access token过期,refresh token有效 | 自动刷新+重试 | 无感知(可能多100ms延迟) |
| access token过期,refresh token也过期 | 跳转登录页 | 需要重新登录 |
| 用户在操作中token即将过期 | 前端定时器提前刷新 | 无感知 |
前端定时刷新(可选优化):
// 在app启动时设置定时器
const access_token_expiry = 14 * 60 * 1000; // 14分钟(token有效期15分钟,提前1分钟刷新)
setinterval(async () => {
  if (useauthstore().isauthenticated) {
    try {
      await useauthstore().refreshtoken();
    } catch (e) {
      console.warn('token refresh failed:', e);
    }
  }
}, access_token_expiry);
🚪 第六幕:登出与token失效
6.1 单设备登出
@postmapping("/auth/logout")
public result<void> logout(httpservletrequest request, httpservletresponse response) {
    // 1. 从当前请求中获取access token
    string authheader = request.getheader("authorization");
    string accesstoken = authheader.substring(7);
    claims claims = jwtutil.parsetoken(accesstoken);
    string jti = claims.getid();
    string userid = claims.getsubject();

    // 2. 将access token的jti加入黑名单
    // ttl设为token的剩余有效期(过期后自动清理)
    long remainingtime = claims.getexpiration().gettime() - system.currenttimemillis();
    if (remainingtime > 0) {
        redistemplate.opsforvalue().set(
            "auth:blacklist:" + jti,
            "1",
            remainingtime, timeunit.milliseconds
        );
    }

    // 3. 删除redis中的refresh token
    redistemplate.delete("auth:refresh:" + userid);

    // 4. 清除cookie
    responsecookie clearcookie = responsecookie.from("refreshtoken", "")
        .httponly(true)
        .secure(true)
        .samesite("strict")
        .path("/")
        .maxage(0)  // 立即过期
        .build();
    response.addheader("set-cookie", clearcookie.tostring());

    return result.ok();
}
6.2 全设备登出(踢人下线)
@postmapping("/auth/logout-all")
public result<void> logoutalldevices(@authenticationprincipal string userid) {
    // 递增tokenversion,所有旧版本的token都会失效
    string key = "auth:token:version:" + userid;
    redistemplate.opsforvalue().increment(key);
    redistemplate.expire(key, 30, timeunit.days);

    // 删除refresh token
    redistemplate.delete("auth:refresh:" + userid);

    return result.ok();
}
表3:token失效策略对比
| 策略 | 实现方式 | 影响范围 | 使用场景 |
|---|---|---|---|
| access token黑名单 | redis set blacklist:{jti} | 单个token | 本设备登出 |
| 删除refresh token | redis del refresh:{userid} | 当前设备的刷新能力 | 本设备登出 |
| 递增tokenversion | redis incr token:version:{userid} | 该用户所有设备 | 修改密码、管理员踢人 |
| 清除所有token | del refresh + incr version | 该用户所有设备全部下线 | 安全事件 |
👥 第七幕:rbac权限模型
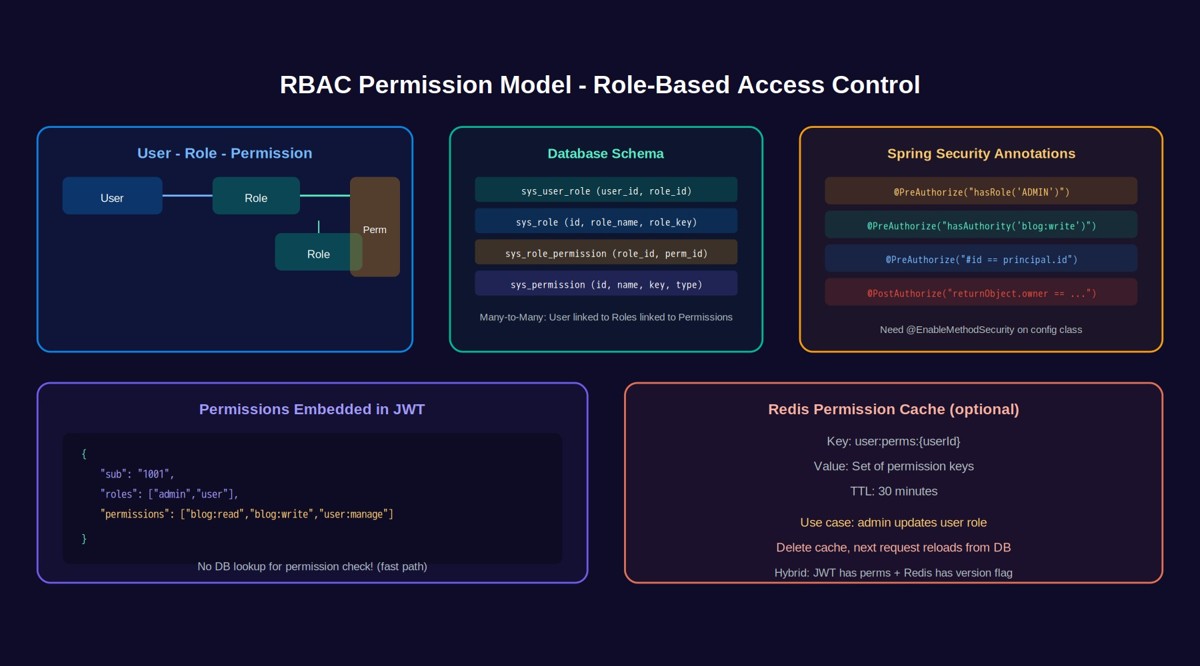
7.1 数据库设计
-- 用户表
create table sys_user (
    id bigint primary key auto_increment,
    username varchar(50) unique not null,
    password varchar(100) not null,  -- bcrypt加密
    status tinyint default 1,
    created_at datetime default current_timestamp
);
-- 角色表
create table sys_role (
    id bigint primary key auto_increment,
    role_name varchar(50) not null,
    role_key varchar(50) unique not null  -- 如 admin, user
);
-- 权限表
create table sys_permission (
    id bigint primary key auto_increment,
    perm_name varchar(100) not null,
    perm_key varchar(100) unique not null  -- 如 blog:read, blog:write
);
-- 用户-角色关联表
create table sys_user_role (
    user_id bigint not null,
    role_id bigint not null,
    primary key (user_id, role_id)
);
-- 角色-权限关联表
create table sys_role_permission (
    role_id bigint not null,
    perm_id bigint not null,
    primary key (role_id, perm_id)
);
7.2 权限嵌入jwt
登录时,将用户的权限列表写入jwt的payload:
public string generateaccesstoken(loginuser loginuser) {
    map<string, object> claims = new hashmap<>();
    claims.put("sub", string.valueof(loginuser.getuser().getid()));
    claims.put("username", loginuser.getusername());
    claims.put("roles", loginuser.getroles());          // ["admin", "user"]
    claims.put("permissions", loginuser.getpermissions()); // ["blog:read", "blog:write"]
    claims.put("jti", uuid.randomuuid().tostring());

    return jwts.builder()
        .setclaims(claims)
        .setissuedat(new date())
        .setexpiration(new date(system.currenttimemillis() + 15 * 60 * 1000))
        .signwith(signaturealgorithm.hs256, secret)
        .compact();
}
7.3 前端动态路由与权限按钮
// router/guard.ts — 路由守卫
import { useauthstore } from '@/stores/auth';
import router from '@/router';

// 动态路由表(根据权限生成)
const asyncroutes = [
  {
    path: '/admin',
    component: () => import('@/layouts/adminlayout.vue'),
    meta: { roles: ['admin'] },  // 需要admin角色
    children: [
      { path: 'users', component: () => import('@/views/admin/users.vue'), meta: { roles: ['admin'] } },
      { path: 'roles', component: () => import('@/views/admin/roles.vue'), meta: { roles: ['admin'] } },
    ]
  },
  {
    path: '/blog',
    component: () => import('@/layouts/mainlayout.vue'),
    children: [
      { path: 'list', component: () => import('@/views/blog/list.vue') },  // 已登录即可
      { path: 'create', component: () => import('@/views/blog/create.vue'), meta: { permissions: ['blog:write'] } },
      { path: 'edit/:id', component: () => import('@/views/blog/edit.vue'), meta: { permissions: ['blog:write'] } },
    ]
  },
];

// 路由前置守卫
router.beforeeach(async (to, from, next) => {
  const authstore = useauthstore();

  // 1. 白名单直接放行
  if (['/login', '/register', '/404'].includes(to.path)) return next();

  // 2. 未登录 -> 尝试用refresh token恢复
  if (!authstore.isauthenticated) {
    try {
      await authstore.refreshtoken();
    } catch {
      return next('/login');
    }
  }

  // 3. 首次访问 -> 加载动态路由
  if (!router.hasroute('admin')) {
    asyncroutes.foreach(route => {
      if (!route.meta?.roles || authstore.hasrole(route.meta.roles[0])) {
        router.addroute(route);
      }
    });
    return next({ ...to, replace: true });  // 重新进入以匹配新路由
  }

  // 4. 检查路由权限
  if (to.meta?.roles && !to.meta.roles.some((r: string) => authstore.hasrole(r))) {
    return next('/403');
  }
  if (to.meta?.permissions && !to.meta.permissions.some((p: string) => authstore.haspermission(p))) {
    return next('/403');
  }

  next();
});
<!-- 权限按钮组件 components/permbutton.vue -->
<template>
  <button v-if="hasperm" @click="$emit('click')" :class="btnclass">
    <slot />
  </button>
</template>
<script setup lang="ts">
import { computed } from 'vue';
import { useauthstore } from '@/stores/auth';
const props = defineprops<{
  permission?: string;  // 如 'blog:write'
  role?: string;        // 如 'admin'
  btnclass?: string;
}>();
const authstore = useauthstore();
const hasperm = computed(() => {
  if (props.permission) return authstore.haspermission(props.permission);
  if (props.role) return authstore.hasrole(props.role);
  return true;
});
</script>
<!-- 使用:只有有blog:write权限的用户才能看到“编辑”按钮 -->
<!-- <permbutton permission="blog:write" @click="editblog">编辑</permbutton> -->
7.4 方法级权限控制
@restcontroller
@requestmapping("/api/blog")
public class blogcontroller {

    // 只有admin角色才能访问
    @preauthorize("hasrole('admin')")
    @deletemapping("/{id}")
    public result<void> deleteblog(@pathvariable long id) {
        blogservice.delete(id);
        return result.ok();
    }

    // 需要blog:write权限
    @preauthorize("hasauthority('blog:write')")
    @postmapping
    public result<void> createblog(@requestbody blogdto dto) {
        blogservice.create(dto);
        return result.ok();
    }

    // 自定义权限表达式:只能操作自己的博客
    @preauthorize("#blog.userid == authentication.principal")
    @putmapping("/{id}")
    public result<void> updateblog(@pathvariable long id, @requestbody blogdto dto) {
        blogservice.update(id, dto);
        return result.ok();
    }

    // 已登录即可访问
    @preauthorize("isauthenticated()")
    @getmapping("/{id}")
    public result<blogvo> getblog(@pathvariable long id) {
        return result.ok(blogservice.getbyid(id));
    }
}
⚙️ 第八幕:spring security配置架构
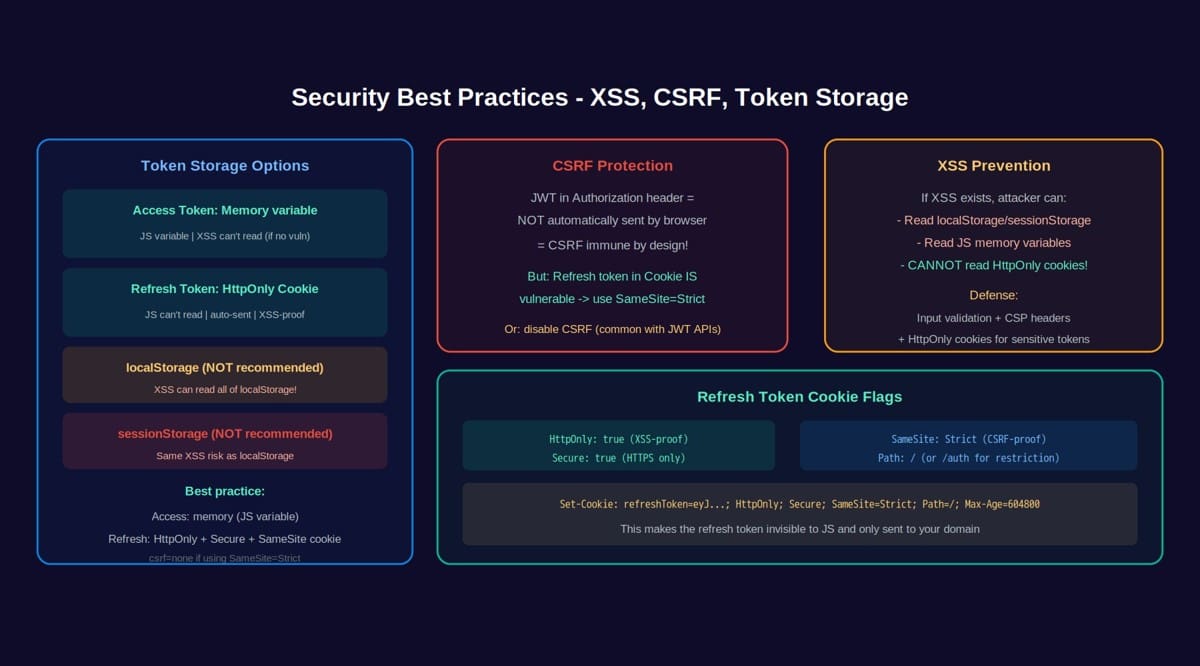
8.1 完整配置类
@configuration
@enablemethodsecurity  // 启用方法级权限控制
public class securityconfig {

    @autowired
    private jwtauthenticationfilter jwtauthenticationfilter;

    @autowired
    private authenticationentrypoint authentrypoint;

    @autowired
    private accessdeniedhandler accessdeniedhandler;

    @bean
    public securityfilterchain filterchain(httpsecurity http) throws exception {
        http
            // 禁用csrf(jwt api不需要)
            .csrf(csrf -> csrf.disable())

            // 无状态session(不使用session)
            .sessionmanagement(session ->
                session.sessioncreationpolicy(sessioncreationpolicy.stateless))

            // 请求授权规则
            .authorizehttprequests(auth -> auth
                // 公开接口
                .requestmatchers("/auth/login", "/auth/refresh").permitall()
                .requestmatchers("/public/**").permitall()
                .requestmatchers("/actuator/health").permitall()
                // 管理接口
                .requestmatchers("/admin/**").hasrole("admin")
                // 其他所有请求需要认证
                .anyrequest().authenticated()
            )

            // 异常处理
            .exceptionhandling(exception -> exception
                .authenticationentrypoint(authentrypoint)  // 401
                .accessdeniedhandler(accessdeniedhandler)  // 403
            )

            // 添加jwt过滤器(在usernamepasswordauthenticationfilter之前)
            .addfilterbefore(jwtauthenticationfilter,
                usernamepasswordauthenticationfilter.class);

        return http.build();
    }

    @bean
    public passwordencoder passwordencoder() {
        return new bcryptpasswordencoder();  // 密码加密
    }

    @bean
    public authenticationmanager authenticationmanager(
            authenticationconfiguration config) throws exception {
        return config.getauthenticationmanager();
    }
}
8.2 自定义异常处理
@component
public class authentrypoint implements authenticationentrypoint {
    @override
    public void commence(httpservletrequest request,
                         httpservletresponse response,
                         authenticationexception authexception) throws ioexception {
        response.setcontenttype("application/json;charset=utf-8");
        response.setstatus(401);
        response.getwriter().write("{\"code\":401,\"message\":\"未认证,请先登录\"}");
    }
}

@component
public class customaccessdeniedhandler implements accessdeniedhandler {
    @override
    public void handle(httpservletrequest request,
                       httpservletresponse response,
                       accessdeniedexception accessdeniedexception) throws ioexception {
        response.setcontenttype("application/json;charset=utf-8");
        response.setstatus(403);
        response.getwriter().write("{\"code\":403,\"message\":\"权限不足\"}");
    }
}
🛡️ 第九幕:安全最佳实践
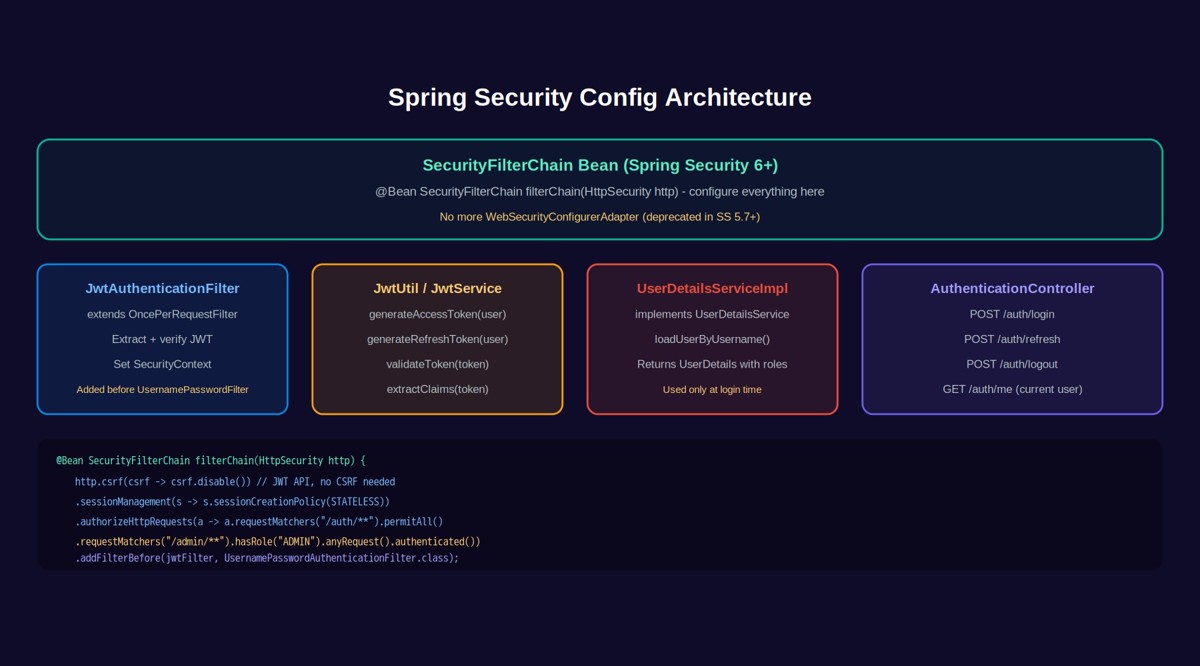
9.1 token存储安全
表4:token存储方案对比
| 存储方式 | xss风险 | csrf风险 | 推荐度 | 说明 |
|---|---|---|---|---|
| localstorage | ❌ 高(js可读) | ✅ 低 | ⭐⭐ | 不推荐存敏感token |
| sessionstorage | ❌ 高(js可读) | ✅ 低 | ⭐⭐ | 同上 |
| cookie (普通) | ✅ 低 | ❌ 高(自动携带) | ⭐⭐⭐ | 需要csrf防护 |
| cookie (httponly+secure+samesite) | ✅ 无 | ✅ 低 | ⭐⭐⭐⭐⭐ | 推荐 |
| 内存变量 (js) | ✅ 低(页面刷新丢失) | ✅ 低 | ⭐⭐⭐⭐ | access token推荐 |
最佳实践:
- access token:存在js内存变量中(页面刷新丢失 → 用refresh token重新获取)
- refresh token:存在httponly + secure + samesite=strict的cookie中
9.2 cookie安全标志
responsecookie cookie = responsecookie.from("refreshtoken", token)
    .httponly(true)       // js无法通过document.cookie读取(防xss)
    .secure(true)         // 只在https连接下传输(防中间人)
    .samesite("strict")   // 跨站请求不携带cookie(防csrf)
    .path("/")            // cookie的作用路径
    .maxage(7 * 24 * 3600) // 7天过期
    .build();
9.3 密码安全
// bcrypt加密(每次结果不同,因为加了随机盐)
string encoded = passwordencoder.encode("mypassword");
// $2a$10$n9qo8uloickgx2zmrzomyeijzagcfl7p92ldgxad68ljzdl17lhwy

// 验证
boolean matches = passwordencoder.matches("mypassword", encoded); // true
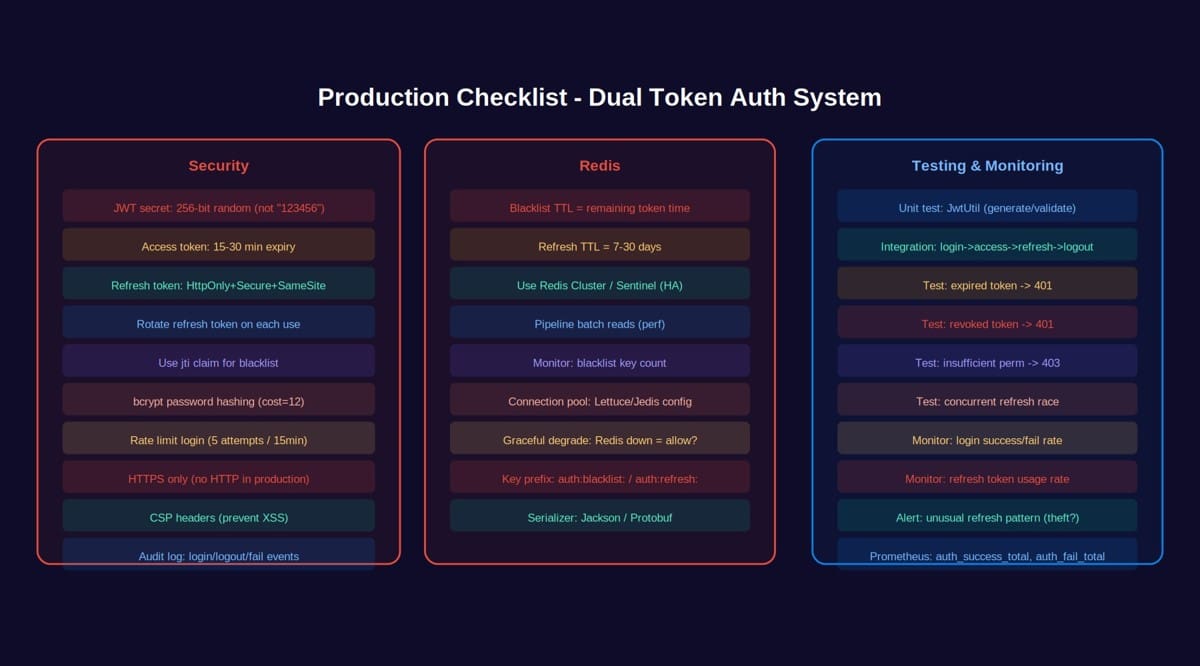
表5:安全checklist
| # | 检查项 | 优先级 | 说明 |
|---|---|---|---|
| 1 | jwt secret ≥ 256位随机密钥 | p0 | 不要用"123456" |
| 2 | access token ≤ 30分钟 | p0 | 泄露危害有限 |
| 3 | refresh token存httponly cookie | p0 | 防xss窃取 |
| 4 | bcrypt加密密码(cost=12) | p0 | 不要用md5/sha |
| 5 | 登录失败限流(5次/15分钟) | p0 | 防 暴 力 破 解 |
| 6 | refresh token rotation | p1 | 防token盗用 |
| 7 | https全站 | p0 | 防中间人攻击 |
| 8 | cors严格配置 | p1 | 只允许信任的域 |
| 9 | 审计日志(登录/登出/失败) | p1 | 安全事件追溯 |
| 10 | redis高可用(sentinel/cluster) | p1 | 避免单点故障 |
🌟 结语
双token认证体系看似复杂,但核心思想很简单:
- access token = “通行证”,短命但快(无状态,不查库)
- refresh token = “续命符”,长命但可控(有状态,存redis)
- spring security filter chain = “安检系统”,每个请求都要过安检
- redis黑名单 = “作废公告”,让已登出的token失效
- rbac权限 = “门禁卡级别”,不同角色能进不同的门
“认证的本质是证明’你是你’,授权的本质是决定’你能做什么’。双token体系把这两件事分开处理:access token证明身份+携带权限,refresh token管理登录状态。分工明确,各司其职。”
📚 参考文献
- internet engineering task force. “json web token (jwt).” rfc 7519, 2015. https://www.rfc-editor.org/rfc/rfc7519
- internet engineering task force. “json web signature (jws).” rfc 7515, 2015. https://www.rfc-editor.org/rfc/rfc7515
- spring security reference documentation. “authentication architecture.” https://docs.spring.io/spring-security/reference/servlet/authentication/architecture.html
- spring security reference documentation. “authorization.” https://docs.spring.io/spring-security/reference/servlet/authorization/index.html
- oauth 2.0 rfc 6749. “the oauth 2.0 authorization framework.” ietf, 2012. https://www.rfc-editor.org/rfc/rfc6749
- auth0 blog. “refresh token rotation.” https://auth0.com/blog/refresh-tokens-what-are-they-and-when-to-use-them/
- owasp. “json web token cheat sheet.” https://cheatsheetseries.owasp.org/cheatsheets/json_web_token_for_java_cheat_sheet.html
- spring boot reference documentation. “spring security.” https://docs.spring.io/spring-boot/reference/web/spring-security.html
- redis documentation. “expire / setex / ttl commands.” https://redis.io/commands/
到此这篇关于spring security + jwt + redis实现双token认证的文章就介绍到这了,更多相关springsecurity 双token认证内容请搜索代码网以前的文章或继续浏览下面的相关文章希望大家以后多多支持代码网!






发表评论