
 我要评论
我要评论说明:
1、springfox(旧 swagger2)大量存在兼容 bug(springboot2.6+、3.x 报错),
本文使用 springdoc openapi 3,页面就是 swagger ui
2、springboot2.x/ springboot3.x 区分依赖版本,下文标注清楚
3、全程一步一步操作,复制即可运行
前置说明
访问地址最终:http://localhost:你的端口/swagger-ui/index.html
第 1 步:引入 maven 依赖 pom.xml
情况 a:springboot 3.x(jdk17+)
<!-- springdoc openapi3 swagger -->
<dependency>
    <groupid>org.springdoc</groupid>
    <artifactid>springdoc-openapi-starter-webmvc-ui</artifactid>
    <version>2.5.0</version>
</dependency>
情况 b:springboot 2.x(jdk8 / jdk11)
<dependency>
    <groupid>org.springdoc</groupid>
    <artifactid>springdoc-openapi-ui</artifactid>
    <version>1.7.0</version>
</dependency>
引入依赖后,刷新 maven,等待依赖下载完成。
第 2 步:创建 swagger 配置类(可选,用于修改文档标题、描述)
新建配置类 swaggeropenapiconfig.java,放在你的 config 包下
import io.swagger.v3.oas.models.openapi;
import io.swagger.v3.oas.models.info.info;
import org.springframework.context.annotation.bean;
import org.springframework.context.annotation.configuration;
@configuration
public class swaggeropenapiconfig {
@bean
public openapi openapi() {
    return new openapi()
            .info(new info()
                    .title("项目后端接口文档")     //文档标题
                    .version("v1.0")               //版本
                    .description("所有业务接口在线调试文档")); //描述
}
}
不写这个配置类也能正常打开 swagger,只是文档顶部没有自定义标题。
第 3 步【核心】给你的 controller 接口添加注解(让接口显示在文档)
openapi3 常用注解对照表
注解 | 作用 |
| 加在 controller 类上,划分接口模块 |
| 标记单个接口 |
| url 传参说明 |
| 实体类、dto 字段注释 |
其实 不加注解也能用了。springdoc 会自动扫描你所有的@restcontroller,直接生成文档。
controller 完整示例
import io.swagger.v3.oas.annotations.operation;
import io.swagger.v3.oas.annotations.tags.tag;
import org.springframework.web.bind.annotation.getmapping;
import org.springframework.web.bind.annotation.requestmapping;
import org.springframework.web.bind.annotation.restcontroller;
@restcontroller
@requestmapping("/user")
@tag(name = "用户管理模块")
public class usercontroller {
    @getmapping("/get")
    @operation(summary = "根据id获取用户信息", description = "传入用户id,查询基础用户数据")
    public string getuser(long userid){
        return "用户信息";
    }
}
dto / 实体类示例(返回对象展示注释)
dto(data transfer object,数据传输对象)和实体类(entity)是后端开发中常用的两种数据模型类,它们都可以通过 swagger/openapi 注解来展示字段说明。
在 swagger 文档中,当接口返回或接收这些对象时,字段上的 @schema 注解能让文档清晰地展示每个字段的含义和示例值。
import io.swagger.v3.oas.annotations.media.schema;
import lombok.data;
@data
@schema(description = "用户返回实体")
public class userdto {
@schema(description = "用户唯一id", example = "1001")
private long userid;

@schema(description = "用户姓名", example = "张三")
private string username;

@schema(description = "用户邮箱", example = "zhangsan@example.com")
private string email;

@schema(description = "创建时间", example = "2023-10-01 12:00:00")
private string createtime;
}
关键点:
@schema(description = "..."):用于描述整个类或单个字段的作用。
@schema(example = "..."):提供字段的示例值,方便在 swagger ui 中直接测试。
实体类(如 jpa entity)的注解用法完全相同,但通常用于数据库映射。
确保导入正确的包:import io.swagger.v3.oas.annotations.media.schema;,不要用旧版 swagger2 的 @apimodel。
这样配置后,swagger 文档中该对象的字段就会显示清晰的注释和示例,提升接口文档的可读性。
第 4 步:启动项目,访问文档地址
http://localhost:8080/swagger-ui/index.html
把 8080 替换成你项目的 server.port 端口。
如果打不开页面:往下看【常见问题排查】
成功了
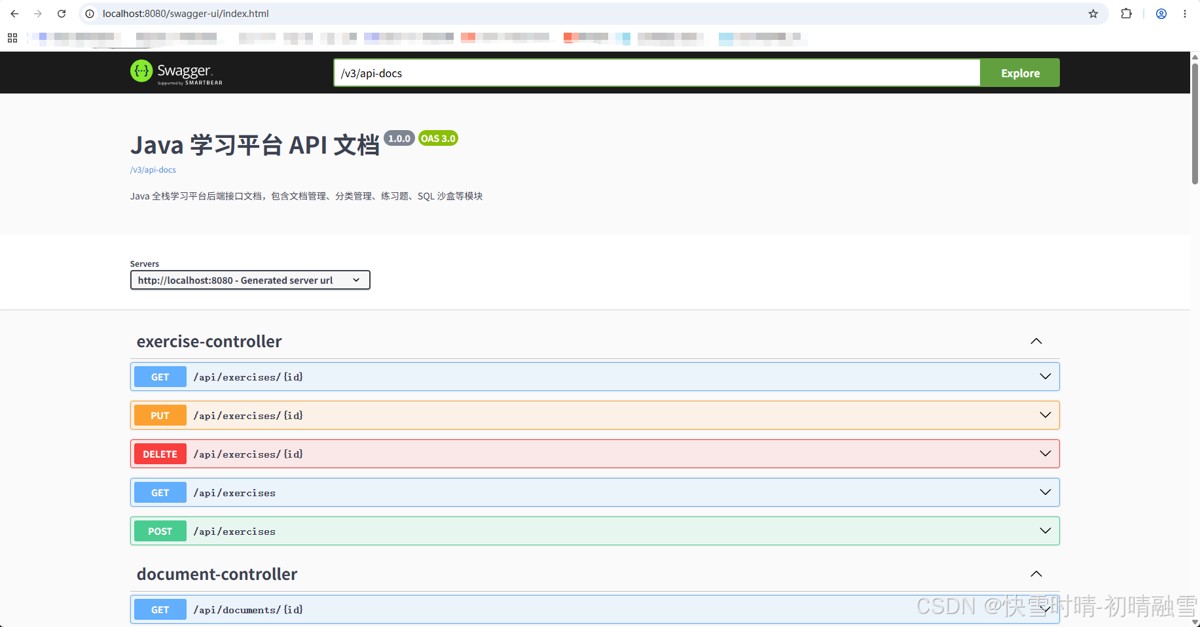
第 5 步(可选):springsecurity / 拦截器放行 swagger 资源
如果项目使用 springsecurity、自定义拦截器,会拦截 swagger 地址,页面无法加载,需要放行地址: 放行路径清单:
/v3/api-docs/**
/swagger-ui/**
/swagger-ui/index.html
springsecurity 放行示例
@override
public void configure(httpsecurity http) throws exception {
    http.authorizehttprequests()
            .requestmatchers("/v3/api-docs/**","/swagger-ui/**").permitall()
            .anyrequest().authenticated();
}
自定义 webmvc 拦截器放行
@override
public void addinterceptors(interceptorregistry registry) {
    registry.addinterceptor(logininterceptor)
            .addpathpatterns("/**")
            .excludepathpatterns("/v3/api-docs/**","/swagger-ui/**");
}
第 6 步(可选)区分环境:只开发环境开启 swagger
一般生产环境关闭接口文档,使用 @conditionalonproperty 修改配置类:
@configuration
// yml配置 springdoc.enable=true 才开启
@conditionalonproperty(name = "springdoc.enable", havingvalue = "true")
public class swaggeropenapiconfig {
    // ...代码不变
}
application.yml
springdoc:
  enable: true # dev开启;prod改为false
高频踩坑排查清单(重点!)
问题 1:打开页面,但是一片空白,看不到自己写的接口
- controller 必须加
@restcontroller - 接口方法必须是
public - 启动项目后不要直接访问静态 html,先让 spring 加载所有 controller
- 检查请求路径是否有统一前缀
server.servlet.context-path,访问地址要带上前缀
问题 2:404 找不到页面
核对地址!
✅ 正确:/swagger-ui/index.html
❌ 旧 swagger2 地址 /swagger-ui.html 在 springdoc 中失效
问题 3:实体类返回值不显示注释
确认导入注解包:
import io.swagger.v3.oas.annotations.media.schema;
不要导错旧 swagger2 的@apimodel
问题 4:springboot3 启动报错
必须使用 springdoc-openapi-starter-webmvc-ui,不能使用 2.x 旧依赖
补充:如果你执意使用老版本 swagger2(springfox,不推荐)
pom 依赖
<dependency>
    <groupid>io.springfox</groupid>
    <artifactid>springfox-swagger2</artifactid>
    <version>2.9.2</version>
</dependency>
<dependency>
    <groupid>io.springfox</groupid>
    <artifactid>springfox-swagger-ui</artifactid>
    <version>2.9.2</version>
</dependency>
配置类
import springfox.documentation.builders.requesthandlerselectors;
import springfox.documentation.spi.documentationtype;
import springfox.documentation.spring.web.plugins.docket;
import springfox.documentation.swagger2.annotations.enableswagger2;
import org.springframework.context.annotation.bean;
import org.springframework.context.annotation.configuration;
@configuration
@enableswagger2
public class swagger2config {
    @bean
    public docket docket(){
        return new docket(documentationtype.swagger_2)
                .select()
                // 重点!修改为你的controller包路径
                .apis(requesthandlerselectors.basepackage("com.xxx.controller"))
                .build();
    }
}访问地址:http://localhost:8080/swagger-ui.html
springboot 2.6 以上必须额外配置 yml 解决路径匹配报错
spring:
  mvc:
    pathmatch:
      matching-strategy: ant_path_matcher
问题5、本地有swagger ui文件吗
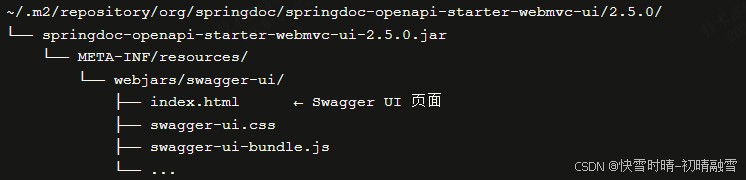
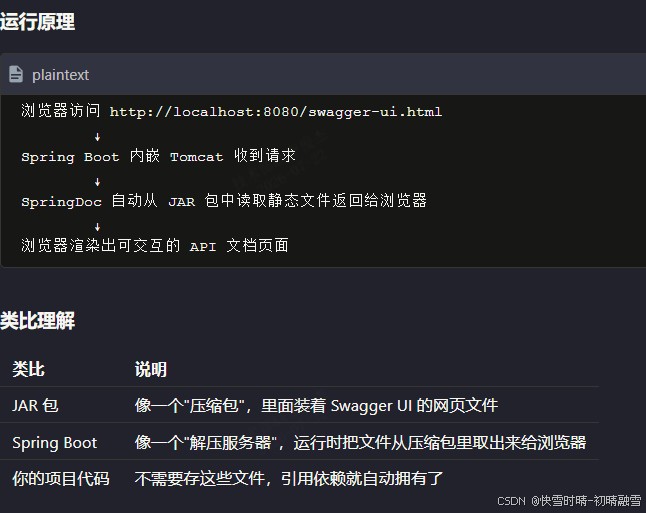
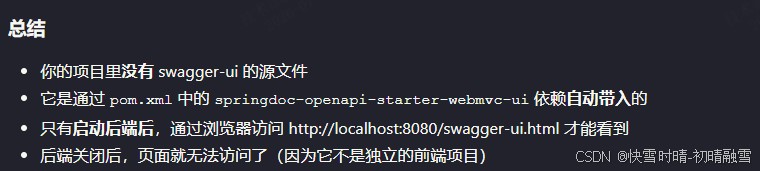
你在项目目录里找不到任何 swagger-ui 的 html/css/js 文件
swagger ui 的静态文件打包在 jar 依赖包内部
以上就是springboot集成springdoc openapi(替代springfox/swagger2)的完整步骤的详细内容,更多关于springboot集成springdoc openapi的资料请关注代码网其它相关文章!





发表评论