引言
apache http server(简称 apache)是世界上最流行的 web 服务器软件之一。它开源、稳定、功能强大,支持模块化扩展,适用于从小型个人网站到大型企业级应用的各种场景。本文将带你从零开始在 linux 系统上完整搭建 apache 服务器,并结合 java web 应用进行实战部署。
为什么选择 apache?
在开始动手之前,我们先来了解下 apache 的优势:
- ✅ 成熟稳定:自1995年发布以来,apache 已经经历了近30年的考验。
- ✅ 高度可配置:支持 .htaccess 文件、虚拟主机、url重写等高级功能。
- ✅ 模块丰富:通过加载不同模块(如 mod_ssl、mod_rewrite)实现功能扩展。
- ✅ 社区活跃:拥有庞大的开发者社区和详尽的官方文档。
- ✅ 跨平台兼容:不仅支持 linux,也支持 windows、macos 等系统。
小贴士:虽然 nginx 在静态资源处理和高并发方面表现更优,但 apache 在动态内容处理、.htaccess 控制、与 php/python 集成等方面依然具有不可替代的优势。
环境准备
本文以 ubuntu 22.04 lts 为例进行演示,其他主流发行版(如 centos、debian)操作类似,仅包管理命令略有不同。
检查系统版本
lsb_release -a
输出示例:
no lsb modules are available.
distributor id: ubuntu
description:    ubuntu 22.04.3 lts
release:        22.04
codename:       jammy
更新系统包
sudo apt update && sudo apt upgrade -y
确保你的系统是最新的,避免因依赖问题导致安装失败。
安装 apache http server
ubuntu 默认仓库中包含 apache,我们可以直接使用 apt 安装:
sudo apt install apache2 -y
安装完成后,apache 服务会自动启动。你可以通过以下命令检查状态:
sudo systemctl status apache2
你应该看到类似如下输出:
● apache2.service - the apache http server
     loaded: loaded (/lib/systemd/system/apache2.service; enabled; vendor preset: enabled)
     active: active (running) since mon 2024-06-10 10:00:00 utc; 2min ago
验证安装是否成功
打开浏览器,访问你的服务器 ip 地址或域名:
http://your-server-ip
如果看到 “apache2 ubuntu default page” 页面,说明安装成功!
你也可以在命令行中使用 curl 测试:
curl http://localhost
apache 目录结构详解
理解 apache 的目录结构对后续配置至关重要:
# 主配置文件目录
/etc/apache2/

# 站点配置(启用的站点)
/etc/apache2/sites-enabled/

# 可用站点配置模板
/etc/apache2/sites-available/

# 模块配置
/etc/apache2/mods-enabled/
/etc/apache2/mods-available/

# apache 主配置文件
/etc/apache2/apache2.conf

# 端口配置
/etc/apache2/ports.conf

# 默认网页根目录
/var/www/html/

# 日志目录
/var/log/apache2/
提示:ubuntu 使用 a2ensite 和 a2enmod 命令来启用站点和模块,这些命令本质是在 sites-enabled 和 mods-enabled 中创建符号链接。
基础配置优化
修改默认监听端口(可选)
编辑 /etc/apache2/ports.conf:
sudo nano /etc/apache2/ports.conf
默认监听 80 端口:
listen 80
如果你想改为 8080:
listen 8080
然后重启 apache:
sudo systemctl restart apache2
注意:修改端口后需确保防火墙允许新端口访问。
配置防火墙(ufw)
如果你启用了 ufw 防火墙,需要放行 http 端口:
sudo ufw allow 'apache full'
# 或者指定端口
sudo ufw allow 80/tcp
sudo ufw allow 443/tcp
sudo ufw reload
查看状态:
sudo ufw status
配置虚拟主机(virtual host)
虚拟主机允许你在同一台服务器上托管多个网站。
创建网站目录
假设我们要部署一个名为 example.com 的网站:
sudo mkdir -p /var/www/example.com/public_html
sudo chown -r $user:$user /var/www/example.com/public_html
sudo chmod -r 755 /var/www/example.com
创建测试页面
nano /var/www/example.com/public_html/index.html
内容如下:
<!doctype html>
<html>
<head>
    <title>welcome to example.com!</title>
</head>
<body>
    <h1>success! the example.com virtual host is working!</h1>
</body>
</html>
创建虚拟主机配置文件
sudo nano /etc/apache2/sites-available/example.com.conf
添加以下内容:
<virtualhost *:80>
    serveradmin admin@example.com
    servername example.com
    serveralias www.example.com
    documentroot /var/www/example.com/public_html
    errorlog ${apache_log_dir}/example_error.log
    customlog ${apache_log_dir}/example_access.log combined
    <directory /var/www/example.com/public_html>
        options indexes followsymlinks
        allowoverride all
        require all granted
    </directory>
</virtualhost>
启用站点并重启 apache
sudo a2ensite example.com.conf
sudo systemctl reload apache2
提示:a2ensite 是 “apache2 enable site” 的缩写。
启用重要模块
apache 的强大之处在于其模块化架构。以下是几个常用模块:
启用 rewrite 模块(用于 url 重写)
sudo a2enmod rewrite
sudo systemctl restart apache2
启用 ssl 模块(https 支持)
sudo a2enmod ssl
sudo systemctl restart apache2
启用 headers 和 expires(性能优化)
sudo a2enmod headers
sudo a2enmod expires
sudo systemctl restart apache2
性能调优配置
编辑主配置文件:
sudo nano /etc/apache2/apache2.conf
在文件末尾添加以下优化配置:
# 启用 keepalive 以复用 tcp 连接
keepalive on
maxkeepaliverequests 100
keepalivetimeout 5

# mpm prefork 配置(适用于 php 等非线程安全应用)
<ifmodule mpm_prefork_module>
    startservers            5
    minspareservers         5
    maxspareservers        10
    maxrequestworkers      150
    maxconnectionsperchild   0
</ifmodule>

# 启用压缩
<ifmodule mod_deflate.c>
    addoutputfilterbytype deflate text/html text/plain text/xml text/css text/javascript application/javascript application/json
</ifmodule>

# 缓存静态资源
<ifmodule mod_expires.c>
    expiresactive on
    expiresbytype image/jpg "access plus 1 year"
    expiresbytype image/jpeg "access plus 1 year"
    expiresbytype image/gif "access plus 1 year"
    expiresbytype image/png "access plus 1 year"
    expiresbytype text/css "access plus 1 month"
    expiresbytype application/pdf "access plus 1 month"
    expiresbytype text/javascript "access plus 1 month"
    expiresbytype application/javascript "access plus 1 month"
    expiresbytype application/x-javascript "access plus 1 month"
    expiresbytype application/x-shockwave-flash "access plus 1 month"
    expiresbytype image/x-icon "access plus 1 year"
    expiresdefault "access plus 2 days"
</ifmodule>
重启服务使配置生效:
sudo systemctl restart apache2
使用 mermaid 图表展示请求处理流程
apache 处理 http 请求的过程可以用以下流程图表示:
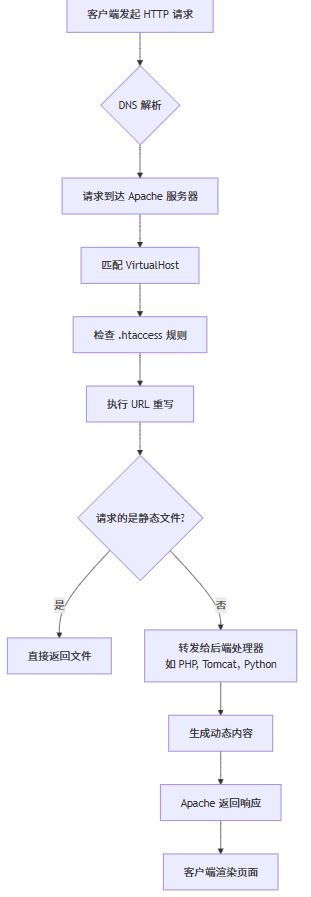
这个流程图展示了 apache 如何接收请求、匹配虚拟主机、应用重写规则,最后返回响应的全过程。
部署 java web 应用
虽然 apache 本身不直接运行 java 应用,但我们可以通过反向代理的方式,将请求转发给后端的 tomcat 或 spring boot 应用。
方案一:apache + tomcat(推荐传统项目)
1. 安装 tomcat
sudo apt install tomcat9 tomcat9-admin -y
sudo systemctl start tomcat9
sudo systemctl enable tomcat9
2. 部署 war 包
将你的 java web 应用打包为 .war 文件,放入:
sudo cp your-app.war /var/lib/tomcat9/webapps/
tomcat 会自动解压并部署。
3. 配置 apache 反向代理
启用 proxy 模块:
sudo a2enmod proxy
sudo a2enmod proxy_http
sudo systemctl restart apache2
编辑虚拟主机配置:
sudo nano /etc/apache2/sites-available/java-app.conf
<virtualhost *:80>
    servername javaapp.yourdomain.com
    proxypreservehost on
    proxypass / http://localhost:8080/your-app/
    proxypassreverse / http://localhost:8080/your-app/
    errorlog ${apache_log_dir}/javaapp_error.log
    customlog ${apache_log_dir}/javaapp_access.log combined
</virtualhost>
启用站点:
sudo a2ensite java-app.conf
sudo systemctl reload apache2
现在访问 http://javaapp.yourdomain.com 就能看到你的 java 应用了!
方案二:apache + spring boot(现代微服务架构)
spring boot 内嵌 tomcat,可独立运行。我们只需配置 apache 作为前端代理。
示例 java 代码:spring boot controller
// 📄 democontroller.java
package com.example.demo.controller;
import org.springframework.web.bind.annotation.getmapping;
import org.springframework.web.bind.annotation.restcontroller;
@restcontroller
public class democontroller {
    @getmapping("/api/hello")
    public apiresponse hello() {
        return new apiresponse("hello from spring boot via apache!", system.currenttimemillis());
    }
    @getmapping("/health")
    public healthcheck health() {
        return new healthcheck(true, "up", "all systems operational");
    }
}
// 📄 apiresponse.java
package com.example.demo.model;
public class apiresponse {
    private string message;
    private long timestamp;
    public apiresponse(string message, long timestamp) {
        this.message = message;
        this.timestamp = timestamp;
    }
    // getters and setters
    public string getmessage() { return message; }
    public void setmessage(string message) { this.message = message; }
    public long gettimestamp() { return timestamp; }
    public void settimestamp(long timestamp) { this.timestamp = timestamp; }
}
// 📄 healthcheck.java
package com.example.demo.model;
public class healthcheck {
    private boolean success;
    private string status;
    private string details;
    public healthcheck(boolean success, string status, string details) {
        this.success = success;
        this.status = status;
        this.details = details;
    }
    // getters and setters
    public boolean issuccess() { return success; }
    public void setsuccess(boolean success) { this.success = success; }
    public string getstatus() { return status; }
    public void setstatus(string status) { this.status = status; }
    public string getdetails() { return details; }
    public void setdetails(string details) { this.details = details; }
}
启动 spring boot 应用
java -jar your-springboot-app.jar --server.port=8081
配置 apache 代理
<virtualhost *:80>
    servername api.yourdomain.com
    # 代理 api 请求
    proxypass /api http://localhost:8081/api
    proxypassreverse /api http://localhost:8081/api
    # 代理健康检查
    proxypass /health http://localhost:8081/health
    proxypassreverse /health http://localhost:8081/health
    # 静态资源由 apache 直接提供(可选)
    alias /static /var/www/api.yourdomain.com/static
    <directory /var/www/api.yourdomain.com/static>
        require all granted
    </directory>
    errorlog ${apache_log_dir}/api_error.log
    customlog ${apache_log_dir}/api_access.log combined
    # 启用 cors(如需)
    header always set access-control-allow-origin "*"
    header always set access-control-allow-methods "get, post, put, delete, options"
    header always set access-control-allow-headers "content-type, authorization"
</virtualhost>
这样,apache 负责静态资源和负载均衡,spring boot 专注业务逻辑,架构清晰高效。
启用 https(ssl/tls)
安全是现代 web 的基本要求。我们可以使用免费的 let’s encrypt 证书。
安装 certbot
sudo apt install certbot python3-certbot-apache -y
获取并安装证书
sudo certbot --apache -d example.com -d www.example.com
certbot 会自动修改 apache 配置并重启服务。
自动续期
let’s encrypt 证书有效期为 90 天,设置自动续期:
sudo crontab -e
添加一行:
0 12 * * * /usr/bin/certbot renew --quiet
这将在每天中午检查并自动续期即将过期的证书。
安全加固建议
1. 隐藏 apache 版本信息
编辑 /etc/apache2/conf-available/security.conf:
servertokens prod
serversignature off
2. 禁用目录浏览
确保所有 <directory> 块中没有 indexes 选项:
options -indexes +followsymlinks
3. 限制 http 方法
<limitexcept get post head>
    require all denied
</limitexcept>
4. 设置安全头
在虚拟主机配置中添加:
header always set x-content-type-options "nosniff"
header always set x-frame-options "sameorigin"
header always set x-xss-protection "1; mode=block"
header always set referrer-policy "strict-origin-when-cross-origin"
header always set content-security-policy "default-src 'self'; script-src 'self' 'unsafe-inline' 'unsafe-eval'; style-src 'self' 'unsafe-inline';"
监控与日志分析
查看实时访问日志
sudo tail -f /var/log/apache2/access.log
使用 goaccess 分析日志(推荐)
安装 goaccess:
sudo apt install goaccess -y
生成 html 报告:
goaccess /var/log/apache2/access.log -o report.html --log-format=combined
你也可以配置定时任务自动生成日报:
# 每天凌晨 2 点生成报告
0 2 * * * goaccess /var/log/apache2/access.log -o /var/www/html/stats/report-$(date +\%y-\%m-\%d).html --log-format=combined
自动化部署脚本示例
下面是一个 bash 脚本,用于自动化部署 java web 应用:
#!/bin/bash
# deploy-java-app.sh

app_name="my-java-app"
app_version="1.0.0"
tomcat_home="/var/lib/tomcat9"
webapps_dir="$tomcat_home/webapps"
war_file="$app_name-$app_version.war"

echo "🚀 开始部署 $app_name v$app_version"

# 1. 停止 tomcat
echo "🛑 停止 tomcat 服务..."
sudo systemctl stop tomcat9

# 2. 删除旧版本
echo "🗑️  清理旧版本..."
sudo rm -rf "$webapps_dir/$app_name"
sudo rm -f "$webapps_dir/$app_name.war"

# 3. 复制新 war 包
echo "📦 部署新版本..."
sudo cp "./build/libs/$war_file" "$webapps_dir/"

# 4. 设置权限
echo "🔐 设置权限..."
sudo chown tomcat:tomcat "$webapps_dir/$war_file"
sudo chmod 644 "$webapps_dir/$war_file"

# 5. 启动 tomcat
echo "✅ 启动 tomcat 服务..."
sudo systemctl start tomcat9

# 6. 等待部署完成
echo "⏳ 等待应用部署完成 (最多 60 秒)..."
for i in {1..12}; do
    if [ -d "$webapps_dir/$app_name" ]; then
        echo "🎉 应用部署成功!"
        break
    fi
    sleep 5
done

# 7. 检查应用状态
echo "🔍 检查应用健康状态..."
sleep 10
status_code=$(curl -s -o /dev/null -w "%{http_code}" http://localhost:8080/$app_name/health)

if [ "$status_code" == "200" ]; then
    echo "💚 应用健康检查通过!状态码: $status_code"
else
    echo "💔 应用健康检查失败!状态码: $status_code"
    exit 1
fi

echo "✅ 部署完成!访问地址: http://your-domain.com/$app_name"
保存为 deploy.sh,赋予执行权限:
chmod +x deploy.sh
./deploy.sh
java 客户端测试代码
编写一个简单的 java 客户端来测试部署的应用:
// 📄 apacheintegrationtest.java
package com.example.test;
import java.io.bufferedreader;
import java.io.inputstreamreader;
import java.net.httpurlconnection;
import java.net.url;
import java.nio.charset.standardcharsets;
import com.google.gson.gson;
import com.google.gson.jsonobject;
public class apacheintegrationtest {
    private static final string base_url = "http://your-domain.com/api";
    public static void main(string[] args) {
        apacheintegrationtest test = new apacheintegrationtest();
        system.out.println("🧪 开始测试 apache + spring boot 集成...");
        // 测试健康检查
        test.testhealthendpoint();
        // 测试 hello 接口
        test.testhelloendpoint();
        // 测试错误处理
        test.testnotfoundendpoint();
        system.out.println("✅ 所有测试完成!");
    }
    private void testhealthendpoint() {
        system.out.println("\n=== 测试健康检查接口 ===");
        try {
            string response = sendgetrequest(base_url + "/health");
            gson gson = new gson();
            jsonobject json = gson.fromjson(response, jsonobject.class);
            boolean success = json.get("success").getasboolean();
            string status = json.get("status").getasstring();
            if (success && "up".equals(status)) {
                system.out.println("💚 健康检查通过!状态: " + status);
                system.out.println("📊 详细信息: " + json.get("details").getasstring());
            } else {
                system.out.println("💔 健康检查失败!状态: " + status);
            }
        } catch (exception e) {
            system.out.println("❌ 健康检查异常: " + e.getmessage());
        }
    }
    private void testhelloendpoint() {
        system.out.println("\n=== 测试 hello 接口 ===");
        try {
            string response = sendgetrequest(base_url + "/hello");
            gson gson = new gson();
            jsonobject json = gson.fromjson(response, jsonobject.class);
            string message = json.get("message").getasstring();
            long timestamp = json.get("timestamp").getaslong();
            system.out.println("💬 收到消息: " + message);
            system.out.println("⏱️  时间戳: " + timestamp);
            system.out.println("✅ hello 接口测试通过!");
        } catch (exception e) {
            system.out.println("❌ hello 接口测试失败: " + e.getmessage());
        }
    }
    private void testnotfoundendpoint() {
        system.out.println("\n=== 测试 404 错误处理 ===");
        try {
            string response = sendgetrequest(base_url + "/nonexistent-endpoint");
            system.out.println("⚠️  意外成功!应该返回 404");
        } catch (exception e) {
            system.out.println("✅ 正确捕获 404 错误: " + e.getmessage());
        }
    }
    private string sendgetrequest(string urlstring) throws exception {
        url url = new url(urlstring);
        httpurlconnection conn = (httpurlconnection) url.openconnection();
        conn.setrequestmethod("get");
        conn.setrequestproperty("user-agent", "java apache integration test client");
        conn.setrequestproperty("accept", "application/json");
        int responsecode = conn.getresponsecode();
        system.out.println("🌐 请求 url: " + urlstring);
        system.out.println("🔢 响应码: " + responsecode);
        if (responsecode == httpurlconnection.http_ok) {
            bufferedreader in = new bufferedreader(
                new inputstreamreader(conn.getinputstream(), standardcharsets.utf_8));
            stringbuilder response = new stringbuilder();
            string line;
            while ((line = in.readline()) != null) {
                response.append(line);
            }
            in.close();
            return response.tostring();
        } else {
            throw new runtimeexception("http error: " + responsecode);
        }
    }
}
要运行此测试,你需要添加 gson 依赖:
<!-- pom.xml -->
<dependency>
    <groupid>com.google.code.gson</groupid>
    <artifactid>gson</artifactid>
    <version>2.10.1</version>
</dependency>
使用 mermaid 展示架构拓扑
以下是 apache + java 应用的典型生产架构:
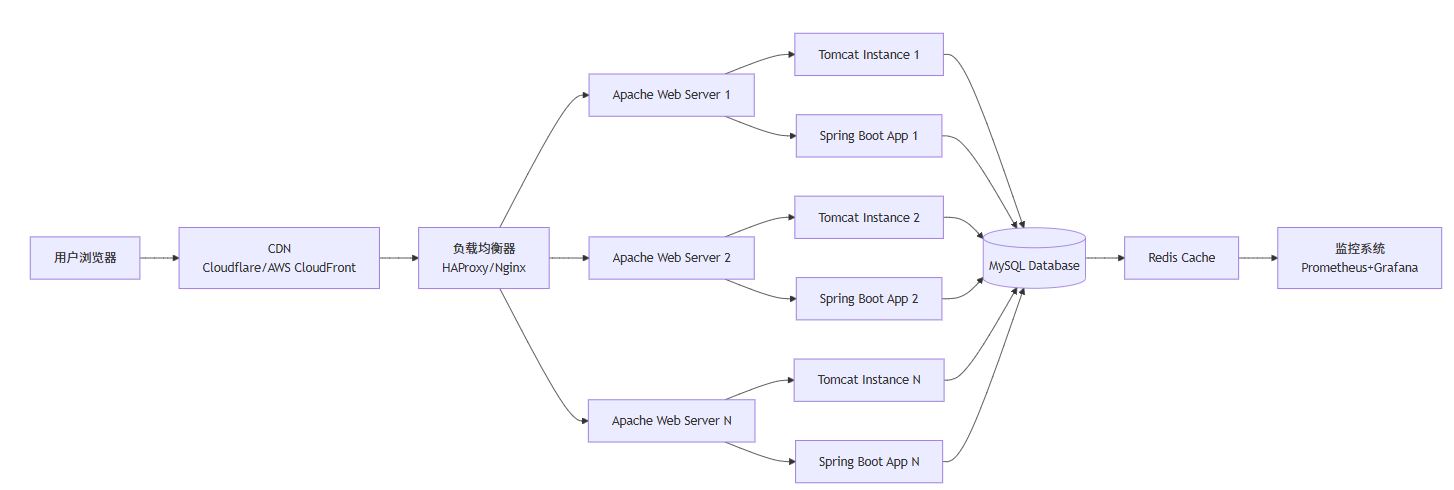
这种架构提供了高可用性、负载均衡和横向扩展能力。
故障排查技巧
1. 检查 apache 配置语法
sudo apache2ctl configtest
2. 查看错误日志
sudo tail -50 /var/log/apache2/error.log
3. 检查端口占用
sudo netstat -tlnp | grep :80
4. 测试本地连接
curl -i http://localhost
5. 检查 selinux(centos/rhel)
getenforce
# 如果是 enforcing,可能需要调整策略
sudo setsebool -p httpd_can_network_connect 1
最佳实践总结
- 使用虚拟主机:每个网站独立配置,便于管理和维护。
- 启用 https:保护用户数据安全,提升 seo 排名。
- 定期备份配置:
cp -r /etc/apache2 /backup/apache2-$(date +%y%m%d) - 监控日志:设置日志轮转,避免磁盘空间耗尽。
- 性能测试:使用
ab(apache bench)或wrk进行压力测试。 - 安全更新:定期更新系统和 apache 版本。
结语
通过本文,你已经掌握了在 linux 上搭建 apache http 服务器的完整流程,包括基础安装、虚拟主机配置、性能优化、安全加固,以及与 java web 应用的集成部署。apache 作为久经考验的 web 服务器,配合现代 java 框架,依然能够构建高性能、高可用的 web 应用系统。
记住,技术选型没有绝对的对错,关键是根据项目需求选择合适的工具。apache + java 的组合在企业级应用、内容管理系统、api 网关等场景中仍然具有强大的生命力。
现在,轮到你动手实践了!部署你的第一个 java web 应用,让它运行在自己搭建的 apache 服务器上吧!💪
提示:技术之路永无止境,保持好奇心,持续学习,你将成为更优秀的开发者!
常见问题解答(faq)
q1: apache 和 nginx 哪个更好?
a: 没有绝对答案。nginx 在静态文件处理和高并发方面表现优异;apache 在动态内容处理、.htaccess 控制、模块生态方面更强大。很多生产环境采用 nginx 做前端 + apache 做后端的混合架构。
q2: 如何提高 apache 性能?
a: 主要方法包括:
- 启用压缩(mod_deflate)
- 设置缓存头(mod_expires)
- 使用 mpm 事件模式(mpm_event_module)
- 启用 keepalive
- 限制不必要的模块
- 使用 cdn 加速静态资源
q3: apache 能直接运行 java 吗?
a: 不能。apache 是 web 服务器,不是应用服务器。java 应用需要运行在 tomcat、jetty、undertow 等 servlet 容器中,apache 通过反向代理将请求转发给它们。
q4: 如何监控 apache 性能?
a: 可以使用:
mod_status模块查看实时状态apachetop工具监控实时请求- prometheus + grafana 构建可视化监控
- elk stack(elasticsearch+logstash+kibana)分析日志
q5: apache 支持 http/2 吗?
a: 支持!需要启用 mod_http2 模块,并在虚拟主机配置中添加:
protocols h2 http/1.1
同时需要 https 支持,因为主流浏览器只支持 http/2 over tls。
希望这篇详细的指南能帮助你在 linux 上成功搭建 apache http 服务器,并顺利部署 java web 应用!
以上就是在linux上完整搭建apache http服务器的详细步骤的详细内容,更多关于linux搭建apache http服务器的资料请关注代码网其它相关文章!


发表评论