引言
ftp(file transfer protocol)作为最古老、最成熟的文件传输协议之一,至今仍在企业级应用中扮演重要角色。无论是部署静态资源、备份数据库,还是在不同系统间同步文件,ftp 服务都是不可或缺的基础组件。本文将带你从零开始,在 linux 系统上搭建完整的 ftp 服务器,并通过 java 编写客户端程序实现自动化上传与下载功能。
为什么选择 ftp?
虽然现代云存储和 http api 已经非常流行,但 ftp 依然有其不可替代的优势:
- 简单稳定:协议成熟,兼容性极强。
- 权限控制灵活:可针对用户、目录设置读写权限。
- 断点续传支持:大文件传输更可靠。
- 广泛支持:几乎所有操作系统和编程语言都内置或提供库支持。
- 低资源占用:轻量级服务,适合嵌入式或老旧设备。
小贴士:如果你需要加密传输,建议使用 sftp 或 ftps,它们是在 ftp 基础上增加 ssl/tls 加密的安全版本。
环境准备
我们将在一台标准的 ubuntu 22.04 lts 服务器上进行操作。如果你使用的是 centos、debian 或其他发行版,命令略有不同,我会在文中注明。
最小系统要求:
- 操作系统:ubuntu 22.04 / centos 8+
- 内存:≥ 512mb
- 磁盘空间:≥ 2gb(视文件大小而定)
- 网络:开放 20, 21, 及被动模式端口范围(如 49152–65534)
安装 vsftpd —— 非常安全的 ftp 服务器
vsftpd(very secure ftp daemon)是 linux 上最受欢迎的 ftp 服务器软件之一,以其高性能和安全性著称。
sudo apt update
sudo apt install vsftpd -y
如果是 centos/rhel:
sudo yum install vsftpd -y
# 或者在较新版本中:
sudo dnf install vsftpd -y
安装完成后,启动并设置开机自启:
sudo systemctl start vsftpd
sudo systemctl enable vsftpd
sudo systemctl status vsftpd
你应该看到类似如下输出:
● vsftpd.service - vsftpd ftp server
     loaded: loaded (/lib/systemd/system/vsftpd.service; enabled; vendor preset: enabled)
     active: active (running) since mon 2024-06-17 10:00:00 utc; 5s ago
配置 vsftpd —— 安全第一!
默认配置位于 /etc/vsftpd.conf,我们需要对其进行修改以满足生产环境需求。
首先备份原始配置:
sudo cp /etc/vsftpd.conf /etc/vsftpd.conf.bak
然后编辑配置文件:
sudo nano /etc/vsftpd.conf
推荐配置内容如下:
# 禁用匿名登录
anonymous_enable=no
# 启用本地用户登录
local_enable=yes
# 允许本地用户写入
write_enable=yes
# 限制用户只能访问自己的主目录
chroot_local_user=yes
# 允许 chroot 目录可写(重要!否则无法上传)
allow_writeable_chroot=yes
# 使用被动模式(推荐用于公网访问)
pasv_enable=yes
pasv_min_port=49152
pasv_max_port=65534
# 启用日志记录
xferlog_enable=yes
xferlog_file=/var/log/vsftpd.log
xferlog_std_format=yes
# 设置连接超时时间(秒)
idle_session_timeout=600
data_connection_timeout=120
# 限制最大客户端数
max_clients=50
max_per_ip=5
# 拒绝某些用户登录(可选)
# userlist_enable=yes
# userlist_file=/etc/vsftpd.userlist
# userlist_deny=yes
# 启用 utf-8 编码
utf8_filesystem=yes
注意:allow_writeable_chroot=yes 是关键配置。如果没有它,即使你开启了 write_enable,用户也无法在被 chroot 的目录中上传文件。
保存后重启服务:
sudo systemctl restart vsftpd
创建专用 ftp 用户
为了安全起见,不建议直接使用 root 或已有系统用户进行 ftp 操作。我们创建一个专用用户:
sudo adduser ftpuser
系统会提示你设置密码和填写一些信息(可以一路回车跳过)。接着,为该用户创建专属上传目录:
sudo mkdir -p /home/ftpuser/uploads
sudo chown ftpuser:ftpuser /home/ftpuser/uploads
sudo chmod 755 /home/ftpuser
权限说明:
- 755 表示所有者可读写执行,组和其他人只读执行。
- 如果希望其他用户也能上传,可设为 775,但需谨慎。
防火墙配置
ubuntu 默认使用 ufw,centos 使用 firewalld。确保开放 ftp 端口:
ubuntu:
sudo ufw allow 20/tcp
sudo ufw allow 21/tcp
sudo ufw allow 49152:65534/tcp
sudo ufw reload
centos:
sudo firewall-cmd --permanent --add-port=20-21/tcp
sudo firewall-cmd --permanent --add-port=49152-65534/tcp
sudo firewall-cmd --reload
测试 ftp 连接
我们可以使用命令行工具 ftp 或图形化工具 filezilla 进行测试。
使用命令行测试:
ftp localhost
输入用户名 ftpuser 和密码,如果成功登录,你会看到:
connected to localhost.
220 (vsftpd 3.0.3)
name (localhost:yourname): ftpuser
331 please specify the password.
password:
230 login successful.
remote system type is unix.
using binary mode to transfer files.
ftp>
尝试上传一个测试文件:
echo "hello ftp server!" > test.txt
ftp> put test.txt
ftp> ls
ftp> quit
如果一切顺利,文件应已上传至 /home/ftpuser/uploads/。
外网访问注意事项
如果你希望通过公网 ip 访问 ftp 服务器,请注意:
- 路由器端口转发:将 21 和被动端口范围映射到内网服务器。
- 云服务商安全组:如 aws、阿里云、腾讯云等,需在控制台放行相应端口。
- 动态 dns(可选):如果你没有固定公网 ip,可使用 no-ip 或 dyndns 服务绑定域名。
警告:ftp 协议本身是明文传输,包括用户名和密码。强烈建议仅在内网使用,或升级为 ftps/sftp。
ftp 工作模式图解
ftp 有两种工作模式:主动模式(active)和被动模式(passive)。理解它们对防火墙配置至关重要。
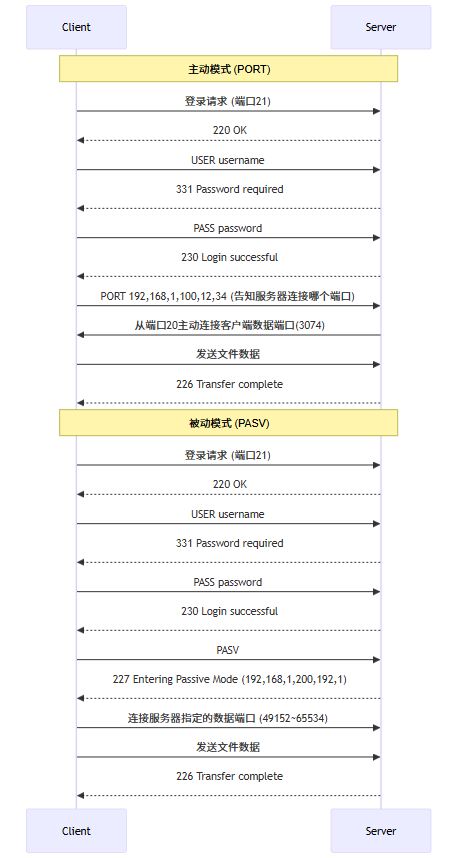
图表解读:
- 主动模式中,服务器主动连接客户端的数据端口 —— 对客户端防火墙不友好。
- 被动模式中,客户端连接服务器的数据端口 —— 更适合现代网络环境。
- 我们前面配置的就是被动模式。
java 实现 ftp 客户端 —— apache commons net
现在进入重头戏 —— 用 java 编写 ftp 客户端程序,实现自动上传、下载、列出目录等功能。
第一步:添加 maven 依赖
在你的 pom.xml 中加入:
<dependency>
    <groupid>commons-net</groupid>
    <artifactid>commons-net</artifactid>
    <version>3.9.0</version>
</dependency>
如果你使用 gradle:
implementation 'commons-net:commons-net:3.9.0'
pache commons net 是一个强大的网络协议库,支持 ftp、smtp、pop3、telnet 等多种协议。官方文档详见:apache commons net
java 代码实战 —— 基础上传下载
下面是一个完整的 java 类,封装了 ftp 连接、上传、下载、断开等操作。
import org.apache.commons.net.ftp.ftp;
import org.apache.commons.net.ftp.ftpclient;
import org.apache.commons.net.ftp.ftpfile;
import org.apache.commons.net.ftp.ftpreply;
import java.io.*;
import java.nio.charset.standardcharsets;
public class ftpuploader {
    private string server;
    private int port;
    private string username;
    private string password;
    private ftpclient ftpclient;
    public ftpuploader(string server, int port, string username, string password) {
        this.server = server;
        this.port = port;
        this.username = username;
        this.password = password;
        this.ftpclient = new ftpclient();
    }
    /**
     * 连接到 ftp 服务器
     */
    public boolean connect() {
        try {
            ftpclient.connect(server, port);
            int replycode = ftpclient.getreplycode();
            if (!ftpreply.ispositivecompletion(replycode)) {
                system.err.println("连接失败,服务器返回码:" + replycode);
                return false;
            }
            boolean loggedin = ftpclient.login(username, password);
            if (!loggedin) {
                system.err.println("登录失败,用户名或密码错误");
                return false;
            }
            // 设置被动模式
            ftpclient.enterlocalpassivemode();
            // 设置二进制传输模式(推荐用于所有文件)
            ftpclient.setfiletype(ftp.binary_file_type);
            // 设置编码(避免中文乱码)
            ftpclient.setcontrolencoding(standardcharsets.utf_8.name());
            system.out.println("✅ 成功连接到 ftp 服务器: " + server);
            return true;
        } catch (ioexception e) {
            system.err.println("连接异常:" + e.getmessage());
            return false;
        }
    }
    /**
     * 上传文件
     */
    public boolean uploadfile(string localfilepath, string remotefilename) {
        file localfile = new file(localfilepath);
        if (!localfile.exists()) {
            system.err.println("本地文件不存在:" + localfilepath);
            return false;
        }
        try (inputstream inputstream = new fileinputstream(localfile)) {
            boolean done = ftpclient.storefile(remotefilename, inputstream);
            if (done) {
                system.out.println("📤 文件上传成功: " + remotefilename);
                return true;
            } else {
                system.err.println("❌ 文件上传失败: " + remotefilename);
                return false;
            }
        } catch (ioexception e) {
            system.err.println("上传过程中发生异常:" + e.getmessage());
            return false;
        }
    }
    /**
     * 下载文件
     */
    public boolean downloadfile(string remotefilename, string localfilepath) {
        try (outputstream outputstream = new fileoutputstream(localfilepath)) {
            boolean done = ftpclient.retrievefile(remotefilename, outputstream);
            if (done) {
                system.out.println("📥 文件下载成功: " + localfilepath);
                return true;
            } else {
                system.err.println("❌ 文件下载失败: " + remotefilename);
                return false;
            }
        } catch (ioexception e) {
            system.err.println("下载过程中发生异常:" + e.getmessage());
            return false;
        }
    }
    /**
     * 列出远程目录内容
     */
    public void listfiles(string remotedir) {
        try {
            ftpclient.changeworkingdirectory(remotedir);
            ftpfile[] files = ftpclient.listfiles();
            system.out.println("📁 当前目录: " + remotedir);
            system.out.println("----------------------------------------");
            for (ftpfile file : files) {
                string fileinfo = file.isdirectory() ? "[dir] " : "[file]";
                fileinfo += " " + file.getname() + " (" + file.getsize() + " bytes)";
                system.out.println(fileinfo);
            }
        } catch (ioexception e) {
            system.err.println("列出文件失败:" + e.getmessage());
        }
    }
    /**
     * 创建远程目录
     */
    public boolean makedirectory(string dirpath) {
        try {
            boolean success = ftpclient.makedirectory(dirpath);
            if (success) {
                system.out.println("✅ 目录创建成功: " + dirpath);
                return true;
            } else {
                system.err.println("❌ 目录创建失败: " + dirpath);
                return false;
            }
        } catch (ioexception e) {
            system.err.println("创建目录异常:" + e.getmessage());
            return false;
        }
    }
    /**
     * 删除远程文件
     */
    public boolean deletefile(string filename) {
        try {
            boolean success = ftpclient.deletefile(filename);
            if (success) {
                system.out.println("🗑️  文件删除成功: " + filename);
                return true;
            } else {
                system.err.println("❌ 文件删除失败: " + filename);
                return false;
            }
        } catch (ioexception e) {
            system.err.println("删除文件异常:" + e.getmessage());
            return false;
        }
    }
    /**
     * 断开连接
     */
    public void disconnect() {
        if (ftpclient.isconnected()) {
            try {
                ftpclient.logout();
                ftpclient.disconnect();
                system.out.println("🔌 已断开 ftp 连接");
            } catch (ioexception e) {
                system.err.println("断开连接时发生异常:" + e.getmessage());
            }
        }
    }
}
测试 java 客户端
编写一个简单的测试类来验证功能:
public class ftptest {
    public static void main(string[] args) {
        // 替换为你自己的服务器信息
        string server = "your-server-ip-or-domain";
        int port = 21;
        string username = "ftpuser";
        string password = "your-password";
        ftpuploader uploader = new ftpuploader(server, port, username, password);
        // 1. 连接服务器
        if (!uploader.connect()) {
            system.exit(1);
        }
        // 2. 创建子目录
        uploader.makedirectory("test-dir");
        // 3. 上传文件
        uploader.uploadfile("/path/to/local/file.txt", "test-dir/uploaded-file.txt");
        // 4. 列出目录内容
        uploader.listfiles("test-dir");
        // 5. 下载文件
        uploader.downloadfile("test-dir/uploaded-file.txt", "/tmp/downloaded-file.txt");
        // 6. 删除文件(可选)
        // uploader.deletefile("test-dir/uploaded-file.txt");
        // 7. 断开连接
        uploader.disconnect();
    }
}
运行后,你将看到类似输出:
✅ 成功连接到 ftp 服务器: 192.168.1.100
✅ 目录创建成功: test-dir
📤 文件上传成功: test-dir/uploaded-file.txt
📁 当前目录: test-dir
----------------------------------------
[file] uploaded-file.txt (18 bytes)
📥 文件下载成功: /tmp/downloaded-file.txt
🔌 已断开 ftp 连接
高级功能 —— 断点续传与进度监控
对于大文件传输,断点续传和进度条是刚需。apache commons net 支持这些功能。
断点续传上传:
public boolean uploadwithresume(string localfilepath, string remotefilename) {
    file localfile = new file(localfilepath);
    if (!localfile.exists()) {
        system.err.println("本地文件不存在:" + localfilepath);
        return false;
    }
    try {
        // 获取远程文件大小(如果存在)
        long remotesize = 0;
        ftpfile[] files = ftpclient.listfiles(remotefilename);
        if (files.length > 0) {
            remotesize = files[0].getsize();
        }
        // 如果远程文件大小 >= 本地文件,则无需上传
        if (remotesize >= localfile.length()) {
            system.out.println("✅ 文件已完整上传,跳过:" + remotefilename);
            return true;
        }
        // 打开输入流,从断点位置开始读取
        randomaccessfile raf = new randomaccessfile(localfile, "r");
        raf.seek(remotesize); // 移动到断点位置
        // 告诉服务器从指定位置开始写入
        ftpclient.setrestartoffset(remotesize);
        inputstream inputstream = new fileinputstream(raf.getfd());
        boolean done = ftpclient.storefile(remotefilename, inputstream);
        raf.close();
        inputstream.close();
        if (done) {
            system.out.println("📤 断点续传完成: " + remotefilename);
            return true;
        } else {
            system.err.println("❌ 断点续传失败: " + remotefilename);
            return false;
        }
    } catch (ioexception e) {
        system.err.println("断点续传异常:" + e.getmessage());
        return false;
    }
}
带进度条的上传(使用观察者模式):
import java.util.function.consumer;
public class progressmonitorinputstream extends inputstream {
    private final inputstream inputstream;
    private final long totalbytes;
    private long bytesread = 0;
    private final consumer<long> progresscallback;
    public progressmonitorinputstream(inputstream inputstream, long totalbytes, consumer<long> progresscallback) {
        this.inputstream = inputstream;
        this.totalbytes = totalbytes;
        this.progresscallback = progresscallback;
    }
    @override
    public int read() throws ioexception {
        int b = inputstream.read();
        if (b != -1) {
            bytesread++;
            progresscallback.accept(bytesread);
        }
        return b;
    }
    @override
    public int read(byte[] b, int off, int len) throws ioexception {
        int result = inputstream.read(b, off, len);
        if (result != -1) {
            bytesread += result;
            progresscallback.accept(bytesread);
        }
        return result;
    }
    @override
    public void close() throws ioexception {
        inputstream.close();
    }
}
然后在上传方法中使用:
public boolean uploadwithprogress(string localfilepath, string remotefilename) {
    file localfile = new file(localfilepath);
    if (!localfile.exists()) {
        system.err.println("本地文件不存在:" + localfilepath);
        return false;
    }
    try (fileinputstream fis = new fileinputstream(localfile)) {
        progressmonitorinputstream pmis = new progressmonitorinputstream(
            fis,
            localfile.length(),
            current -> {
                double percent = (double) current / localfile.length() * 100;
                system.out.printf("\r📤 上传进度: %.2f%% (%d/%d bytes)", percent, current, localfile.length());
            }
        );
        boolean done = ftpclient.storefile(remotefilename, pmis);
        system.out.println(); // 换行
        if (done) {
            system.out.println("✅ 上传完成: " + remotefilename);
            return true;
        } else {
            system.err.println("❌ 上传失败: " + remotefilename);
            return false;
        }
    } catch (ioexception e) {
        system.err.println("上传异常:" + e.getmessage());
        return false;
    }
}
调用示例:
uploader.uploadwithprogress("/large/video.mp4", "videos/video.mp4");输出效果:
📤 上传进度: 47.32% (496210944/1048576000 bytes)
异常处理与重试机制
网络不稳定时,ftp 操作可能失败。我们可以加入重试逻辑:
public boolean uploadwithretry(string localfilepath, string remotefilename, int maxretries) {
    for (int attempt = 1; attempt <= maxretries; attempt++) {
        system.out.println("🔄 尝试第 " + attempt + " 次上传...");
        if (uploadfile(localfilepath, remotefilename)) {
            return true;
        }
        if (attempt < maxretries) {
            system.out.println("⏳ " + (5 * attempt) + " 秒后重试...");
            try {
                thread.sleep(5000 * attempt); // 指数退避
            } catch (interruptedexception e) {
                thread.currentthread().interrupt();
                break;
            }
        }
    }
    system.err.println("❌ 达到最大重试次数,放弃上传");
    return false;
}
性能优化建议
- 连接池:频繁创建/销毁连接开销大,建议使用连接池(如 apache commons pool)。
- 批量操作:尽量减少交互次数,比如一次列出多个文件而不是逐个查询。
- 压缩传输:对文本文件启用压缩(需服务器支持)。
- 并发上传:使用多线程同时上传多个文件(注意服务器并发限制)。
安全加固建议
虽然我们已经做了基础安全配置,但仍可进一步加固:
1. 使用 ftps(ftp over ssl)
修改 /etc/vsftpd.conf:
ssl_enable=yes
rsa_cert_file=/etc/ssl/certs/ssl-cert-snakeoil.pem
rsa_private_key_file=/etc/ssl/private/ssl-cert-snakeoil.key
allow_anon_ssl=no
force_local_data_ssl=yes
force_local_logins_ssl=yes
ssl_tlsv1=yes
ssl_sslv2=no
ssl_sslv3=no
java 客户端需改用 ftpsclient:
import org.apache.commons.net.ftp.ftpsclient;
// ...
this.ftpclient = new ftpsclient(true); // true 表示显式 ssl
((ftpsclient) ftpclient).execpbsz(0);
((ftpsclient) ftpclient).execprot("p");
2. 限制用户权限
创建 /etc/vsftpd.userlist 并添加允许登录的用户:
echo "ftpuser" | sudo tee -a /etc/vsftpd.userlist
然后在配置中启用:
userlist_enable=yes
userlist_file=/etc/vsftpd.userlist
userlist_deny=no  # 只允许列表中的用户登录
3. 启用日志审计
确保日志路径存在并定期轮转:
sudo touch /var/log/vsftpd.log
sudo chmod 644 /var/log/vsftpd.log
配置 logrotate(/etc/logrotate.d/vsftpd):
/var/log/vsftpd.log {
    weekly
    missingok
    rotate 12
    compress
    delaycompress
    notifempty
    create 644 root root
}
自动化脚本示例
你可以编写 shell 脚本定时备份网站文件到 ftp:
#!/bin/bash
# backup-to-ftp.sh
date=$(date +%y%m%d_%h%m%s)
backup_dir="/backup"
web_root="/var/www/html"
ftp_server="your.ftp.server"
ftp_user="ftpuser"
ftp_pass="password"
# 创建备份
tar -czf "$backup_dir/website_$date.tar.gz" -c /var/www html
# 上传到 ftp
ftp -n <<eof
open $ftp_server
user $ftp_user $ftp_pass
binary
put $backup_dir/website_$date.tar.gz
bye
eof
# 清理本地7天前的备份
find $backup_dir -name "website_*.tar.gz" -mtime +7 -delete
echo "✅ 备份完成: website_$date.tar.gz"
添加到 crontab:
crontab -e
# 每天凌晨2点执行
0 2 * * * /path/to/backup-to-ftp.sh
🆘 常见问题排查
问题1:530 login incorrect
- 用户名或密码错误
- 用户 shell 被设为
/usr/sbin/nologin→ 改为/bin/bash - 检查
/etc/shells是否包含用户的 shell
问题2:550 permission denied
- 目标目录无写权限 →
chmod 755或chown allow_writeable_chroot=yes未设置- selinux 阻止(centos)→
setsebool -p ftp_home_dir on
问题3:连接超时或卡住
- 防火墙未开放被动模式端口
- 客户端未启用被动模式 →
enterlocalpassivemode() - 网络中间有 nat/代理 → 尝试主动模式(不推荐)
问题4:中文文件名乱码
- 服务器和客户端编码不一致 → 统一使用 utf-8
- 在 java 中设置:
ftpclient.setcontrolencoding("utf-8") - 在 vsftpd.conf 中设置:
utf8_filesystem=yes
总结
通过本文,你已经掌握了:
✅ 在 linux 上安装配置 vsftpd
✅ 创建安全的 ftp 用户和目录结构
✅ 配置防火墙和被动模式
✅ 使用 java 编写功能完整的 ftp 客户端
✅ 实现断点续传、进度监控、自动重试
✅ 安全加固与性能优化技巧
ftp 虽然“古老”,但在自动化部署、文件同步、备份归档等场景中依然高效可靠。结合 java 的强大生态,你可以轻松构建企业级文件传输解决方案。
最后提醒
生产环境中请务必使用 ftps 或 sftp 替代明文 ftp,保护你的数据安全!
以上就是linux配置ftp服务器实现文件上传下载功能的详细内容,更多关于linux配置ftp文件上传下载的资料请关注代码网其它相关文章!


发表评论