页眉和页脚是 word 文档中常用的元素,用于在每一页的顶部或底部显示统一的信息,如文档标题、公司名称、页码等。在处理大量文档或需要批量添加页眉页脚时,手动操作效率较低。使用 python 可以自动化完成这些任务,提高文档处理效率。
本文将介绍如何使用 python 和 free spire.doc 库在 word 文档中添加和设置页眉页脚,包括添加文本、图片、页码,以及设置奇偶页不同的页眉页脚等常见操作。
环境准备
首先需要安装 spire.doc 库:
pip install spire.doc.free
安装完成后,即可在 python 代码中导入并使用相关功能。
基本概念
在开始编写代码之前,需要了解几个基本概念:
- section(节): word 文档由一个或多个节组成,每个节可以有自己的页眉页脚设置
- header(页眉): 位于页面顶部的区域
- footer(页脚): 位于页面底部的区域
- paragraph(段落): 页眉页脚中的内容通过段落来组织和显示
添加基本页眉页脚
下面的示例演示如何为 word 文档添加包含文本和图片的页眉页脚:
from spire.doc import *
from spire.doc.common import *

# 创建文档对象并加载文件
document = document()
document.loadfromfile("sample.docx")

# 获取第一个节
section = document.sections[0]

# 获取页眉和页脚对象
header = section.headersfooters.header
footer = section.headersfooters.footer

# 在页眉中添加段落
headerparagraph = header.addparagraph()

# 添加图片到页眉
headerpicture = headerparagraph.appendpicture("header.png")

# 设置图片大小和位置
headerpicture.width = 40
headerpicture.height = 40
headerpicture.textwrappingstyle = textwrappingstyle.infrontoftext
headerpicture.horizontalalignment = shapehorizontalalignment.left
headerpicture.verticalalignment = shapeverticalalignment.outside

# 添加文本到页眉
text = headerparagraph.appendtext("公司内部文档")
text.characterformat.fontname = "微软雅黑"
text.characterformat.fontsize = 10
text.characterformat.italic = true

# 设置页眉段落右对齐
headerparagraph.format.horizontalalignment = horizontalalignment.right

# 添加下边框线
headerparagraph.format.borders.bottom.bordertype = borderstyle.single
headerparagraph.format.borders.bottom.space = 0.05

# 在页脚中添加段落
footerparagraph = footer.addparagraph()

# 添加页码字段
footerparagraph.appendfield("page number", fieldtype.fieldpage)
footerparagraph.appendtext(" / ")
footerparagraph.appendfield("number of pages", fieldtype.fieldnumpages)

# 设置页脚段落居中对齐
footerparagraph.format.horizontalalignment = horizontalalignment.center

# 保存文档
document.savetofile("headerandfooter.docx", fileformat.docx)
document.close()
以下是生成文档的页眉页脚:
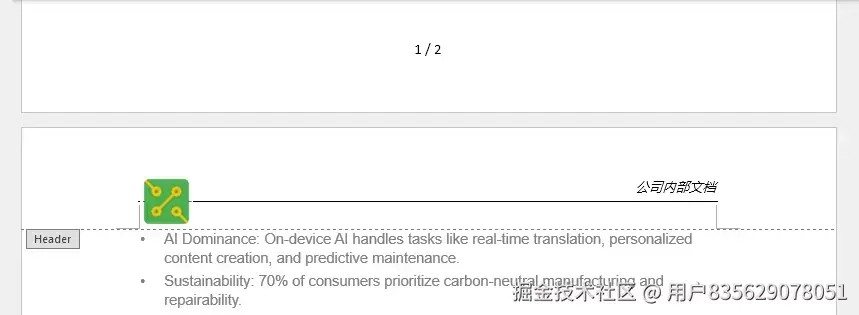
这段代码首先加载一个现有的 word 文档,然后获取文档的第一个节。通过 headersfooters 属性访问页眉和页脚对象,使用 addparagraph() 方法添加段落,再通过 appendpicture() 和 appendtext() 方法添加图片和文本内容。
设置奇偶页不同的页眉页脚
在正式文档中,经常需要为奇数页和偶数页设置不同的页眉页脚,例如奇数页显示章节标题,偶数页显示文档名称。下面的代码演示如何实现这一功能:
from spire.doc import *
from spire.doc.common import *

# 加载文档
doc = document()
doc.loadfromfile("multiplepages.docx")

# 获取第一个节
section = doc.sections[0]

# 启用奇偶页不同的页眉页脚
section.pagesetup.differentoddandevenpagesheaderfooter = true

# 添加奇数页页眉
oddheaderpara = section.headersfooters.oddheader.addparagraph()
oddheadertext = oddheaderpara.appendtext("奇数页页眉 - 章节标题")
oddheaderpara.format.horizontalalignment = horizontalalignment.center
oddheadertext.characterformat.fontname = "微软雅黑"
oddheadertext.characterformat.fontsize = 10

# 添加偶数页页眉
evenheaderpara = section.headersfooters.evenheader.addparagraph()
evenheadertext = evenheaderpara.appendtext("偶数页页眉 - 文档名称")
evenheaderpara.format.horizontalalignment = horizontalalignment.center
evenheadertext.characterformat.fontname = "微软雅黑"
evenheadertext.characterformat.fontsize = 10

# 添加奇数页页脚
oddfooterpara = section.headersfooters.oddfooter.addparagraph()
oddfootertext = oddfooterpara.appendtext("奇数页页脚")
oddfooterpara.format.horizontalalignment = horizontalalignment.center

# 添加偶数页页脚
evenfooterpara = section.headersfooters.evenfooter.addparagraph()
evenfootertext = evenfooterpara.appendtext("偶数页页脚")
evenfooterpara.format.horizontalalignment = horizontalalignment.center

# 保存文档
doc.savetofile("oddandevenheaderfooter.docx", fileformat.docx)
doc.close()
生成的文档页眉页脚如下:

关键步骤是将 differentoddandevenpagesheaderfooter 属性设置为 true,然后分别通过 oddheader、evenheader、oddfooter、evenfooter 属性访问和设置奇偶页的页眉页脚。
设置首页不同的页眉页脚
某些文档需要首页使用特殊的页眉页脚,或者首页不显示页眉页脚。可以通过以下方式实现:
from spire.doc import *
from spire.doc.common import *

# 加载文档
doc = document()
doc.loadfromfile("sample.docx")

# 获取第一个节
section = doc.sections[0]

# 启用首页不同的页眉页脚
section.pagesetup.differentfirstpageheaderfooter = true

# 设置首页页眉(可以为空以实现首页不显示页眉)
firstheaderpara = section.headersfooters.firstpageheader.addparagraph()
firstheadertext = firstheaderpara.appendtext("首页专用页眉")
firstheaderpara.format.horizontalalignment = horizontalalignment.center

# 设置常规页眉(用于除首页外的其他页面)
headerpara = section.headersfooters.header.addparagraph()
headertext = headerpara.appendtext("常规页眉")
headerpara.format.horizontalalignment = horizontalalignment.right

# 保存文档
doc.savetofile("firstpageheader.docx", fileformat.docx)
doc.close()
生成的文档页眉页脚如下:

通过设置 differentfirstpageheaderfooter 属性为 true,然后使用 firstpageheader 和 firstpagefooter 属性设置首页的页眉页脚。
调整页眉页脚高度
页眉页脚的高度可以通过 headerdistance 和 footerdistance 属性进行调整:
from spire.doc import *
from spire.doc.common import *

# 加载文档
doc = document()
doc.loadfromfile("sample.docx")

# 获取第一个节
section = doc.sections[0]

# 设置页眉距离页面顶部的距离(单位:磅)
section.pagesetup.headerdistance = 50

# 设置页脚距离页面底部的距离(单位:磅)
section.pagesetup.footerdistance = 50

# 添加页眉内容
header = section.headersfooters.header
headerpara = header.addparagraph()
headerpara.appendtext("调整高度后的页眉")

# 保存文档
doc.savetofile("adjustedheight.docx", fileformat.docx)
doc.close()
生成的文档如下:

实用技巧
添加页码格式
页码是页脚中最常见的元素,可以添加各种格式的页码:
footerparagraph = footer.addparagraph()

# 添加"第 x 页"格式
footerparagraph.appendtext("第 ")
footerparagraph.appendfield("page number", fieldtype.fieldpage)
footerparagraph.appendtext(" 页")

# 添加"第 x 页,共 y 页"格式
footerparagraph.appendtext("第 ")
footerparagraph.appendfield("page number", fieldtype.fieldpage)
footerparagraph.appendtext(" 页,共 ")
footerparagraph.appendfield("number of pages", fieldtype.fieldnumpages)
footerparagraph.appendtext(" 页")
添加分隔线
为页眉或页脚添加分隔线可以增强视觉效果:
# 页眉底部添加分隔线
headerparagraph.format.borders.bottom.bordertype = borderstyle.single
headerparagraph.format.borders.bottom.color = color.get_gray()
headerparagraph.format.borders.bottom.linewidth = 0.5

# 页脚顶部添加分隔线
footerparagraph.format.borders.top.bordertype = borderstyle.single
footerparagraph.format.borders.top.color = color.get_gray()
footerparagraph.format.borders.top.linewidth = 0.5
设置图片大小和位置
当在页眉页脚中添加图片时,可以精确控制图片的位置:
picture = headerparagraph.appendpicture("logo.png")

# 设置图片大小
headerpicture.width = 40
headerpicture.height = 40

# 设置文字环绕方式
picture.textwrappingstyle = textwrappingstyle.behind

# 设置水平位置
picture.horizontalorigin = horizontalorigin.page
picture.horizontalalignment = shapehorizontalalignment.left

# 设置垂直位置
picture.verticalorigin = verticalorigin.page
picture.verticalalignment = shapeverticalalignment.top
总结
本文介绍了使用 python 在 word 文档中添加和设置页眉页脚的多种方法,包括添加文本和图片、设置奇偶页不同的页眉页脚、首页特殊处理、调整高度等常见操作。通过这些技术,可以高效地批量处理文档,实现页眉页脚的自动化设置。
在实际应用中,可以根据具体需求组合使用这些方法,例如为正式报告创建包含公司 logo、文档标题和页码的专业页眉页脚,或者为书籍排版设置奇偶页不同的页眉页脚样式。掌握这些技巧能够显著提升文档处理的效率和规范性。
以上就是python实现添加和自定义设置word页眉页脚的详细内容,更多关于python word页眉页脚的资料请关注代码网其它相关文章!


发表评论