1 学习目标与重点提示
学习目标:掌握spring boot消息队列与异步通信的核心概念与使用方法,包括消息队列的定义与特点、spring boot与activemq的集成、spring boot与rabbitmq的集成、spring boot与kafka的集成、spring boot异步通信的基本方法、spring boot的实际应用场景,学会在实际开发中处理消息队列与异步通信问题。
重点:消息队列的定义与特点、spring boot与activemq的集成、spring boot与rabbitmq的集成、spring boot与kafka的集成、spring boot异步通信的基本方法、spring boot的实际应用场景。
2 消息队列概述
消息队列是java开发中的重要组件。
2.1 消息队列的定义
定义:消息队列是一种异步通信机制,用于在应用程序之间传递消息。
作用:
- 实现应用程序之间的异步通信。
- 实现应用程序之间的解耦。
- 提高应用程序的性能。
常见的消息队列:
- activemq:apache activemq是一款开源的消息队列。
- rabbitmq:rabbitmq是一款开源的消息队列。
- kafka:apache kafka是一款开源的消息队列。
✅ 结论:消息队列是一种异步通信机制,作用是实现应用程序之间的异步通信、解耦、提高应用程序的性能。
2.2 消息队列的特点
定义:消息队列的特点是指消息队列的特性。
特点:
- 异步通信:消息发送者不需要等待消息接收者的响应。
- 解耦:消息发送者与消息接收者之间不需要直接通信。
- 可靠性:消息队列提供消息的可靠传输。
- 可扩展性:消息队列可以扩展到多个应用程序之间的通信。
✅ 结论:消息队列的特点包括异步通信、解耦、可靠性、可扩展性。
3 spring boot与activemq的集成
spring boot与activemq的集成是java开发中的重要内容。
3.1 集成activemq的步骤
定义:集成activemq的步骤是指使用spring boot与activemq集成的方法。
步骤:
- 创建spring boot项目。
- 添加所需的依赖。
- 配置activemq。
- 创建消息生产者。
- 创建消息消费者。
- 测试应用。
示例:
pom.xml文件中的依赖:
<dependencies>
    <!-- web依赖 -->
    <dependency>
        <groupid>org.springframework.boot</groupid>
        <artifactid>spring-boot-starter-web</artifactid>
    </dependency>

    <!-- activemq依赖 -->
    <dependency>
        <groupid>org.springframework.boot</groupid>
        <artifactid>spring-boot-starter-activemq</artifactid>
    </dependency>

    <!-- 测试依赖 -->
    <dependency>
        <groupid>org.springframework.boot</groupid>
        <artifactid>spring-boot-starter-test</artifactid>
        <scope>test</scope>
    </dependency>
</dependencies>
application.properties文件中的activemq配置:
# 服务器端口
server.port=8080

# activemq配置
spring.activemq.broker-url=tcp://localhost:61616
spring.activemq.user=admin
spring.activemq.password=admin
消息生产者:
import org.springframework.beans.factory.annotation.autowired;
import org.springframework.jms.core.jmstemplate;
import org.springframework.stereotype.component;

@component
public class messageproducer {
    @autowired
    private jmstemplate jmstemplate;

    public void sendmessage(string destination, string message) {
        jmstemplate.convertandsend(destination, message);
        system.out.println("发送消息:" + message);
    }
}
消息消费者:
import org.springframework.jms.annotation.jmslistener;
import org.springframework.stereotype.component;

@component
public class messageconsumer {
    @jmslistener(destination = "test-queue")
    public void receivemessage(string message) {
        system.out.println("接收消息:" + message);
    }
}
控制器类:
import org.springframework.beans.factory.annotation.autowired;
import org.springframework.web.bind.annotation.getmapping;
import org.springframework.web.bind.annotation.requestparam;
import org.springframework.web.bind.annotation.restcontroller;

@restcontroller
public class messagecontroller {
    @autowired
    private messageproducer messageproducer;

    @getmapping("/send")
    public string sendmessage(@requestparam string message) {
        messageproducer.sendmessage("test-queue", message);
        return "消息发送成功";
    }
}
测试类:
import org.junit.jupiter.api.test;
import org.springframework.beans.factory.annotation.autowired;
import org.springframework.boot.test.context.springboottest;
import org.springframework.boot.test.web.client.testresttemplate;
import org.springframework.boot.web.server.localserverport;

import static org.assertj.core.api.assertions.assertthat;

@springboottest(webenvironment = springboottest.webenvironment.random_port)
class activemqapplicationtests {
    @localserverport
    private int port;

    @autowired
    private testresttemplate resttemplate;

    @test
    void contextloads() {
    }

    @test
    void testsendmessage() {
        string message = "hello, activemq!";
        string response = resttemplate.getforobject("http://localhost:" + port + "/send?message=" + message, string.class);
        assertthat(response).contains("消息发送成功");
    }
}
✅ 结论:集成activemq的步骤包括创建spring boot项目、添加所需的依赖、配置activemq、创建消息生产者、创建消息消费者、测试应用。
4 spring boot与rabbitmq的集成
spring boot与rabbitmq的集成是java开发中的重要内容。
4.1 集成rabbitmq的步骤
定义:集成rabbitmq的步骤是指使用spring boot与rabbitmq集成的方法。
步骤:
- 创建spring boot项目。
- 添加所需的依赖。
- 配置rabbitmq。
- 创建消息生产者。
- 创建消息消费者。
- 测试应用。
示例:
pom.xml文件中的依赖:
<dependencies>
    <!-- web依赖 -->
    <dependency>
        <groupid>org.springframework.boot</groupid>
        <artifactid>spring-boot-starter-web</artifactid>
    </dependency>

    <!-- rabbitmq依赖 -->
    <dependency>
        <groupid>org.springframework.boot</groupid>
        <artifactid>spring-boot-starter-amqp</artifactid>
    </dependency>

    <!-- 测试依赖 -->
    <dependency>
        <groupid>org.springframework.boot</groupid>
        <artifactid>spring-boot-starter-test</artifactid>
        <scope>test</scope>
    </dependency>
</dependencies>
application.properties文件中的rabbitmq配置:
# 服务器端口
server.port=8080

# rabbitmq配置
spring.rabbitmq.host=localhost
spring.rabbitmq.port=5672
spring.rabbitmq.username=guest
spring.rabbitmq.password=guest
消息生产者:
import org.springframework.amqp.rabbit.core.rabbittemplate;
import org.springframework.beans.factory.annotation.autowired;
import org.springframework.stereotype.component;

@component
public class messageproducer {
    @autowired
    private rabbittemplate rabbittemplate;

    public void sendmessage(string exchange, string routingkey, string message) {
        rabbittemplate.convertandsend(exchange, routingkey, message);
        system.out.println("发送消息:" + message);
    }
}
消息消费者:
import org.springframework.amqp.rabbit.annotation.rabbitlistener;
import org.springframework.stereotype.component;

@component
public class messageconsumer {
    @rabbitlistener(queues = "test-queue")
    public void receivemessage(string message) {
        system.out.println("接收消息:" + message);
    }
}
rabbitmq配置类:
import org.springframework.amqp.core.binding;
import org.springframework.amqp.core.bindingbuilder;
import org.springframework.amqp.core.directexchange;
import org.springframework.amqp.core.queue;
import org.springframework.context.annotation.bean;
import org.springframework.context.annotation.configuration;

@configuration
public class rabbitmqconfig {
    @bean
    public queue testqueue() {
        return new queue("test-queue", true);
    }

    @bean
    public directexchange testexchange() {
        return new directexchange("test-exchange");
    }

    @bean
    public binding testbinding() {
        return bindingbuilder.bind(testqueue()).to(testexchange()).with("test-routing-key");
    }
}
控制器类:
import org.springframework.beans.factory.annotation.autowired;
import org.springframework.web.bind.annotation.getmapping;
import org.springframework.web.bind.annotation.requestparam;
import org.springframework.web.bind.annotation.restcontroller;

@restcontroller
public class messagecontroller {
    @autowired
    private messageproducer messageproducer;

    @getmapping("/send")
    public string sendmessage(@requestparam string message) {
        messageproducer.sendmessage("test-exchange", "test-routing-key", message);
        return "消息发送成功";
    }
}
测试类:
import org.junit.jupiter.api.test;
import org.springframework.beans.factory.annotation.autowired;
import org.springframework.boot.test.context.springboottest;
import org.springframework.boot.test.web.client.testresttemplate;
import org.springframework.boot.web.server.localserverport;

import static org.assertj.core.api.assertions.assertthat;

@springboottest(webenvironment = springboottest.webenvironment.random_port)
class rabbitmqapplicationtests {
    @localserverport
    private int port;

    @autowired
    private testresttemplate resttemplate;

    @test
    void contextloads() {
    }

    @test
    void testsendmessage() {
        string message = "hello, rabbitmq!";
        string response = resttemplate.getforobject("http://localhost:" + port + "/send?message=" + message, string.class);
        assertthat(response).contains("消息发送成功");
    }
}
✅ 结论:集成rabbitmq的步骤包括创建spring boot项目、添加所需的依赖、配置rabbitmq、创建消息生产者、创建消息消费者、测试应用。
5 spring boot与kafka的集成
spring boot与kafka的集成是java开发中的重要内容。
5.1 集成kafka的步骤
定义:集成kafka的步骤是指使用spring boot与kafka集成的方法。
步骤:
- 创建spring boot项目。
- 添加所需的依赖。
- 配置kafka。
- 创建消息生产者。
- 创建消息消费者。
- 测试应用。
示例:
pom.xml文件中的依赖:
<dependencies>
    <!-- web依赖 -->
    <dependency>
        <groupid>org.springframework.boot</groupid>
        <artifactid>spring-boot-starter-web</artifactid>
    </dependency>

    <!-- kafka依赖 -->
    <dependency>
        <groupid>org.springframework.kafka</groupid>
        <artifactid>spring-kafka</artifactid>
    </dependency>

    <!-- 测试依赖 -->
    <dependency>
        <groupid>org.springframework.boot</groupid>
        <artifactid>spring-boot-starter-test</artifactid>
        <scope>test</scope>
    </dependency>
</dependencies>
application.properties文件中的kafka配置:
# 服务器端口
server.port=8080

# kafka配置
spring.kafka.bootstrap-servers=localhost:9092
spring.kafka.consumer.group-id=test-group
spring.kafka.consumer.auto-offset-reset=earliest
spring.kafka.consumer.key-deserializer=org.apache.kafka.common.serialization.stringdeserializer
spring.kafka.consumer.value-deserializer=org.apache.kafka.common.serialization.stringdeserializer
spring.kafka.producer.key-serializer=org.apache.kafka.common.serialization.stringserializer
spring.kafka.producer.value-serializer=org.apache.kafka.common.serialization.stringserializer
消息生产者:
import org.springframework.beans.factory.annotation.autowired;
import org.springframework.kafka.core.kafkatemplate;
import org.springframework.stereotype.component;

@component
public class messageproducer {
    @autowired
    private kafkatemplate<string, string> kafkatemplate;

    public void sendmessage(string topic, string message) {
        kafkatemplate.send(topic, message);
        system.out.println("发送消息:" + message);
    }
}
消息消费者:
import org.springframework.kafka.annotation.kafkalistener;
import org.springframework.stereotype.component;

@component
public class messageconsumer {
    @kafkalistener(topics = "test-topic", groupid = "test-group")
    public void receivemessage(string message) {
        system.out.println("接收消息:" + message);
    }
}
控制器类:
import org.springframework.beans.factory.annotation.autowired;
import org.springframework.web.bind.annotation.getmapping;
import org.springframework.web.bind.annotation.requestparam;
import org.springframework.web.bind.annotation.restcontroller;

@restcontroller
public class messagecontroller {
    @autowired
    private messageproducer messageproducer;

    @getmapping("/send")
    public string sendmessage(@requestparam string message) {
        messageproducer.sendmessage("test-topic", message);
        return "消息发送成功";
    }
}
测试类:
import org.junit.jupiter.api.test;
import org.springframework.beans.factory.annotation.autowired;
import org.springframework.boot.test.context.springboottest;
import org.springframework.boot.test.web.client.testresttemplate;
import org.springframework.boot.web.server.localserverport;

import static org.assertj.core.api.assertions.assertthat;

@springboottest(webenvironment = springboottest.webenvironment.random_port)
class kafkaapplicationtests {
    @localserverport
    private int port;

    @autowired
    private testresttemplate resttemplate;

    @test
    void contextloads() {
    }

    @test
    void testsendmessage() {
        string message = "hello, kafka!";
        string response = resttemplate.getforobject("http://localhost:" + port + "/send?message=" + message, string.class);
        assertthat(response).contains("消息发送成功");
    }
}
✅ 结论:集成kafka的步骤包括创建spring boot项目、添加所需的依赖、配置kafka、创建消息生产者、创建消息消费者、测试应用。
6 spring boot异步通信的基本方法
spring boot异步通信的基本方法包括使用@async注解、使用completablefuture、使用消息队列。
6.1 使用@async注解
定义:使用@async注解是指使用spring boot异步通信的基本方法之一。
作用:
- 实现异步通信。
- 提高应用程序的性能。
示例:
pom.xml文件中的依赖:
<dependencies>
    <!-- web依赖 -->
    <dependency>
        <groupid>org.springframework.boot</groupid>
        <artifactid>spring-boot-starter-web</artifactid>
    </dependency>

    <!-- 测试依赖 -->
    <dependency>
        <groupid>org.springframework.boot</groupid>
        <artifactid>spring-boot-starter-test</artifactid>
        <scope>test</scope>
    </dependency>
</dependencies>
异步配置类:
import org.springframework.context.annotation.configuration;
import org.springframework.scheduling.annotation.enableasync;

@configuration
@enableasync
public class asyncconfig {
}
异步服务类:
import org.springframework.scheduling.annotation.async;
import org.springframework.stereotype.service;

@service
public class asyncservice {
    @async
    public void asyncmethod() {
        system.out.println("异步方法执行:" + thread.currentthread().getname());
    }
}
控制器类:
import org.springframework.beans.factory.annotation.autowired;
import org.springframework.web.bind.annotation.getmapping;
import org.springframework.web.bind.annotation.restcontroller;

@restcontroller
public class asynccontroller {
    @autowired
    private asyncservice asyncservice;

    @getmapping("/async")
    public string asyncmethod() {
        system.out.println("主线程执行:" + thread.currentthread().getname());
        asyncservice.asyncmethod();
        return "异步方法调用成功";
    }
}
测试类:
import org.junit.jupiter.api.test;
import org.springframework.beans.factory.annotation.autowired;
import org.springframework.boot.test.context.springboottest;
import org.springframework.boot.test.web.client.testresttemplate;
import org.springframework.boot.web.server.localserverport;

import static org.assertj.core.api.assertions.assertthat;

@springboottest(webenvironment = springboottest.webenvironment.random_port)
class asyncapplicationtests {
    @localserverport
    private int port;

    @autowired
    private testresttemplate resttemplate;

    @test
    void contextloads() {
    }

    @test
    void testasyncmethod() {
        string response = resttemplate.getforobject("http://localhost:" + port + "/async", string.class);
        assertthat(response).contains("异步方法调用成功");
    }
}
✅ 结论:使用@async注解是指使用spring boot异步通信的基本方法之一,作用是实现异步通信、提高应用程序的性能。
6.2 使用completablefuture
定义:使用completablefuture是指使用spring boot异步通信的基本方法之一。
作用:
- 实现异步通信。
- 提高应用程序的性能。
示例:
控制器类:
import org.springframework.web.bind.annotation.getmapping;
import org.springframework.web.bind.annotation.restcontroller;

import java.util.concurrent.completablefuture;
import java.util.concurrent.executionexception;

@restcontroller
public class completablefuturecontroller {
    @getmapping("/completablefuture")
    public string completablefuture() throws executionexception, interruptedexception {
        system.out.println("主线程执行:" + thread.currentthread().getname());

        completablefuture<void> future = completablefuture.runasync(() -> {
            system.out.println("异步方法执行:" + thread.currentthread().getname());
        });

        future.get();
        return "completablefuture调用成功";
    }
}
测试类:
import org.junit.jupiter.api.test;
import org.springframework.beans.factory.annotation.autowired;
import org.springframework.boot.test.context.springboottest;
import org.springframework.boot.test.web.client.testresttemplate;
import org.springframework.boot.web.server.localserverport;

import static org.assertj.core.api.assertions.assertthat;

@springboottest(webenvironment = springboottest.webenvironment.random_port)
class completablefutureapplicationtests {
    @localserverport
    private int port;

    @autowired
    private testresttemplate resttemplate;

    @test
    void contextloads() {
    }

    @test
    void testcompletablefuture() {
        string response = resttemplate.getforobject("http://localhost:" + port + "/completablefuture", string.class);
        assertthat(response).contains("completablefuture调用成功");
    }
}
✅ 结论:使用completablefuture是指使用spring boot异步通信的基本方法之一,作用是实现异步通信、提高应用程序的性能。
7 spring boot的实际应用场景
在实际开发中,spring boot消息队列与异步通信的应用场景非常广泛,如:
- 实现用户注册的异步处理。
- 实现订单的异步处理。
- 实现邮件发送的异步处理。
- 实现日志的异步处理。
示例:
import org.springframework.beans.factory.annotation.autowired;
import org.springframework.boot.springapplication;
import org.springframework.boot.autoconfigure.springbootapplication;
import org.springframework.scheduling.annotation.enableasync;
import org.springframework.scheduling.annotation.async;
import org.springframework.stereotype.service;
import org.springframework.web.bind.annotation.getmapping;
import org.springframework.web.bind.annotation.restcontroller;
@springbootapplication
@enableasync
public class userregistrationapplication {
public static void main(string[] args) {
springapplication.run(userregistrationapplication.class, args);
}
}
@service
class userregistrationservice {
@async
public void sendwelcomeemail(string email) {
system.out.println("发送欢迎邮件:" + email);
try {
thread.sleep(2000);
} catch (interruptedexception e) {
e.printstacktrace();
}
system.out.println("邮件发送成功:" + email);
}
}
@restcontroller
class userregistrationcontroller {
@autowired
private userregistrationservice userregistrationservice;
@getmapping("/register")
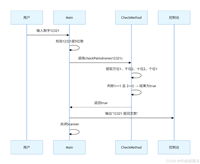
public string registeruser(string email) {
system.out.println("用户注册:" + email);
userregistrationservice.sendwelcomeemail(email);
return "用户注册成功";
}
}
// 测试类
@springboottest(webenvironment = springboottest.webenvironment.random_port)
class userregistrationapplicationtests {
@localserverport
private int port;
@autowired
private testresttemplate resttemplate;
@test
void contextloads() {
}
@test
void testregisteruser() {
string email = "test@example.com";
string response = resttemplate.getforobject("http://localhost:" + port + "/register?email=" + email, string.class);
assertthat(response).contains("用户注册成功");
}
}
输出结果:
访问http://localhost:8080/register?email=test@example.com:返回用户注册成功。
控制台输出:
用户注册:test@example.com
发送欢迎邮件:test@example.com
邮件发送成功:test@example.com
✅ 结论:在实际开发中,spring boot消息队列与异步通信的应用场景非常广泛,需要根据实际问题选择合适的异步通信方法。
总结
本章我们学习了spring boot消息队列与异步通信,包括消息队列的定义与特点、spring boot与activemq的集成、spring boot与rabbitmq的集成、spring boot与kafka的集成、spring boot异步通信的基本方法、spring boot的实际应用场景,学会了在实际开发中处理消息队列与异步通信问题。其中,消息队列的定义与特点、spring boot与activemq的集成、spring boot与rabbitmq的集成、spring boot与kafka的集成、spring boot异步通信的基本方法、spring boot的实际应用场景是本章的重点内容。从下一章开始,我们将学习spring boot的其他组件、微服务等内容。
到此这篇关于springboot实现消息队列与异步通信的文章就介绍到这了,更多相关springboot 消息队列与异步通信内容请搜索代码网以前的文章或继续浏览下面的相关文章希望大家以后多多支持代码网!


发表评论