技术栈与依赖
本工具使用了以下 python 库:
pillow:用于图片处理(读写、滤镜、透明通道等)。numpy:矩阵计算,加快图像运算。imageio:将图片序列生成 gif。ttkbootstrap:美化版 tkinter gui,操作友好。tkinter:基础 gui 框架,用于文件选择和交互。
安装依赖:
pip install pillow numpy imageio ttkbootstrap
核心思路
- 生成光条 mask 通过数学函数生成一个沿对角线扫过的光条掩码,并支持调节宽度、角度和多光源叠加效果。
- 叠加光条到原图 使用 numpy 对图片像素做线性叠加,让光条有柔和的渐变效果,并支持调整亮度和透明度。
- 生成多帧 gif 将每一帧的光条位置稍微移动,然后利用
imageio保存成 gif,实现光条流动的效果。
关键代码示例
生成光条掩码
def make_sweep_mask(size, progress, offset=0.0, width_px=25):
    w, h = size
    diag = int((w**2 + h**2)**0.5 * 1.3)
    x = np.linspace(-1.5, 1.5, diag)
    y = np.linspace(-1.5, 1.5, diag)
    xx, yy = np.meshgrid(x, y)

    rad = np.deg2rad(35)  # 光条角度
    xr = xx * np.cos(rad) + yy * np.sin(rad)
    center = progress * 2 - 1 + offset
    dist = np.abs(xr - center)

    mask = np.exp(-(dist / (width_px / min(w, h))) ** 2)
    return image.fromarray((mask * 255).astype(np.uint8), 'l').crop((diag-w)//2, (diag-h)//2, (diag+w)//2, (diag+h)//2)
光条叠加
def apply_sweep(base_img, frame_index, width_px=25):
    mask = make_sweep_mask(base_img.size, frame_index / (frames - 1), width_px=width_px)
    mask = mask.filter(imagefilter.gaussianblur(max(1, int(min(base_img.size)*0.03))))
    alpha = np.clip(np.array(mask)/255*1.5, 0, 1)
    base_arr = np.array(base_img.convert("rgba"), dtype=np.float32)
    out_rgb = base_arr[..., :3] + alpha[..., none] * (255 - base_arr[..., :3])
    return image.fromarray(np.dstack([out_rgb, base_arr[...,3]]).astype(np.uint8), "rgba")
批量生成 gif
def generate_gif_batch():
    file_paths = filedialog.askopenfilenames(title="选择图片")
    output_dir = filedialog.askdirectory(title="选择输出文件夹")
    for path in file_paths:
        base = image.open(path).convert("rgba")
        frames = [apply_sweep(base, i) for i in range(frames)]
        out_path = os.path.join(output_dir, os.path.splitext(os.path.basename(path))[0]+"_sweep.gif")
        imageio.mimsave(out_path, frames, duration=float(duration_entry.get()))
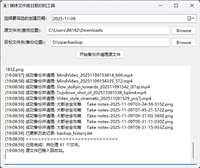
gui 使用界面
工具提供简单易用的 gui:
- 输入光条宽度(px)
- 设置每帧时长(秒)
- 点击按钮选择多张图片并生成 gif
gui 使用 ttkbootstrap 美化,让操作更直观:
root = ttk.window(title="扫光gif生成器", themename="superhero")
width_entry = ttk.entry(root)
duration_entry = ttk.entry(root)
ttk.button(root, text="生成 gif", command=generate_gif_batch).pack()
root.mainloop()
效果展示
使用该工具,只需几秒钟就能将普通图片生成带光条扫过的动态 gif,光条位置、宽度、透明度和帧数都可以灵活调节,非常适合电商主图和社交媒体动图。
总结
这个工具的特点:
- 批量处理:一次选择多张图片即可生成 gif
- 可调光条:宽度、颜色、透明度、模糊可调
- gui 操作简单:无需命令行即可完成全部操作
- 纯 python 实现:跨平台、轻量级
如果你是电商运营或者社媒设计师,想给商品图片加点“亮点”,这个小工具绝对值得一试。
到此这篇关于用python批量生成炫酷扫光gif动效效果的文章就介绍到这了,更多相关python炫酷扫光gif动效内容请搜索代码网以前的文章或继续浏览下面的相关文章希望大家以后多多支持代码网!


发表评论