1. 简介
在springboot应用程序中,数据验证是确保应用程序健壮性和安全性的关键环节。
spring validator提供了强大的验证功能,而分组校验则允许我们根据不同的场景对同一个对象进行不同的验证。
本文将详细介绍如何在springboot中使用validator完成分组校验,包括两种主要的实现方法。
2. 环境准备
2.1 依赖配置
首先,确保你的项目中包含了必要的依赖。在pom.xml文件中添加以下依赖:
<dependency>
    <groupid>org.springframework.boot</groupid>
    <artifactid>spring-boot-starter-validation</artifactid>
</dependency>
2.2 定义验证组
创建接口来定义不同的验证组:
public interface create {}
public interface update {}
3. 创建实体类
使用注解来定义带有分组的验证规则:
import javax.validation.constraints.*;

public class user {
    @notnull(groups = {create.class, update.class})
    private long id;

    @notblank(groups = create.class)
    @size(min = 4, max = 20, groups = {create.class, update.class})
    private string username;

    @notblank(groups = create.class)
    @size(min = 6, max = 20, groups = {create.class, update.class})
    private string password;

    @min(value = 18, groups = create.class)
    private int age;

    @email(groups = {create.class, update.class})
    private string email;

    // getters and setters
}
4. 实现分组校验
4.1 方法一:使用@validated注解
4.1.1 创建控制器
import org.springframework.validation.annotation.validated;
import org.springframework.web.bind.annotation.*;

@restcontroller
@requestmapping("/users")
public class usercontroller {

    @postmapping
    public string createuser(@validated(create.class) @requestbody user user) {
        // 处理用户创建逻辑
        return "user created successfully";
    }

    @putmapping
    public string updateuser(@validated(update.class) @requestbody user user) {
        // 处理用户更新逻辑
        return "user updated successfully";
    }
}
4.1.2 全局异常处理
import org.springframework.http.httpstatus;
import org.springframework.validation.fielderror;
import org.springframework.web.bind.methodargumentnotvalidexception;
import org.springframework.web.bind.annotation.*;

import java.util.hashmap;
import java.util.map;

@controlleradvice
public class globalexceptionhandler {

    @responsestatus(httpstatus.bad_request)
    @exceptionhandler(methodargumentnotvalidexception.class)
    public map<string, string> handlevalidationexceptions(methodargumentnotvalidexception ex) {
        map<string, string> errors = new hashmap<>();
        ex.getbindingresult().getallerrors().foreach((error) -> {
            string fieldname = ((fielderror) error).getfield();
            string errormessage = error.getdefaultmessage();
            errors.put(fieldname, errormessage);
        });
        return errors;
    }
}
4.2 方法二:使用validateutil
4.2.1 创建validateutil
import javax.validation.constraintviolation;
import javax.validation.validation;
import javax.validation.validator;
import java.util.set;
import java.util.stream.collectors;

public class validateutil {

    private static final validator validator = validation.builddefaultvalidatorfactory().getvalidator();

    public static <t> void validate(t obj, class<?>... groups) {
        set<constraintviolation<t>> violations = validator.validate(obj, groups);
        if (!violations.isempty()) {
            throw new validationexception(violations.stream()
                    .map(v -> v.getpropertypath() + ": " + v.getmessage())
                    .collect(collectors.joining(", ")));
        }
    }

    public static class validationexception extends runtimeexception {
        public validationexception(string message) {
            super(message);
        }
    }
}
4.2.2 在服务层使用validateutil
@service
public class userservice {

    public void createuser(user user) {
        validateutil.validate(user, create.class);
        // 继续处理用户创建逻辑
    }

    public void updateuser(user user) {
        validateutil.validate(user, update.class);
        // 继续处理用户更新逻辑
    }
}
4.2.3 处理validationexception
在全局异常处理器中添加:
@controlleradvice
public class globalexceptionhandler {

    // ... 之前的代码 ...

    @responsestatus(httpstatus.bad_request)
    @exceptionhandler(validateutil.validationexception.class)
    public map<string, string> handlevalidationexception(validateutil.validationexception ex) {
        map<string, string> errors = new hashmap<>();
        errors.put("error", ex.getmessage());
        return errors;
    }
}
5. 比较两种校验方式
使用@validated注解:
- 优点:与spring mvc集成紧密,自动处理验证逻辑
- 缺点:仅限于控制器层使用
使用validateutil.validate():
- 优点:可以在任何层(如服务层)使用,更加灵活
- 缺点:需要手动调用验证方法
6. 测试
使用postman或其他api测试工具来测试你的api:
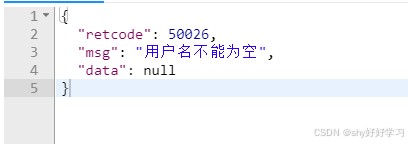
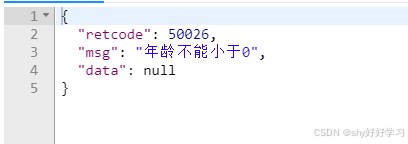
创建用户时,所有字段都必须填写,且符合相应的规则。
更新用户时,id是必须的,但其他字段可以选填,只要填写了就必须符合规则。
7. 总结
本文介绍了在springboot中实现分组校验的两种主要方法:
- 使用
@validated注解在控制器层进行校验 - 使用
validateutil工具类在任意位置进行手动校验
这两种方法各有优势,可以根据具体的业务需求选择使用。通过合理使用验证组和验证方法,我们可以:
- 确保数据的正确性和一致性
- 提高应用程序的健壮性和安全性
- 根据不同的业务场景灵活应用验证规则
- 在早期发现和处理潜在的问题
在实际开发中,建议根据项目的架构和需求,选择合适的验证策略。良好的验证实践不仅可以提高代码质量,还能增强用户体验,是构建可靠软件系统的关键环节。
以上为个人经验,希望能给大家一个参考,也希望大家多多支持代码网。


![Java中将byte[]转MultipartFile的具体实现方式](/images/newimg/nimg6.png)
发表评论