# 为什么选择spring boot与redis整合?
将spring boot与redis整合可以充分利用两者的优势,简化开发并提升应用性能。具体好处包括:
- 缓存支持:使用redis作为缓存层可以极大提高应用的响应速度和可扩展性。
- 会话管理:将用户会话存储在redis中,可以实现分布式会话管理。
- 数据持久性:redis的持久化功能可以确保数据的可靠性。
- 简化配置:spring boot的自动配置和redis starter可以简化配置工作。
了解了这些基础知识后,接下来将详细介绍如何在spring boot项目中整合redis,包括依赖配置、连接设置、基本操作和应用案例。
1. 更新 pom.xml
确保你的项目包含了以下依赖。如果使用 spring initializr 已经添加了 spring-boot-starter-data-redis,这里就无需再次添加。
<dependencies>
    <dependency>
        <groupid>org.springframework.boot</groupid>
        <artifactid>spring-boot-starter-data-redis</artifactid>
    </dependency>
    <dependency>
        <groupid>org.apache.commons</groupid>
        <artifactid>commons-pool2</artifactid>
    </dependency>
</dependencies>
commons-pool2 是用于 lettuce 连接池配置的依赖。
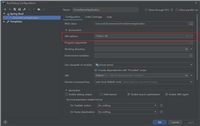
2. 配置application.yml
补充:
- spring boot 1.x 和 spring boot 2.x 中,
spring.redis.host用于配置 redis 连接属性。 - spring boot 3.x 中,
spring.redis.host已经弃用。 - 从 spring boot 2.x 开始,引入了
spring.data.redis作为配置 redis 连接的方式,并且在 spring boot 3.x 中也可以使用spring.data.redis进行配置。
在 src/main/resources 目录下,添加 redis 连接池的配置。
application.yml:
server:
  port: 8080
spring:
  redis:
    host: 127.0.0.1  # 地址
    port: 6379  # 端口号
    database: 0  # 数据库索引(默认为0)
    timeout: 1800000  # 连接超时时间(毫秒)
    lettuce:
      pool:
        max-active: 20  # 连接池最大连接数(使用负值表示没有限制)
        max-wait: -1  # 最大阻塞等待时间(负数表示没有限制)
        max-idle: 5  # 连接池中最大空闲连接
        min-idle: 0  # 连接池中最小空闲连接
3. 创建 redis 配置类
在 com.lei.my_redis.config 包中创建或更新 redisconfig 类,使用连接池配置 lettuceconnectionfactory。
package com.lei.my_redis.config;
import org.apache.commons.pool2.impl.genericobjectpoolconfig;
import org.springframework.cache.annotation.cachingconfigurersupport;
import org.springframework.cache.annotation.enablecaching;
import org.springframework.context.annotation.bean;
import org.springframework.context.annotation.configuration;
import org.springframework.data.redis.connection.redisstandaloneconfiguration;
import org.springframework.data.redis.connection.lettuce.lettuceconnectionfactory;
import org.springframework.data.redis.connection.lettuce.lettucepoolingclientconfiguration;
import org.springframework.data.redis.core.redistemplate;
import org.springframework.data.redis.serializer.stringredisserializer;
@enablecaching  // 开启缓存
@configuration  // 配置类
public class redisconfig extends cachingconfigurersupport {
    /**
     * 配置 redis 连接工厂
     * 意义: lettuceconnectionfactory 是连接 redis 服务器的入口,它使用了 lettuce 客户端,并且配置了连接池来提高性能和资源管理
     * @return lettuceconnectionfactory
     */
    @bean
    public lettuceconnectionfactory redisconnectionfactory() {
        // 配置 redis 服务器的连接信息
        redisstandaloneconfiguration redisstandaloneconfiguration = new redisstandaloneconfiguration();
        redisstandaloneconfiguration.sethostname("localhost");
        redisstandaloneconfiguration.setport(6379);
        // redisstandaloneconfiguration.setpassword("password"); // 取消注释以设置密码
        // 配置连接池
        genericobjectpoolconfig<object> poolconfig = new genericobjectpoolconfig<>();
        poolconfig.setmaxtotal(10);       // 连接池中的最大连接数
        poolconfig.setmaxidle(5);         // 连接池中的最大空闲连接数
        poolconfig.setminidle(1);         // 连接池中的最小空闲连接数
        poolconfig.setmaxwaitmillis(2000); // 连接池获取连接的最大等待时间
        // 创建一个带有连接池配置的 lettuce 客户端配置
        lettucepoolingclientconfiguration lettucepoolingclientconfiguration =
                lettucepoolingclientconfiguration.builder()
                        .poolconfig(poolconfig)
                        .build();
        // 返回带有连接池配置的 redis 连接工厂
        return new lettuceconnectionfactory(redisstandaloneconfiguration, lettucepoolingclientconfiguration);
    }
    /**
     * 配置并返回一个 redistemplate 实例,用于执行 redis 操作
     * 意义: redistemplate 提供了一种高级抽象,使得开发者可以通过模板方法操作 redis,而无需直接处理底层的 redis 命令。
     * 它支持多种 redis 操作,例如值操作、哈希操作、列表操作等
     * @return redistemplate
     */
    @bean
    public redistemplate<string, object> redistemplate() {
        /*
            1.创建 redistemplate: 这是 spring 用于与 redis 交互的核心类,简化了与 redis 的交互。
            2.设置连接工厂: 使用前面定义的 lettuceconnectionfactory。
            3.设置序列化器: 设置键和值的序列化器,这里使用 stringredisserializer 来将键和值序列化为字符串。
         */
        redistemplate<string, object> template = new redistemplate<>();
        template.setconnectionfactory(redisconnectionfactory());  // 设置连接工厂
        template.setkeyserializer(new stringredisserializer());  // 设置键的序列化器
        template.setvalueserializer(new stringredisserializer()); // 设置值的序列化器
        return template;
    }
}
4. redis 操作类
保持 redis 操作类和控制器不变。它们已经实现了基本的 redis 操作。这里只需更新 redisservice 类以支持连接池即可。
package com.lei.my_redis.service;
import org.springframework.beans.factory.annotation.autowired;
import org.springframework.data.redis.core.redistemplate;
import org.springframework.stereotype.service;
import java.util.concurrent.timeunit;
/**
 * redisservice 类提供了简化的 redis 操作接口,用于在 spring boot 应用中存储和检索数据。
 * 它通过 redistemplate 与 redis 服务器交互,执行常见的操作如设置值、获取值、设置值带过期时间和删除值。
 */
@service
public class redisservice {
    /*
        意义: redistemplate 是 spring 提供的一个 redis 操作模板,它抽象了 redis 的底层访问,
        使开发者可以用 java 对象操作 redis。使用 @autowired 注解,spring 自动将配置好的 redistemplate 注入到 redisservice 类中
     */
    @autowired
    private redistemplate<string, object> redistemplate;
    // 作用: 向 redis 中存储一个键值对
    public void setvalue(string key, object value) {
        redistemplate.opsforvalue().set(key, value);
    }
    // 作用: 从 redis 中获取指定键的值
    public object getvalue(string key) {
        return redistemplate.opsforvalue().get(key);
    }
    // 作用: 向 redis 中存储一个键值对,并设置其过期时间
    // timeout 指定时间量,timeunit 指定时间单位
    public void setvaluewithexpiry(string key, object value, long timeout, timeunit timeunit) {
        redistemplate.opsforvalue().set(key, value, timeout, timeunit);
    }
    // 作用: 从 redis 中删除指定键及其对应的值
    public void deletevalue(string key) {
        redistemplate.delete(key);
    }
}
5. 创建控制器
rediscontroller 类的实现保持不变。
package com.lei.my_redis.controller;
import com.lei.my_redis.service.redisservice;
import org.springframework.beans.factory.annotation.autowired;
import org.springframework.web.bind.annotation.getmapping;
import org.springframework.web.bind.annotation.postmapping;
import org.springframework.web.bind.annotation.requestparam;
import org.springframework.web.bind.annotation.restcontroller;
/**
* rediscontroller 是一个 rest 控制器类,用于处理客户端发来的 http 请求,并通过调用 redisservice
* 执行 redis 数据操作。它提供了三个 api 端点:设置值、获取值和删除值
* restcontroller注解作用: 表示这个类是一个 restful 控制器,它的所有方法的返回值都会直接作为 http 响应体返回。
* restcontroller注解意义: 结合 @controller 和 @responsebody 的功能,简化了返回 json 格式数据的开发工作。
*/
@restcontroller
public class rediscontroller {
@autowired
private redisservice redisservice;
/**
* 作用: 处理 http post 请求,设置 redis 中的键值对
* 1.使用 @requestparam 注解获取请求参数 key 和 value
* 2.调用 redisservice.setvalue(key, value) 方法,将 key 和 value 存储到 redis 中
* 3.返回一个简单的字符串 "value set" 作为响应
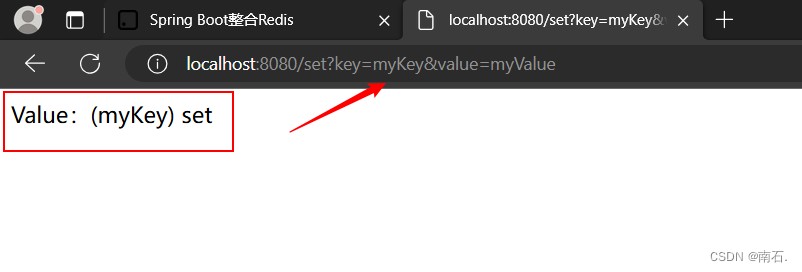
* 请求:post /set?key=mykey&value=myvalue
* 响应:"value set"
* requestparam注解:获取请求参数: 它从 http 请求中获取参数,并将这些参数绑定到控制器方法的参数上
*/
// @postmapping("/set")
@getmapping("/set")
public string setvalue(@requestparam string key, @requestparam string value) {
redisservice.setvalue(key, value);
return "value:(" + key + ") set";
}
/**
* 作用: 处理 http get 请求,从 redis 中获取指定键的值
* 1.使用 @requestparam 注解获取请求参数 key
* 2.调用 redisservice.getvalue(key) 方法,从 redis 中获取 key 对应的值,并将结果转换为 string 类型
* 3.返回获取的值
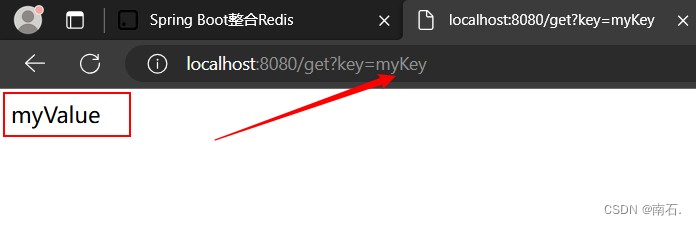
* 请求:get /get?key=mykey
* 响应:"myvalue" // redis 中对应 `mykey` 的值
*/
@getmapping("/get")
public string getvalue(@requestparam string key) {
return (string) redisservice.getvalue(key);
}
/**
* 作用: 处理 http post 请求,删除 redis 中指定键的值
* 1.使用 @requestparam 注解获取请求参数 key
* 2.调用 redisservice.deletevalue(key) 方法,从 redis 中删除 key 对应的键值对
* 3.返回一个简单的字符串 "value deleted" 作为响应
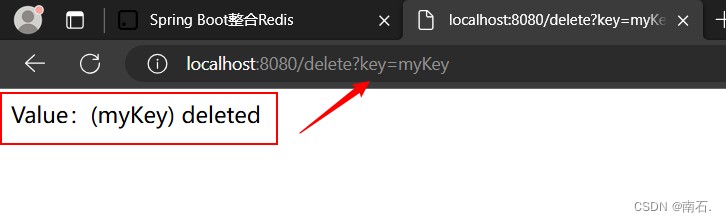
* 请求:post /delete?key=mykey
* 响应:"value deleted"
*/
// @postmapping("/delete")
@getmapping("/delete")
public string deletevalue(@requestparam string key) {
redisservice.deletevalue(key);
return "value:(" + key + ") deleted";
}
}6. 启动应用程序
springbootredisapplication 主类保持不变。
package com.lei.my_redis;
import org.springframework.boot.springapplication;
import org.springframework.boot.autoconfigure.springbootapplication;
@springbootapplication
public class myredisapplication {
    public static void main(string[] args) {
        springapplication.run(myredisapplication.class, args);
    }
}
7. 测试
启动应用程序后,可以选中通过 postman 或浏览器访问以下 url,验证 redis 操作是否成功。
- 设置值:
post http://localhost:8080/set?key=mykey&value=myvalue - 获取值:
get http://localhost:8080/get?key=mykey - 删除值:
post http://localhost:8080/delete?key=mykey
案例1:设置值
案例2:获取值
案例3:删除值
成功在 spring boot 项目中整合了 redis 并配置了连接池。我们使用连接池可以显著提高 redis 操作的性能和资源管理效率。
到此这篇关于使用spring boot框架整合redis的超详细案例教程的文章就介绍到这了,更多相关spring boot整合redis内容请搜索代码网以前的文章或继续浏览下面的相关文章希望大家以后多多支持代码网!


发表评论