nginx (engine x) 是一个高性能的http和反向代理web服务器,同时也提供了imap/pop3/smtp服务。nginx是由伊戈尔·赛索耶夫为俄罗斯访问量第二的rambler.ru站点(俄文:рамблер)开发的,公开版本1.19.6发布于2020年12月15日。
其将源代码以类bsd许可证的形式发布,因它的稳定性、丰富的功能集、简单的配置文件和低系统资源的消耗而闻名。2022年01月25日,nginx 1.21.6发布。
nginx是一款轻量级的web 服务器/反向代理服务器及电子邮件(imap/pop3)代理服务器,在bsd-like 协议下发行。其特点是占有内存少,并发能力强,事实上nginx的并发能力在同类型的网页服务器中表现较好。
一、初识nginx
nginx是什么?
nginx也是一个web服务器,能够支持正向代理(代理用户去访问服务器)、反向代理(代理服务器来让用户访问)、负载均衡(将用户的访问分发给服务器集群)。
conf的作用及读取过程
nginx的系统配置conf文件有什么作用?
用于定义 nginx 的全局和特定站点的行为。
- 有master进程监听到有用户连接请求后,worker进程通过原子操作抢占连接,加入epoll监听,其中worker进程的数量在conf中确定。
- http块下多个的server块,每个server块代表一个虚拟主机,定义虚拟主机的设置,如监听端口、路由规则。
- 在server块中定义分发的服务器ip地址,实现负载均衡。
worker_processes 4;
events {
	worker_connections 1024;
}
http {
	upstream backend {
		server 192.168.159.130:9002 weight=2;//可以是任意的服务器地址  不一定是本机的
		server 192.168.159.130:9003 weight=2;
	}
	server {
		listen 9000;
		location / {//路由规则
            #root /home/king/share/nginx/html9000/;
			proxy_pass http://backend;   # ...转发给 backend 服务器池处理
		}
	}
	server {
		listen 9001;
		location / {
                        root /home/king/share/nginx/html9001/;# ...由本机文件系统处理
                }
	}
	server {
		listen 9002;
		location / {
                        root /home/king/share/nginx/html9002/;
                }
	}
	server {
		listen 9003;
		location / {
                        root /home/king/share/nginx/html9003/;
                }
	}
}
nginx在代码中对conf文件的处理是怎么样的?
nginx 主进程启动,readline逐行读取conf内容。
例如:当读取并解析到
worker_processes 1024;
这行配置时,在内存中会发生以下事情:
- 创建一块内存,并且并将其初始化为一个
ngx_core_conf_t结构体,用一个conf指针指向 - 将conf指针传入
ngx_set_worker_processes函数,这是读到worker_processes后触发的回调函数 - 在函数内部根据"1024",修改
ngx_core_conf_t结构体中worker_processes 字段的值
http状态机
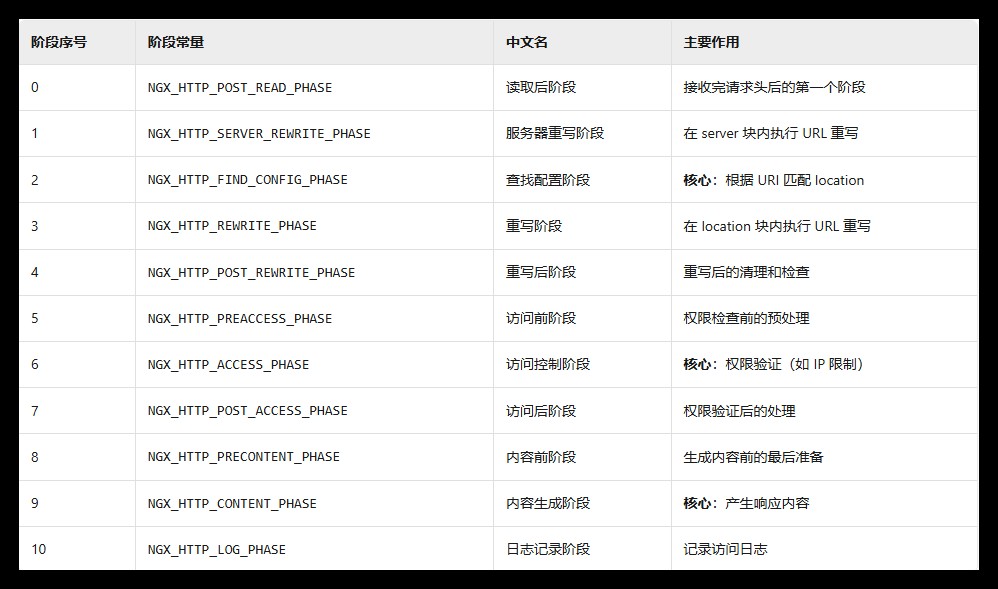
nginx的状态机是什么?
在nginx源码里有作者自定义的11个http状态,也有一份黑白名单,里面限制了某些ip、限制了某些资源的访问、限制了某些用户的访问,这些限制也是存在于特定状态下的。通过明确的阶段划分,nginx 实现了处理流程的标准化和模块化。
nginx惊群
nginx的惊群现象及应对方法是什么?
nginx 的“惊群现象”是指:
在多进程(worker)模式下,多个进程同时等待某个事件(如新连接),当事件发生时,所有进程都被唤醒,但只有一个能成功 accept,其他进程再次休眠,造成资源浪费和性能下降。
应对方法:
在 worker 进程间引入 accept_mutex(接受互斥锁)。只有获得锁的进程才会去 accept 新连接,其他进程等待,避免所有进程一起被唤醒。通过配置 conf中events模块的accept_mutex on实现
二、nginx组件拆出来使用
nginx内部实现了很多组件,在链接对应头文件的基础上,可以直接编写代码,调用其特定的组件比如:内存池、线程池、原子操作、日志、数据结构(ngx_str_t ;ngx_array_t ;ngx_list_t ;ngx_rbtree_t)
下面是内存池、string、日志模块的拆分使用
#include "ngx_config.h"
#include "ngx_conf_file.h"
#include "nginx.h"
#include "ngx_core.h"
#include "ngx_string.h"
#include "ngx_palloc.h"
#include "ngx_array.h"
#include "ngx_hash.h"
#define unused(x)  x=x
volatile ngx_cycle_t  *ngx_cycle;
void ngx_log_error_core(ngx_uint_t level, ngx_log_t *log, ngx_err_t err,
    const char *fmt, ...) {    //日志模块调用
	unused(level);
	unused(log);
	unused(err);
	unused(fmt);
}
void print_pool(ngx_pool_t *pool) {
	printf("\nlast: %p, end: %p\n", pool->d.last, pool->d.end);
}
int main() {
#if 0
	ngx_str_t name = ngx_string("king");    //string数据结构使用
	printf("name --> len: %ld, data: %s\n", name.len, name.data);
#elif 0
	ngx_pool_t *pool = ngx_create_pool(4096, null);    //ngx_pool_t   内存池使用
	print_pool(pool);
	int *p1 = ngx_palloc(pool, sizeof(int));
	print_pool(pool);
	void *p2 = ngx_palloc(pool, 0x10);
	print_pool(pool);
	void *p3 = ngx_palloc(pool, 0x15);
	print_pool(pool);
	ngx_destroy_pool(pool);
#else
#endif
}
三、nginx模块开发
过滤器模块
接收到后端的response,返回response给浏览器客户端
任务:开发一个在 http 响应的 html 内容前插入一段固定的文本(如作者信息和链接)的nginx http filter 模块,ngx_http_prefix_filter_module.c。
流程:在读取到conf的"add_prefix"后,会执行对应的set函数,将对应的值保存到读取到location模块初始化创建的配置结构体里面。当conf文件读取结束,会触发prefix过滤器初始化,将我们的prefix_filter加入到nginx的filter链表里面。当后端传来了http响应,就会触发我们的header_top和body_top过滤器函数,在header函数中里面检查和标记请求,在body函数中加入对应的文本,然后传入下一个过滤器。
#include <ngx_config.h>
#include <ngx_core.h>
#include <ngx_http.h>
typedef struct {
ngx_flag_t enable; # 是否启用模块(0/1)
} ngx_http_prefix_filter_conf_t;
typedef struct {
ngx_int_t add_prefix; #标记是否需要插入前缀(0=不插入,1=需要插入,2=已插入)
} ngx_http_prefix_filter_ctx_t;
三个核心处理函数
static ngx_int_t ngx_http_prefix_filter_init(ngx_conf_t *cf);
static ngx_int_t ngx_http_prefix_filter_header_filter(ngx_http_request_t *r);
static ngx_int_t ngx_http_prefix_filter_body_filter(ngx_http_request_t *r, ngx_chain_t *in);
static ngx_str_t filter_prefix = ngx_string("<h2>author : king</h2><p><a href=\"http://www.0voice.com\">0voice</a></p>");
static void *ngx_http_prefix_filter_create_conf(ngx_conf_t *cf) {
#创建一个独立的配置结构体,并初始化默认值。
ngx_http_prefix_filter_conf_t *conf = ngx_pcalloc(cf->pool, sizeof(ngx_http_prefix_filter_conf_t));
if (conf == null) {
return null;
}
conf->enable = ngx_conf_unset;
return conf;
}
static char *ngx_http_prefix_filter_merge_conf(ngx_conf_t *cf, void *parent, void *child) {#继承配置
ngx_http_prefix_filter_conf_t *prev = (ngx_http_prefix_filter_conf_t*)parent;// 父配置(如 server 块)
ngx_http_prefix_filter_conf_t *conf = (ngx_http_prefix_filter_conf_t*)child;// 子配置(如 location 块)
// 合并规则:如果子配置未设置,则继承父配置的值
ngx_conf_merge_value(conf->enable, prev->enable, 0);
return ngx_conf_ok;
}
static ngx_command_t ngx_http_prefix_filter_commands[] = {
#conf中可用的指令
{
ngx_string("add_prefix"), # 指令名
ngx_http_main_conf|ngx_http_srv_conf|ngx_http_loc_conf|ngx_http_lmt_conf|ngx_conf_flag,#指令可能出现的在conf中的部分
ngx_conf_set_flag_slot, #遇到命令的时候执行这个set函数
ngx_http_loc_conf_offset, #读取到conf中add_prefix值后,存储的位置(location 级别)
offsetof(ngx_http_prefix_filter_conf_t, enable), #具体存储在结构体的哪个位置
null
},
ngx_null_command //结尾标识
};
static ngx_http_module_t ngx_http_prefix_filter_module_ctx = {
null,
ngx_http_prefix_filter_init, #读完最后一行conf时执行此回调函数
null, #解析到主模块 执行此回调函数
null, // 初始化主配置
null, #解析到server块 执行此回调函数
null, // server配置继承
ngx_http_prefix_filter_create_conf, #解析到location块 执行此回调函数 会创建一个独立的配置结构体,并初始化默认值
ngx_http_prefix_filter_merge_conf //location配置继承
};
ngx_module_t ngx_http_prefix_filter_module = { #模块属性
ngx_module_v1,
&ngx_http_prefix_filter_module_ctx, #模块上下文
ngx_http_prefix_filter_commands, #模块的命令
ngx_http_module, #模块的类型
null,
null,
null,
null,
null,
null,
null,
ngx_module_v1_padding
};
static ngx_http_output_header_filter_pt ngx_http_next_header_filter;
static ngx_http_output_body_filter_pt ngx_http_next_body_filter;
nginx 处理 http 响应时,会依次调用两类 filter:header filter:处理响应头;body filter:处理响应体(如修改 html 内容)。这些 filter 以链表形式组织,下面是头插法插入我们的header filter与body filter。
static ngx_int_t ngx_http_prefix_filter_init(ngx_conf_t *cf) {
ngx_http_next_header_filter = ngx_http_top_header_filter;
ngx_http_top_header_filter = ngx_http_prefix_filter_header_filter;
ngx_http_next_body_filter = ngx_http_top_body_filter;
ngx_http_top_body_filter = ngx_http_prefix_filter_body_filter;
return ngx_ok;
}
static ngx_int_t ngx_http_prefix_filter_header_filter(ngx_http_request_t *r) {
#检查并标记请求
ngx_http_prefix_filter_ctx_t *ctx;
ngx_http_prefix_filter_conf_t *conf;
if (r->headers_out.status != ngx_http_ok) {
return ngx_http_next_header_filter(r);
}
// 获取模块配置
ctx = ngx_http_get_module_ctx(r, ngx_http_prefix_filter_module);
if (ctx) {
return ngx_http_next_header_filter(r);
}
// 检查是否已处理过(防止重复处理)
conf = ngx_http_get_module_loc_conf(r, ngx_http_prefix_filter_module);
if (conf == null) {
return ngx_http_next_header_filter(r);
}
if (conf->enable == 0) {
return ngx_http_next_header_filter(r);
}
// 为需要加入的前缀 分配空间,随后把这个指针和当前的http请求绑定
ctx = ngx_pcalloc(r->pool, sizeof(ngx_http_prefix_filter_ctx_t));
if (ctx == null) {
return ngx_error;
}
ctx->add_prefix = 0;
ngx_http_set_ctx(r, ctx, ngx_http_prefix_filter_module);
// 仅对 text/html 响应插入前缀
if (r->headers_out.content_type.len >= sizeof("text/html") - 1
&& ngx_strncasecmp(r->headers_out.content_type.data, (u_char*)"text/html", sizeof("text/html")-1) == 0) {
ctx->add_prefix = 1;// 标记需要插入前缀
if (r->headers_out.content_length_n > 0) {
r->headers_out.content_length_n += filter_prefix.len;// 修正 content-length
}
}
return ngx_http_prefix_filter_header_filter(r);
}
static ngx_int_t ngx_http_prefix_filter_body_filter(ngx_http_request_t *r, ngx_chain_t *in) {
#插入前缀内容
ngx_http_prefix_filter_ctx_t *ctx = ngx_http_get_module_ctx(r, ngx_http_prefix_filter_module);
if (ctx == null || ctx->add_prefix != 1) {
return ngx_http_next_body_filter(r, in);
}
#标记已处理
ctx->add_prefix = 2;
# 创建包含前缀内容的缓冲区,存放预设的前缀文本(filter_prefix)
ngx_buf_t *b = ngx_create_temp_buf(r->pool, filter_prefix.len);
b->start = b->pos = filter_prefix.data;
b->last = b->pos + filter_prefix.len;
# 将前缀缓冲区插入到响应体链表的头部
ngx_chain_t *cl = ngx_alloc_chain_link(r->pool);
cl->buf = b;
cl->next = in;
return ngx_http_next_body_filter(r, cl);
}编写ngx_http_prefix_filter_module.c后,还需要在同一目录下编写config文件,让nginx识别到这个模块。
#模块的名字
ngx_addon_name=ngx_http_prefix_filter_module
#makefile中的关键字  在其后面加上我们的库
http_filter_modules="$http_filter_modules ngx_http_prefix_filter_module"
#源文件的路径
ngx_addon_srcs="$ngx_addon_srcs $ngx_addon_dir/ngx_http_prefix_filter_module.c"
handler模块
接收浏览器客户端请求,直接返回请求给浏览器客户端
任务:统计页面访问次数,可以直接在nginx上通过handler模块计数,因为所有的数据都会经过nginx,可以统计后直接返回给客户端。
流程:在conf文件中读取到关键词"count",执行对应的set函数,每执行一次,都会设置一个handler函数,还会创建一个共享内存区,并且指定对应的回调init函数。回调init函数会在nginx启动和reload的时候执行。handler函数的执行时机是当客户端请求发送来的时候,每来一个请求,都会执行handler函数。在handler函数里面,就能拿到请求方的ip地址,根据ip的最后一位1-255,search查找ngx_rbtree是否有相同节点,决定是否插入。通过encode_page函数组织html网页,遍历ngx_rbtree获取总访问次数,将内容都写入。最后组织一个header和body,返回给客户端。
亮点:采用ngx_rbtree增强健壮性,增加slab共享内存,解决多进程间通信的问题。所有 worker 进程都能访问同一份计数数据,通过slab自带的锁依次通过lookup函数遍历红黑树
代码
#include <ngx_http.h>
#include <ngx_config.h>
#include <ngx_core.h>
/*
#include <arpa/inet.h>
#include <netinet/in.h>
*/
#define enable_rbtree	1
#读到关键字的时候调用 用于指定handler函数 和 创建共享内存区并指定其初始化回调函数
static char *ngx_http_pagecount_set(ngx_conf_t *cf, ngx_command_t *cmd, void *conf);
#有请求的时候调用,加锁统计当前客户端 ip 的访问次数,并生成统计页面返回给用户
static ngx_int_t ngx_http_pagecount_handler(ngx_http_request_t *r);
#读到location模块调用,为每个 location 创建并初始化配置结构体
static void  *ngx_http_pagecount_create_location_conf(ngx_conf_t *cf);
#开启/reload nginx时候调用,初始化共享内存区的回调函数
static ngx_int_t ngx_http_pagecount_shm_init (ngx_shm_zone_t *zone, void *data);
#在handler中的lookup函数中调用,自定义红黑树的插入规则
static void ngx_http_pagecount_rbtree_insert_value(ngx_rbtree_node_t *temp,
        ngx_rbtree_node_t *node, ngx_rbtree_node_t *sentinel);
#在handler中调用,遍历红黑树统计数量
static int ngx_encode_http_page_rb(ngx_http_pagecount_conf_t *conf, char *html);
#在handler中调用,对于一个新key(ip)的处理
static ngx_int_t ngx_http_pagecount_lookup(ngx_http_request_t *r, ngx_http_pagecount_conf_t *conf, ngx_uint_t key);
static ngx_command_t count_commands[] = {
	{//告诉nginx  conf中的count是关键字,并且指定其处理函数set
		ngx_string("count"),
		ngx_http_loc_conf | ngx_conf_noargs,    //指令可以出现的位置
		ngx_http_pagecount_set,         //读到conf中的count指令时调用
		ngx_http_loc_conf_offset,
		0, null
	},
	ngx_null_command
};
static ngx_http_module_t count_ctx = {
	null,
	null,
    //没用上了 因为handler和共享内存池(包括红黑树)都在set函数里创建并且绑定回调了,nginx启动的时候会自动调用回调
	null,
	null,
	null,
	null,
	ngx_http_pagecount_create_location_conf,	//读到location配置时调用,确保每个 location 都有独立的配置空间
	null,
};
//ngx_http_count_module   最先编写的内容
ngx_module_t ngx_http_pagecount_module = {
	ngx_module_v1,
	&count_ctx,
	count_commands,
	ngx_http_module,
	null,
	null,
	null,
	null,
	null,
	null,
	null,
	ngx_module_v1_padding
};
typedef struct {
	int count;
} ngx_http_pagecount_node_t;
typedef struct {	//共享内存中的 “数据区”红黑树
	ngx_rbtree_t rbtree;
	ngx_rbtree_node_t sentinel;
} ngx_http_pagecount_shm_t;
typedef struct	//location 级别的配置结构体
{
    ssize_t shmsize;
    ngx_slab_pool_t *shpool;
    ngx_http_pagecount_shm_t *sh;
} ngx_http_pagecount_conf_t;
ngx_int_t ngx_http_pagecount_shm_init (ngx_shm_zone_t *zone, void *data) {
//zone:nginx 共享内存区对象,包含分配好的内存地址等信息。
//data:上一次初始化时的配置数据
	ngx_http_pagecount_conf_t *conf;
	ngx_http_pagecount_conf_t *oconf = data;
	conf = (ngx_http_pagecount_conf_t*)zone->data;
	if (oconf) {//已经初始化过了  复用红黑树和 slab 内存池指针
		conf->sh = oconf->sh;
		conf->shpool = oconf->shpool;
		return ngx_ok;
	}
	//没初始化过  新建红黑树和 slab 内存池
	conf->shpool = (ngx_slab_pool_t*)zone->shm.addr;
	conf->sh = ngx_slab_alloc(conf->shpool, sizeof(ngx_http_pagecount_shm_t));
	if (conf->sh == null) {
		return ngx_error;
	}
    //绑定红黑树  到nginx内置new slab 内存池
	conf->shpool->data = conf->sh;
	//初始化红黑树
	ngx_rbtree_init(&conf->sh->rbtree, &conf->sh->sentinel,
		ngx_http_pagecount_rbtree_insert_value);
	return ngx_ok;
}
static char *ngx_http_pagecount_set(ngx_conf_t *cf, ngx_command_t *cmd, void *conf) {
	ngx_shm_zone_t *shm_zone;
	ngx_str_t name = ngx_string("pagecount_slab_shm");
	ngx_http_pagecount_conf_t *mconf = (ngx_http_pagecount_conf_t*)conf;
    //创建nginx内置的配置结构体corecf
	ngx_http_core_loc_conf_t *corecf;
	mconf->shmsize = 1024*1024;
    //创建一个名为 pagecount_slab_shm 的共享内存区(通过ngx内置的共享内存管理函数  )
	shm_zone = ngx_shared_memory_add(cf, &name, mconf->shmsize, &ngx_http_pagecount_module);
	if (null == shm_zone) {
		return ngx_conf_error;
	}
	//把创建的共享内存区初始化
	shm_zone->init = ngx_http_pagecount_shm_init;
	shm_zone->data = mconf;
    //获取nginx内置的配置空间,在里面设置handler,让nginx知道遇到http请求时调用我们写的处理函数
	corecf = ngx_http_conf_get_module_loc_conf(cf, ngx_http_core_module);
	corecf->handler = ngx_http_pagecount_handler;
	return ngx_conf_ok;
}
void  *ngx_http_pagecount_create_location_conf(ngx_conf_t *cf) {
//为每个 location 创建并初始化配置结构体
	ngx_http_pagecount_conf_t *conf;
	conf = ngx_palloc(cf->pool, sizeof(ngx_http_pagecount_conf_t));
	if (null == conf) {
		return null;
	}
	conf->shmsize = 0;
	return conf;
}
static void
ngx_http_pagecount_rbtree_insert_value(ngx_rbtree_node_t *temp,
        ngx_rbtree_node_t *node, ngx_rbtree_node_t *sentinel)
{
//自定义红黑树的插入规则,据节点的 key(ip 地址的数值)决定插入到树的哪个位
   ngx_rbtree_node_t **p;
    for (;;)
    {
        if (node->key < temp->key)
        {
            p = &temp->left;
        }
        else if (node->key > temp->key) {
           	p = &temp->right;
        }
        else
        {
          	return ;
        }
        if (*p == sentinel)
        {
            break;
        }
        temp = *p;
    }
    *p = node;
    node->parent = temp;
    node->left = sentinel;
    node->right = sentinel;
    ngx_rbt_red(node);
}
static ngx_int_t ngx_http_pagecount_lookup(ngx_http_request_t *r, ngx_http_pagecount_conf_t *conf, ngx_uint_t key) {
//在红黑树中查找指定 key(ip),如果找到则计数加一;如果没找到则插入新节点并初始化计数为 1
	ngx_rbtree_node_t *node, *sentinel;
	node = conf->sh->rbtree.root;
	sentinel = conf->sh->rbtree.sentinel;
	ngx_log_error(ngx_log_emerg, r->connection->log, ngx_errno, " ngx_http_pagecount_lookup 111 --> %x\n", key);
	while (node != sentinel) {
		if (key < node->key) {
			node = node->left;
			continue;
		} else if (key > node->key) {
			node = node->right;
			continue;
		} else { // key == node
			node->data ++;
			return ngx_ok;
		}
	}
	ngx_log_error(ngx_log_emerg, r->connection->log, ngx_errno, " ngx_http_pagecount_lookup 222 --> %x\n", key);
	// insert rbtree
	node = ngx_slab_alloc_locked(conf->shpool, sizeof(ngx_rbtree_node_t));
	if (null == node) {
		return ngx_error;
	}
	node->key = key;
	node->data = 1;
	ngx_rbtree_insert(&conf->sh->rbtree, node);
	ngx_log_error(ngx_log_emerg, r->connection->log, ngx_errno, " insert success\n");
	return ngx_ok;
}
static int ngx_encode_http_page_rb(ngx_http_pagecount_conf_t *conf, char *html) {
//遍历红黑树,将所有 ip 及其访问次数以 html 格式输出到字符串 html,用于页面展示
	sprintf(html, "<h1>67777 </h1>");
	strcat(html, "<h2>");
	ngx_rbtree_node_t *node = ngx_rbtree_min(conf->sh->rbtree.root, conf->sh->rbtree.sentinel);
	do {//遍历红黑树节点
		char str[inet_addrstrlen] = {0};
		char buffer[128] = {0};
		sprintf(buffer, "req from : %s, count: %d
",
		inet_ntop(af_inet, &node->key, str, sizeof(str)), node->data);
		strcat(html, buffer);
		node = ngx_rbtree_next(&conf->sh->rbtree, node);
	} while (node);
	strcat(html, "</h2>");
	return ngx_ok;
}
static ngx_int_t ngx_http_pagecount_handler(ngx_http_request_t *r) {
	// http 请求的处理函数,统计当前客户端 ip 的访问次数,并生成统计页面返回给用户
	u_char html[1024] = {0};
	int len = sizeof(html);
	ngx_rbtree_key_t key = 0;
	struct sockaddr_in *client_addr =  (struct sockaddr_in*)r->connection->sockaddr;
	ngx_http_pagecount_conf_t *conf = ngx_http_get_module_loc_conf(r, ngx_http_pagecount_module);
	key = (ngx_rbtree_key_t)client_addr->sin_addr.s_addr;
	ngx_log_error(ngx_log_emerg, r->connection->log, ngx_errno, " ngx_http_pagecount_handler --> %x\n", key);
    //先对共享内存池加锁,保证多进程/多线程安全(共享内存池自带的锁)
	ngx_shmtx_lock(&conf->shpool->mutex);
	ngx_http_pagecount_lookup(r, conf, key);
	ngx_shmtx_unlock(&conf->shpool->mutex);
	ngx_encode_http_page_rb(conf, (char*)html);
	//header
	r->headers_out.status = 200;
	ngx_str_set(&r->headers_out.content_type, "text/html");
	ngx_http_send_header(r);
	//body
	ngx_buf_t *b = ngx_pcalloc(r->pool,  sizeof(ngx_buf_t));
	ngx_chain_t out;
	out.buf = b;
	out.next = null;
	b->pos = html;
	b->last = html+len;
	b->memory = 1;
	b->last_buf = 1;
	return ngx_http_output_filter(r, &out);
}
upstream模块
ginx 的 upstream 模块用于实现反向代理和负载均衡。可以通过配置 upstream 块,将请求分发到多个后端服务器。对于upstream模块,直接用 nginx conf配置实现 自己的upstream,比如:
http {
    //定义了一个后端服务器组,包含两个服务器
	upstream backend {
		server 192.168.159.130:9002 weight=2;//可以是任意的服务器地址  不一定是本机的
		server 192.168.159.130:9003 weight=2;
	}
	server {
		listen 9000;
		location / {//路由规则
            #root /home/king/share/nginx/html9000/;
			proxy_pass http://backend;   # ...转发给 backend 服务器池处理
	}
}
到此这篇关于nginx中间件的文章就介绍到这了,更多相关nginx中间件内容请搜索代码网以前的文章或继续浏览下面的相关文章希望大家以后多多支持代码网!


发表评论