一、前言
pyautogui 让您的 python 脚本控制鼠标和键盘以自动与其他应用程序交互。
| 函数名 | 功能 | |
|---|---|---|
| 基本 | pyautogui.size() | 返回包含分辨率的元组 |
| pyautogui.pause | 每个函数的停顿时间,默认0.1s | |
| pyautogui.failsafe | 是否开启防故障功能,默认true | |
| 键盘 | pyautogui.press('键盘字符') | 按下并松开指定按键 |
| pyautogui.keydown('键盘字符') | 按下指定按键 | |
| pyautogui.keyup('键盘字符') | 松开指定按键 | |
| pyautogui.hotkey('键盘字符1', '键盘字符2') | 按下多个指定键 | |
| 鼠标 | pyautogui.position() | 返回当前鼠标当前位置的元组 |
| pyautogui.moveto(x,y,duration=1) | 按绝对位置移动鼠标并设置移动时间 | |
| pyautogui.moverel(x_rel,y_rel,duration=4) | 按相对位置移动鼠标并设置移动时间 | |
| pyautogui.dragto(x, y, duration=1) | 按绝对位置拖动鼠标并设置移动时间 | |
| pyautogui.dragrel(x_rel, y_rel, duration=4) | 按相对位置拖动鼠标并设置移动时间 | |
| pyautogui.click(x, y) | 鼠标点击指定位置,默认左键 | |
| pyautogui.click(x, y, button='left') | 鼠标单击左键 | |
| pyautogui.click(x, y, button='right') | 鼠标单击右键 | |
| pyautogui.click(x, y, button='middle') | 鼠标单击中间,即滚轮 | |
| pyautogui.doubleclick(10,10) | 鼠标左键双击指定位置 | |
| pyautogui.rightclick(10,10) | 鼠标右键双击指定位置 | |
| pyautogui.middleclick(10,10) | 鼠标中键双击指定位置 | |
| pyautogui.scroll(10) | 鼠标滚轮向上滚动10个单位 |
press(), keydowm(),keyup(),hotkey()支持的有效字符串列表如下:
| 类别 | |
|---|---|
| 字母 | 'a', 'b', 'c', 'd', 'e','f', 'g', 'h', 'i', 'j', 'k', 'l', 'm', 'n', 'o', 'p', 'q', 'r', 's', 't', 'u', 'v', 'w', 'x', 'y', 'z' |
| 数字 | '0', '1', '2', '3', '4', '5', '6', '7', '8', '9' |
| 符号 | '\t', '\n', '\r', ' ', '!', '"', '#', '$', '%', '&', "'", '(', ')', '*', '+', ',', '-', '.', '/', , ':', ';', '<', '=', '>', '?', '@', '[', '\\', ']', '^', '_', '`', '{', '|', '}', '~', |
| f键 | 'f1', 'f10', 'f11', 'f12', 'f13', 'f14', 'f15', 'f16', 'f17', 'f18', 'f19', 'f2', 'f20', 'f21', 'f22', 'f23', 'f24', 'f3', 'f4', 'f5', 'f6', 'f7', 'f8', 'f9', |
| 数字键盘 | 'num0', 'num1', 'num2', 'num3', 'num4', 'num5', 'num6', 'num7', 'num8', 'num9', |
| 其他 | 'accept', 'add', 'alt', 'altleft', 'altright', 'apps', 'backspace', 'browserback', 'browserfavorites', 'browserforward', 'browserhome', 'browserrefresh', 'browsersearch', 'browserstop', 'capslock', 'clear', 'convert', 'ctrl', 'ctrlleft', 'ctrlright', 'decimal', 'del', 'delete', 'divide', 'down', 'end', 'enter', 'esc', 'escape', 'execute', 'final', 'fn', 'hanguel', 'hangul', 'hanja', 'help', 'home', 'insert', 'junja', 'kana', 'kanji', 'launchapp1', 'launchapp2', 'launchmail', 'launchmediaselect', 'left', 'modechange', 'multiply', 'nexttrack', 'nonconvert', , 'numlock', 'pagedown', 'pageup', 'pause', 'pgdn', 'pgup', 'playpause', 'prevtrack', 'print', 'printscreen', 'prntscrn', 'prtsc', 'prtscr', 'return', 'right', 'scrolllock', 'select', 'separator', 'shift', 'shiftleft', 'shiftright', 'sleep', 'space', 'stop', 'subtract', 'tab', 'up', 'volumedown', 'volumemute', 'volumeup', 'win', 'winleft', 'winright', 'yen', 'command', 'option', 'optionleft', 'optionright' |
二、基本使用
0. 坐标说明

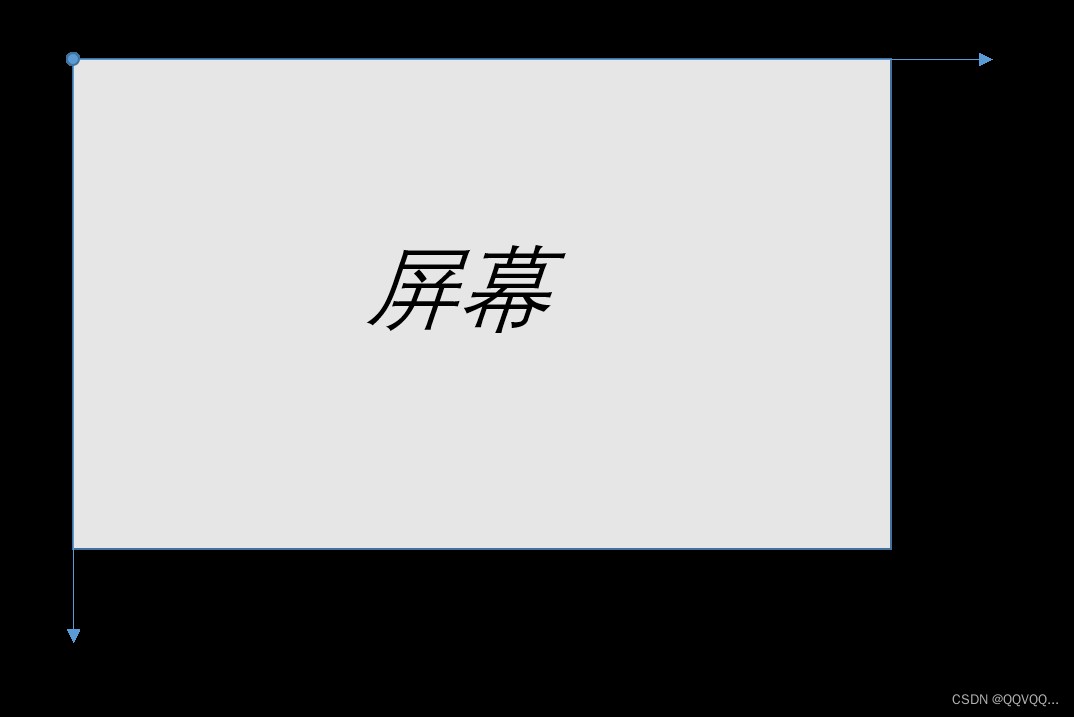
坐标的距离通过像素计算,如果你的屏幕分辨率是1920 x 1080,右下角的像素将是1919, 1079(因为坐标从0开始,而不是1)。
1. 一般功能
① 获取鼠标当前坐标(以像素为单位)
pyautogui.position()
② 获取屏幕尺寸
pyautogui.size()
③ 判断指定坐标 (x,y) 是否在屏幕内
pyautogui.onscreen(x, y)
2. 故障保险
① 控制调用 pyautogui 后的暂停时间(单位:秒)
pyautogui.pause = 2.5
② 当故障安全模式为true时,将鼠标移动到左上角将引发一个 pyautogui.failsafeexception 从而中断程序(默认为:true)
pyautogui.failsafe = true
3. 鼠标控制
① 在 num_second 秒内将鼠标移动到指定坐标
pyautogui.moveto(x, y, duration=num_seconds)
② 相对于鼠标当前位置移动鼠标
pyautogui.moverel(xoffset, yoffset, duration=num_seconds)
③ 在 num_second 秒内将鼠标拖动到指定坐标
pyautogui.dragto(x, y, duration=num_seconds)
④ 相对于鼠标当前位置拖动鼠标
pyautogui.dragrel(xoffset, yoffset, duration=num_seconds)
⑤ 调用click()只会让鼠标在当前位置用左键单击一次,但关键字参数可以改变这一点,button关键字参数可以'left'是、'middle'或'right'。
pyautogui.click(x=movetox, y=movetoy, clicks=num_of_clicks, interval=secs_between_clicks,button = 'left')
⑥ 单独调用指定键的点击事件
pyautogui.rightclick(x=movetox, y=movetoy)
pyautogui.middleclick(x=movetox, y=movetoy)
pyautogui.doubleclick(x=movetox, y=movetoy)
pyautogui.tripleclick(x=movetox, y=movetoy)
⑦ 正数控制滚轮将向上滚动,负数控制滚轮将向下滚动
pyautogui.scroll(amount_to_scroll, x=movetox, y=movetoy)
⑧ 单独调用鼠标的按下和松开事件
pyautogui.mousedown(x=movetox, y=movetoy, button='left')
pyautogui.mouseup(x=movetox, y=movetoy, button='left')
4. 键盘控制
① 在键盘光标处输入指定文本
pyautogui.typewrite('hello world!\n', interval=secs_between_keys)② 传递密钥等
pyautogui.typewrite(['a', 'b', 'c', 'left', 'backspace', 'enter', 'f1'], interval=secs_between_keys)
③ 键盘热键(如ctrl-s或ctrl-shift-1)可以通过将键名称列表传递给hotkey()来完成:
pyautogui.hotkey('ctrl', 'c')  # ctrl-c 复制
pyautogui.hotkey('ctrl', 'v')  # ctrl-v 粘贴
④ 单独调用按钮的点击事件和松开事件:
pyautogui.keydown(键名称)
pyautogui.keyup(键名称)
5. 消息框函数
如果您需要暂停程序直到用户单击确定,或者想要向用户显示一些信息,则可使用消息框函数。
pyautogui.alert('这将显示带有确定按钮的文本。')
pyautogui.confirm('这将显示带有确定和取消按钮的文本。')
pyautogui.prompt('这样用户就可以输入一个字符串,然后按确定。')
6. 截图功能
① pyautogui使用pillow/pil来存储与图像相关的数据。
pyautogui.screenshot()  # 返回pillow/pil图像对象
pyautogui.screenshot('foo.png')  # 返回pillow/pil图像对象,并将其保存到文件
② 返回在当前界面找到第一个图标位置的元组 (left, top, width, height)
pyautogui.locateonscreen('lookslikethis.png') ③ locateallonscreen()函数将返回屏幕上找到的所有位置的生成器。
>>> for i in pyautogui.locateallonscreen('lookslikethis.png')
...
...
(863, 117, 70, 13)
(623, 137, 70, 13)
(853, 577, 70, 13)
(883, 617, 70, 13)
(973, 657, 70, 13)
(933, 877, 70, 13)>>> list(pyautogui.locateallonscreen('lookslikethis.png'))
[(863, 117, 70, 13), (623, 137, 70, 13), (853, 577, 70, 13), (883, 617, 70, 13), (973, 657, 70, 13), (933, 877, 70, 13)]
④ 返回屏幕上图像所在位置的xy坐标。
>>> pyautogui.locatecenteronscreen('lookslikethis.png') # 返回中心坐标 (898,423)
三、进阶教程
1. 鼠标控制
1.1 pyautogui.size()
返回屏幕的分辨率大小,返回类型为元组。
>>> pyautogui.size()
(1920, 1080)
1.2 pyautogui.position()
返回鼠标光标的当前位置,返回类型为元组。
>>> pyautogui.position()
(187, 567)
1.3 pyautogui.onscreen()
判断指定位置是否在屏幕内,返回类型为布尔型。
>>> pyautogui.onscreen(0, 0)
true
>>> pyautogui.onscreen(0, -1)
false
>>> pyautogui.onscreen(0, 99999999)
false
1.4 pyautogui.move()
移动鼠标光标以当前位置为起点移动指定距离,如果输入 none 则为当前位置的x或y。
>>> pyautogui.moveto(100, 200)   # moves mouse to x of 100, y of 200.
>>> pyautogui.moveto(none, 500)  # moves mouse to x of 100, y of 500.
>>> pyautogui.moveto(600, none)  # moves mouse to x of 600, y of 500.
第三个参数可以设置鼠标移动到指定位置所花费的时间。
>>> pyautogui.moveto(100, 200, 2) # moves mouse to x of 100, y of 200 over 2 seconds
1.5 pyautogui.moveto()
与move()类似,此函数可以按照绝对位置移动鼠标。
>>> pyautogui.moveto(100, 200)  # moves mouse to x of 100, y of 200.
>>> pyautogui.move(0, 50)       # move the mouse down 50 pixels.
>>> pyautogui.move(-30, 0)      # move the mouse left 30 pixels.
>>> pyautogui.move(-30, none)   # move the mouse left 30 pixels.
1.6 pyautogui.drag()
以相对位置拖动鼠标,可指定拖动时按住某个键:'left', 'middle', 'right'。
>>> pyautogui.dragto(100, 200, button='left')     # drag mouse to x of 100, y of 200 while holding down left mouse button
>>> pyautogui.dragto(300, 400, 2, button='left')  # drag mouse to x of 300, y of 400 over 2 seconds while holding down left mouse button
>>> pyautogui.drag(30, 0, 2, button='right')   # drag the mouse left 30 pixels over 2 seconds while holding down the right mouse button
1.7 pyautogui.dragto()
以绝对位置拖动鼠标,可指定拖动时按住某个键:'left', 'middle', 'right'。
1.8 pyautogui.click()
模拟在鼠标当前位置单击鼠标左键。
>>> pyautogui.click()  # click the mouse
>>> pyautogui.click(x=100, y=200)  # move to 100, 200, then click the left mouse button.
>>> pyautogui.click(button='right')  # right-click the mouse
>>> pyautogui.click(clicks=2)  # double-click the left mouse button
>>> pyautogui.click(clicks=2, interval=0.25)  # double-click the left mouse button, but with a quarter second pause in between clicks
>>> pyautogui.click(button='right', clicks=3, interval=0.25)  ## triple-click the right mouse button with a quarter second pause in between clicks
1.9 pyautogui.doubleclick()
模拟双击鼠标左键。
>>> pyautogui.doubleclick() # perform a left-button double click
1.10 pyautogui.tripleclick()
1.11 pyautogui.rightclick()
1.12 pyautogui.mousedown()
按下鼠标
>>> pyautogui.mousedown(); pyautogui.mouseup()  # does the same thing as a left-button mouse click
>>> pyautogui.mousedown(button='right')  # press the right button down
>>> pyautogui.mouseup(button='right', x=100, y=200)  # move the mouse to 100, 200, then release the right button up.
1.13 pyautogui.mouseup()
松开鼠标
1.14 pyautogui.scroll()
滚动鼠标滚轮
>>> pyautogui.scroll(10)   # scroll up 10 "clicks"
>>> pyautogui.scroll(-10)  # scroll down 10 "clicks"
>>> pyautogui.scroll(10, x=100, y=100)  # move mouse cursor to 100, 200, then scroll up 10 "clicks"
1.15 pyautogui.hscroll()
水平滚动鼠标
>>> pyautogui.hscroll(10)   # scroll right 10 "clicks"
>>> pyautogui.hscroll(-10)   # scroll left 10 "clicks"
1.16 pyautogui.vscroll()
垂直滚动鼠标
2. 键盘控制
2.1 pyautogui.write()
键入指定字符串
>>> pyautogui.write('hello world!')                 # prints out "hello world!" instantly
>>> pyautogui.write('hello world!', interval=0.25)  # prints out "hello world!" with a quarter second delay after each character
2.2 pyautogui.press()
按一次指定键
>>> pyautogui.press('enter')  # press the enter key
>>> pyautogui.press('f1')     # press the f1 key
>>> pyautogui.press('left')   # press the left arrow key
2.4 pyautogui.keydown()
按下指定键
2.5 pyautogui.keyup()
松开指定键
2.6 pyautogui.hold()
保持按住某个键并松开
>>> with pyautogui.hold('shift'):
        pyautogui.press(['left', 'left', 'left'])
2.7 pyautogui.hotkey()
实现快捷键
>>> pyautogui.hotkey('ctrl', 'shift', 'esc')3. 消息框函数
pyautogui利用pymsgbox中的消息框函数提供了一种跨平台的纯python方式来显示javascript样式的消息框。提供了四个消息框函数:
3.1 pyautogui.alert()
>>> alert(text='', title='', button='ok')
显示一个简单的消息框,其中包含文本和一个确定按钮。返回单击的按钮的文本。
3.2 pyautogui.confirm()
>>> confirm(text='', title='', buttons=['ok', 'cancel'])
显示带有确定和取消按钮的消息框。可以自定义按钮的数量和文本。返回单击的按钮的文本。
3.3 pyautogui.prompt()
>>> prompt(text='', title='' , default='')
显示带有文本输入和确定和取消按钮的消息框。返回输入的文本,如果单击了取消,则返回none。
3.4 pyautogui.password()
>>> password(text='', title='', default='', mask='*')
显示带有文本输入和确定和取消按钮的消息框。键入的字符显示为*。返回输入的文本,如果单击了取消,则返回none。
4. 截图功能
pyautogui可以截取屏幕截图,将它们保存到文件中,并在屏幕内定位图像。
例如,如果您有一个需要单击的按钮的小图像,并且想要在屏幕上找到它,这是很有用的。这些功能由随pyautogui一起安装的pyscreeze模块提供。
4.1 pyautogui.screenshot()
调用screenshot()将返回一个 image 对象(有关详细信息,请参阅 pillow 或 pil 模块文档)。传递文件名字符串会将屏幕截图保存到文件中,并将其作为 image 对象返回。
>>> import pyautogui
>>> im1 = pyautogui.screenshot()
>>> im2 = pyautogui.screenshot('my_screenshot.png')  # 捕获并保存到本地
>>> im3 = pyautogui.screenshot(region=(0,0, 300, 400))  # 捕获指定范围
4.2 pyautogui.locateonscreen()
获取屏幕坐标。返回值是一个 4 整数元组:(left, top, width, height)。可以传递此元组center()以获取此区域中心的 x 和 y 坐标。
4.3 pyautogui.locatecenteronscreen()
返回在屏幕上找到的第一个实例的中心的 (x, y) 坐标。
4.4 pyautogui.locateallonscreen()
返回一个生成器,该生成器生成(左、上、宽、高)元组。
4.5 pyautogui.pixel()
获取屏幕截图中像素的 rgb 颜色
>>> import pyautogui
>>> im = pyautogui.screenshot()
>>> im.getpixel((100, 200))
(130, 135, 144)
4.6 pyautogui.pixelmatchescolor()
验证单个像素是否与给定像素匹配。
>>> import pyautogui
>>> pyautogui.pixelmatchescolor(100, 200, (130, 135, 144))
true
>>> pyautogui.pixelmatchescolor(100, 200, (0, 0, 0))
false
四、实例
1. 自动点击网页指定图标
参考链接:
import pyautogui
import time

while true:
    # 本页存在指定图标
    if pyautogui.locateonscreen('icon.png'):
        time.sleep(0.5)    # 等待 0.5 秒
        position = pyautogui.center(pyautogui.locateonscreen('icon.png'))    # 寻找图标的中心
        pyautogui.click(position)    # 点击
    # 本页不存在指定图标
    else:
        pyautogui.scroll(-500)    # 滚动鼠标,进入下一页
2. 获取鼠标当前位置
# 案例获取鼠标的位置,方便复制我们定位的鼠标坐标点到代码中
import pyautogui
import time


# 获取鼠标位置
def get_mouse_positon():
  time.sleep(5) # 准备时间
  print('开始获取鼠标位置')
  try:
    for i in range(10):
      # get and print the mouse coordinates.
      x, y = pyautogui.position()
      positionstr = '鼠标坐标点(x,y)为:{},{}'.format(str(x).rjust(4), str(y).rjust(4))
      pix = pyautogui.screenshot().getpixel((x, y)) # 获取鼠标所在屏幕点的rgb颜色
      positionstr += ' rgb:(' + str(pix[0]).rjust(3) + ',' + str(pix[1]).rjust(3) + ',' + str(pix[2]).rjust(
        3) + ')'
      print(positionstr)
      time.sleep(0.5) # 停顿时间
  except:
    print('获取鼠标位置失败')


if __name__ == "__main__":
  get_mouse_positon()
总结
以上为个人经验,希望能给大家一个参考,也希望大家多多支持代码网。


发表评论