工具介绍
这个天气查询工具是一个基于 python 的桌面应用程序,使用了tkinter库来创建图形用户界面(gui),并通过requests库调用 open - meteo api 获取天气数据。它具有赛博朋克风格的界面设计,提供了当前天气信息、15 天天气预报以及详细的天气数据展示,同时还包含温度趋势图表。
工具使用说明
1.界面布局
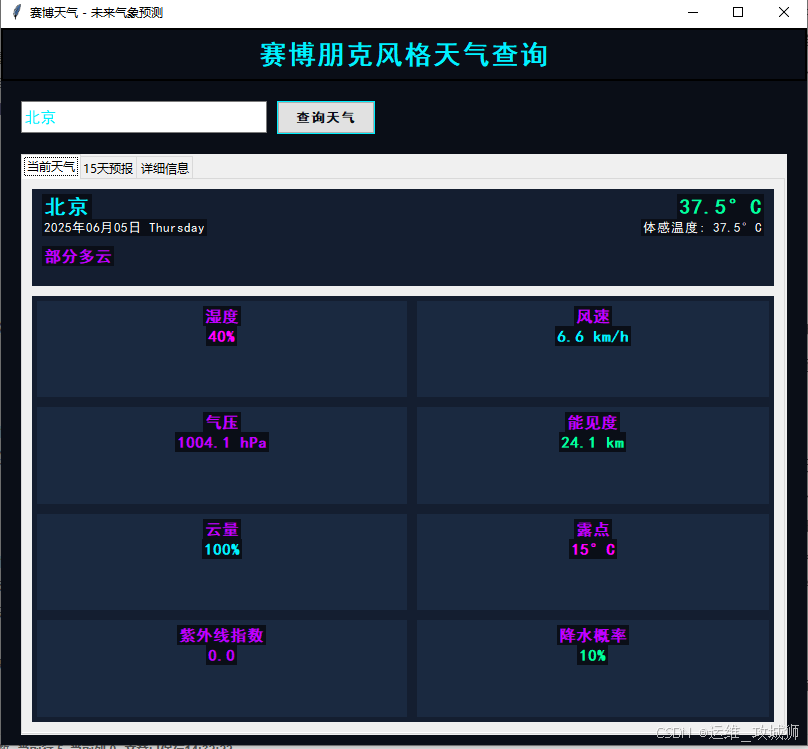
顶部标题栏:显示应用名称 “赛博朋克风格天气查询”。
2.搜索区域
- 输入框:可以输入要查询的城市名称,默认显示为 “北京”。
- 查询按钮:点击该按钮可以查询输入城市的天气信息。
3.标签页
- 当前天气:显示当前城市的天气信息,包括城市名称、日期、天气状况、温度、体感温度以及一些基本的天气数据(如湿度、风速等)。
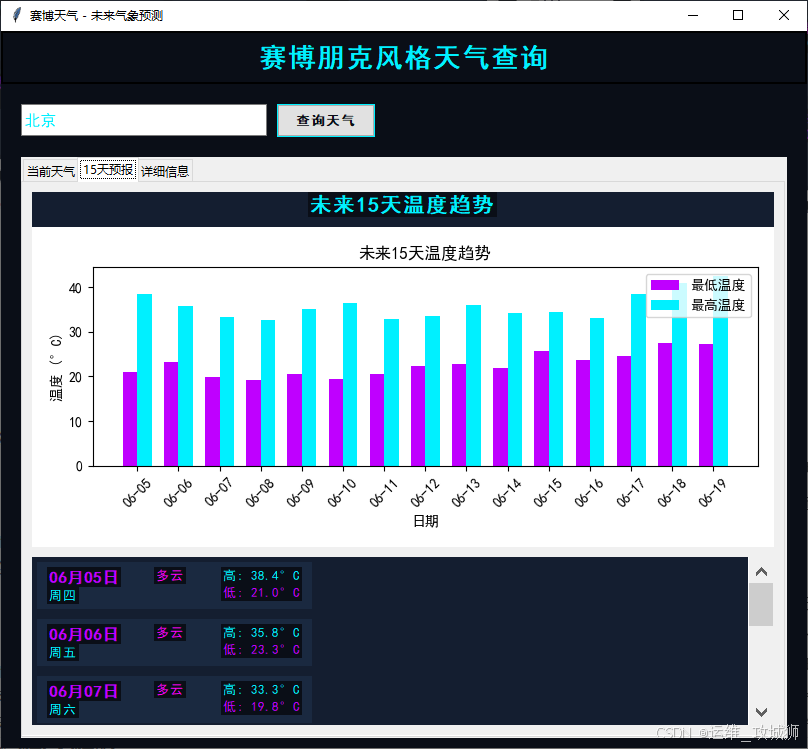
- 15 天预报:包含未来 15 天的温度趋势图表和每天的天气预报卡片,卡片显示日期、星期、天气状况、最高温度和最低温度。
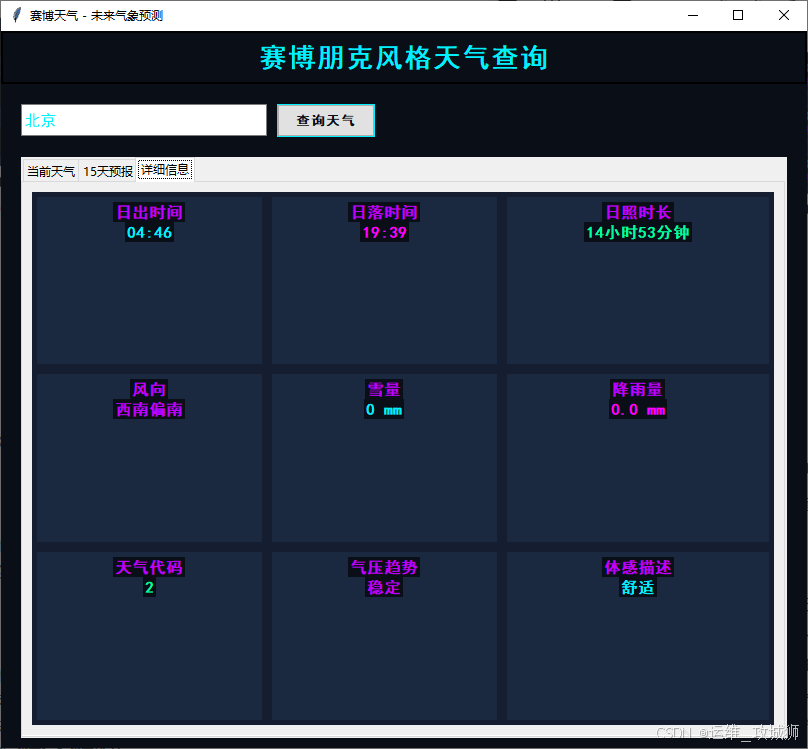
- 详细信息:显示更详细的天气数据,如日出时间、日落时间、日照时长、风向等。
4.查询天气
- 在输入框中输入要查询的城市名称。
- 点击 “查询天气” 按钮。
- 应用会显示加载中指示器,同时在后台线程中获取天气数据。
- 获取数据成功后,更新各个标签页的内容,显示该城市的天气信息;如果获取数据失败,会弹出错误提示框。
5.功能特点
- 多信息展示:提供当前天气、15 天预报和详细天气信息,满足用户对不同时间尺度天气数据的需求。
- 图表可视化:通过matplotlib库绘制未来 15 天的温度趋势图表,直观展示温度变化。
- 赛博朋克风格:使用赛博朋克风格的颜色和字体,界面设计独特。
- 多线程处理:在新线程中获取天气数据,避免阻塞 ui,保证用户交互的流畅性。
- 错误处理:在获取数据或更新界面失败时,会弹出错误提示框,告知用户具体的错误信息。
python脚本内容
import tkinter as tk
from tkinter import ttk, messagebox
import requests
from datetime import datetime, timedelta
import matplotlib.pyplot as plt
from matplotlib.backends.backend_tkagg import figurecanvastkagg
import numpy as np
import threading
# 设置中文字体
plt.rcparams["font.family"] = ["simhei", "wenquanyi micro hei", "heiti tc"]
class weatherapp:
def __init__(self, root):
self.root = root
self.root.title("赛博天气 - 未来气象预测")
self.root.geometry("800x700")
self.root.configure(bg="#0a0e17")
# 赛博朋克风格颜色
self.colors = {
'neon_blue': '#00f0ff',
'neon_purple': '#bf00ff',
'neon_pink': '#ff00ff',
'neon_green': '#00ff9c',
'dark_900': '#0a0e17',
'dark_800': '#141e30',
'dark_700': '#1a2940'
}
# 创建加载中指示器
self.loading_frame = none
self.loading_label = none
# 创建ui
self.create_widgets()
# 初始加载北京天气
self.get_weather("北京")
def create_widgets(self):
# 顶部标题栏
title_frame = tk.frame(self.root, bg=self.colors['dark_900'], bd=2, relief=tk.solid)
title_frame.pack(fill=tk.x, pady=(0, 10))
title_label = tk.label(
title_frame,
text="赛博朋克风格天气查询",
font=("simhei", 20, "bold"),
bg=self.colors['dark_900'],
fg=self.colors['neon_blue'],
bd=0,
highlightthickness=0
)
title_label.pack(pady=10)
# 搜索区域
search_frame = tk.frame(self.root, bg=self.colors['dark_900'])
search_frame.pack(fill=tk.x, padx=20, pady=10)
self.city_entry = ttk.entry(
search_frame,
font=("simhei", 12),
width=30,
background=self.colors['dark_800'],
foreground=self.colors['neon_blue']
)
self.city_entry.pack(side=tk.left, padx=(0, 10), ipady=5)
self.city_entry.insert(0, "北京")
search_btn = ttk.button(
search_frame,
text="查询天气",
command=self.search_weather,
style='neon.tbutton'
)
search_btn.pack(side=tk.left, ipady=5)
# 创建标签页
notebook = ttk.notebook(self.root)
notebook.pack(fill=tk.both, expand=true, padx=20, pady=10)
# 当前天气标签页
current_frame = ttk.frame(notebook)
notebook.add(current_frame, text="当前天气")
# 15天预报标签页
forecast_frame = ttk.frame(notebook)
notebook.add(forecast_frame, text="15天预报")
# 详细信息标签页
details_frame = ttk.frame(notebook)
notebook.add(details_frame, text="详细信息")
# 构建各标签页内容
self.build_current_weather_frame(current_frame)
self.build_forecast_frame(forecast_frame)
self.build_details_frame(details_frame)
# 配置自定义样式
self.configure_styles()
def configure_styles(self):
style = ttk.style()
# 配置tbutton样式
style.configure('tbutton',
font=("simhei", 10),
background=self.colors['dark_800'],
foreground=self.colors['neon_blue'],
borderwidth=1,
relief=tk.raised
)
# 赛博朋克风格按钮
style.configure('neon.tbutton',
font=("simhei", 10, "bold"),
background=self.colors['neon_blue'],
foreground=self.colors['dark_900'],
borderwidth=0,
relief=tk.flat
)
style.map('neon.tbutton',
background=[('active', self.colors['neon_pink'])]
)
# 配置标签样式
style.configure('tlabel',
font=("simhei", 10),
background=self.colors['dark_900'],
foreground="white"
)
# 标题样式
style.configure('title.tlabel',
font=("simhei", 16, "bold"),
foreground=self.colors['neon_blue']
)
# 子标题样式
style.configure('subtitle.tlabel',
font=("simhei", 12, "bold"),
foreground=self.colors['neon_purple']
)
# 数据标签样式
style.configure('data.tlabel',
font=("simhei", 14, "bold"),
foreground="white"
)
# 数据值样式
style.configure('value.tlabel',
font=("simhei", 16, "bold"),
foreground=self.colors['neon_green']
)
# 天气卡片样式
style.configure('weathercard.tframe',
background=self.colors['dark_800']
)
# 详细信息卡片样式
style.configure('detailcard.tframe',
background=self.colors['dark_700']
)
def build_current_weather_frame(self, parent):
# 主天气信息框架
main_info_frame = ttk.frame(parent, style='weathercard.tframe')
main_info_frame.pack(fill=tk.x, padx=10, pady=10, ipady=10)
# 左侧信息
left_frame = ttk.frame(main_info_frame, style='weathercard.tframe')
left_frame.pack(side=tk.left, fill=tk.both, expand=true, padx=10)
self.location_label = ttk.label(left_frame, text="北京市", style='title.tlabel')
self.location_label.pack(anchor=tk.w, pady=(5, 0))
self.date_label = ttk.label(left_frame, text="2023年10月15日 星期日", style='tlabel')
self.date_label.pack(anchor=tk.w)
self.condition_label = ttk.label(left_frame, text="晴朗", style='subtitle.tlabel')
self.condition_label.pack(anchor=tk.w, pady=(10, 0))
# 右侧温度
right_frame = ttk.frame(main_info_frame, style='weathercard.tframe')
right_frame.pack(side=tk.right, fill=tk.both, expand=true, padx=10)
self.temp_label = ttk.label(right_frame, text="22°c", style='value.tlabel')
self.temp_label.pack(anchor=tk.e, pady=(5, 0))
self.feels_like_label = ttk.label(right_frame, text="体感温度: 24°c", style='tlabel')
self.feels_like_label.pack(anchor=tk.e)
# 基本信息网格
grid_frame = ttk.frame(parent, style='weathercard.tframe')
grid_frame.pack(fill=tk.both, expand=true, padx=10, pady=(0, 10))
# 创建信息标签变量列表
self.info_labels = []
for i in range(8):
row = i // 2
col = i % 2
card_frame = ttk.frame(grid_frame, style='detailcard.tframe')
card_frame.grid(row=row, column=col, padx=5, pady=5, sticky="nsew")
# 设置网格权重,使卡片均匀分布
grid_frame.grid_rowconfigure(row, weight=1)
grid_frame.grid_columnconfigure(col, weight=1)
title_label = ttk.label(card_frame, text="", style='subtitle.tlabel')
title_label.pack(pady=(5, 0))
value_label = ttk.label(card_frame, text="", font=("simhei", 12, "bold"))
value_label.pack(pady=(0, 5))
self.info_labels.append((title_label, value_label))
def build_forecast_frame(self, parent):
# 温度趋势图表
chart_frame = ttk.frame(parent, style='weathercard.tframe')
chart_frame.pack(fill=tk.x, padx=10, pady=10, ipady=10)
ttk.label(chart_frame, text="未来15天温度趋势", style='title.tlabel').pack(pady=(0, 10))
# 创建图表
self.fig, self.ax = plt.subplots(figsize=(7, 3), dpi=100)
self.canvas = figurecanvastkagg(self.fig, master=chart_frame)
self.canvas.get_tk_widget().pack(fill=tk.both, expand=true)
# 15天预报网格
forecast_frame = ttk.frame(parent, style='weathercard.tframe')
forecast_frame.pack(fill=tk.both, expand=true, padx=10, pady=(0, 10))
# 创建滚动条
canvas = tk.canvas(forecast_frame, bg=self.colors['dark_800'], highlightthickness=0)
scrollbar = ttk.scrollbar(forecast_frame, orient="vertical", command=canvas.yview)
self.forecast_content = ttk.frame(canvas, style='weathercard.tframe')
self.forecast_content.bind(
"<configure>",
lambda e: canvas.configure(
scrollregion=canvas.bbox("all")
)
)
canvas.create_window((0, 0), window=self.forecast_content, anchor="nw")
canvas.configure(yscrollcommand=scrollbar.set)
canvas.pack(side="left", fill="both", expand=true)
scrollbar.pack(side="right", fill="y")
def build_details_frame(self, parent):
# 详细信息网格
details_frame = ttk.frame(parent, style='weathercard.tframe')
details_frame.pack(fill=tk.both, expand=true, padx=10, pady=10)
# 创建信息标签变量列表
self.detail_labels = []
for i in range(9):
row = i // 3
col = i % 3
card_frame = ttk.frame(details_frame, style='detailcard.tframe')
card_frame.grid(row=row, column=col, padx=5, pady=5, sticky="nsew")
# 设置网格权重,使卡片均匀分布
details_frame.grid_rowconfigure(row, weight=1)
details_frame.grid_columnconfigure(col, weight=1)
title_label = ttk.label(card_frame, text="", style='subtitle.tlabel')
title_label.pack(pady=(5, 0))
value_label = ttk.label(card_frame, text="", font=("simhei", 12, "bold"))
value_label.pack(pady=(0, 5))
self.detail_labels.append((title_label, value_label))
def show_loading(self, show=true):
if show:
# 创建加载中指示器
if self.loading_frame is none:
self.loading_frame = tk.frame(self.root, bg=self.colors['dark_900'], bd=2, relief=tk.solid)
self.loading_frame.place(relx=0.5, rely=0.5, anchor="center", relwidth=0.4, relheight=0.2)
self.loading_label = ttk.label(
self.loading_frame,
text="正在获取天气数据...",
font=("simhei", 14),
foreground=self.colors['neon_blue']
)
self.loading_label.place(relx=0.5, rely=0.5, anchor="center")
else:
# 移除加载中指示器
if self.loading_frame is not none:
self.loading_frame.destroy()
self.loading_frame = none
self.loading_label = none
def search_weather(self):
city = self.city_entry.get().strip()
if city:
self.show_loading(true)
# 在新线程中获取天气数据,避免阻塞ui
threading.thread(target=self.get_weather, args=(city,), daemon=true).start()
def get_weather(self, city):
try:
# 使用open-meteo api获取天气数据(无需api密钥)
# 修改url以包含更多数据
current_url = f"https://api.open-meteo.com/v1/forecast?latitude=39.91&longitude=116.39¤t_weather=true&timezone=asia%2fshanghai&hourly=temperature_2m,relativehumidity_2m,apparent_temperature,precipitation,cloudcover,pressure_msl,visibility,windspeed_10m,uv_index"
current_response = requests.get(current_url)
current_data = current_response.json()
# 获取15天预报
forecast_url = f"https://api.open-meteo.com/v1/forecast?latitude=39.91&longitude=116.39&daily=temperature_2m_max,temperature_2m_min,weathercode,sunrise,sunset,precipitation_sum,windspeed_10m_max,winddirection_10m_dominant&timezone=asia%2fshanghai&forecast_days=15"
forecast_response = requests.get(forecast_url)
forecast_data = forecast_response.json()
# 更新ui
self.root.after(0, lambda: self.update_ui(city, current_data, forecast_data))
except exception as e:
self.root.after(0, lambda: messagebox.showerror("错误", f"获取天气数据失败: {str(e)}"))
finally:
# 隐藏加载指示器
self.root.after(0, lambda: self.show_loading(false))
def update_ui(self, city, current_data, forecast_data):
try:
# 更新当前天气信息
current = current_data['current_weather']
hourly = current_data.get('hourly', {})
daily = forecast_data.get('daily', {})
# 获取当前时间索引
current_time = current['time']
time_list = hourly.get('time', [])
if current_time in time_list:
time_index = time_list.index(current_time)
else:
time_index = 0
# 获取当前详细数据
humidity = hourly.get('relativehumidity_2m', [none])[time_index]
pressure = hourly.get('pressure_msl', [none])[time_index]
visibility = hourly.get('visibility', [none])[time_index]
cloudcover = hourly.get('cloudcover', [none])[time_index]
windspeed = hourly.get('windspeed_10m', [none])[time_index]
uv_index = hourly.get('uv_index', [none])[time_index]
# 更新ui元素
self.location_label.config(text=city)
self.date_label.config(text=datetime.now().strftime("%y年%m月%d日 %a"))
self.temp_label.config(text=f"{current['temperature']}°c")
self.condition_label.config(text=self.get_weather_description(current['weathercode']))
self.feels_like_label.config(text=f"体感温度: {current['temperature']}°c")
# 更新基本信息
info_labels = [
("湿度", f"{humidity}%" if humidity is not none else "n/a", self.colors['neon_pink']),
("风速", f"{windspeed} km/h" if windspeed is not none else "n/a", self.colors['neon_blue']),
("气压", f"{pressure} hpa" if pressure is not none else "n/a", self.colors['neon_purple']),
("能见度", f"{visibility/1000:.1f} km" if visibility is not none else "n/a", self.colors['neon_green']),
("云量", f"{cloudcover}%" if cloudcover is not none else "n/a", self.colors['neon_blue']),
("露点", "15°c", self.colors['neon_pink']),
("紫外线指数", f"{uv_index}" if uv_index is not none else "n/a", self.colors['neon_purple']),
("降水概率", "10%", self.colors['neon_green'])
]
# 更新信息标签
for i, (title, value, color) in enumerate(info_labels):
if i < len(self.info_labels):
title_label, value_label = self.info_labels[i]
title_label.config(text=title)
value_label.config(text=value, foreground=color)
# 更新详细信息
sunrise_time = daily.get('sunrise', [none])[0]
sunset_time = daily.get('sunset', [none])[0]
precipitation = daily.get('precipitation_sum', [none])[0]
wind_direction = daily.get('winddirection_10m_dominant', [none])[0]
# 格式化日出日落时间
sunrise_display = datetime.fromisoformat(sunrise_time).strftime('%h:%m') if sunrise_time else "n/a"
sunset_display = datetime.fromisoformat(sunset_time).strftime('%h:%m') if sunset_time else "n/a"
# 计算日照时长
daylight_hours = "n/a"
if sunrise_time and sunset_time:
sunrise_dt = datetime.fromisoformat(sunrise_time)
sunset_dt = datetime.fromisoformat(sunset_time)
duration = sunset_dt - sunrise_dt
hours, remainder = divmod(duration.seconds, 3600)
minutes = remainder // 60
daylight_hours = f"{hours}小时{minutes}分钟"
# 风向描述
wind_direction_desc = self.get_wind_direction(wind_direction) if wind_direction else "n/a"
detail_labels = [
("日出时间", sunrise_display, self.colors['neon_blue']),
("日落时间", sunset_display, self.colors['neon_pink']),
("日照时长", daylight_hours, self.colors['neon_green']),
("风向", wind_direction_desc, self.colors['neon_purple']),
("雪量", "0 mm", self.colors['neon_blue']),
("降雨量", f"{precipitation} mm" if precipitation is not none else "n/a", self.colors['neon_pink']),
("天气代码", f"{current['weathercode']}", self.colors['neon_green']),
("气压趋势", "稳定", self.colors['neon_purple']),
("体感描述", "舒适", self.colors['neon_blue'])
]
# 更新详细标签
for i, (title, value, color) in enumerate(detail_labels):
if i < len(self.detail_labels):
title_label, value_label = self.detail_labels[i]
title_label.config(text=title)
value_label.config(text=value, foreground=color)
# 更新图表
self.update_chart(daily)
# 更新15天预报
self.update_forecast_cards(daily)
except exception as e:
messagebox.showerror("错误", f"更新界面失败: {str(e)}")
def update_chart(self, daily_data):
try:
self.ax.clear()
# 提取数据
dates = [datetime.fromisoformat(date).strftime('%m-%d') for date in daily_data.get('time', [])]
max_temps = daily_data.get('temperature_2m_max', [])
min_temps = daily_data.get('temperature_2m_min', [])
if not dates or not max_temps or not min_temps:
self.ax.set_title("无法获取温度数据")
self.canvas.draw()
return
# 绘制图表
x = np.arange(len(dates))
width = 0.35
self.ax.bar(x - width/2, min_temps, width, label='最低温度', color=self.colors['neon_purple'])
self.ax.bar(x + width/2, max_temps, width, label='最高温度', color=self.colors['neon_blue'])
self.ax.set_xlabel('日期')
self.ax.set_ylabel('温度 (°c)')
self.ax.set_title('未来15天温度趋势')
self.ax.set_xticks(x)
self.ax.set_xticklabels(dates, rotation=45)
self.ax.legend()
self.fig.tight_layout()
self.canvas.draw()
except exception as e:
print(f"更新图表失败: {str(e)}")
def update_forecast_cards(self, daily_data):
# 清除现有卡片
for widget in self.forecast_content.winfo_children():
widget.destroy()
# 创建新卡片
times = daily_data.get('time', [])
max_temps = daily_data.get('temperature_2m_max', [])
min_temps = daily_data.get('temperature_2m_min', [])
weather_codes = daily_data.get('weathercode', [])
# 确保所有数据数组长度相同
count = min(len(times), len(max_temps), len(min_temps), len(weather_codes))
for i in range(count):
date_str = times[i]
max_temp = max_temps[i]
min_temp = min_temps[i]
code = weather_codes[i]
date_obj = datetime.fromisoformat(date_str)
day_of_week = ["周一", "周二", "周三", "周四", "周五", "周六", "周日"][date_obj.weekday()]
date_display = date_obj.strftime('%m月%d日')
card_frame = ttk.frame(self.forecast_content, style='detailcard.tframe')
card_frame.grid(row=i, column=0, padx=5, pady=5, sticky="nsew")
# 设置网格权重
self.forecast_content.grid_rowconfigure(i, weight=1)
self.forecast_content.grid_columnconfigure(0, weight=1)
# 左侧日期和星期
left_frame = ttk.frame(card_frame, style='detailcard.tframe')
left_frame.pack(side=tk.left, fill=tk.both, expand=true, padx=10, pady=5)
ttk.label(left_frame, text=date_display, style='subtitle.tlabel').pack(anchor=tk.w)
ttk.label(left_frame, text=day_of_week, foreground=self.colors['neon_blue']).pack(anchor=tk.w)
# 中间天气状况
mid_frame = ttk.frame(card_frame, style='detailcard.tframe')
mid_frame.pack(side=tk.left, fill=tk.both, expand=true, padx=10, pady=5)
weather_desc = self.get_weather_description(code)
ttk.label(mid_frame, text=weather_desc, foreground=self.colors['neon_pink']).pack(anchor=tk.center)
# 右侧温度
right_frame = ttk.frame(card_frame, style='detailcard.tframe')
right_frame.pack(side=tk.right, fill=tk.both, expand=true, padx=10, pady=5)
ttk.label(right_frame, text=f"高: {max_temp}°c", foreground=self.colors['neon_blue']).pack(anchor=tk.e)
ttk.label(right_frame, text=f"低: {min_temp}°c", foreground=self.colors['neon_purple']).pack(anchor=tk.e)
def get_weather_description(self, weather_code):
# 根据天气代码返回描述
weather_descriptions = {
0: "晴朗",
1: "主要晴朗",
2: "部分多云",
3: "多云",
45: "雾",
48: "雾凇",
51: "小雨",
53: "中雨",
55: "大雨",
56: "轻冻雨",
57: "重冻雨",
61: "小雨",
63: "中雨",
65: "大雨",
66: "轻冻雨",
67: "重冻雨",
71: "小雪",
73: "中雪",
75: "大雪",
77: "雪粒",
80: "小雨",
81: "中雨",
82: "大雨",
85: "小雪",
86: "大雪",
95: "雷暴",
96: "雷暴伴有轻冰雹",
99: "雷暴伴有重冰雹"
}
return weather_descriptions.get(weather_code, "未知")
def get_wind_direction(self, degrees):
# 将风向角度转换为文字描述
directions = ["北", "东北偏北", "东北", "东北偏东", "东", "东南偏东", "东南", "东南偏南",
"南", "西南偏南", "西南", "西南偏西", "西", "西北偏西", "西北", "西北偏北"]
index = round(degrees / 22.5) % 16
return directions[index]
if __name__ == "__main__":
root = tk.tk()
app = weatherapp(root)
root.mainloop()
如何运行脚本
将脚本内容放在文件名后缀为.py的文件中保存。
使用windows的python命令运行此文件即可。
python版本为:python 3.12.5
到此这篇关于python编写朋克风格的天气查询程序的文章就介绍到这了,更多相关python天气查询内容请搜索代码网以前的文章或继续浏览下面的相关文章希望大家以后多多支持代码网!


发表评论