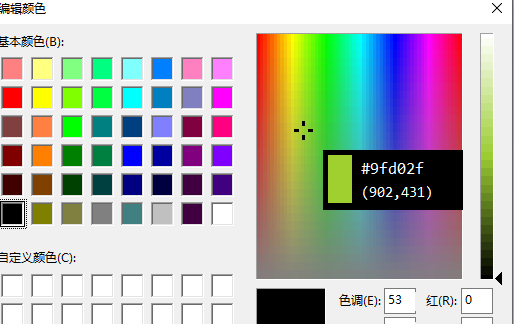
一、一个小工具,按住f10键,颜色值会跟着显示。
完整代码
import tkinter as tk
import pyautogui
import keyboard

class colorviewer:
    def __init__(self):
        self.root = tk.tk()
        self.root.overrideredirect(true)  # 无边框
        self.root.wm_attributes("-topmost", 1)  # 最前
        self.root.configure(bg="black")
        self.root.geometry("140x60")

        self.color_frame = tk.frame(self.root, width=24, height=48, bg="white")
        self.color_frame.place(x=5, y=5)

        self.hex_label = tk.label(self.root, text="#------", font=("consolas", 13), bg="black", fg="white")
        self.hex_label.place(x=35, y=5)

        self.coord_label = tk.label(self.root, text="(0000,0000)", font=("consolas", 11), bg="black", fg="white")
        self.coord_label.place(x=35, y=30)

        self.update_loop()

        self.root.withdraw()  # 初始隐藏
        self.root.mainloop()

    def update_loop(self):
        if keyboard.is_pressed("f10"):
            x, y = pyautogui.position()
            r, g, b = pyautogui.screenshot(region=(x, y, 1, 1)).getpixel((0, 0))
            hex_color = "#{:02x}{:02x}{:02x}".format(r, g, b)

            self.color_frame.configure(bg=hex_color)
            self.hex_label.configure(text=hex_color)
            self.coord_label.configure(text=f"({x},{y})")

            # 自动移动窗口,避免遮挡鼠标
            screen_w = self.root.winfo_screenwidth()
            screen_h = self.root.winfo_screenheight()
            win_w, win_h = 140, 60
            offset = 20

            pos_x = x + offset
            pos_y = y + offset
            if pos_x + win_w > screen_w:
                pos_x = x - win_w - offset
            if pos_y + win_h > screen_h:
                pos_y = y - win_h - offset

            self.root.geometry(f"{win_w}x{win_h}+{pos_x}+{pos_y}")
            self.root.deiconify()
        else:
            self.root.withdraw()

        self.root.after(30, self.update_loop)  # 循环检查

if __name__ == "__main__":
    colorviewer()
二、样式示例

三、方法补充
python获取像素颜色
使用image模块中的getpixel函数获得像素值。
getpixel函数检索指定坐标点的像素的rgb颜色值。
函数原型:colorref getpixel(hdc hdc, int nxpos, int nypos)
参数:
hdc:设备环境句柄。
nxpos:指定要检查的像素点的逻辑x轴坐标。
nypos:指定要检查的像素点的逻辑y轴坐标。
示例:
import image
import sys
im = image.open(sys.argv[1])
width = im.size[0]
height = im.size[1]
print "/* width:%d */"%(width)
print "/* height:%d */"%(height)
count = 0
for h in range(0, height):
for w in range(0, width):
pixel = im.getpixel((w, h))
for i in range(0,3):
count = (count+1)%16
if (count == 0):
print "0x%02x,/n"%(pixel[i]),
else:
print "0x%02x,"%(pixel[i]),
python获取屏幕指定坐标处像素颜色
import ctypes
from ctypes import wintypes
from typing import sequence, generator


user32 = ctypes.windll.user32
gdi32 = ctypes.windll.gdi32

# 定义类型
hwnd = wintypes.hwnd
hdc = wintypes.hdc
hbitmap = wintypes.hbitmap


class bitmapinfoheader(ctypes.structure):
    _fields_ = [
        ("bisize", wintypes.dword),
        ("biwidth", wintypes.long),
        ("biheight", wintypes.long),
        ("biplanes", wintypes.word),
        ("bibitcount", wintypes.word),
        ("bicompression", wintypes.dword),
        ("bisizeimage", wintypes.dword),
        ("bixpelspermeter", wintypes.long),
        ("biypelspermeter", wintypes.long),
        ("biclrused", wintypes.dword),
        ("biclrimportant", wintypes.dword)
    ]

class bitmapinfo(ctypes.structure):
    _fields_ = [
        ("bmiheader", bitmapinfoheader),
        ("bmicolors", wintypes.dword * 3)
    ]


def get_pixel_color(coords: sequence[tuple[int, int]], hwnd: hwnd) -> generator[tuple[int, int, int], none, none]:
    rect = wintypes.rect()
    user32.getclientrect(hwnd, ctypes.byref(rect))
    width = rect.right - rect.left
    height = rect.bottom - rect.top

    # 创建内存设备上下文
    hdc_src = user32.getdc(hwnd)
    hdc_dst = gdi32.createcompatibledc(hdc_src)
    bmp = gdi32.createcompatiblebitmap(hdc_src, width, height)
    gdi32.selectobject(hdc_dst, bmp)

    # 使用 bitblt 复制窗口内容到内存设备上下文
    gdi32.bitblt(hdc_dst, 0, 0, width, height, hdc_src, 0, 0, 0x00cc0020)  # srccopy

    # 获取位图信息
    bmi = bitmapinfo()
    bmi.bmiheader.bisize = ctypes.sizeof(bitmapinfoheader)
    bmi.bmiheader.biwidth = width
    bmi.bmiheader.biheight = -height  # 负值表示自底向上
    bmi.bmiheader.biplanes = 1
    bmi.bmiheader.bibitcount = 32
    bmi.bmiheader.bicompression = 0

    # 创建缓冲区并获取位图数据
    buffer = ctypes.create_string_buffer(width * height * 4)
    gdi32.getdibits(hdc_dst, bmp, 0, height, buffer, ctypes.byref(bmi), 0)

    # 释放资源
    gdi32.deleteobject(bmp)
    gdi32.deletedc(hdc_dst)
    user32.releasedc(hwnd, hdc_src)

    # 遍历指定坐标并返回像素颜色
    for x, y in coords:
        if 0 <= x < width and 0 <= y < height:
            offset = (y * width + x) * 4
            color = buffer[offset:offset + 4]
            yield color[2], color[1], color[0]  # bgr -> rgb
        else:
            yield (0, 0, 0)
到此这篇关于使用python实现获取屏幕像素颜色值的文章就介绍到这了,更多相关python获取屏幕像素颜色值内容请搜索代码网以前的文章或继续浏览下面的相关文章希望大家以后多多支持代码网!


发表评论