nginx实现负载均衡的方式
- 1.轮询(默认)
每个请求按时间顺序逐一分配到不同的后端服务器,后端服务器宕机时,能被自动删除且请求不会受影响
- 2.weight权重
指定轮询概率,weight和访问比率成正比,用于后端服务器性能不均的情况,权重越高被访问的概率就越大
- 3.ip hash
每个请求被访问ip的hash结果分配,这样每个访客访客固定访问一个后端服务器
- 4.fair
动态根据后端服务器处理请求的响应时间来进行负载分配,响应时间短的优先分配,时间长的 分配的请求会减少,nginx服务默认不支持这个算法,需要安装upstream_fair模块
- 5.url_hash
根据访问的upl计算出的hash结果来分配请求,每个请求会指向固定的服务器,常用于nginx作为静态资源服务器的场景,可以提高缓存效率,nginx服务默认不支持这个算法,需要安装nginx的hash软件包
环境配置
需要三台虚拟机,都要配置好nginx
| 机器名 | 服务器ip | 用途 |
| nginx (主) | 192.168.95.137 | 负载均衡服务器 |
| 服务器1 | 192.168.95.138 | 后端服务器 |
| 服务器2 | 192.168.95.139 | 后端服务器 |
1.设置防火墙 三台虚拟机都要设置
firewall-cmd --zone=public --add-port=80/tcp --permanent
systemctl restart firewalld.service
- 关闭selinux: /etc/selinux/config
- 修改配置文件:将selinux=enforcing改为disabled
- 弄好后重启虚拟机,查看后出现disabled
getenforce #查看selinux状态
- 或者临时关闭(不用重启机器):setenforce 0
轮询模式负载均衡
打开nginx(负责负载均衡)主虚拟机
编辑配置文件:
cd /usr/local/nginx/conf

cp nginx.conf nginx.conf.bak #备份一个配置文件,防止配置错误可重新配置

vim nginx.conf

在http{}模块里添加以下内容

upstream webserver {
server 192.168.95.138:80; #服务器1
server 192.168.95.139:80; #服务器2
}
server{
listen 80;
server_name 192.168.95.137;
location / {
index index.html index.htm;
proxy_pass http://webserver; #【webserver】和upstream 【webserver】名字一致
}
}
检查语法并重启
/usr/local/nginx/sbin/nginx -t #检查语法
/usr/local/nginx/sbin/nginx -s reload #重启

配置服务器1
cd /usr/local/nginx/html/
cp index.html index.html.bak
vim index.html #清空里面的所有配置
添加下面的语句:
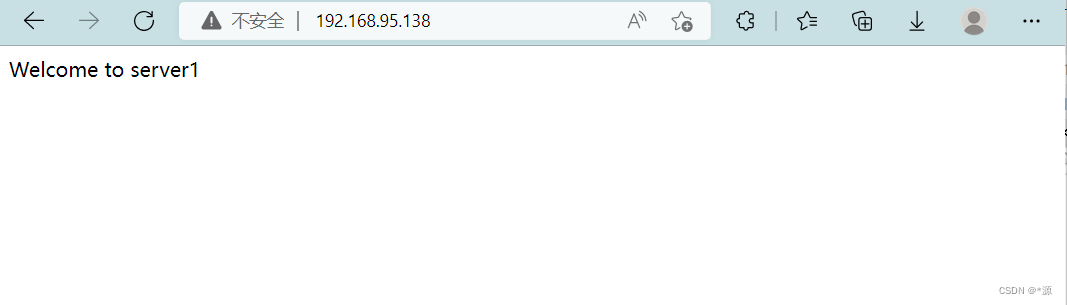
<h>welcome to server1<h>
保存退出
/usr/local/nginx/sbin/nginx -t
/usr/local/nginx/sbin/nginx -s reload
浏览器访问:http://ip
配置服务器2
cd /usr/local/nginx/html/
cp index.html index.html.bak
vim index.html #清空里面的所有配置
添加下面的语句:
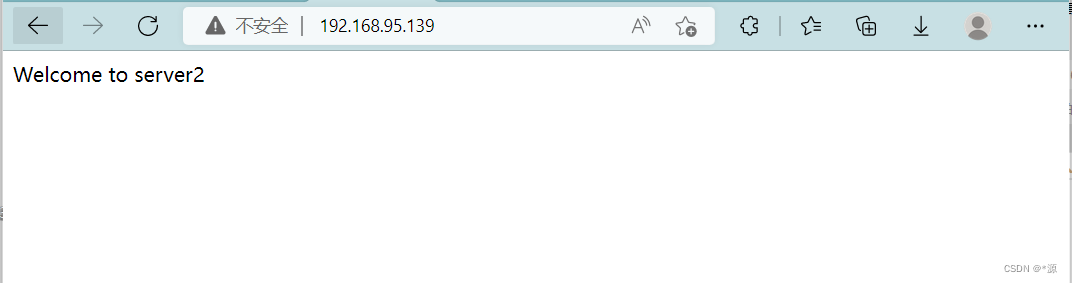
<h>welcome to server2<h>
保存退出
/usr/local/nginx/sbin/nginx -t
/usr/local/nginx/sbin/nginx -s reload
浏览器访问:http://ip
测试负载均衡:
[root@localhost conf]# curl 192.168.95.137
<h>welcome to server1 <h>
[root@localhost conf]# curl 192.168.95.137
<h>welcome to server2<h/>
[root@localhost conf]# curl 192.168.95.137
<h>welcome to server1 <h>
[root@localhost conf]# curl 192.168.95.137
<h>welcome to server2<h/>
然后浏览器进行访问
权重模式负载均衡
打开nginx(负责负载均衡)主虚拟机
编辑配置文件:
在http{}模块里添加以下内容
upstream webserver {
server 192.168.95.138:80 weight=3; #在原来的基础上添加weight=自定义权重值
server 192.168.95.139:80 weight=7;
}
server{
listen 80;
server_name 192.168.95.137;
location / {
index index.html index.htm;
proxy_pass http://webserver;
}
}
保存退出
/usr/local/nginx/sbin/nginx -t
/usr/local/nginx/sbin/nginx -s reload
测试负载均衡
[root@localhost conf]# curl 192.168.95.137
<h>welcome to server2<h/>

[root@localhost conf]# curl 192.168.95.137
<h>welcome to server1 <h>

[root@localhost conf]# curl 192.168.95.137
<h>welcome to server2<h/>

[root@localhost conf]# curl 192.168.95.137
<h>welcome to server2<h/>

[root@localhost conf]# curl 192.168.95.137
<h>welcome to server1 <h>

[root@localhost conf]# curl 192.168.95.137
<h>welcome to server2<h/>

[root@localhost conf]# curl 192.168.95.137
<h>welcome to server2<h/>

[root@localhost conf]# curl 192.168.95.137
<h>welcome to server2<h/>

[root@localhost conf]# curl 192.168.95.137
<h>welcome to server1 <h>

[root@localhost conf]# curl 192.168.95.137
<h>welcome to server2<h/>
从上面结果可以看出,一共测试访问10次用户请求,分流至server2服务器上的有7次,分流至server1服务器上的有3次,表明权重配置生效
总结
以上为个人经验,希望能给大家一个参考,也希望大家多多支持代码网。


发表评论