spring boot 缓存,默认使用的是 concurrentmap 的方式来实现的,然而我们在项目中并不会这么使用。我们经常会引入第三方缓存框架,来完成对数据的缓存操作。比如说:redis 。本文就来介绍 spring boot 整合 redis 来实现数据的缓存。
1.添加 maven 依赖
<!--引入 redis starter 的maven依赖-->
<dependency>
	<groupid>org.springframework.boot</groupid>
	<artifactid>spring-boot-starter-data-redis</artifactid>
</dependency>
2.配置redis属性
spring.redis.host=192.168.204.211
spring.redis.port=6379
spring.redis.password=xxx
spring.redis.database=0
# 设置连接池配置等(如有需要)
spring.redis.lettuce.pool.max-active=xxx
spring.redis.lettuce.pool.max-idle=xxx
配置好 redis 相关属性之后,spring boot 在项目启动时,便会自动为我们注入 redistemplate、stringredistemplate 组件。因为我们操作缓存大多数都是对字符串进行操作。所以为我们专门抽取出来的一个 stringredistemplate 组件,方便我们的使用。
3.创建 rediscachemanager
引入 redis 来实现缓存,此时我们便使用 rediscachemanager 来进行管理了。我们在使用 rediscachemanager 来操作 redis 时,底层操作默认使用的是 redistemplate,而 redistemplate 是 redisautoconfiguration 在项目启动时帮我们自动注册的组件,它默认使用的是 jdk 序列化机制。所以在 redis 存储时,会出现类似乱码的情况出现。所以我们需要来自己配置 rediscachemanager。
新建一个配置类 myredisconfig.java,使用@configuration 注解来标注该类是一个配置类。然后使用 @bean 注解为 ioc 容器注册我们自定义的 rediscachemanager,代码如下所示:
import com.fasterxml.jackson.annotation.jsonautodetect;
import com.fasterxml.jackson.annotation.propertyaccessor;
import com.fasterxml.jackson.databind.objectmapper;
import com.fasterxml.jackson.databind.jsontype.impl.laissezfairesubtypevalidator;
import org.springframework.context.annotation.bean;
import org.springframework.context.annotation.configuration;
import org.springframework.data.redis.cache.rediscacheconfiguration;
import org.springframework.data.redis.cache.rediscachemanager;
import org.springframework.data.redis.connection.redisconnectionfactory;
import org.springframework.data.redis.serializer.jackson2jsonredisserializer;
import org.springframework.data.redis.serializer.redisserializationcontext;
import org.springframework.data.redis.serializer.redisserializer;
import org.springframework.data.redis.serializer.stringredisserializer;
import java.time.duration;
/**
 * 自定义 redis缓存相关配置
 */
@enablecaching
@configuration
public class myredisconfig {
    /**
     * 自定义cachemanager管理器
     * @param redisconnectionfactory
     * @return
     */
    @bean
    public rediscachemanager rediscachemanager(redisconnectionfactory redisconnectionfactory){
        redisserializer<string> redisserializer = new stringredisserializer();
        jackson2jsonredisserializer jackson2jsonredisserializer = new jackson2jsonredisserializer(object.class);
        //解决查询缓存转换异常的问题
        objectmapper om = new objectmapper();
        om.setvisibility(propertyaccessor.all, jsonautodetect.visibility.any);//这一句必须要,作用是序列化时将对象全类名一起保存下来
        om.activatedefaulttyping(laissezfairesubtypevalidator.instance, objectmapper.defaulttyping.non_final);
        jackson2jsonredisserializer.setobjectmapper(om);
        //配置序列化(解决乱码的问题)
        rediscacheconfiguration config = rediscacheconfiguration.defaultcacheconfig()
                .entryttl(duration.ofseconds(300))//设置 key 过期时间
                .serializekeyswith(redisserializationcontext.serializationpair.fromserializer(redisserializer)) //设置key序列化规则
                .serializevalueswith(redisserializationcontext.serializationpair.fromserializer(jackson2jsonredisserializer))//设置value序列化规则
                .disablecachingnullvalues();
        rediscachemanager cachemanager = rediscachemanager.builder(redisconnectionfactory)
                .cachedefaults(config)
                .build();
        return cachemanager;
    }
}
4.使用spring提供的注解,实现缓存数据到 redis
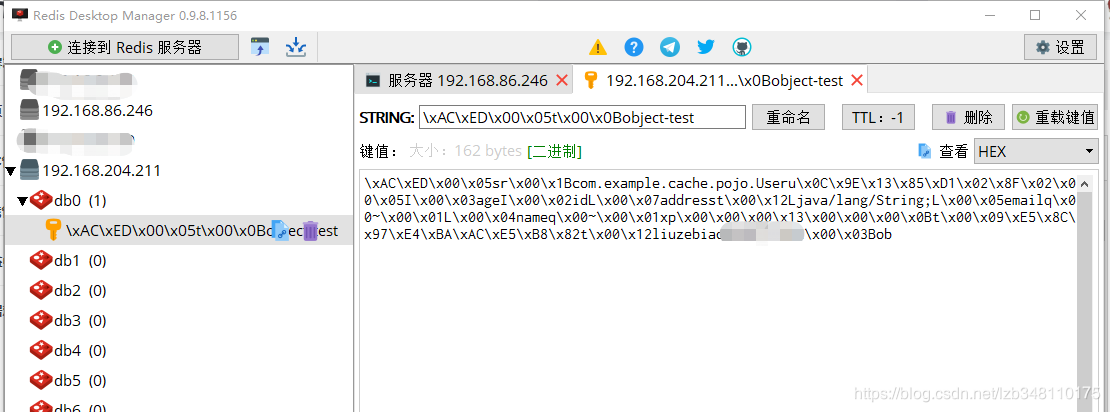
使用 @cacheable、@cacheput、@cacheevict 等注解来实现缓存功能,此处不再过多介绍,可参考:spring 缓存在项目中的使用。测试图如下所示:
5.完成对操作过程中数据的缓存
使用 @cacheable 等注解,都是将最终的结果进行缓存。如果我们需要对过程中的部分数据也进行缓存,我们此时就需要使用 rediscachemanager 来手动操作。
/**
 * 如果有多个cachemanager,也可以来手动指定使用哪个
 */
@override
@cacheable(value = "user", key = "#root.methodname +'['+ #id +']'",cachemanager = "rediscachemanager")
public user getuser(integer id) {
    log.info("用户"+id+"开始执行数据库查询");
    user user =  usermapper.getuser(id);
    return user;
}
也可以直接使用cachemanager来对中间结果缓存
@override
public user getuser(integer id) {
    log.info("用户"+id+"开始执行数据库查询");
    user user =  usermapper.getuser(id);
     //可以直接使用cachemanager来对中间结果缓存
    cache cache = cachemanager.getcache("user");
    cache.put("test",1111);
    return user;
}
6.附 demo 实例
spring boot 整合 redis 实现数据缓存
百度网盘下载地址:
链接: https://pan.baidu.com/s/16bnmeiynfthj88pgf5ux4a
提取码: jm67
到此这篇关于spring boot 整合 redis 实现数据缓存的文章就介绍到这了,更多相关spring boot redis 数据缓存内容请搜索代码网以前的文章或继续浏览下面的相关文章希望大家以后多多支持代码网!


发表评论