本篇主要是基于go来实现一个压测的工具,关于压测的内容可以参考其他的文章,这里默认了解压测的基本概念
整体架构
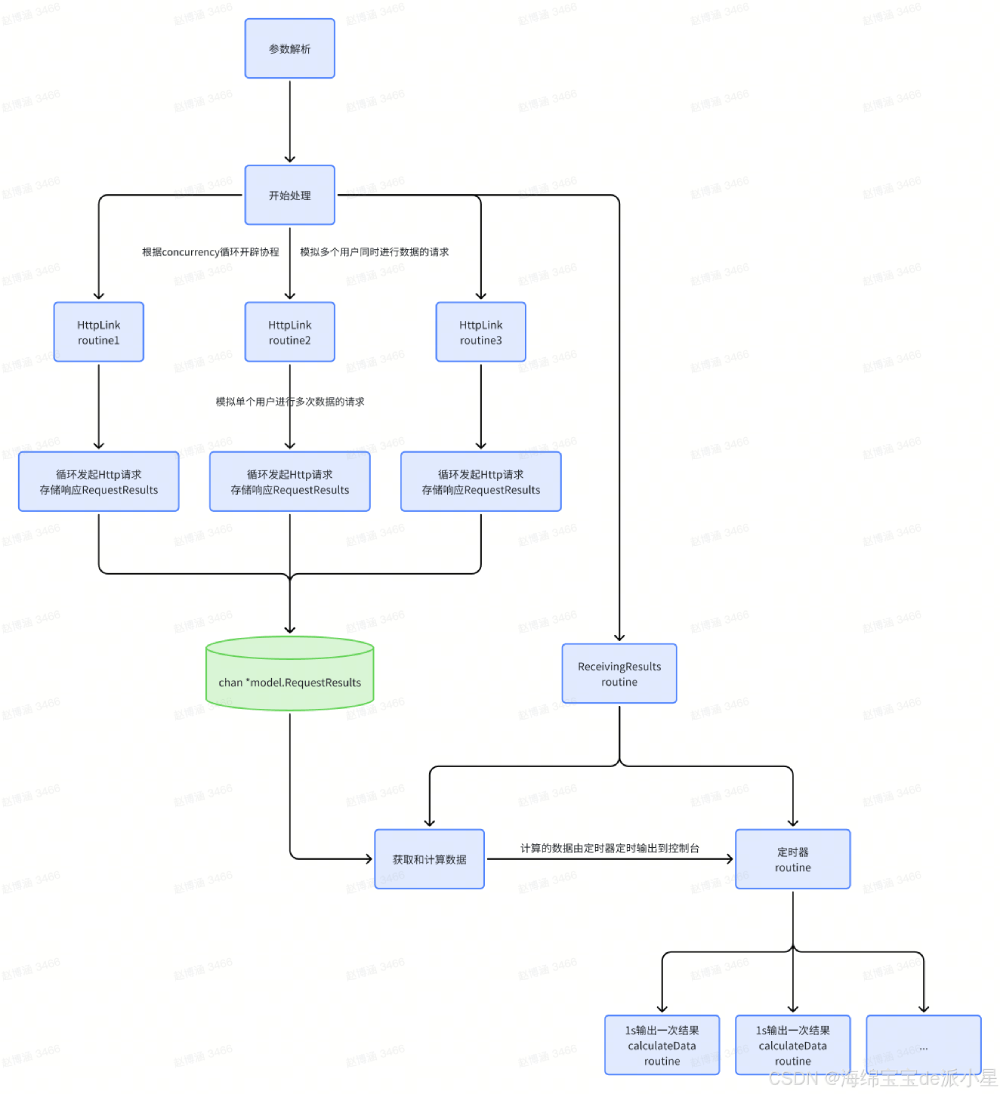
整体系统架构比较简单
通用数据处理模块
http请求响应数据处理
本项目支持http协议、websocket协议、grpc协议、remote authentication dial-in user service协议,因此需要构造出一个通用的http请求和响应的结构体,进行一个通用的封装:
// request 请求数据
type request struct {
	url       string            // url
	form      string            // http/websocket/tcp
	method    string            // 方法 get/post/put
	headers   map[string]string // headers
	body      string            // body
	verify    string            // 验证的方法
	timeout   time.duration     // 请求超时时间
	debug     bool              // 是否开启debug模式
	maxcon    int               // 每个连接的请求数
	http2     bool              // 是否使用http2.0
	keepalive bool              // 是否开启长连接
	code      int               // 验证的状态码
	redirect  bool              // 是否重定向
}
这当中值得注意的是验证的方法,这里是因为在进行压测中,要判断返回的响应是否是正确的响应,因此要进行判断响应是否正确,所以要进行相应的函数的注册,因此对于一个请求,是有必要找到一个对应的请求方法来判断这个请求正确,之后进行记录
这个model的核心功能,就是生成一个http请求的结构体,来帮助进行存储
// newrequest 生成请求结构体
// url 压测的url
// verify 验证方法 在server/verify中 http 支持:statuscode、json websocket支持:json
// timeout 请求超时时间
// debug 是否开启debug
// path curl文件路径 http接口压测,自定义参数设置
func newrequest(url string, verify string, code int, timeout time.duration, debug bool, path string,
	reqheaders []string, reqbody string, maxcon int, http2, keepalive, redirect bool) (request *request, err error) {
	var (
		method  = "get"
		headers = make(map[string]string)
		body    string
	)
	if path != "" {
		var curl *curl
		curl, err = parsethefile(path)
		if err != nil {
			return nil, err
		}
		if url == "" {
			url = curl.geturl()
		}
		method = curl.getmethod()
		headers = curl.getheaders()
		body = curl.getbody()
	} else {
		if reqbody != "" {
			method = "post"
			body = reqbody
		}
		for _, v := range reqheaders {
			getheadervalue(v, headers)
		}
		if _, ok := headers["content-type"]; !ok {
			headers["content-type"] = "application/x-www-form-urlencoded; charset=utf-8"
		}
	}
	var form string
	form, url = getform(url)
	if form == "" {
		err = fmt.errorf("url:%s 不合法,必须是完整http、websocket连接", url)
		return
	}
	var ok bool
	switch form {
	case formtypehttp:
		// verify
		if verify == "" {
			verify = "statuscode"
		}
		key := fmt.sprintf("%s.%s", form, verify)
		_, ok = verifymaphttp[key]
		if !ok {
			err = errors.new("验证器不存在:" + key)
			return
		}
	case formtypewebsocket:
		// verify
		if verify == "" {
			verify = "json"
		}
		key := fmt.sprintf("%s.%s", form, verify)
		_, ok = verifymapwebsocket[key]
		if !ok {
			err = errors.new("验证器不存在:" + key)
			return
		}
	}
	if timeout == 0 {
		timeout = 30 * time.second
	}
	request = &request{
		url:       url,
		form:      form,
		method:    strings.toupper(method),
		headers:   headers,
		body:      body,
		verify:    verify,
		timeout:   timeout,
		debug:     debug,
		maxcon:    maxcon,
		http2:     http2,
		keepalive: keepalive,
		code:      code,
		redirect:  redirect,
	}
	return
}
之后是对于对应的响应的封装,结构体定义为:
// requestresults 请求结果
type requestresults struct {
	id            string // 消息id
	chanid        uint64 // 消息id
	time          uint64 // 请求时间 纳秒
	issucceed     bool   // 是否请求成功
	errcode       int    // 错误码
	receivedbytes int64
}
curl参数解析处理
对于这个模块,本项目中实现的逻辑是根据一个指定的curl的文件,对于文件中的curl进行解析,即可解析出对应的http请求的参数,具体代码链接如下
https://gitee.com/zhaobohan/stress-testing/blob/master/model/curl_model.go
客户端模块
http客户端处理
在该模块中主要是对于http客户端进行处理,对于普通请求和http2.0请求进行了特化处理,支持根据客户端id来获取到指定的客户端,建立映射关系
具体的核心成员为:
var (
    mutex sync.rwmutex
    // clients 客户端
    // key 客户端id - value 客户端
    clients = make(map[uint64]*http.client)
)
再具体的,对于客户端的封装,主要操作是,对于client的构造
// createlanghttpclient 初始化长连接客户端参数
// 创建了一个配置了长连接的 http 客户端传输对象
func createlanghttpclient(request *model.request) *http.client {
tr := &http.transport{
// 使用 net.dialer 来建立 tcp 连接
// timeout 设置为 30 秒,表示如果连接在 30 秒内没有建立成功,则超时
// keepalive 设置为 30 秒,表示连接建立后,如果 30 秒内没有数据传输,则发送一个 keep-alive 探测包以保持连接
dialcontext: (&net.dialer{
timeout: 30 * time.second,
keepalive: 30 * time.second,
}).dialcontext,
maxidleconns: 0, // 最大连接数,默认0无穷大
maxidleconnsperhost: request.maxcon, // 对每个host的最大连接数量(maxidleconnsperhost<=maxidleconns)
idleconntimeout: 90 * time.second, // 多长时间未使用自动关闭连接
// insecureskipverify 设置为 true,表示不验证服务器的 ssl 证书
tlsclientconfig: &tls.config{insecureskipverify: true},
}
if request.http2 {
// 使用真实证书 验证证书 模拟真实请求
tr = &http.transport{
dialcontext: (&net.dialer{
timeout: 30 * time.second,
keepalive: 30 * time.second,
}).dialcontext,
maxidleconns: 0, // 最大连接数,默认0无穷大
maxidleconnsperhost: request.maxcon, // 对每个host的最大连接数量(maxidleconnsperhost<=maxidleconns)
idleconntimeout: 90 * time.second, // 多长时间未使用自动关闭连接
// 配置 tls 客户端设置,insecureskipverify 设置为 false,表示验证服务器的 ssl 证书
tlsclientconfig: &tls.config{insecureskipverify: false},
}
// 将 tr 配置为支持 http/2 协议
_ = http2.configuretransport(tr)
}
client := &http.client{
transport: tr,
}
// 禁止 http 客户端自动重定向,而是让客户端在遇到重定向时停止并返回最后一个响应
if !request.redirect {
client.checkredirect = func(req *http.request, via []*http.request) error {
return http.erruselastresponse
}
}
return client
}https://gitee.com/zhaobohan/stress-testing/blob/master/server/client/http_client.go
grpc客户端处理
对于grpc的构造来说,主要实现的功能是建立连接等,这些操作是较为简单的操作,因此这里不具体讲述
// grpcsocket grpc
type grpcsocket struct {
    conn    *grpc.clientconn
    address string
}
conn和address主要都是借助于两个类的成员函数来完成,解析地址和建立连接
其余模块可在代码中查看,这里不进行过多讲述
https://gitee.com/zhaobohan/stress-testing/blob/master/server/client/grpc_client.go
websocket客户端处理
// websocket websocket
type websocket struct {
    conn       *websocket.conn
    urllink    string
    url        *url.url
    isssl      bool
    httpheader map[string]string
}
其余模块可在代码中查看,这里不进行过多讲述
https://gitee.com/zhaobohan/stress-testing/blob/master/server/client/websocket_client.go
连接处理模块
grpc
对于grpc的测试,这里模拟了一个rpc调用,执行了一个hello world的函数,之后填充相应的数据作为请求的响应,最后将结果返回
// grpcrequest 请求
func grpcrequest(chanid uint64, ch chan<- *model.requestresults, i uint64, request *model.request,
    ws *client.grpcsocket) {
    var (
        starttime = time.now()
        issucceed = false
        errcode   = model.httpok
    )
    // 获取连接
    conn := ws.getconn()
    if conn == nil {
        errcode = model.requesterr
    } else {
        c := pb.newapiserverclient(conn)
        var (
            ctx = context.background()
            req = &pb.request{
                username: request.body,
            }
        )
        // 发送请求,获得响应
        rsp, err := c.helloworld(ctx, req)
        if err != nil {
            errcode = model.requesterr
        } else {
            // 200 为成功
            if rsp.code != 200 {
                errcode = model.requesterr
            } else {
                issucceed = true
            }
        }
    }
    requesttime := uint64(helper.diffnano(starttime))
    requestresults := &model.requestresults{
        time:      requesttime,
        issucceed: issucceed,
        errcode:   errcode,
    }
    requestresults.setid(chanid, i)
    ch <- requestresults
}
http
对于http的测试,效果也基本类似,原理也基本相同
// http 请求
func http(ctx context.context, chanid uint64, ch chan<- *model.requestresults, totalnumber uint64, wg *sync.waitgroup,
	request *model.request) {
	defer func() {
		wg.done()
	}()
	for i := uint64(0); i < totalnumber; i++ {
		if ctx.err() != nil {
			break
		}

		list := getrequestlist(request)
		issucceed, errcode, requesttime, contentlength := sendlist(chanid, list)
		requestresults := &model.requestresults{
			time:          requesttime,
			issucceed:     issucceed,
			errcode:       errcode,
			receivedbytes: contentlength,
		}
		requestresults.setid(chanid, i)
		ch <- requestresults
	}

	return
}
统计数据模块
下面来看计算统计数据模块
统计原理
这里需要统计的数据有以下:
耗时、并发数、成功数、失败数、qps、最长耗时、最短耗时、平均耗时、下载字节、字节每秒、状态码
其中这里需要注意的,计算的数据有qps,其他基本都可以经过简单的计算得出
那qps该如何进行计算呢?这里来这样进行计算:
qps = 服务器每秒钟处理请求数量 (req/sec 请求数/秒)
定义:单个协程耗时t, 所有协程压测总时间 sumt,协程数 n
如果:只有一个协程,假设接口耗时为 2毫秒,每个协程请求了10次接口,每个协程耗总耗时210=20毫秒,sumt=20
qps = 10/201000=500
如果:只有十个协程,假设接口耗时为 2毫秒,每个协程请求了10次接口,每个协程耗总耗时210=20毫秒,sumt=2010=200
qps = 100/(200/10)*1000=5000
上诉两个示例现实中总耗时都是20毫秒,示例二 请求了100次接口,qps应该为 示例一 的10倍,所以示例二的实际总qps为5000
除以协程数的意义是,sumt是所有协程耗时总和
实现过程
这个模块主要是定时进行一个统计压测的结论并进行打印的工作,依赖的函数是
// calculatedata 计算数据
func calculatedata(concurrent, processingtime, requesttime, maxtime, mintime, successnum, failurenum uint64,
	chanidlen int, errcode *sync.map, receivedbytes int64) {
	if processingtime == 0 {
		processingtime = 1
	}
	var (
		qps              float64
		averagetime      float64
		maxtimefloat     float64
		mintimefloat     float64
		requesttimefloat float64
	)
	// 平均 qps 成功数*总协程数/总耗时 (每秒)
	if processingtime != 0 {
		qps = float64(successnum*concurrent) * (1e9 / float64(processingtime))
	}
	// 平均时长 总耗时/总请求数/并发数 纳秒=>毫秒
	if successnum != 0 && concurrent != 0 {
		averagetime = float64(processingtime) / float64(successnum*1e6)
	}
	// 纳秒=>毫秒
	maxtimefloat = float64(maxtime) / 1e6
	mintimefloat = float64(mintime) / 1e6
	requesttimefloat = float64(requesttime) / 1e9
	// 打印的时长都为毫秒
	table(successnum, failurenum, errcode, qps, averagetime, maxtimefloat, mintimefloat, requesttimefloat, chanidlen,
		receivedbytes)
}
以上就是基于go语言实现一个压测工具的详细内容,更多关于go压测工具的资料请关注代码网其它相关文章!


发表评论