springboot整合kaptcha验证码
前面学习了几种样式的验证码验证,java实现kaptcha网页验证码验证,你会吗???
作为一个目前以java后端的为方向的小白,当然要写一个关于springboot整合kaptcha来实现验证码的操作啦,而且以后要用到该功能的话直接复制粘贴就可以啦~
程序目录参考
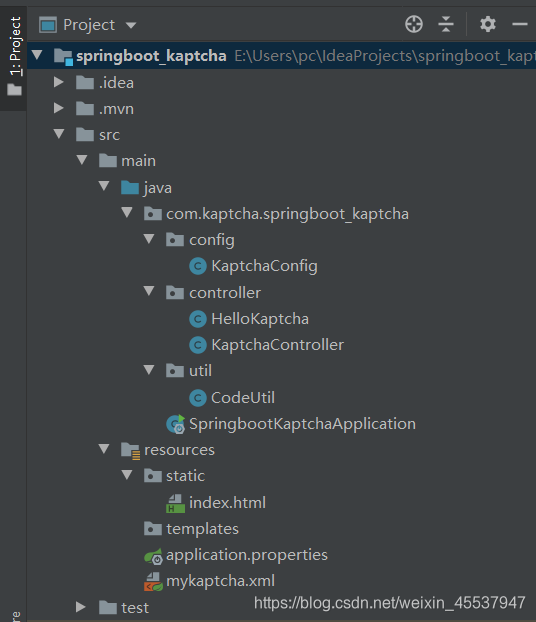
1、首先用idea新建一个spring initializr
2、添加依赖:
- pom.xml:
<!-- kaptcha验证码 -->
        <dependency>
            <groupid>com.github.penggle</groupid>
            <artifactid>kaptcha</artifactid>
            <version>2.3.2</version>
        </dependency>
有两种方式在springboot中使用kaptcha
- 第一种使用.xml的配置方式配置生成kaptcha的bean对象,在启动类上@importresource这个xml文件;在controller中注入其对象并使用
- 第二种是把kaptcha作为工程的一个类,加上@component注解在返回kaptcha的方法中加上@bean注解,再在controller中注入其对象。
第一种方式
- mykaptcha.xml:
	<?xml version="1.0" encoding="utf-8"?>
<beans xmlns="http://www.springframework.org/schema/beans"
       xmlns:xsi="http://www.w3.org/2001/xmlschema-instance"
       xsi:schemalocation="http://www.springframework.org/schema/beans
    http://www.springframework.org/schema/beans/spring-beans-3.1.xsd">
    <!-- kaptcha组件配置 -->
    <bean id="kaptchaproducer" class="com.google.code.kaptcha.impl.defaultkaptcha">
        <property name="config">
            <bean class="com.google.code.kaptcha.util.config">
                <constructor-arg>
                    <props>
                        <!-- 验证码宽度 -->
                        <prop key="kaptcha.image.width">120</prop>
                        <!-- 验证码高度 -->
                        <prop key="kaptcha.image.height">50</prop>
                        <!-- 生成验证码内容范围 -->
                        <prop key="kaptcha.textproducer.char.string">0123456789akwuehpmrx</prop>
                        <!-- 验证码个数 -->
                        <prop key="kaptcha.textproducer.char.length">4</prop>
                        <!-- 是否有边框 -->
                        <prop key="kaptcha.border">no</prop>
                        <!-- 边框颜色 -->
                        <prop key="kaptcha.border.color">105,179,90</prop>
                        <!-- 边框厚度 -->
                        <prop key="kaptcha.border.thickness">1</prop>
                        <!-- 验证码字体颜色 -->
                        <prop key="kaptcha.textproducer.font.color">yellow</prop>
                        <!-- 验证码字体大小 -->
                        <prop key="kaptcha.textproducer.font.size">30</prop>
                        <!-- 验证码所属字体样式 -->
                        <prop key="kaptcha.textproducer.font.names">楷体</prop>
                        <!-- 干扰线颜色 -->
                        <prop key="kaptcha.noise.color">black</prop>
                        <!-- 验证码文本字符间距 -->
                        <prop key="kaptcha.textproducer.char.space">8</prop>
                        <!-- 图片样式 :阴影-->
                        <prop key="kaptcha.obscurificator.impl">com.google.code.kaptcha.impl.shadowgimpy</prop>
                    </props>
                </constructor-arg>
            </bean>
        </property>
    </bean>
</beans>
在springboot启动类上加上@importresource(locations = {“classpath:mykaptcha.xml”}),加了这个注解,springboot就会去加载kaptcha.xml文件
- springboot启动类:
@springbootapplication
@importresource(locations = {"classpath:mykaptcha.xml"})
public class springbootkaptchaapplication {

    public static void main(string[] args) {
        springapplication.run(springbootkaptchaapplication.class, args);
    }
}
第二种方式
写一个kaptcha配置类kaptchaconfig。
- kaptchaconfig.java:
@component
public class kaptchaconfig {
    @bean
    public defaultkaptcha getdefaultkaptcha(){
        com.google.code.kaptcha.impl.defaultkaptcha defaultkaptcha = new com.google.code.kaptcha.impl.defaultkaptcha();
        properties properties = new properties();
        properties.setproperty("kaptcha.border", "yes");
        properties.setproperty("kaptcha.border.color", "105,179,90");
        properties.setproperty("kaptcha.textproducer.font.color", "blue");
        properties.setproperty("kaptcha.image.width", "110");
        properties.setproperty("kaptcha.image.height", "40");
        properties.setproperty("kaptcha.textproducer.font.size", "30");
        properties.setproperty("kaptcha.session.key", "code");
        properties.setproperty("kaptcha.textproducer.char.length", "4");
        properties.setproperty("kaptcha.textproducer.font.names", "宋体,楷体,微软雅黑");
        config config = new config(properties);
        defaultkaptcha.setconfig(config);

        return defaultkaptcha;
    }
}
这个类用来配置kaptcha,就相当于方法一的mykaptcha.xml,把mykaptcha加入ioc容器,然后return 回一个设置好属性的实例,最后注入到kaptchacontroller中,在kaptchacontroller中就可以使用它生成验证码。
上面的两种方法选择其一即可,下面我用xml的方式进行操作。
编写controller用于生成验证码
- kaptchacontroller.java:
@controller
public class kaptchacontroller {
    //第二种方法
    //@qualifier("getdefaultkaptcha")
    @autowired
    private producer captchaproducer = null;
    @requestmapping("/mykaptcha")
    public void getkaptchaimage(httpservletrequest request, httpservletresponse response) throws exception {
        httpsession session = request.getsession();
        response.setdateheader("expires", 0);
        response.setheader("cache-control", "no-store, no-cache, must-revalidate");
        response.addheader("cache-control", "post-check=0, pre-check=0");
        response.setheader("pragma", "no-cache");
        response.setcontenttype("image/jpeg");
        //生成验证码
        string captext = captchaproducer.createtext();
        session.setattribute(constants.kaptcha_session_key, captext);
        //向客户端写出
        bufferedimage bi = captchaproducer.createimage(captext);
        servletoutputstream out = response.getoutputstream();
        imageio.write(bi, "jpg", out);
        try {
            out.flush();
        } finally {
            out.close();
        }
    }
}- hellokaptcha.java:
@restcontroller
public class hellokaptcha {
    @requestmapping("/hello")
    public string hello(httpservletrequest request) {
        if (!codeutil.checkverifycode(request)) {
            return "验证码有误!!!";
        } else {
            return "欢迎使用!!!";
        }
    }
}
编写工具类util
- codeutil.java:
public class codeutil {
/**
 * 将获取到的前端参数转为string类型
 */
public static string getstring(httpservletrequest request, string key) {
    try {
        string result = request.getparameter(key);
        if(result != null) {
            result = result.trim();
        }
        if("".equals(result)) {
            result = null;
        }
        return result;
    }catch(exception e) {
        return null;
    }
}
/**
 * 验证码校验
 */
public static boolean checkverifycode(httpservletrequest request) {
    //获取生成的验证码
    string verifycodeexpected = (string) request.getsession().getattribute(com.google.code.kaptcha.constants.kaptcha_session_key);
    //获取用户输入的验证码
    string verifycodeactual = codeutil.getstring(request, "verifycodeactual");
    if(verifycodeactual == null ||!verifycodeactual.equals(verifycodeexpected)) {
        return false;
    }
    return true;
    }
}
这个类用来比对生成的验证码与用户输入的验证码。生成的验证码会自动加到session中,用户输入的通过getparameter获得。
- 前端页面:index.html:
<!doctype html>
<html lang="en">
<head>
    <meta charset="utf-8">
    <title>title</title>
    <script type="text/javascript">
        function refresh() {
            document.getelementbyid('captcha_img').src="/mykaptcha?"+math.random();
        }
    </script>
</head>
<body>
<form action="/hello" method="post">
    验证码:  <input type="text" placeholder="请输入验证码" name="verifycodeactual">
    <div class="item-input">
        <img id="captcha_img" alt="点击更换" title="点击更换"
             onclick="refresh()" src="/mykaptcha" />
    </div>
    <input type="submit" value="提交" />
</form>
</body>
</html>
验证码本质是一张图片,所以用标签,然后通过src = "/kaptcha"指向生成验证码的那个controller的路由即可;通过onclick = “refresh()”调用js代码实现点击切换功能;中要注意name的值,在codeutil中通过request的getparameter()方法获取用户输入的验证码时传入的key值就应该和这里的name值一致。
效果为:


总结:
在用springboot整合kaptcha时操作并不顺利,因为一开始我并不是把所有的程序写到启动类的同一个包下,而是写到了和同级的包下,如:
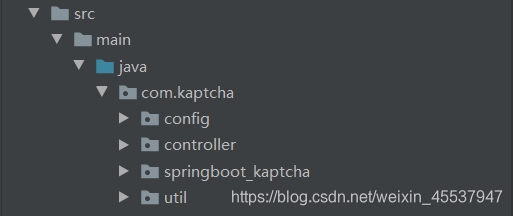
发现了吗???
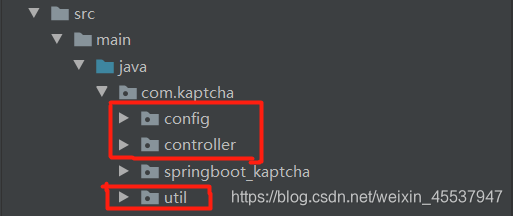
是的,我居然把使用的程序,没有写在启动类的包下,就这个低级的错误让我卡了一下午,害,说多了都是泪;因为没有写在启动类的包下,springboot识别不到,就会出现运行时网页的验证码无法显示的情况,如下:

最后在师兄的帮助下才解决了,感谢师兄~
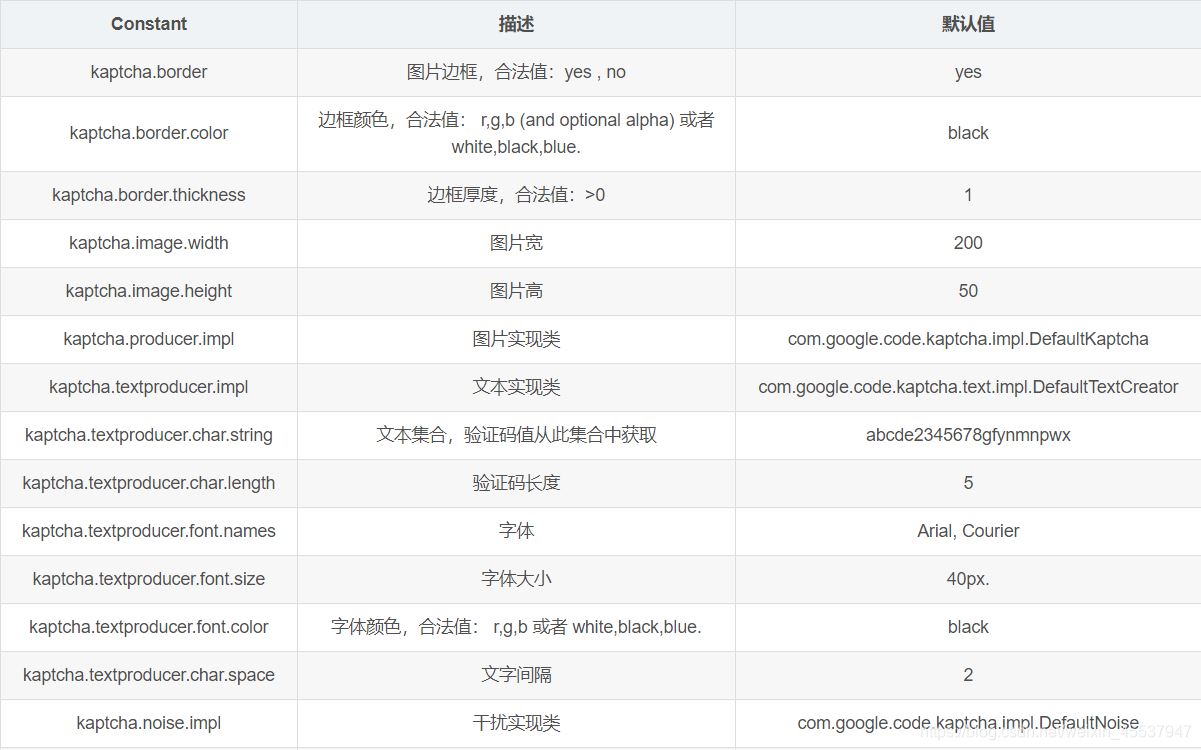
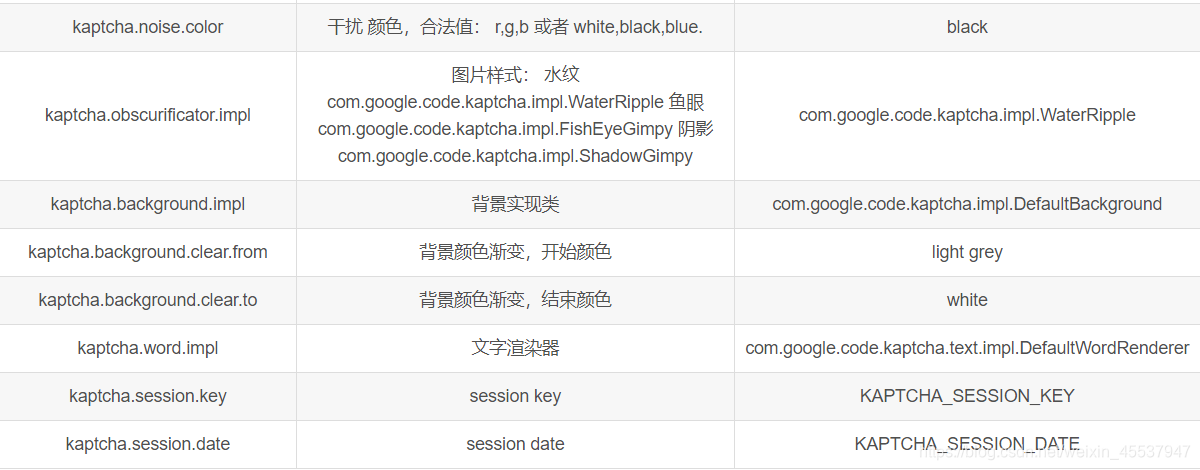
最后附个表以便查阅自己想更改的验证码图形:
总结
关于springboot整合kaptcha验证码的使用就到这里。
以上为个人经验,希望能给大家一个参考,也希望大家多多支持代码网。


发表评论