一、环境变量配置
官网https://cn.vitejs.dev/guide/env-and-mode.html#intellisense
1. 新建.env开头的文件在根目录
为了防止意外地将一些环境变量泄漏到客户端,只有以 vite_ 为前缀的变量才会暴露给经过 vite 处理的代码
.env所有环境默认加载.env.development开发模式默认加载.env.production生产模式默认加载.env.check自定义环境文件
示例:如.env文件
# title
vite_app_title = vue-guide-project
a. 模式
默认情况下,开发服务器 (dev 命令) 运行在 development (开发) 模式,而 build 命令则运行在 production (生产) 模式。
这意味着当执行 vite build 时,它会自动加载 .env.production 中可能存在的环境变量。
在某些情况下,若想在 vite build 时运行不同的模式来渲染不同的标题,可以通过传递 --mode 选项标志来覆盖命令使用的默认模式。例如,如果你想在 staging (预发布)模式下构建应用:
vite build --mode staging

# package.json
{
  # ...
  "type": "module",
  "scripts": {
    "dev": "vite",
    "build": "vite build --mode staging",
  },
}
还需要新建一个 .env.staging 文件:
# .env.staging
vite_app_title = my app (staging)
b. 简单了解下node_env和模式mode
node_env:定义:技术上讲,node_env是一个由node.js暴露给执行脚本的系统环境变量。作用:通常用于确定服务器工具、构建脚本和客户端library在开发环境(development)还是生产环境(production)下的行为。它的值通常为"production"或"development",用于区分不同环境下的逻辑行为。- 模式(
mode):定义:模式指项目运行或构建时的一种特定状态或配置。作用:在前端框架中,模式用于定义项目在不同阶段(如开发、生产、测试)下的行为和配置。它可以包含多个环境变量,并通过特定的文件(如.env.production、.env.development等)来管理这些变量。
所以,我们所写的.env可以理解为创建的不同的模式变量
2. typescript 智能提示,设置全局类型定义
就是在编码过程中应用这些自定义环境变量的时候,给出的智能提示。
src目录下创建一个vite-env.d.ts或者env.d.ts文件src同级别types目录下创建文件env.d.ts
/// <reference types="vite/client" />

interface importmetaenv {
  readonly vite_app_title: string
  // 更多环境变量...
}

interface importmeta {
  readonly env: importmetaenv
}

interface viteenv extends importmetaenv {}- 在
tsconfig.app.json文件中
专门用于处理项目src文件中的typescript配置文件,
include配置项加入文件:(会提示自定义设置的环境变量)
"include": [
  // ...
  // 第一种方式对应配置
  "vite-env.d.ts", // 或者 "env.d.ts"
  // 第二种方式对应配置
  "types/**.d.ts" // 或者直接 "types"
],
效果图:
00
- 或者
compileroptions中加入types:(只会提示默认环境变量)
{
  "compileroptions": {
    // ...
    "types": ["vite/client"]
  }
}
效果图:

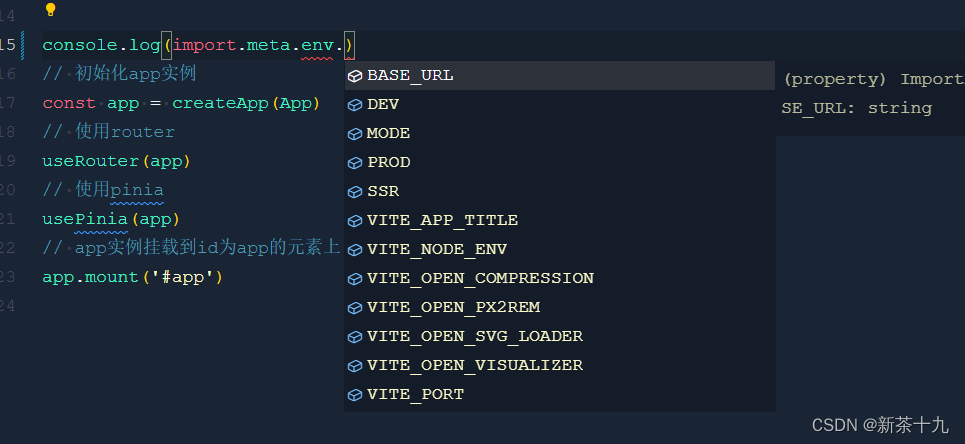
3. 访问环境变量
- 客户端源码(就是
src文件)中访问:import.meta.env.vite_app_title html中访问环境变量:%vite_app_title%,如果环境变量不存在,则会将被忽略而不被替换,- 在配置(
src文件外)文件中访问环境变量
vite 默认是不加载 .env 文件的,因为这些文件需要在执行完 vite 配置后才能确定加载哪一个,举个例子,root 和 envdir 选项会影响加载行为。
不过当你的确需要时,你可以使用 vite 导出的 loadenv 函数来加载指定的 .env 文件。
import { defineconfig, loadenv } from 'vite'
export default defineconfig(({ command, mode }) => {
  // command: "build" | "serve"
  // mode 当前模式
  // 根据当前工作目录中的 `mode` 加载 .env 文件
  // 设置第三个参数为 '' 来加载所有环境变量,而不管是否有 `vite_` 前缀。
  const env = loadenv(mode, process.cwd(), '')
  return {
    // vite 配置
    define: {
      __app_env__: json.stringify(env.app_env),
    },
  }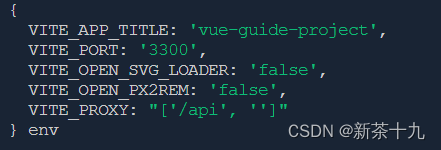
})输出:console.log(env)
二、情景配置-根据不同模式使用不同插件
1. 新建build/getenv.ts 文件处理环境文件变量
loadenv()获取的环境变量env从输出的值可以看出,全是字符串,所以我们可以自定义方法去转换变量类型
/* eslint-disable */
// read all environment variable configuration files to process.env
export function wrapperenv(envconf: any): viteenv {
const ret: any = {}
for (const envname of object.keys(envconf)) {
let realname = envconf[envname].replace(/\\n/g, '\n')
realname = realname === 'true' ? true : realname === 'false' ? false : realname
if (envname === 'vite_port') {
realname = number(realname)
}
if (envname === 'vite_proxy' && realname) {
try {
realname = json.parse(realname.replace(/'/g, '"'))
} catch (error) {
realname = ''
}
}
ret[envname] = realname
}
return ret
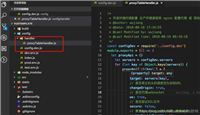
}2. build/plugins/index.ts
新建build/plugins 文件夹处理各种plugins,将每一个plugin配置单独抽离
plugins文件目录
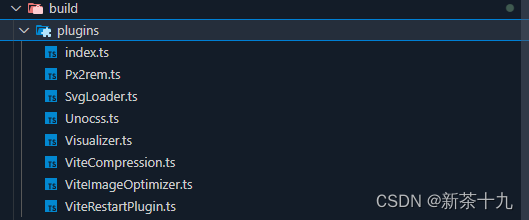
- 入口文件
build/plugins/index.ts
// 插件配置 入口文件index.ts
import vue from '@vitejs/plugin-vue'
import vuejsx from '@vitejs/plugin-vue-jsx'
import { pluginoption } from 'vite'
import vuedevtools from 'vite-plugin-vue-devtools'

import { px2remplugin } from './px2rem' // rem
import { svgloaderplugin } from './svgloader' // svg
import { unocssplugin } from './unocss' // unocss
import { visualizerplugin } from './visualizer' // 打包分析
import { vitecompressionplugin } from './vitecompression' // 压缩gzip
import { viteimageoptimizerplugin } from './viteimageoptimizer' // 图片压缩
import { viterestartplugin } from './viterestartplugin' // 修改配置文件自动重启

export const useplugins = (isbuild: boolean, viteenv: viteenv) => {
  const { vite_open_visualizer, vite_open_svg_loader, vite_open_px2rem, vite_open_compression } =
    viteenv
  const plugins: pluginoption[] = [vue(), vuejsx()]

  plugins.push(unocssplugin())
  if (vite_open_px2rem) plugins.push(px2remplugin())
  if (vite_open_svg_loader) plugins.push(svgloaderplugin())

  // 开发模式下
  if (!isbuild) {
    plugins.push(vuedevtools())
    plugins.push(viterestartplugin())
  }

  if (isbuild) {
    plugins.push(viteimageoptimizerplugin())
    // 压缩gzip
    vite_open_compression && plugins.push(vitecompressionplugin())
    // 打包分析
    vite_open_visualizer && plugins.push(visualizerplugin())
  }
  return plugins
}
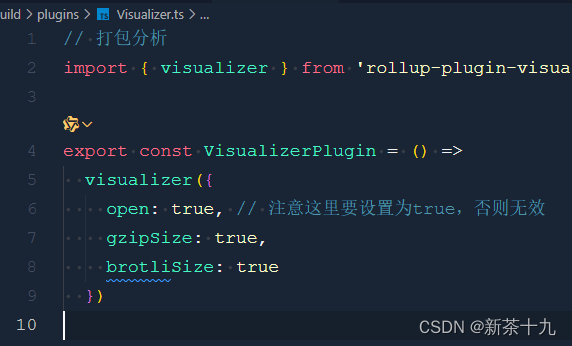
- 单个
plugin示例:
3. tsconfig.node.json
专门用于node.js环境中的typescript配置文件,它定义了用于node.js应用程序的typescript编译器选项
tsconfig.node.json文件中:
"include": [
  // ...
  "build/**/*.ts",
  "types" // 全局类型
],
4. .eslintrc.cjs中添加
overrides: [
  {
    files: ['*.ts', '*.tsx', '*.vue'],
    rules: {
      // 解决 ts 全局类型定义后,eslint报错的问题
      'no-undef': 'off'
    }
  }
],
// ...
'no-unused-expressions': 'off' // 关闭禁止使用表达式
5. vite.config.ts中
import { useplugins } from './build/plugins'
// ...
export default defineconfig(({ command, mode }) => {
  const isbuild = command === 'build'
  const root = process.cwd()
  const env = loadenv(mode, root)
  const viteenv = wrapperenv(env)
  return {
    plugins: useplugins(isbuild, viteenv),
    // ...
  }
})
三、情景配置-server和build配置
build文件夹中创建server.ts和build.ts文件
1. 将build配置写入build.ts文件中
export const usebuild = () => {
  return {
    // 10kb以下,转base64
    assetsinlinelimit: 1024 * 10,
    // chunksizewarninglimit: 1500,//配置文件大小提醒限制,默认500
    rollupoptions: {
      output: {
        // 每个node_modules模块分成一个js文件
        manualchunks(id: string) {
          if (id.includes('node_modules')) {
            return 'vendor'
            // return id.tostring().split('node_modules/.pnpm/')[1].split('/')[0].tostring()
          }
          return undefined
        },
        // 用于从入口点创建的块的打包输出格式[name]表示文件名,[hash]表示该文件内容hash值
        entryfilenames: 'assets/js/[name].[hash].js', // 用于命名代码拆分时创建的共享块的输出命名
        chunkfilenames: 'assets/js/[name].[hash].js', // 用于输出静态资源的命名,[ext]表示文件扩展名
        assetfilenames: 'assets/[ext]/[name].[hash].[ext]'
      }
    }
  }
}
2. 将server配置写入server.ts文件中
import type { proxyoptions } from 'vite'

type proxyitem = [string, string]
type proxylist = proxyitem[]
type proxytargetlist = record<string, proxyoptions>

/**
 * 创建代理,用于解析 .env.development 代理配置
 */
const userproxy = (proxylist: proxylist = []) => {
  const ret: proxytargetlist = {}

  proxylist.foreach((item) => {
    const [prefix, target] = item
    const httpsre = /^https:\/\//
    const ishttps = httpsre.test(target)
    ret[prefix] = {
      target,
      changeorigin: true,
      ws: true,
      rewrite: (path: string) => path.replace(new regexp(`^${prefix}`), ''),
      // https is require secure=false
      // verify ssl certificate
      ...(ishttps ? { secure: false } : {})
    }
  })

  return ret
}

/**
 * server 配置
 * @returns
 */
export const useserver = (viteenv: viteenv) => {
  const { vite_port, vite_proxy } = viteenv
  return {
    // 监听所有公共ip
    // host: '0.0.0.0',
    cors: true,
    port: vite_port,
    proxy: userproxy(vite_proxy)
  }
}
3. 完整vite.config.ts文件
import { fileurltopath, url } from 'node:url'
import { defineconfig, loadenv } from 'vite'

import { usebuild } from './build/build'
import { wrapperenv } from './build/getenv'
import { useplugins } from './build/plugins'
import { useserver } from './build/server'

export default defineconfig(({ command, mode }) => {
  const isbuild = command === 'build'
  const root = process.cwd()
  const env = loadenv(mode, root)
  const viteenv = wrapperenv(env)
  return {
    plugins: useplugins(isbuild, viteenv),
    server: useserver(viteenv),
    build: usebuild(),
    resolve: {
      alias: {
        '@': fileurltopath(new url('./src', import.meta.url))
      }
    },
    css: {
      preprocessoroptions: {
        scss: {
          additionaldata: `
          @use "./src/styles/variables.scss" as *;
          @use "./src/styles/mixin.scss" as *;`,
          javascriptenabled: true
        }
      }
    }
  }
})
总结
以上为个人经验,希望能给大家一个参考,也希望大家多多支持代码网。


发表评论