
#交换设备
交换机的基本配置
目标
- 掌握思科设备的命令行基础
- 会对交换机进行基本配置
- 会通过telent和ssh对交换机进行远程管理
一、思科设备命令基础
1.进入设备的命令行界面
- 设备支持命令行
- 去查看设备上的接口,是否有console
- 需要有console线
- 需要超级终端软件进行连接
- putty
- secret crt
- xshell
2.命令行基础
-
思科设备上的命令模式
-
如何进入
-
用户模式:查看统计信息(用的非常少),用“>"表示
-
用户模式切换到特权模式
-
enable
en     #命令可以简写
-
-
特权模式:查看并修改设备的配置(查看居多),用“#”表示
-
特权模式却换到全局模式
-
configure terminal
conf t  #简写
-
-
全局模式:针对设备的整体配置参数,用“(config)#”表示
-
切换到接口(某一个)模式:(用模拟器,将鼠标移动到交换机的地方不动,就会显示)
-
intrface fastethernet0/1  #进入0/1接口
int f0/1 #简写
-
-
接口模式:针对设备的接口修改配置,用“(config-if)#"表示
-
-
进入对应模式,只能逐级进入
-
如何返回
- 返回对应模式,一级一级返回,使用exit,
-
如果想要快速返回到特权模式,则使用end
当命令输错时
switch#ded
translating "ded"...domain server (255.255.255.255)  #系统会进行域名解析

快速中止按 ctrl+shift+6
#永久不进行域名解析,按一下操作
switch(config)#no if domain-lookup
3.常见配置
- 给交换机配置一个主机名(进入全局模式,输入hostname空格加主机名)
switch>en          #进入特权模式
switch#conf t      #进入全局模式
enter configuration commands, one per line.  end with cntl/z.
switch(config)#hostname sw1   #将交换机主机名设置为“sw1”
sw1(config)#
-
查看交换机内部的mac表
- 在特权模式下查看(show mac-address-table)
    sw1#show mac-address-table
              mac address table
    -------------------------------------------

    vlan    mac address       type        ports
    ----    -----------       --------    -----

       1    00d0.bc48.17a3    dynamic     fa0/2
       1    00e0.b094.24ed    dynamic     fa0/1
-
交换机学习的是信息的源mac地址,首次使用,当主机a发送数据后,交换机记录主机a的mac地址和端口,而后广播出去,当b接受到并回应时,交换机又记录了b的mac地址和对应端口号
-
配置交换机的双工模式(全局模式–接口模式)
sw1#conf t 进入全局模式 enter configuration commands, one per line. end with cntl/z. sw1(config)#int f0/1 进入0/1接口 sw1(config-if)#duplex ? 显示该语法的使用方式 auto enable auto duplex configuration #自适应 full force full duplex operation #全双工 half force half-duplex operation #半双工 sw1(config-if)#duplex half #配置为半双工 sw1#show int f0/1 sw #查看端口 sw1#show int f0/1 switchport #这不是简写 sw1#show int f0/1 #查看端口 fastethernet0/1 is up, line protocol is up (connected) hardware is lance, address is 0005.5e12.7701 (bia 0005.5e12.7701) bw 100000 kbit, dly 1000 usec, reliability 255/255, txload 1/255, rxload 1/255 encapsulation arpa, loopback not set keepalive set (10 sec) half-duplex, 100mb/s #这里显示了当前端口的模式,half:半双工模式 input flow-control is off, output flow-control is off arp type: arpa, arp timeout 04:00:00 last input 00:00:08, output 00:00:05, output hang never -
设置接口速率
sw1#conf t enter configuration commands, one per line. end with cntl/z. sw1(config)#int f0/1 sw1(config-if)#speed 10 #设置接口速率为10m- 如果两个主机对应的接口速率不同则网络会出现延迟
-
配置console接口的密码
sw1#conf t enter configuration commands, one per line. end with cntl/z. sw1(config)#line console 0 #进入console 0接口 sw1(config-line)#password ? 7 specifies a hidden password will follow line the unencrypted (cleartext) line password sw1(config-line)#password 1234 #设置console口的密码为1234 sw1(config-line)#login #应用当前设置 -
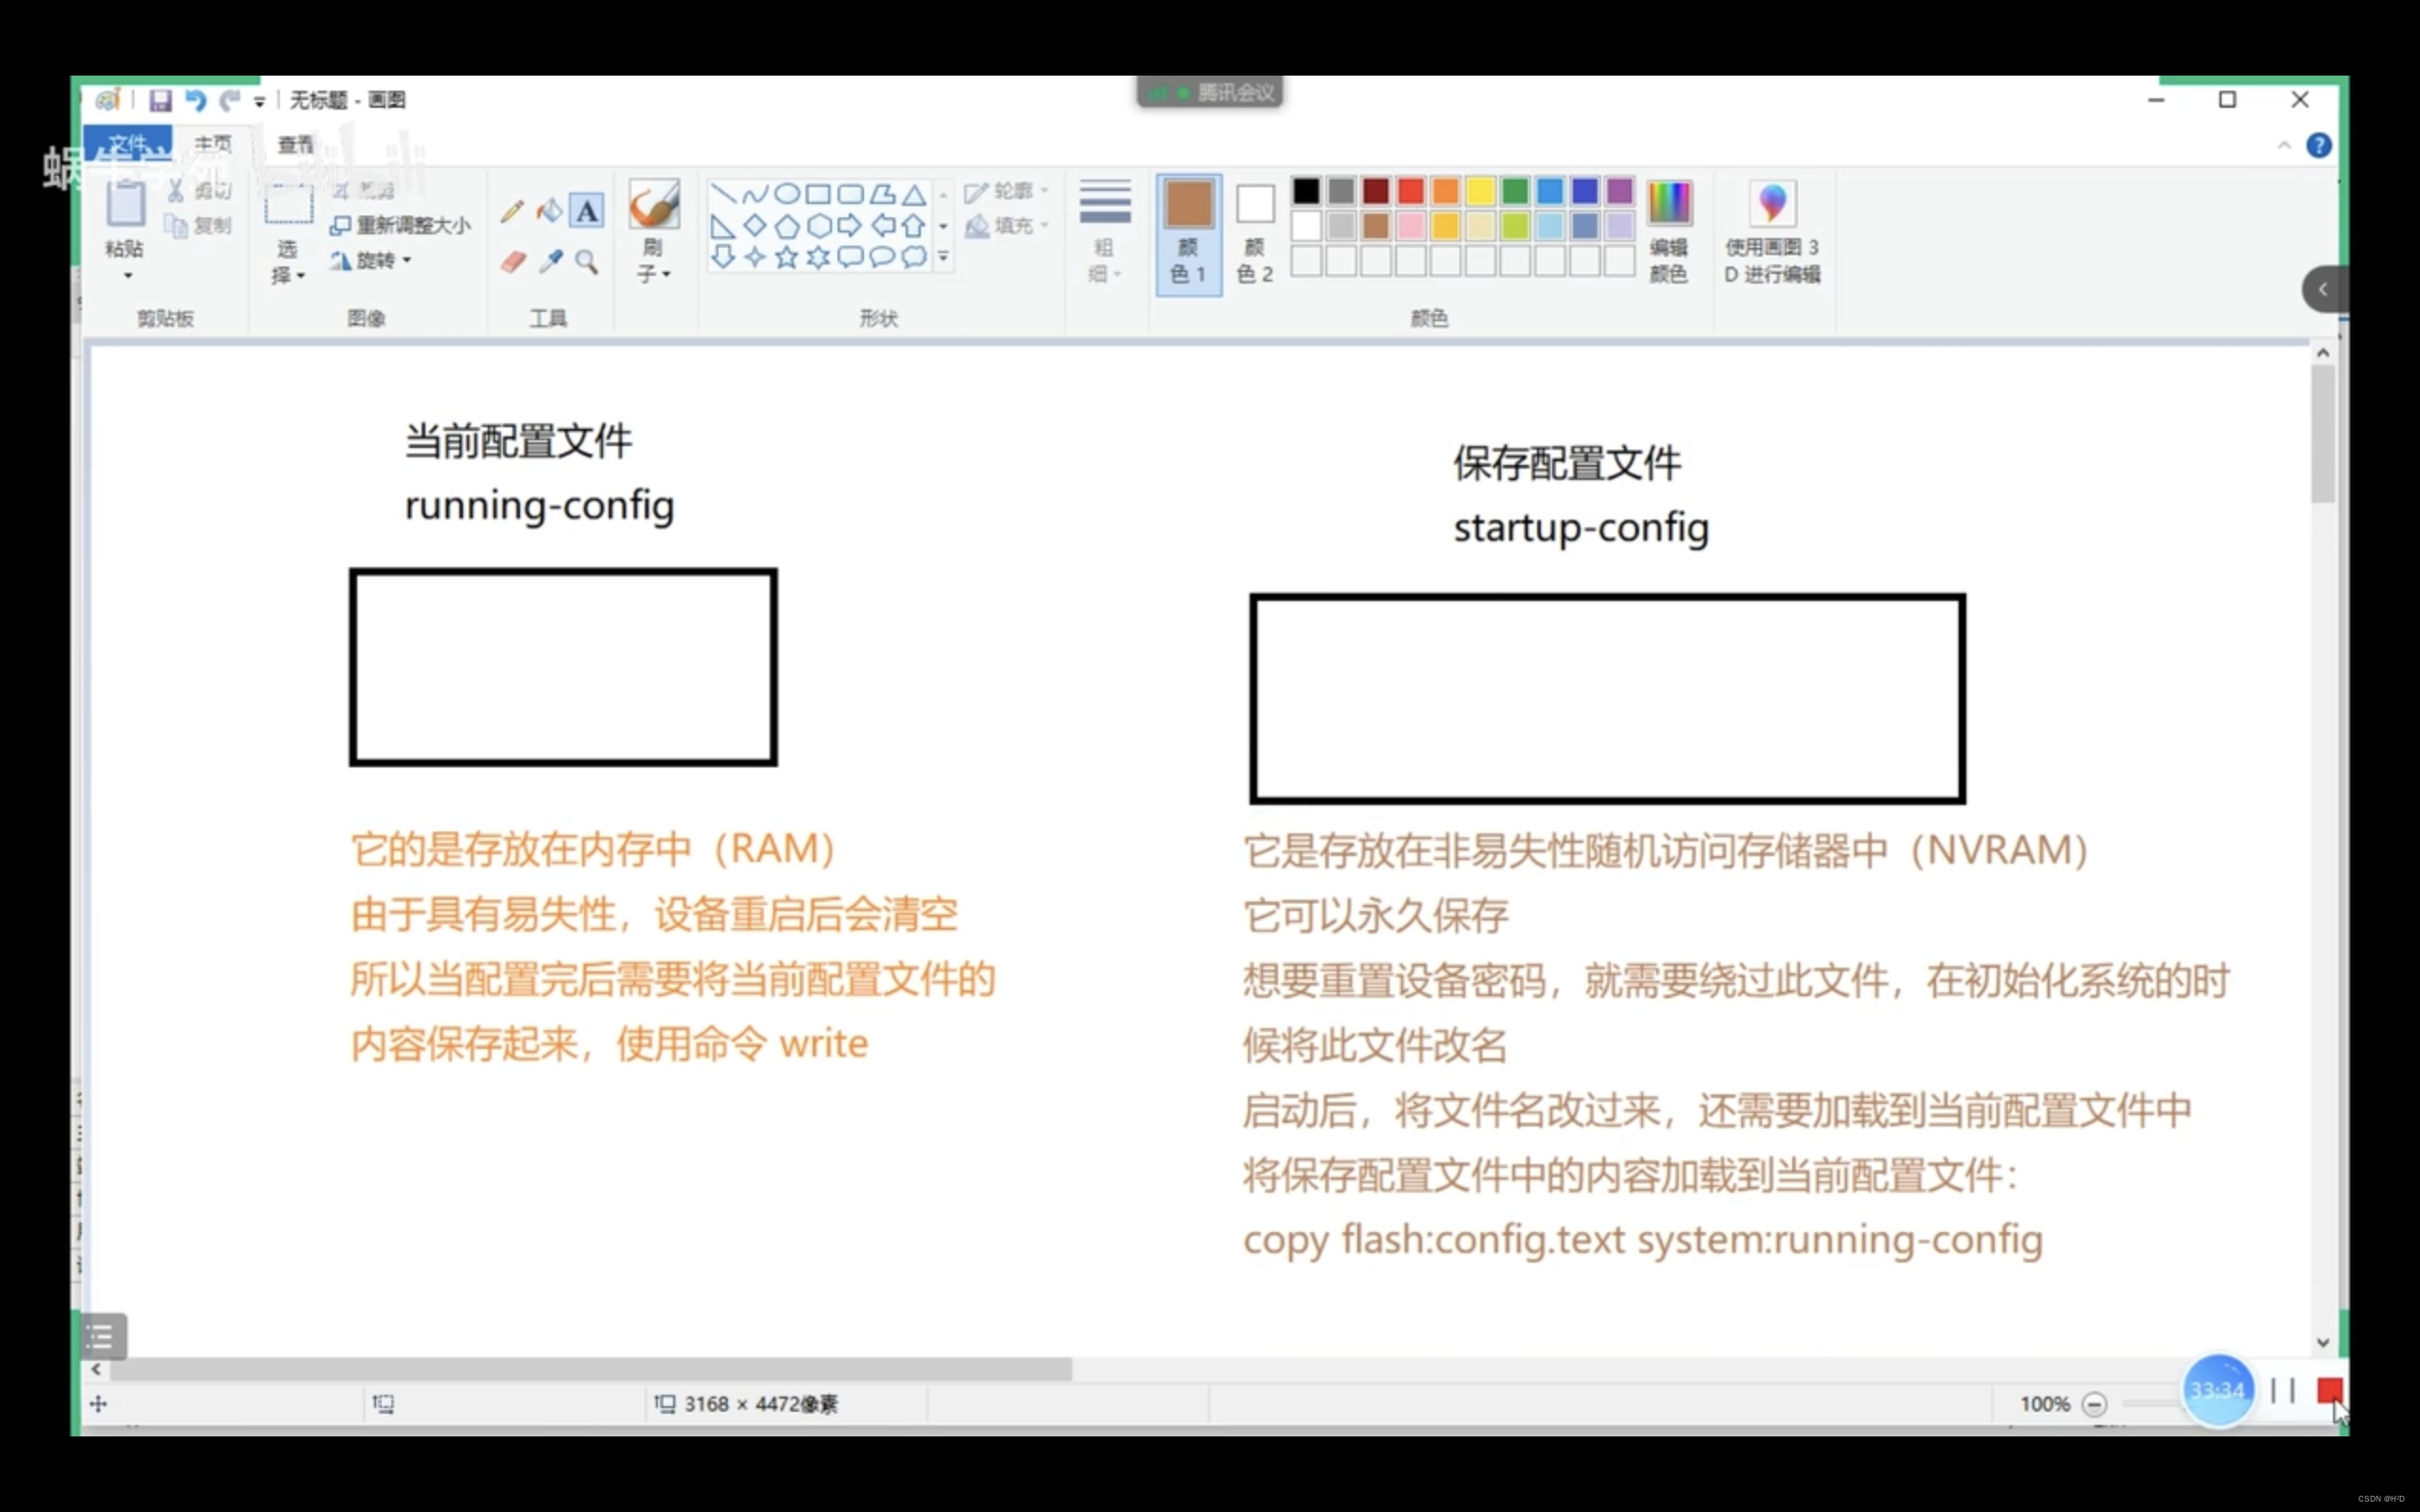
查看当前配置文件
sw1#show running-config -
查看保存配置文件(nvram)
sw1#show startup-config #是查看保存了的配置文件,不是当前已经生效的配置文件 -
保存当前配置文件
  sw1#copy running-config startup-config
  sw1#write     #保存当前配置文件
4.交换机密码恢复

-
拔掉交换机插头,插上电源同时按住mode建
-
出现“swith”界面提示后,松开按键,初始化flash
switch:flash_init #初始化flash -
将config.text文件改成config.old,完成后启动交换机
-
switch:rename flash:config.text flash:config.old
switch:boot         #重新启动
-
-
重新启动后,把配置文件的名字改回来
switch# rename flash:config.old flash:config.text-
该完名字后,使用使用命令即可查看这个保存的配置文件内容,可以看到之前的密码
switch#show startup-config- 在这一步,我们已经饶过了原来设置的密码,进入了交换机,而且知道了原来的密码内容
-
-
手动加载配置文件(将保存的配置文件复制到当前的配置文件中去)
- 如果想要之前配置的一些内容就需要这一步
switch#copy flash:config.text system:running-config #将保存配置文件复制到当前运行的配置文件 -
进入全局模式配置密码
二、通过远程管理方式连接交换机(telnet ssh)
1.telnet
- 是应用层协议,基于传输层tcp,默认端口号23,采用明文密码传输
- 不是太安全,一般用于内网管理
思路
-
1.1既然是通过网路的方式管理设备,设备就必须配置ip地址,由于交换机上的接口都是交换接口,是不允许配置ip地址的,直接为交换机的虚接口配置ip地址:(vlan1)接口
#配置ip地址 switch>en switch#conf t enter configuration commands, one per line. end with cntl/z. switch(config)#hostname sw1 #设定交换机的主机名 sw1(config)#int vlan 1 #进入vlan1虚接口 sw1(config-if)#ip address 192.168.100.100 255.255.255.0 #为当前vlan1接口配置ip地址和子网掩码 sw1(config-if)#no shutdown #打开这个虚接口 -
1.2配置设备的连接终端,并设置密码
  #配置设备的连接终端
  sw1#conf t                                                     #进入全局模式
  enter configuration commands, one per line.  end with cntl/z.
  sw1(config)#line vty 0?                                 #查看vty接口一共有几个可用
  <0-15>                                                  #一共有16个接口可用
  sw1(config)#line vty 0 4                                       #进入0-4的终端接口
  sw1(config-line)#password 1234                                 #设置密码为1234
  sw1(config-line)#login                                         #应用
解释
- 这里的vty,代表交换机的虚拟终端接口,交换机上一共有5个vty口,所以line是进入,vty 0 4 进入这5个口,进一步设置,有些交换机只有这5条线路可用,还有的交换机产品有很多这样的接口
最后使用pc,打开桌面的telnet,输入交换机的ip地址,点击连接
连接成功,输入密码,进入用户模式
当进入特权模式时,显示没有设置密码,则先要在交换机设置特权模式密码
-
2.创建用户名和密码,配置设备的连接密码并应用(第二种方法)
sw1#conf t enter configuration commands, one per line. end with cntl/z. sw1(config)#username heheda password 1234 sw1(config)#line vty 0 4 sw1(config-line)#login local #表示使用用户名密码登录,前面已经设置过密码了-
login:表示直接使用密码登录
-
login local:使用账号密码登录
-
设置特权模式密码(当同时设置明文和密文密码,则只有密文密码生效)
- 设置特权模式密码(必须设置,不然主机不能进入到交换机的特权模式)
  sw1(config)#enable password 123                 #设置明文密码
  sw1(config)#enable secret 456          #设置密文密码,现在只有这个会生效,因为更安全
  sw1(config)#enable password secret 456          #查看当前配置文件
2.ssh
- 是应用层协议,基于传输层tcp,,默认端口22,采用密文密码方式
- 相对来讲比较安全,常用跨越互联网管理、远程管理linux操作系统
步骤:
  switch#conf t                                               #进入特权模式
  enter configuration commands, one per line.  end with cntl/z.
  switch(config)#int vlan 1                                   #进入vlan接口
  switch(config-if)#ip add 192.168.100.100 255.255.255.0      #设置ip地址和子网掩码
  switch(config-if)#no shutdown                               #应用
  ……
  switch#   #返回特权模式
  switch(config)#hostname sw1                                #设置主机名为sw1
  必须创建主机名,因为创建域名的时候不允许使用默认的主机名
  sw1(config)#ip domain-name heheda.com                      #创建域名
  sw1(config)#crypto key generate rsa                        #创建密钥对
  the name for the keys will be: sw1.heheda
  choose the size of the key modulus in the range of 360 to 2048 for your
    general purpose keys. choosing a key modulus greater than 512 may take
    a few minutes.                                           #创建的密钥长度在360~2048之间

  how many bits in the modulus [512]: 2048                  #默认的长度为512,输入2048更安全
  % generating 2048 bit rsa keys, keys will be non-exportable...[ok]

  sw1(config)#ip ssh time-out 120                           #配置超时的时间
  *mar 1 0:6:47.166: %ssh-5-enabled: ssh 1.99 has been enabled
  sw1(config)#ip ssh authentication-retries 5                #配置认证的次数


  sw1(config)#username heheda2 password 123                  #创建用户名密码
  sw1(config)#line vty 0 4
  sw1(config-line)#login local                               #设置用户名密码登录


  sw1(config-line)#exit                                      #退出到全局模式
  sw1(config)#enable secret 123                              #设置特权模式密码(密文)
  sw1(config)#show running-config                            #检查当前配置文件
通过主机的ssh协议访问并设置交换机
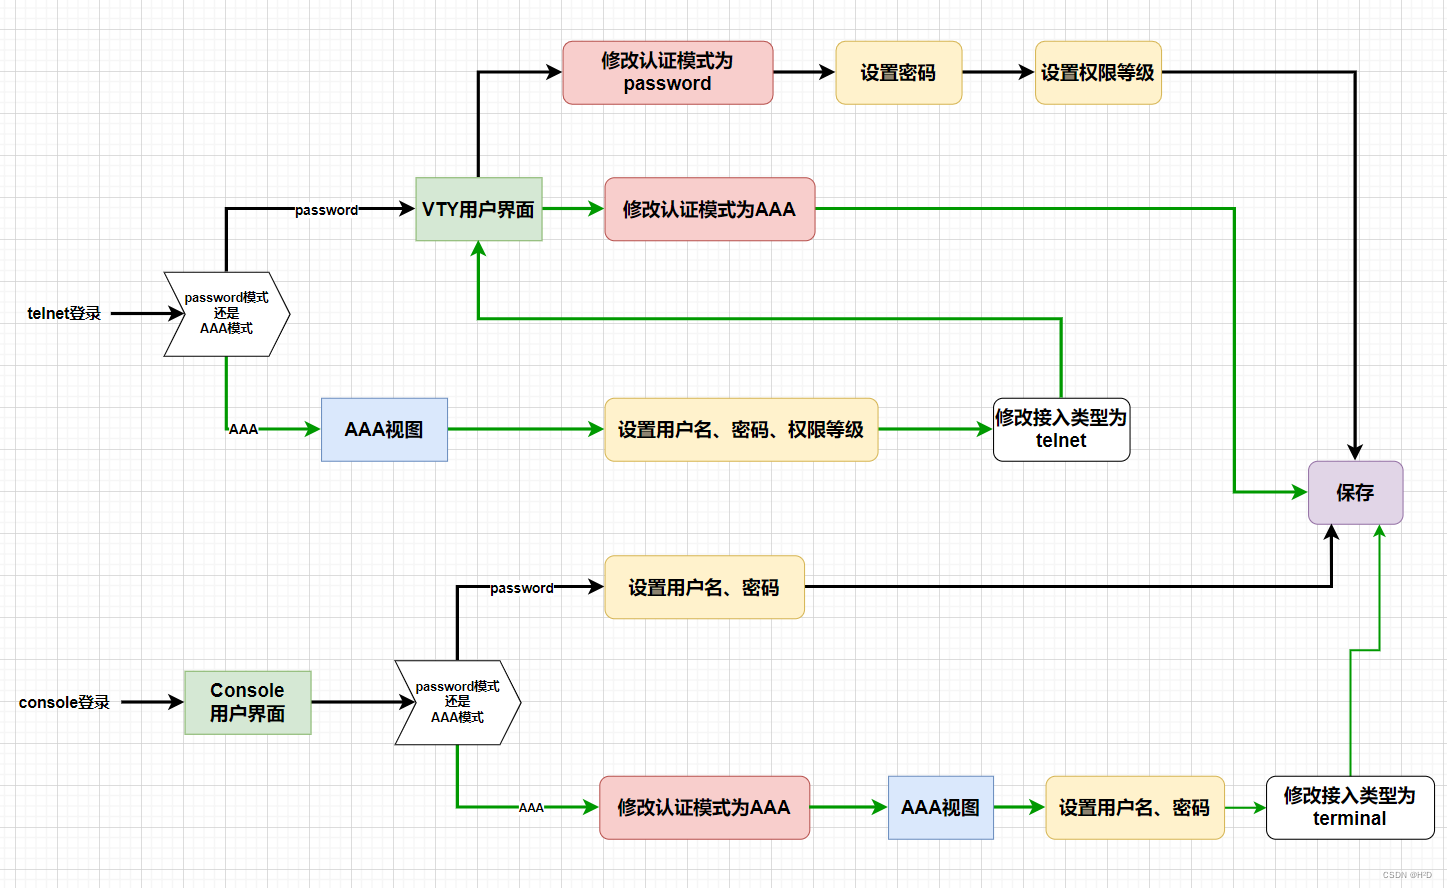
三、华为设备配置登录密码
1.用户界面的概念(vty console)
- 我认为用户界面的概念类似于用户组的概念:如果某用户属于vty0 4,我在vty0 4内设置了某种权限,那么所有属于vty0 4的用户的权限都一样


2.配置telnet
- 以华为路由器为例,设置telnet登录方式,密码为huawei
1. password模式
- 只需要输入密码即可(不安全)
<huawei>sys     #进入系统视图
enter system view, return user view with ctrl+z.
[huawei]sysname ar3     #设置设备名称
[ar3]user-interface vty 0 4   # 进入用户界面准备设置认证模式
[ar3-ui-vty0-4]authentication-mode password   #设置认证方式,
please configure the login password (maximum length 16):huawei  #设置密码
[ar3-ui-vty0-4]user privilege level 1  #设置用户权限等级,只有用户等级大于3才可以进入系统视图
2. aaa模式
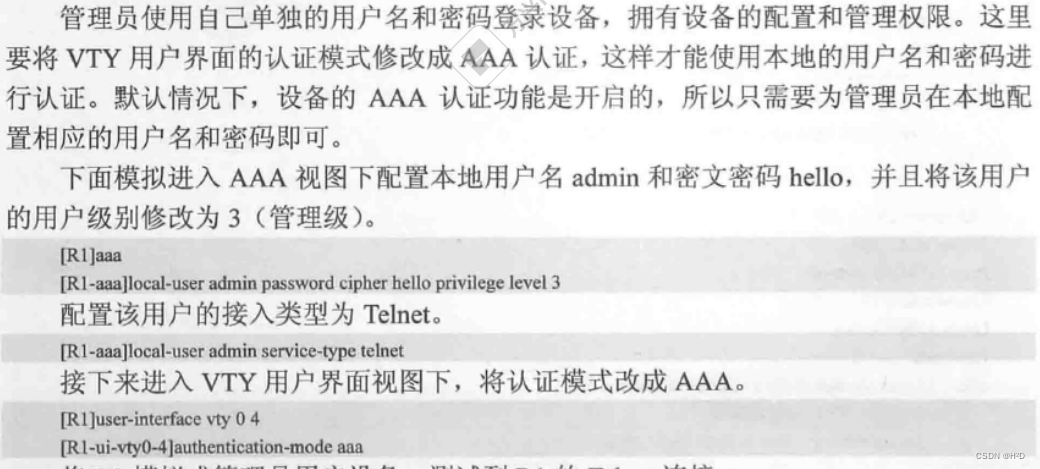
- 需要同时输入用户名和密码
- 配置具有aaa模式的用户
- 设置用户名、密码、权限等级
- 用户视图设置aaa认证模式
[ar3]aaa   #进入aaa视图,注册aaa模式的用户
[ar3-aaa]local-user admin password cipher huawei privilege level 3 #设置 用户名 密码 权限
[ar3-aaa]local-user admin service-type telnet  #设置用户的登录类型
[ar3]q
[ar3]user-interface vty 0 4  # 进入前5个用户界面准备设置认证模式
[ar3-ui-vty0-4]authentication-mode aaa     #设置这属于这5个用户界面的用户。认证模式为aaa
3.配置console口密码
- 配置串口密码,以防止黑客通过串口直连的方式违规接入交换机
1.配置password认证方式
[huawei]user-interface console 0  #进入console接口
[huawei-ui-console0]set authentication username huawei password cipher admin123  #以密文的方式存储密码
2.配置aaa认证方式
[huawei]user-interface console 0   # 进入console视图
[huawei-ui-console0]authentication-mode aaa  #设置aaa模式认证
[huawei-ui-console0]q
[huawei]aaa           #进入aaa视图
[huawei-aaa]local-user admin password cipher admin123	 #设置一个用户
[huawei-aaa]local-user admin service-type terminal       #用户的登录类型为console
4.配置思路
四、通过stelnet远程管理设备(华为)
- 由于telnet使用明文传输,用户在登录时,其用户名密码都是以明文传输,并不安全,因此可以使用stelnet
- stelnet是基于ssh协议进行通讯
配置步骤
1.配置生成本地rsa密钥对
rsa local-key-pair create
dis rsa local-key-pair public  #查看本地密钥对中的公钥信息
2.配置用户的验证方式为aaa
user-interface vty 0 4
authentication-mode aaa
protocol inbound ssh      #指定vty界面支持ssh协议,设备自动禁止telnet功能
3.在aaa界面设置用户信息,新建用户
aaa
local-user huawei1 password cipher 123456    #进入aaa界面,添加用户
local-user huawei1 service-type ssh  #设置该用户的接入类型为ssh
local-user huawei1 privilege level 3    #配置用户权限
4.新建ssh用户、设置认证方式
ssh user huawei1 authentication-type password  #新建ssh用户,名为huawei1,指定认证方式为密码
stelnet server enable   #开启ssh服务
dis ssh user-information huawei1     #查看huawei1的用户信息
dis ssh server status   #查看ssh服务状态
5.在用户端,配置用户端ssh首次登录认证
- 因为用户在第一次登录的时候没有公钥信息,所以会登录失败,所以在用户端将ssh首次认证功能开启,首次登录时不对用户端的公钥进行检查
sys
ssh client frist-time enable

发表评论