华为数通hcia和hcip的考试代码为h12-811、h12-821、h12-831。
想要学好网络,掌握关键因素非常重要:多实操。
来看看具体实验目录:
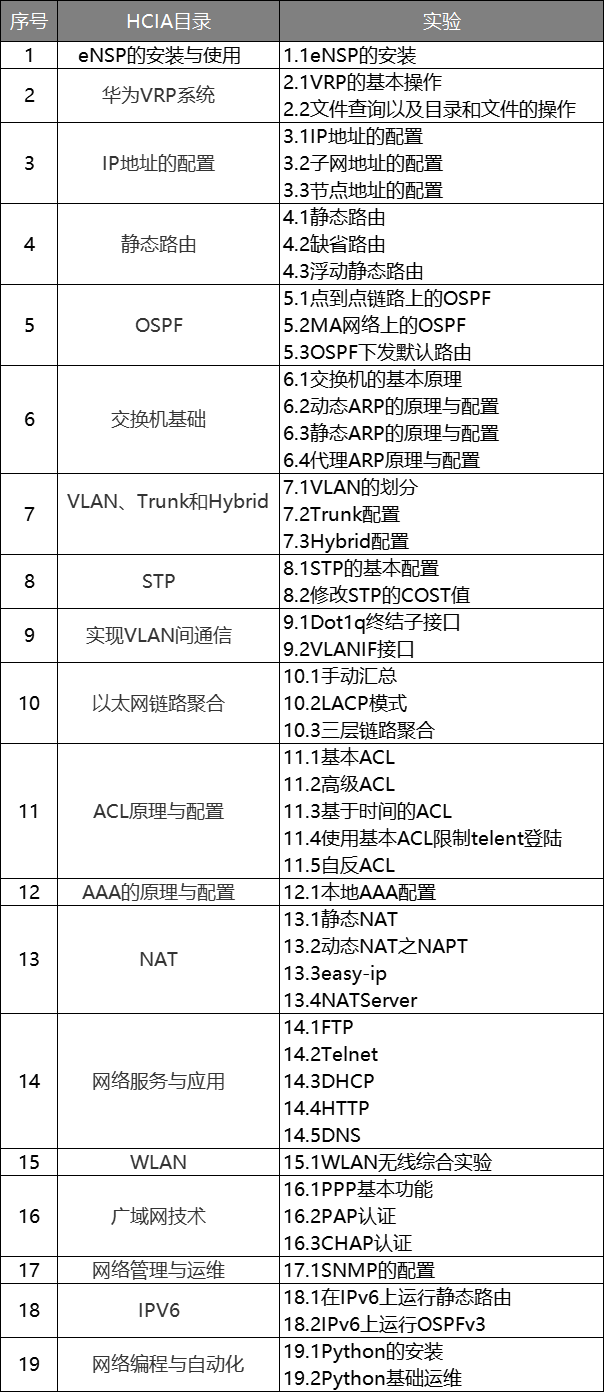
hcia目录详情
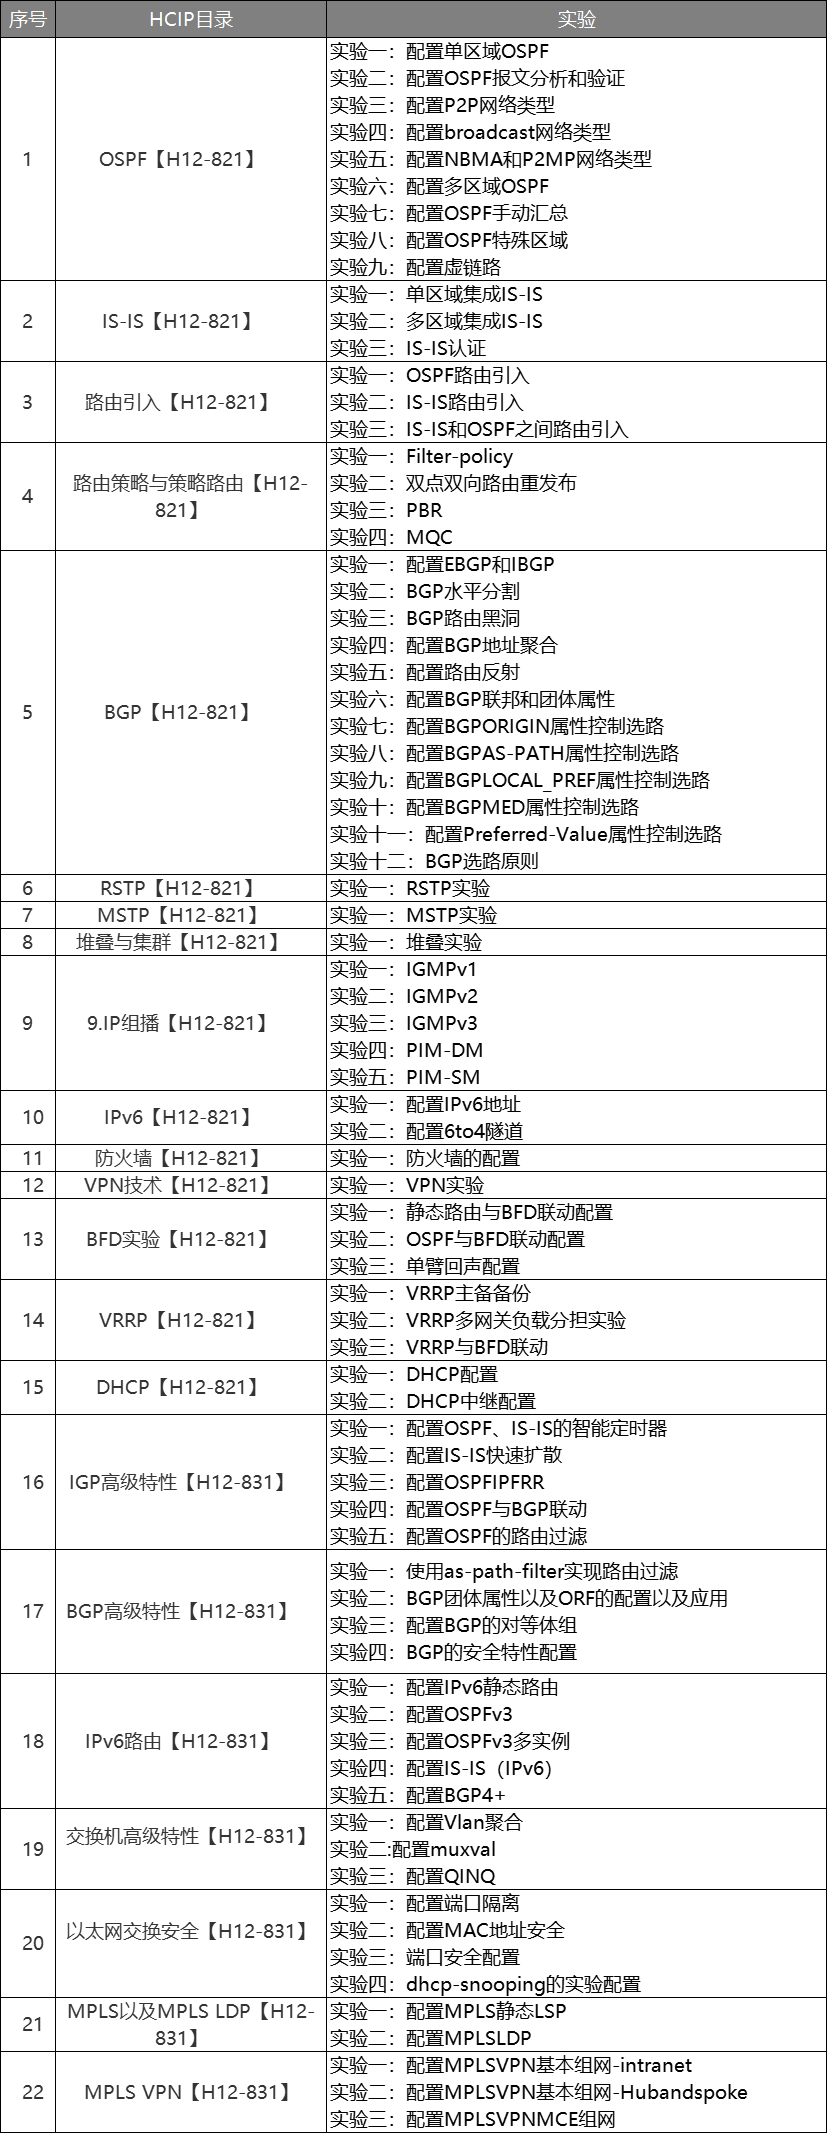
hcip目录详情
需要实验拓扑练习的朋友,可以关注+点赞后,文章底部有我的方式(记得备注csdn)。
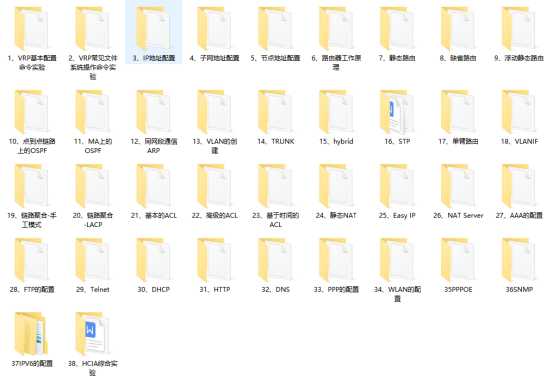
hcia全套实验拓扑

hcip全套实验拓扑
需要实验拓扑练习的朋友,可以关注+点赞后,文章底部有我的方式(记得备注csdn)。
本文重点讲解hcia综合实验,列举一个综合实验详细脚本,更多实验讲持续更新。
hcia综合实验案例详细设计
一、实验拓扑
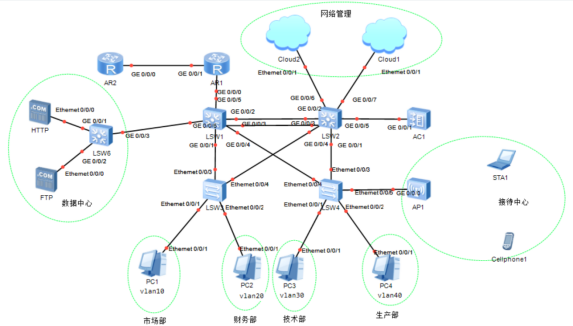
二、实验需求
-
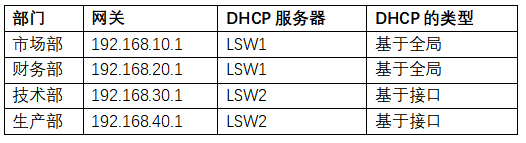
市场部属于vlan10,财务部属于vlan20,技术部属于vlan30,生产部属于vlan40,接待中心属于vlan50,数据中心属于vlan60。
-
lsw1与lsw2之间的链路带宽要求为2g
-
通过stp的配置阻塞lsw3的e0/0/4,阻塞lsw4的e0/0/3
-
通过dhcp让市场部、财务部、技术部、生产部获得ip地址,ip规则如下:
-
接待中心通过ac下发配置给ap1让客户可以通过无线上网
-
把数据中心的服务器搭建好,可以为用户提供服务
-
ar1通过拨号上网
三、实验步骤
1、创建vlan
lsw1的配置
<huawei>system-view
enter system view, return user view with ctrl+z.
[huawei]undo info-center enable
info: information center is disabled.
[huawei]sysname lsw1
[lsw1]vlan batch 10 20 30 40 50 60
[lsw1]quit
lsw2的配置
<huawei>system-view
enter system view, return user view with ctrl+z.
[huawei]undo info-center enable
[huawei]sysname lsw2
[lsw2]vlan batch 10 20 30 40 50 60
[lsw2]quit
lsw3的配置
<huawei>system-view
enter system view, return user view with ctrl+z.
[huawei]undo info-center enable
[huawei]sysname lsw3
[lsw3]vlan batch 10 20 30 40 50 60
[lsw3]quit
lsw4的配置
<huawei>system-view
enter system view, return user view with ctrl+z.
[huawei]undo info-center enable
info: information center is disabled.
[huawei]sysname lsw4
[lsw4]vlan batch 10 20 30 40 50 60
[lsw4]quit
lsw6的配置
<huawei>system-view
enter system view, return user view with ctrl+z.
[huawei]undo info-center enable
info: information center is disabled.
[huawei]sysname lsw6
[lsw6]vlan batch 10 20 30 40 50 60
[lsw6]quit
2、把接口划入到相应的vlan
lsw1的配置
lsw2的配置
lsw3的配置
[lsw3]interface e0/0/1
[lsw3-ethernet0/0/1]port link-type access
[lsw3-ethernet0/0/1]port default vlan 10
[lsw3-ethernet0/0/1]quit
[lsw3]interface e0/0/2
[lsw3-ethernet0/0/2]port link-type access
[lsw3-ethernet0/0/2]port default vlan 20
[lsw3-ethernet0/0/2]quit
lsw4的配置
[lsw4]interface e0/0/1
[lsw4-ethernet0/0/1]port link-type access
[lsw4-ethernet0/0/1]port default vlan 30
[lsw4-ethernet0/0/1]quit
[lsw4]interface e0/0/2
[lsw4-ethernet0/0/2]port link-type access
[lsw4-ethernet0/0/2]port default vlan 40
[lsw4-ethernet0/0/2]quit
lsw6的配置
[lsw6]interface g0/0/1
[lsw6-gigabitethernet0/0/1]port link-type access
[lsw6-gigabitethernet0/0/1]port default vlan 60
[lsw6-gigabitethernet0/0/1]quit
[lsw6]interface g0/0/2
[lsw6-gigabitethernet0/0/2]port link-type access
[lsw6-gigabitethernet0/0/2]port default vlan 60
[lsw6-gigabitethernet0/0/2]quit
3、设置trunk
lsw1的配置
[lsw1]port-group 1
[lsw1-port-group-1]group-member g0/0/1 g0/0/4 g0/0/6
[lsw1-port-group-1]port link-type trunk
[lsw1-port-group-1]port trunk allow-pass vlan 10 20 30 40 50 60
[lsw1-port-group-1]quit
lsw2的配置
[lsw2]port-group 1
[lsw2-port-group-1]group-member gigabitethernet 0/0/1 g0/0/4 g0/0/5
[lsw2-port-group-1]quit
[lsw2-port-group-1]port link-type trunk
[lsw2-port-group-1]port trunk allow-pass vlan 10 20 30 40 50 60
[lsw2-port-group-1]quit
lsw3的配置
[lsw3]port-group 1
[lsw3-port-group-1]group-member e0/0/3 e0/0/4
[lsw3-port-group-1]port link-type trunk
[lsw3-port-group-1]port trunk allow-pass vlan 10 20 30 40 50 60
[lsw3-port-group-1]quit
lsw4的配置
[lsw4]port-group 1
[lsw4-port-group-1]group-member e0/0/3 to e0/0/5
[lsw4-port-group-1]port link-type trunk
[lsw4-port-group-1]port trunk allow-pass vlan 10 20 30 40 50 60
[lsw4-port-group-1]quit
lsw6的配置
[lsw6]interface g0/0/3
[lsw6-gigabitethernet0/0/3]port link-type trunk
[lsw6-gigabitethernet0/0/3]port trunk allow-pass vlan 10 20 30 40 50 60
[lsw6-gigabitethernet0/0/3]quit
4、设置聚合链路
lsw1的配置
[lsw1]interface eth-trunk 1
[lsw1-eth-trunk1]trunkport gigabitethernet 0/0/2 to 0/0/3
[lsw1-eth-trunk1]port link-type trunk
[lsw1-eth-trunk1]port trunk allow-pass vlan all
[lsw1-eth-trunk1]quit
lsw2的配置
[lsw2]interface eth-trunk 1
[lsw2-eth-trunk1]trunkport gigabitethernet 0/0/2 to 0/0/3
[lsw2-eth-trunk1]port link-type trunk
[lsw2-eth-trunk1]port trunk allow-pass vlan all
[lsw2-eth-trunk1]quit
5、stp的配置
[lsw1]stp root primary
[lsw2]stp root secondary
6、dhcp的配置
-
市场部
[lsw1]interface vlanif 10
[lsw1-vlanif10]ip address 192.168.10.1 24
[lsw1-vlanif10]quit

[lsw1]dhcp enable

[lsw1]ip pool vlan10
[lsw1-ip-pool-vlan10]network 192.168.10.0 mask 24
[lsw1-ip-pool-vlan10]dns-list 3.3.3.3 4.4.4.4
[lsw1-ip-pool-vlan10]gateway-list 192.168.10.1
[lsw1-ip-pool-vlan10]quit

[lsw1]interface vlanif 10
[lsw1-vlanif10]dhcp select global
[lsw1-vlanif10]quit-
财务部
[lsw1]interface vlanif 20
[lsw1-vlanif20]ip address 192.168.20.1 24
[lsw1-vlanif20]quit

[lsw1]ip pool vlan20
[lsw1-ip-pool-vlan20]network 192.168.20.0 mask 24
[lsw1-ip-pool-vlan20]gateway-list 192.168.20.1
[lsw1-ip-pool-vlan20]dns-list 3.3.3.3 4.4.4.4
[lsw1-ip-pool-vlan20]quit

[lsw1]interface vlanif 20
[lsw1-vlanif20]dhcp select global
[lsw1-vlanif20]quit-
技术部
[lsw2]dhcp enable

[lsw2]interface vlanif 30
[lsw2-vlanif30]ip address 192.168.30.1 24
[lsw2-vlanif30]dhcp select interface
[lsw2-vlanif30]dhcp server dns-list 3.3.3.3 4.4.4.4-
生产部
[lsw2]interface vlanif 40

[lsw2-vlanif40]ip address 192.168.40.1 24
[lsw2-vlanif40]dhcp select interface
[lsw2-vlanif40]dhcp server dns-list 3.3.3.3 4.4.4.4
[lsw2-vlanif40]quit
7、wlan的配置
交换机lsw4的配置
[lsw4]vlan 70
[lsw4-vlan70]quit

[lsw4]interface e0/0/5
[lsw4-ethernet0/0/5]port trunk pvid vlan 70
[lsw4-ethernet0/0/5]port trunk allow-pass vlan 70   //trunk之前已创建

[lsw4-ethernet0/0/5]quit

[lsw4]interface e0/0/4 // 因为e0/0/3阻塞了
[lsw4-ethernet0/0/3]port trunk allow-pass vlan 70  //trunk之前已创建
[lsw4-ethernet0/0/3]quit
lsw2的配置
[lsw2]vlan 70
[lsw2-vlan70]quit

[lsw2]interface g0/0/1
[lsw2-gigabitethernet0/0/1]port trunk allow-pass vlan 70
[lsw2-gigabitethernet0/0/1]quit

[lsw2]interface g0/0/5
[lsw2-gigabitethernet0/0/5]port trunk allow-pass vlan 50 70
[lsw2-gigabitethernet0/0/5]quit

[lsw2]interface vlanif 50
[lsw2-vlanif50]ip address 192.168.50.1 24
[lsw2-vlanif50]dhcp select interface  //为无线客户分配ip地址
ac的配置
<ac6005>system-view
enter system view, return user view with ctrl+z.
[ac6005]undo info-center enable

[ac6005]sysname ac

[ac]vlan batch 50 70

[ac]interface g0/0/1
[ac-gigabitethernet0/0/1]port link-type trunk
[ac-gigabitethernet0/0/1]port trunk allow-pass vlan 50 70
[ac-gigabitethernet0/0/1]quit

[ac]dhcp enable

[ac]interface vlanif 70
[ac-vlanif70]ip address 192.168.70.1 24
[ac-vlanif70]dhcp  select interface
[ac-vlanif70]quit

[ac-wlan-view]regulatory-domain-profile name x1
[ac-wlan-regulate-domain-x1]country-code cn
[ac-wlan-regulate-domain-x1]quit

[ac-wlan-view]ap-group name x
[ac-wlan-ap-group-x]regulatory-domain-profile x1
warning: modifying the country code will clear channel, power and antenna gain c
onfigurations of the radio and reset the ap. continue?[y/n]:y

[ac]capwap source interface vlanif 70

[ac]wlan
[ac-wlan-view]ap auth-mode mac-auth
[ac-wlan-view]ap-id 1 ap-mac 00e0-fc0f-47d0
[ac-wlan-ap-1]ap-name client
[ac-wlan-ap-1]ap-group x
warning: this operation may cause ap reset. if the country code changes, it will
 clear channel, power and antenna gain configurations of the radio, whether to c
ontinue? [y/n]:y

注意:为什么ap拿不到地址,因为stp把e0/0/3阻塞了,所以其它交换机还要创建vlan70,trunk要允许70通过

[ac]wlan
[ac-wlan-view]security-profile name y1
[ac-wlan-sec-prof-y1]security wpa-wpa2 psk pass-phrase huawei@123 aes
[ac-wlan-sec-prof-y1]quit
[ac-wlan-view]ssid-profile name y2
[ac-wlan-ssid-prof-y2]ssid hcia
info: this operation may take a few seconds, please wait.done.
[ac-wlan-ssid-prof-y2]quit
[ac-wlan-view]vap-profile name y
[ac-wlan-vap-prof-y]forward-mode tunnel
info: this operation may take a few seconds, please wait.done.
[ac-wlan-vap-prof-y]service-vlan vlan-id 50
[ac-wlan-vap-prof-y]security-profile y1
[ac-wlan-vap-prof-y]ssid-profile y2
[ac-wlan-vap-prof-y]quit
[ac-wlan-view]ap-group name x
[ac-wlan-ap-group-x]vap-profile y wlan 1 radio 0
8、数据中心的搭建
[lsw1]interface vlanif 60
[lsw1-vlanif60]ip address 192.168.60.1 24
[lsw1-vlanif60]quit
9、内网相相互访问
第一步:lsw1与ar1的地址
[lsw1]interface vlanif 200
[lsw1-vlanif200]ip address 10.1.1.1 24
[lsw1-vlanif200]quit
[lsw1]interface g0/0/5
[lsw1-gigabitethernet0/0/5]port link-type access
[lsw1-gigabitethernet0/0/5]port default vlan 200
[lsw1-gigabitethernet0/0/5]quit
第二步:路由器的配置
<huawei>system-view
enter system view, return user view with ctrl+z.
[huawei]undo info-center enable
info: information center is disabled.
[huawei]sysname r1
[r1]int
[r1]interface g0/0/0
[r1-gigabitethernet0/0/0]ip address 10.1.1.254 24
[r1-gigabitethernet0/0/0]quit
第三步:运行ospf
[r1]ospf router-id 1.1.1.1
[r1-ospf-1]area 0
[r1-ospf-1-area-0.0.0.0]network 10.1.1.0 0.0.0.255
[r1-ospf-1-area-0.0.0.0]quit

[lsw1]ospf router-id 2.2.2.2
[lsw1-ospf-1]area 0
[lsw1-ospf-1-area-0.0.0.0]network 192.168.60.0 0.0.0.255
[lsw1-ospf-1-area-0.0.0.0]network 192.168.10.0 0.0.0.255
[lsw1-ospf-1-area-0.0.0.0]network 192.168.20.0 0.0.0.255
[lsw1-ospf-1-area-0.0.0.0]quit


[lsw2]ospf router-id 3.3.3.3
[lsw2-ospf-1]area 0
[lsw2-ospf-1-area-0.0.0.0]network 192.168.30.0 0.0.0.255
[lsw2-ospf-1-area-0.0.0.0]network 192.168.40.0 0.0.0.255
[lsw2-ospf-1-area-0.0.0.0]network 192.168.50.0 0.0.0.255
注意:lsw1和lsw2没有直连接口,所以在要lsw2上创建int vlan 10,int vlan 20,并宣告进ospf
10、拨号上网
第一步:拨号服务器的配置
<huawei>system-view
enter system view, return user view with ctrl+z.
[huawei]undo info-center enable
info: information center is disabled.
[huawei]sysname ar2
[ar2]interface loopback 0
[ar2-loopback0]ip address 8.8.8.8 24
[ar2-loopback0]quit

[ar2]ip pool lw
info: it's successful to create an ip address pool.
[ar2-ip-pool-lw]network 100.1.1.0 mask 24
[ar2-ip-pool-lw]gateway-list 100.1.1.1
[ar2-ip-pool-lw]quit

[ar2]aaa
[ar2-aaa]local-user huawei password cipher 1234
[ar2-aaa]local-user huawei service-type ppp

[ar2]interface virtual-template 1
[ar2-virtual-template1]ip address 100.1.1.1 24
[ar2-virtual-template1]pp authentication-mode chap
[ar2-virtual-template1]remote address pool lw
[ar2-virtual-template1]quit

[ar2]interface g0/0/0
[ar2-gigabitethernet0/0/0]pppoe-server bind virtual-template 1
[ar2-gigabitethernet0/0/0]quit
第二步:拨号客户端的配置
[r1]interface dialer 0
[r1-dialer0]dialer user user1
[r1-dialer0]dialer bundle 1
[r1-dialer0]ppp chap user huawei
[r1-dialer0]ppp chap password cipher 1234
[r1-dialer0]ip address ppp-negotiate
[r1-dialer0]quit
[r1]interface g0/0/1
[r1-gigabitethernet0/0/1]pppoe-client dial-bundle-number 1
[r1-gigabitethernet0/0/1]
注意:要在r1上写一条默认路由、做nat,在ospf里面下发默认路由,
需要实验拓扑练习的朋友,可以关注+点赞后,文章底部有我的方式(记得备注csdn)。
hcia全套实验拓扑
hcip全套实验拓扑
更多实验,我将继续更新。
需要实验拓扑练习的朋友,可以关注+点赞后,通过下方方式找我领取(记得备注csdn)。

发表评论