目录
前言
在之前的博客内容中,关于在asp.net core当中使用coap协议进行开发进行一篇博文的探讨物联网协议coap之c#基于mozi的coapserver实现解析。这边博文主要是讲解了在asp .net core当中如何使用c#编程语言进行coapserver的实现,对其涉及的相关类进行了简单的讲解,相信大家对其实现和协议实现由了一定的认识。但是基于c#的client的设计与实现,以及详细的调用方式并没有进行讲解。
本文是上篇博客的继续介绍篇,依然使用asp .net core,采用c#编程语言进行开发,重点介绍coapclient的c#代码实现以及使用get方法实际发送请求,详细阐述与coapserver端的交互调用。便于各位读者在使用过程中对coap的调用机制有更深的了解和掌握。
一、coapclient相关类介绍
在coap中,无论是使用java进行开发,还是c#,或者使用php,必须要使用client对象进行请求的发送,即get、post、put、delete四种请求。因此在c#中有必要对coapclient进行一下简单介绍,同时可以对比一些在不同的编程语言中,实现上的有所区别。
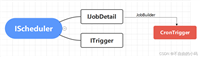
1、coapclient类图
第一步来看一下coapclient的类图,详细如下图所示:

相信看过coapserver的设计的朋友们一定记得,coapserver的父类是什么?不记得的不要紧,下面将贴出重点代码:
public class coapserver : coappeer是的,各位没有看错,coapserver也是coappeer的子类,其实不管是客户端还是服务端,都是需要进行通讯的,二coappeer就承接了这部分工作的。
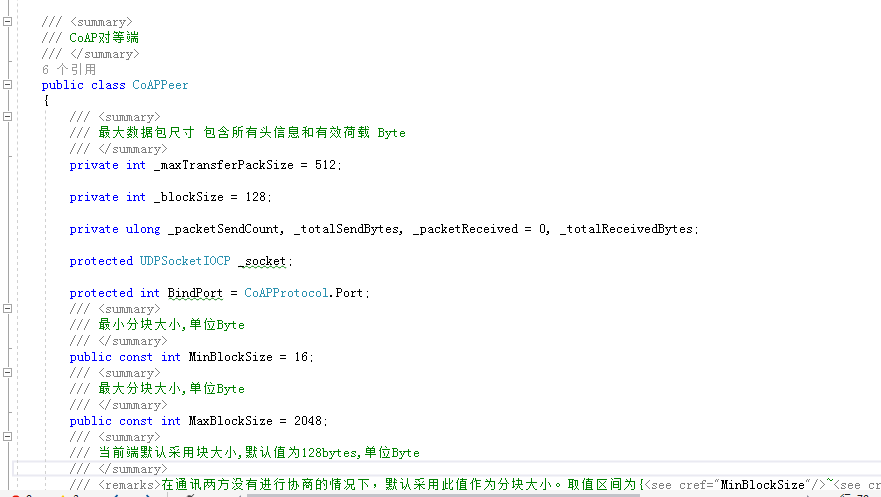
coappeer是对等的,双方都需要实现协议中共同的部分。
2、coapclient的设计与实现
言归正传,这里还是要把coapclient类的设计好好介绍一下,毕竟client负责了所有终端与服务端的交互。也非常有必要介绍一下这位主角。
 public class coapclient : coappeer
    {
        private bool _randomport = true;

        private coaptransmissionconfig _transconfig = new coaptransmissionconfig();

        private messagecachemanager _cachemanager;

        private ulong _packetreceived;

        //private ushort _remoteport = coapprotocol.port;
        //private string _remotehost = "";

        / <summary>
        / 远端服务器地址
        / </summary>
        //public string remoteaddress { get { return _remotehost; } protected set { _remotehost = value; } }

        / <summary>
        / 远端服务器端口
        / </summary>
        //public ushort remoteport { get { return _remoteport; } protected set { _remoteport = value; } }

        /// <summary>
        /// 服务端回应请求
        /// </summary>
        public messagetransmit response;
        /// <summary>
        /// 发起请求
        /// </summary>
        public messagetransmit request;

        private byte[] _token;

        /// <summary>
        /// 统一通信token
        /// </summary>
        public byte[] token { get => _token; set => _token = value; }
通过代码可以看到,在coapclient中,定义了请求和响应对象,以及token对象。 在这个类当中,不仅定义了client的相关属性,同时还定义了丰富的方法,基本上是围绕get、post、put、delete等四个方法当中。下面来详细介绍一下:
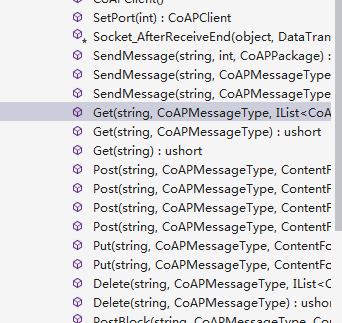
以get为例,这里就定义三个重载方法,对于实际使用过程当中几乎可以覆盖相关场景,如果您还觉得不够,可以自行扩展以更好的贴近自己的实际需求。
| 序号 | 方法 | 参数说明 |
| 1 | get(string url) | get方法,默认消息类型为<see cref="coapmessagetype.confirmable"/> |
| 2 | get(string url, coapmessagetype msgtype) | url,地址中的要素会被分解注入到options中 msgtype消息类型 |
| 3 | get(string url, coapmessagetype msgtype, ilist<coapoption> options) | url,地址中的要素会被分解注入到options中 msgtype消息类型 options 选项集合 |
当然,不论是get还是post方法,其底层其实都用调用sendmessage()方法,因此sendmessage才是核心的方法。
3、sendmessage解析
以下是核心的发送消息的方法,代码如下:
/// <summary>
        /// </summary>
        /// <param name="url">地址中的要素会被分解注入到options中,参见<see cref="get(string, coapmessagetype, ilist{coapoption})"/></param>
        /// <param name="msgtype">消息类型,默认为<see cref="coapmessagetype.confirmable"/></param>
        /// <param name="msgid"></param>
        /// <param name="token"></param>
        /// <param name="method"></param>
        /// <param name="options"></param>
        /// <param name="payload"></param>
        /// <returns></returns>
        public ushort sendmessage(string url, coapmessagetype msgtype, ushort msgid, byte[] token, coaprequestmethod method, ilist<coapoption> options, byte[] payload)
        {
            coappackage cp = new coappackage
            {
                code = method,
                token = token,
                messsageid = msgid,
                messagetype = msgtype ?? coapmessagetype.confirmable
            };

            uriinfo uri = uriinfo.parse(url);

            if (!string.isnullorempty(uri.url))
            {

                if (cp.code == coaprequestmethod.post || cp.code == coaprequestmethod.put)
                {
                    cp.payload = payload;
                }
                //注入uri信息
                cp.seturi(uri);
                //发起通讯
                if (!string.isnullorempty(uri.host))
                {
                    if (options != null)
                    {
                        foreach (var opt in options)
                        {
                            cp.setoption(opt.option, opt.value);
                        }
                    }
                    sendmessage(uri.host, uri.port == 0 ? coapprotocol.port : uri.port, cp);
                }
                else
                {
                    throw new exception($"dns无法解析指定的域名:{uri.domain}");
                }
            }
            else
            {
                throw new exception($"分析链接地址:{url}时出错,请检查url地址是否合法");
            }
            return cp.messsageid;
}| 序号 | 参数名 | 说明 |
| 1 | url | 请求地址 |
| 2 | msgtype | 消息类型 |
| 3 | msgid | 消息id |
| 4 | token | 通信令牌 |
| 5 | method | 请求方法,如get、post、put、delete等 |
| 6 | options | 选项集合 |
| 7 | payload | 请求载荷,简单理解就是请求参数包 |
二、client调用分析
coapclient的请求调用,在c#中的实现与java是类似的,也是要创建coapclient对象,然后向server端发送请求,下面会针对这个调用流程进行介绍。
1、创建coapclient对象
创建client对象的关键代码如下:
coapclient cc = new coapclient();
//本地端口
cc.setport(12340);

cc.response += new messagetransmit((x, y, z) => {
   console.foregroundcolor = consolecolor.darkgreen;
   console.writeline(z.tostring(coappackagetostringtype.httpstyle));
   console.foregroundcolor = consolecolor.gray;
});
cc.request += new messagetransmit((x, y, z) =>
{
   console.writeline(z.tostring(coappackagetostringtype.httpstyle));
});

 cc.start();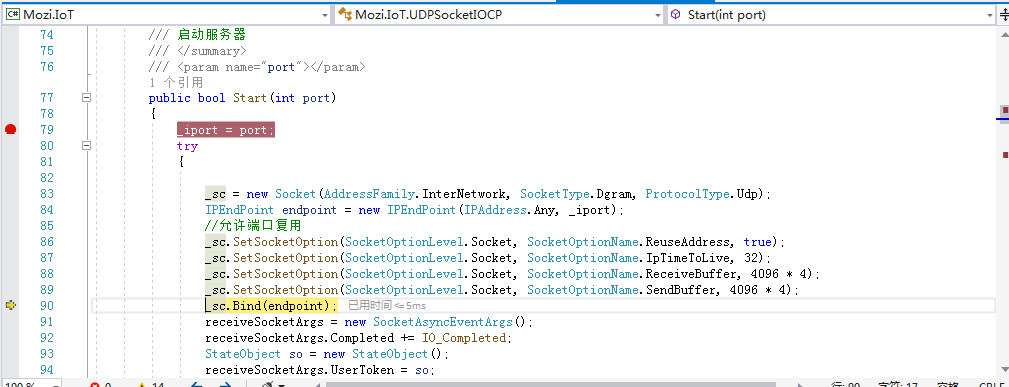
这里与coapserver的启动流程是一样的,同样会创建udp的socket,然后绑定endpoint。这样即完成了coapclient对象的创建及启动准备。
2、实际发送请求
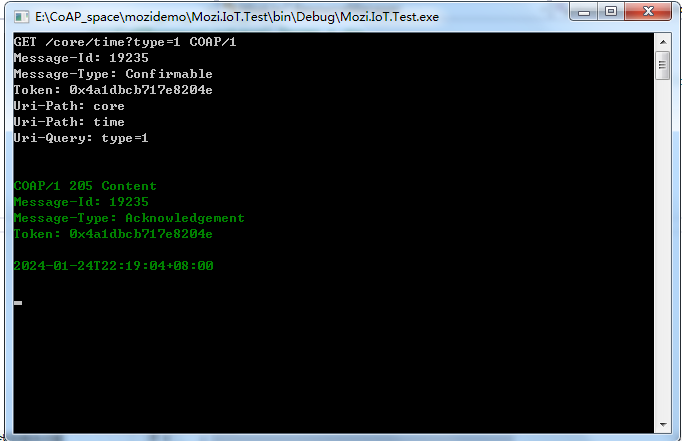
在创建了client对象和启动后,即可进行相应方法的调用。下面以get方法为例,调用一个之前我们用c#写好的一个resource,访问代码如下:
cc.get("coap://127.0.0.1:5683/core/time?type=1",coapmessagetype.confirmable);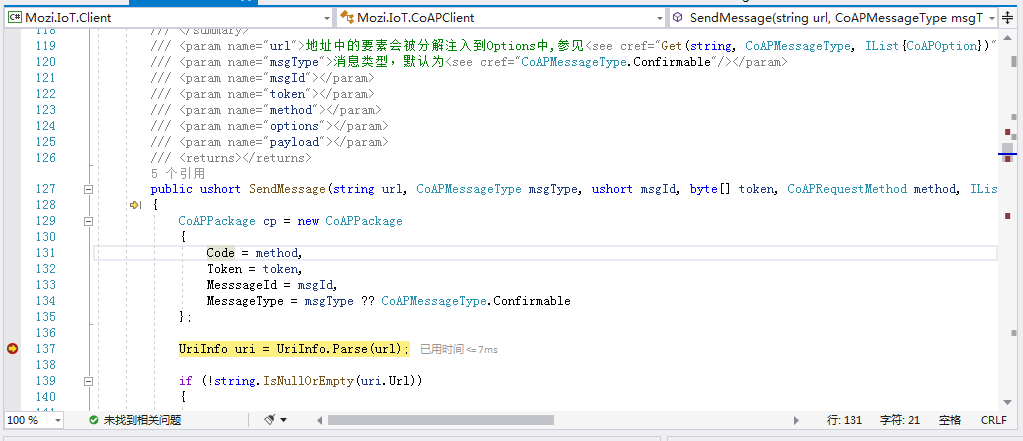
然后调用下面的消息发送方法进行消息的发送。

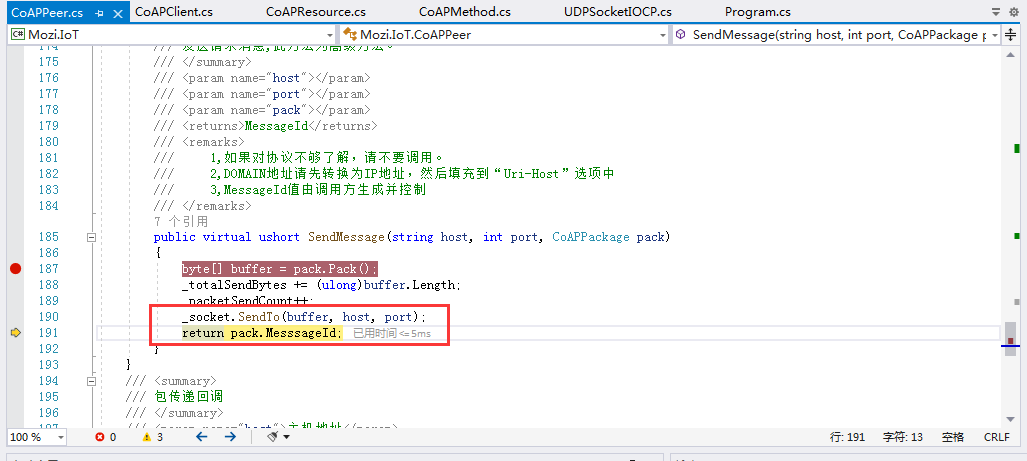
调用socket对象进行消息的发送。
3、server端请求响应
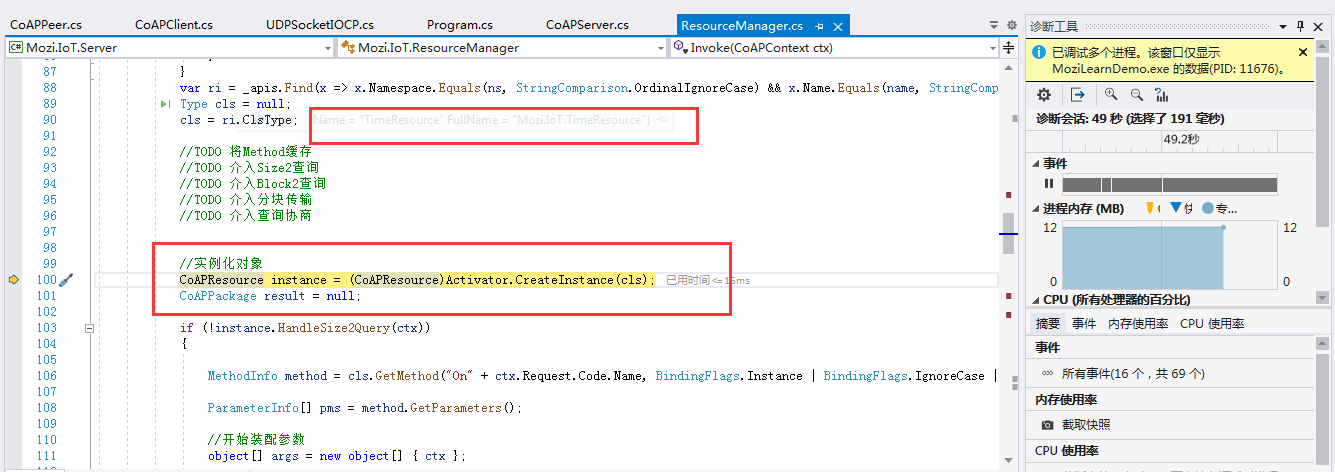
以上步骤一个请求就已经发往了server,下面来看一下server端的resoure寻址过程。首先在coapserver当中,有一个socket_afterreceiveend的方法,用来接收请求,如下过程进行请求包的一个解析和转换。
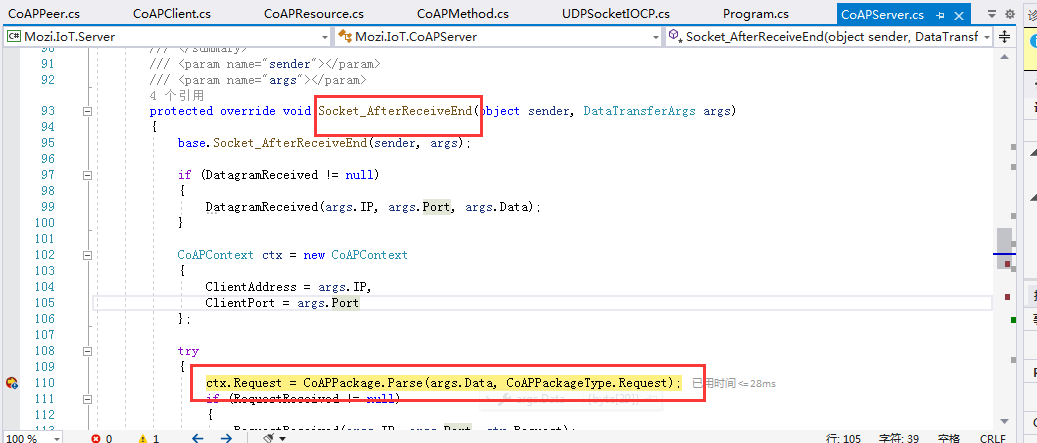
这里很关键,这里就是把之前通过resourcemanager管理器统一管理的控制器进行获取,类似与java当中反射和ioc的概念。这里千万要理解。
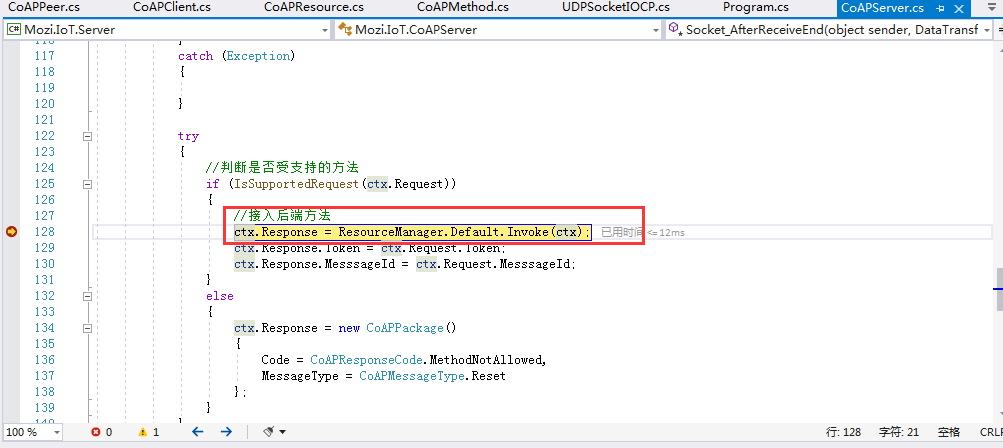
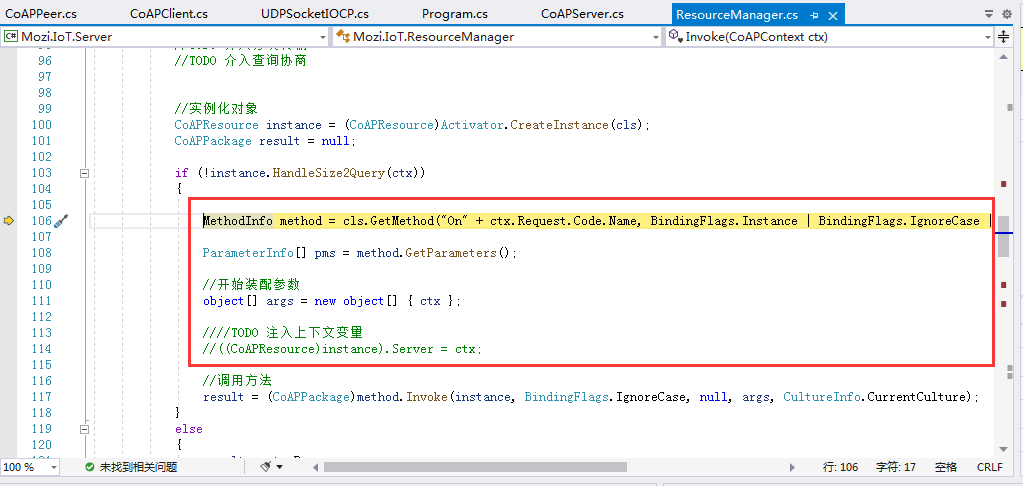
4、控制器寻址
在上面的过程当中会调用invoke方法进行反射调用方法,下面来具体看一下控制器寻址怎么实现的。首先在invoke的之后,实际会调用下面的管理器核心方法。
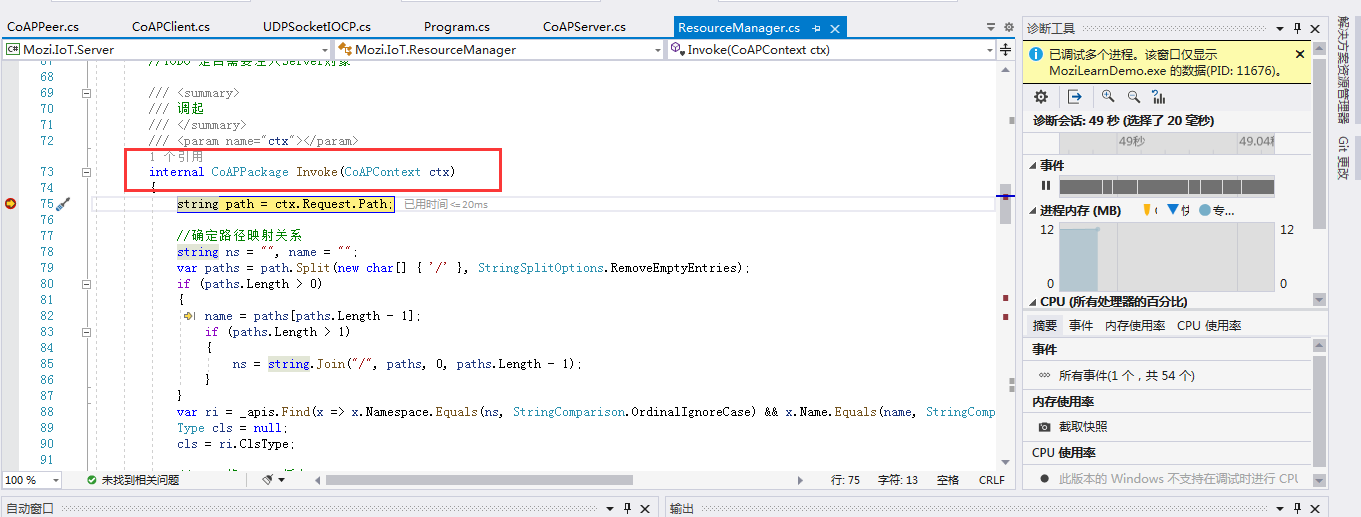
这个方法是定义在resourcemanager这个类当中的。然后根据请求路径去ioc容器中寻找匹配的资源对象。
随后完成实际方法的调用,一气呵成。这种调用方法与java的反射有异曲同工之处。
总结
以上就是本文的主要内容, 本文是上篇博客的继续介绍篇,依然使用asp .net core,采用c#编程语言进行开发,重点介绍coapclient的c#代码实现以及使用get方法实际发送请求,详细阐述与coapserver端的交互调用。便于各位读者在使用过程中对coap的调用机制有更深的了解和掌握。行文仓促,难免有疏漏和不当之处,如果不足,欢迎各位朋友在评论区之处。


发表评论