准备工作:
配置好pyqt5相关的库、qtdesigner、pyuic
1 qtdesigner简单界面设计
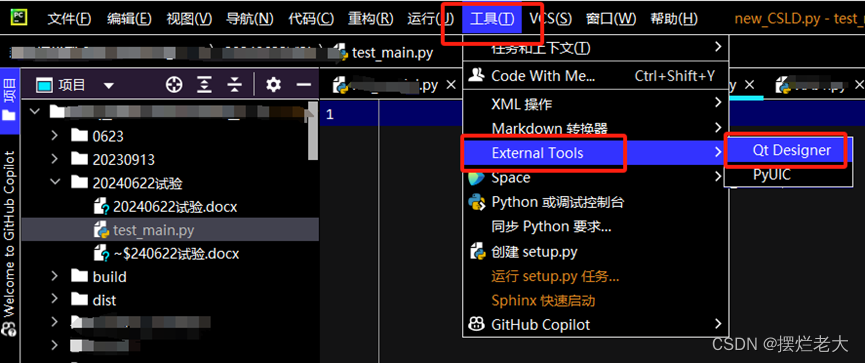
点击“工具"——>“外部工具(external tools)”——>“qtdesigner”。
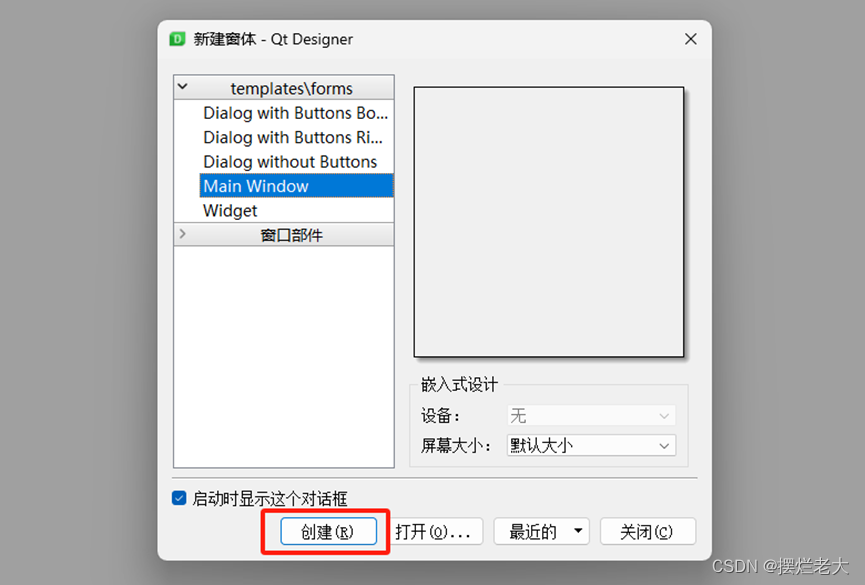
进入程序之后,点击“创建”,创建一个新的ui文件。
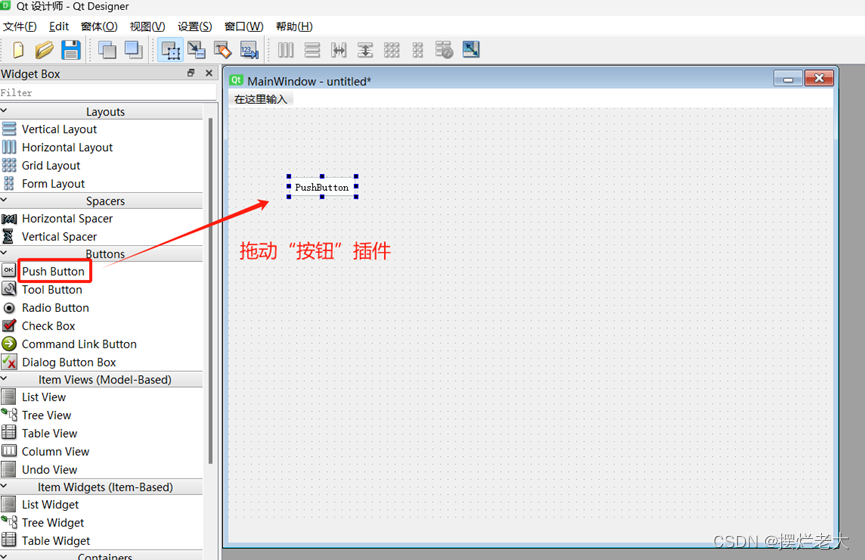
进入设计界面之后,将“按钮”控件拖放到主窗口的合适位置。
(用于响应用户的交互动作,比如点击、按下或释放)
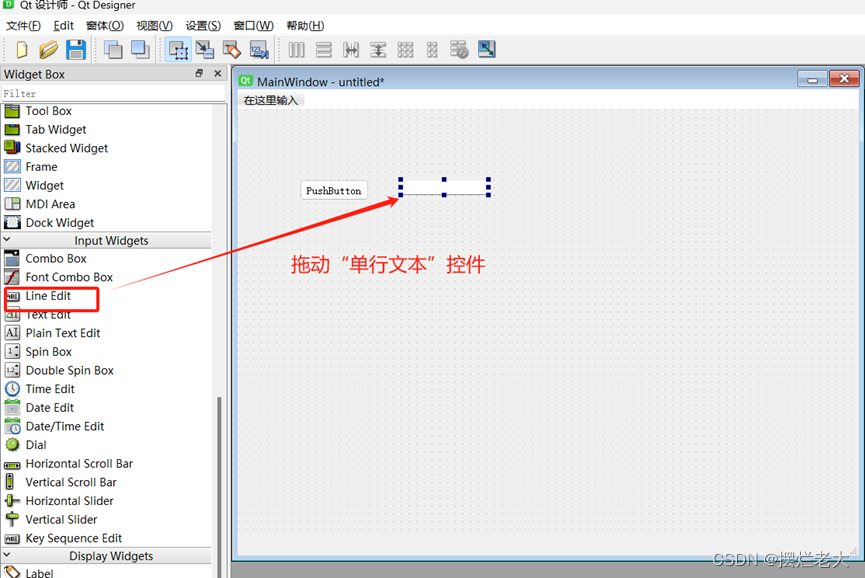
将“单行文本”控件拖放到主窗口的合适位置。
(用于单行文本输入的控件,它允许用户在界面上输入和编辑文本)
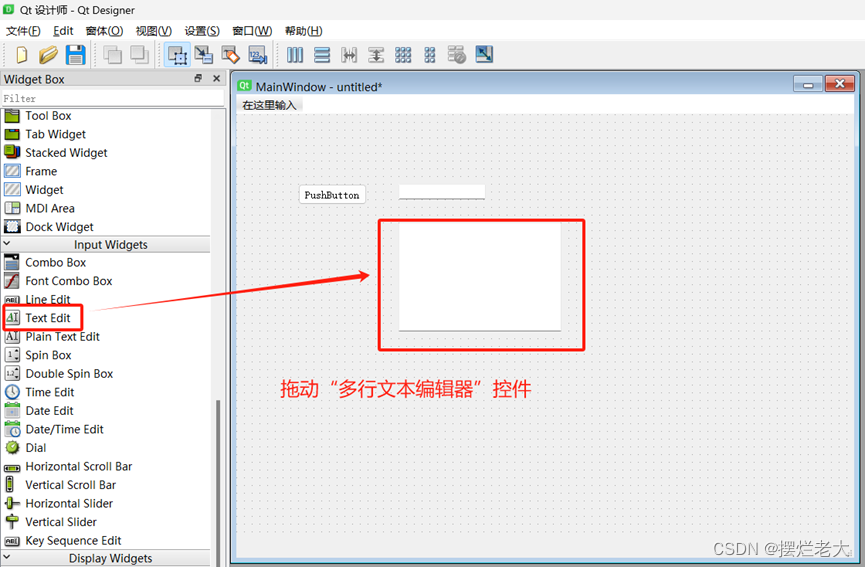
将“多行文本编辑器”控件拖放到主窗口的合适位置。
(与 qlineedit 控件不同,它允许用户输入和编辑多行文本内容)
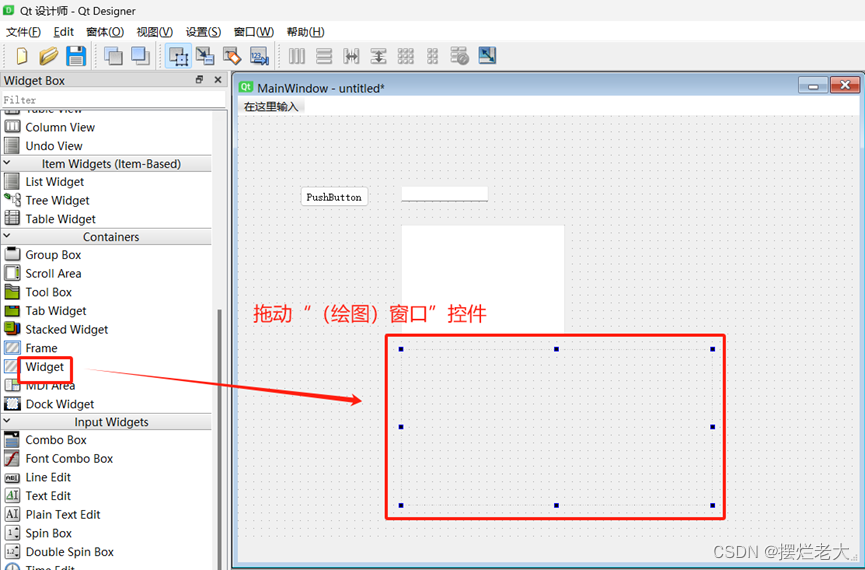
将“窗口(这里用于绘图)”控件拖放到主窗口的合适位置。
(用于绘制、事件处理和布局管理,提供了基本的 gui 功能。)
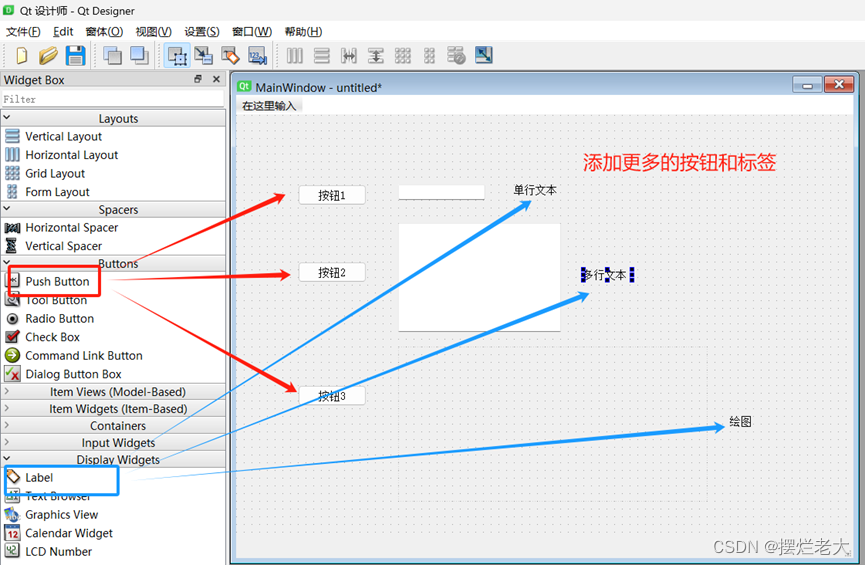
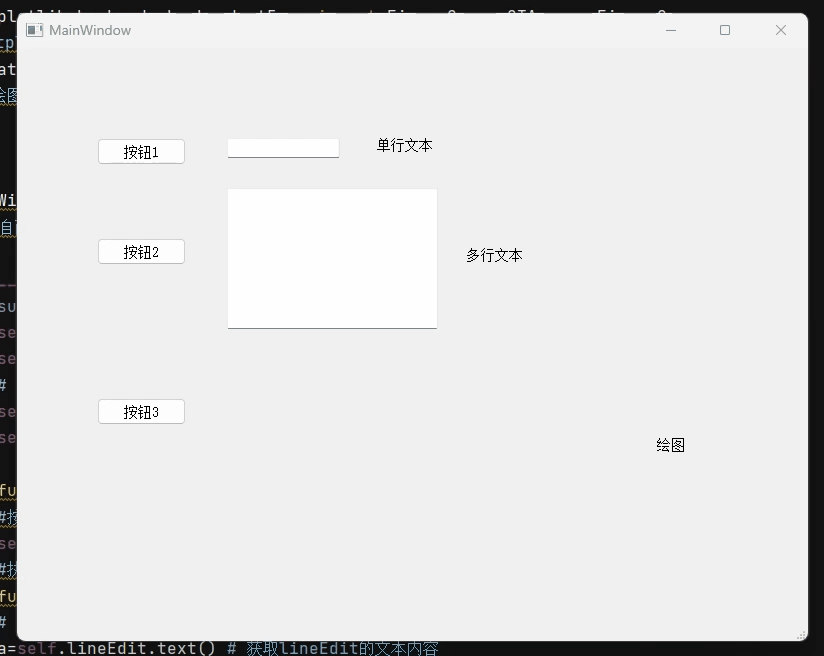
将控件进一步添加如下图所示,添加“按钮”和“标签”,并改变文本内容。
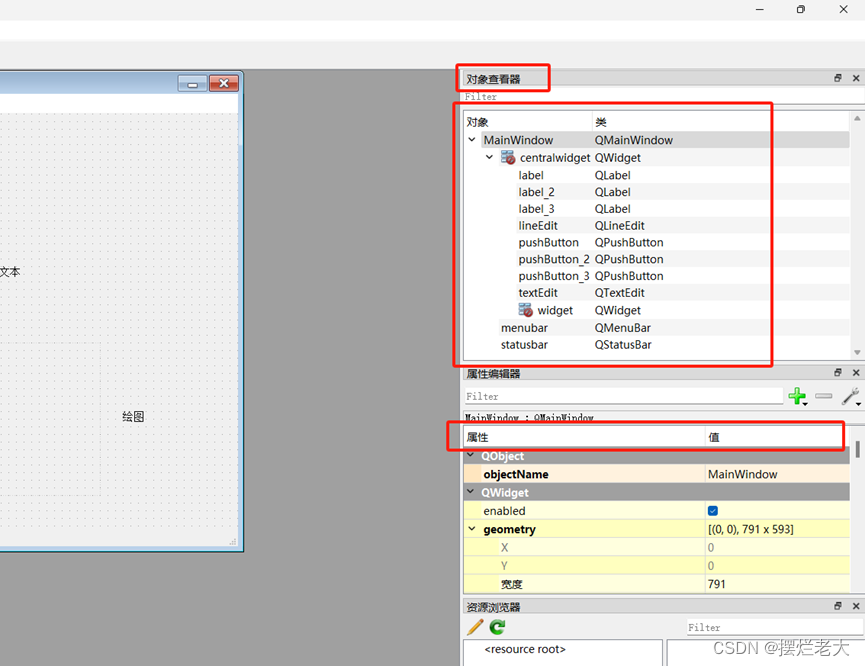
在右侧的“对象查看器”中可以看到当前所添加的所有控件的名称和相应的属性内容。
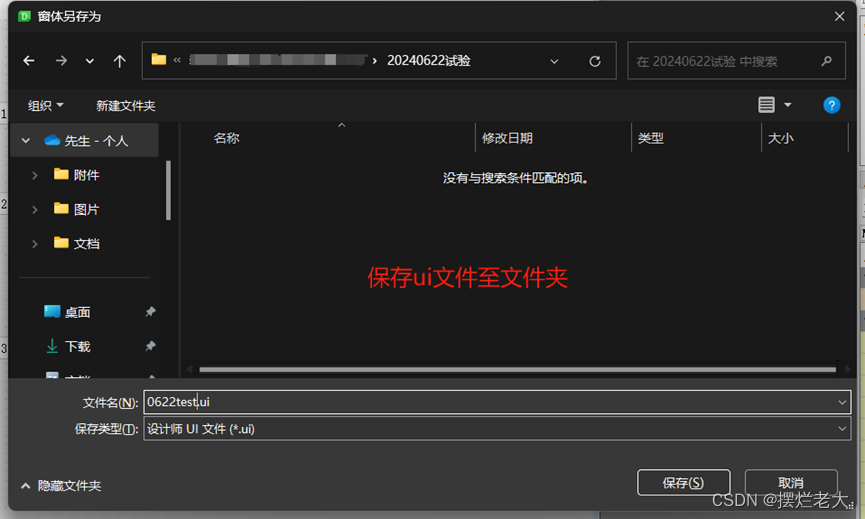
将ui文件保存到文件夹中(后续代码文件也放在这个文件夹里)
2 代码部分
2.1 ui文件转py文件
转换方法有两种,一种是用external tools转换,一种是用专门的代码去转换。(两种方法的前提是要配置好pyuic)
- 方法一(external tools外部工具栏)
(1)在pycharm左侧项目栏中找到刚刚存放ui文件的文件夹,打开文件夹后,将ui文件拖放到右侧打开。
(2)点击“工具"——>“外部工具(external tools)”——>“pyuic”。
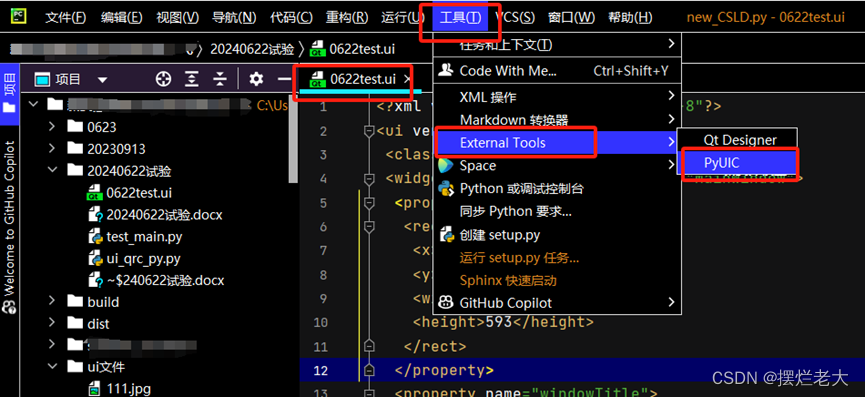
点击之后可以看到左侧文件夹中生成了相应的py文件,转换成功!
- 方法二(ui转py专用代码)
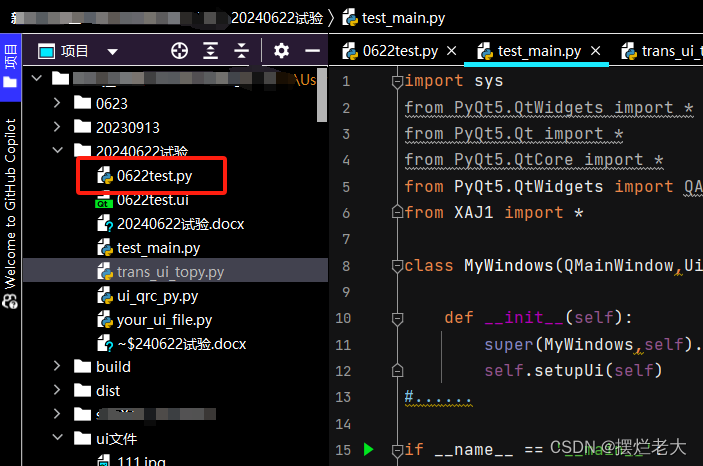
需要注意的是,在运行代码之前,需要把该专用代码放到和ui文件所在的同一个文件夹里。
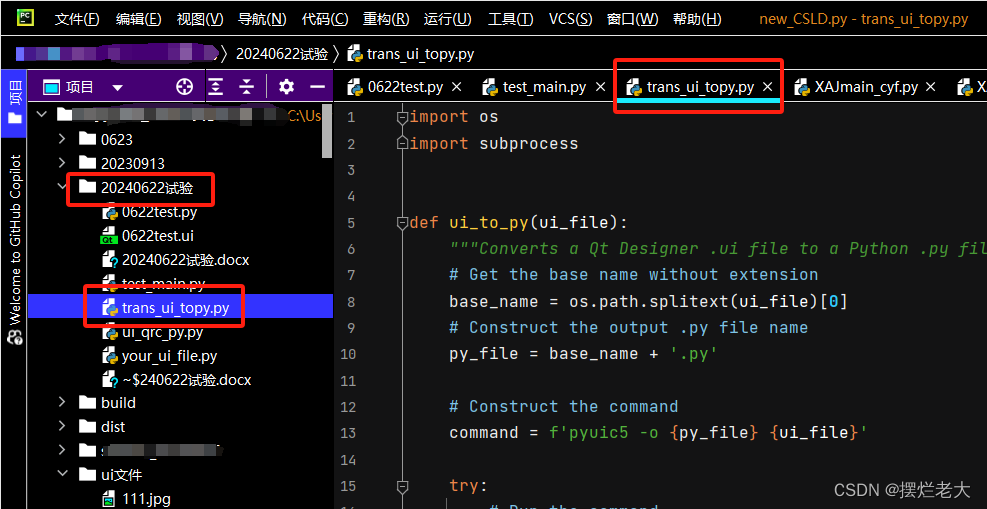
我让chatgpt写了一个ui转换py专用的代码,自己转换了一遍,经验证放心可用,代码如下:
import os
import subprocess


def ui_to_py(ui_file):
    """converts a qt designer .ui file to a python .py file in the same directory."""
    # get the base name without extension
    base_name = os.path.splitext(ui_file)[0]
    # construct the output .py file name
    py_file = base_name + '.py'

    # construct the command
    command = f'pyuic5 -o {py_file} {ui_file}'

    try:
        # run the command
        subprocess.run(command, check=true, shell=true)
        print(f'successfully converted {ui_file} to {py_file}')
    except subprocess.calledprocesserror as e:
        print(f'failed to convert {ui_file} to {py_file}: {e}')


if __name__ == "__main__":
    # get the current directory
    current_directory = os.getcwd()

    # loop through all files in the current directory
    for file_name in os.listdir(current_directory):
        # check if the file is a .ui file
        if file_name.endswith('.ui'):
            # convert the .ui file to .py file
            ui_to_py(file_name)
运行上述之后可以看到左侧文件夹中生成了相应的py文件,转换成功!
2.2 界面文件代码
下面是转换后的py文件,为了方便,我们后面都叫它界面文件。界面文件中有控件的具体信息,比如控件尺寸大小、位置、名称、显示内容等信息。此外,我们还要记住它的类名,以便后续主文件的类进行继承。
转换后的完整py文件代码如下:
# -*- coding: utf-8 -*-
# form implementation generated from reading ui file '0622test.ui'
#
# created by: pyqt5 ui code generator 5.15.4
#
# warning: any manual changes made to this file will be lost when pyuic5 is
# run again. do not edit this file unless you know what you are doing.
from pyqt5 import qtcore, qtgui, qtwidgets
class ui_mainwindow(object):
def setupui(self, mainwindow):
mainwindow.setobjectname("mainwindow")
mainwindow.resize(791, 593) #主窗口大小
self.centralwidget = qtwidgets.qwidget(mainwindow)
self.centralwidget.setobjectname("centralwidget") #主窗口名称
self.pushbutton = qtwidgets.qpushbutton(self.centralwidget)
self.pushbutton.setgeometry(qtcore.qrect(80, 90, 89, 27)) #按钮大小和在主窗口中的位置
self.pushbutton.setobjectname("pushbutton") #按钮名称
self.lineedit = qtwidgets.qlineedit(self.centralwidget)
self.lineedit.setgeometry(qtcore.qrect(210, 90, 113, 20)) #......
self.lineedit.setobjectname("lineedit")
self.textedit = qtwidgets.qtextedit(self.centralwidget)
self.textedit.setgeometry(qtcore.qrect(210, 140, 211, 141))
self.textedit.setobjectname("textedit")
self.widget = qtwidgets.qwidget(self.centralwidget)
self.widget.setgeometry(qtcore.qrect(210, 300, 401, 201))
self.widget.setobjectname("widget")
self.pushbutton_2 = qtwidgets.qpushbutton(self.centralwidget)
self.pushbutton_2.setgeometry(qtcore.qrect(80, 190, 89, 27))
self.pushbutton_2.setobjectname("pushbutton_2")
self.pushbutton_3 = qtwidgets.qpushbutton(self.centralwidget)
self.pushbutton_3.setgeometry(qtcore.qrect(80, 350, 89, 27))
self.pushbutton_3.setobjectname("pushbutton_3")
self.label = qtwidgets.qlabel(self.centralwidget)
self.label.setgeometry(qtcore.qrect(360, 90, 63, 14))
self.label.setobjectname("label")
self.label_2 = qtwidgets.qlabel(self.centralwidget)
self.label_2.setgeometry(qtcore.qrect(450, 200, 63, 14))
self.label_2.setobjectname("label_2")
self.label_3 = qtwidgets.qlabel(self.centralwidget)
self.label_3.setgeometry(qtcore.qrect(640, 390, 63, 14))
self.label_3.setobjectname("label_3")
mainwindow.setcentralwidget(self.centralwidget)
self.menubar = qtwidgets.qmenubar(mainwindow)
self.menubar.setgeometry(qtcore.qrect(0, 0, 791, 26))
self.menubar.setobjectname("menubar")
mainwindow.setmenubar(self.menubar)
self.statusbar = qtwidgets.qstatusbar(mainwindow)
self.statusbar.setobjectname("statusbar")
mainwindow.setstatusbar(self.statusbar)
self.retranslateui(mainwindow)
qtcore.qmetaobject.connectslotsbyname(mainwindow)
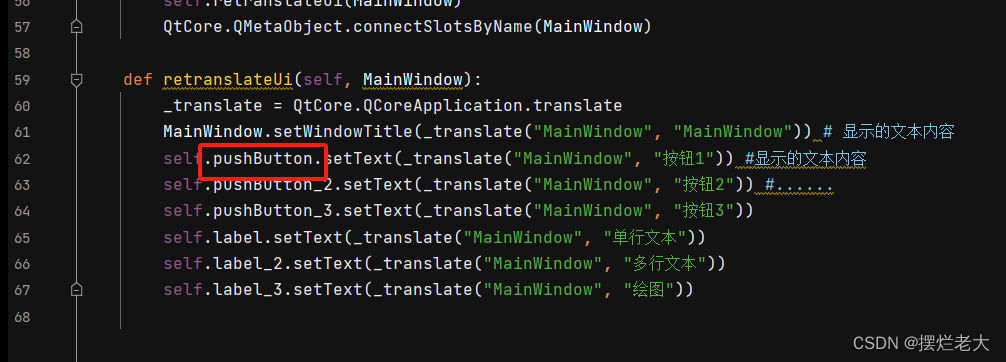
def retranslateui(self, mainwindow):
_translate = qtcore.qcoreapplication.translate
mainwindow.setwindowtitle(_translate("mainwindow", "mainwindow")) # 显示的文本内容
self.pushbutton.settext(_translate("mainwindow", "按钮1")) #显示的文本内容
self.pushbutton_2.settext(_translate("mainwindow", "按钮2")) #......
self.pushbutton_3.settext(_translate("mainwindow", "按钮3"))
self.label.settext(_translate("mainwindow", "单行文本"))
self.label_2.settext(_translate("mainwindow", "多行文本"))
self.label_3.settext(_translate("mainwindow", "绘图"))
2.3 主文件代码
2.3.1 主体框架代码
我们先来介绍主体的框架,这是一部分是个模板,套用的时候需要需改一下细节信息,废话不多说,先上代码:
(先前的转换后的py代码命名不符合规范,我重命名为了f0622test.py)
import sys
from pyqt5.qtwidgets import *
from pyqt5.qt import *
from pyqt5.qtcore import *
from pyqt5.qtwidgets import qapplication,qmainwindow,qdesktopwidget,qlineedit
from f0622test import *
#导入转换后的py文件,要用自己的转换后的py文件的名字,我这里是f0622test.py

class mywindows(qmainwindow,ui_mainwindow):
    #继承自两个父类,一个是qmainwindow,一个是转换后的py文件的类,这里是ui_mainwindow

    def __init__(self):
        super(mywindows,self).__init__()
        self.setupui(self)
#......

if __name__ == '__main__':
    app = qtwidgets.qapplication(sys.argv)
    window = mywindows()
    window.show()
    sys.exit(app.exec_())
下面对它们进行解释:
-
import sys
sys 模块提供了一系列与 python 解释器进行交互的功能,包括命令行参数、标准输入输出、错误流等。 -
from pyqt5.qtwidgets import *
pyqt5.qtwidgets 模块包含了所有用于创建图形用户界面(gui)的基本控件,如按钮、标签、文本框等。 -
from pyqt5.qt import *
pyqt5.qt 模块提供了 pyqt 中常用的基本类,包括信号与槽机制、事件处理等。 -
from pyqt5.qtcore import *
pyqt5.qtcore 模块包含了核心的非 gui 功能,包括事件循环、信号与槽、时间和日期、文件和目录操作等。 -
from pyqt5.qtwidgets import qapplication, qmainwindow, qdesktopwidget, qlineedit
这些特定的导入用于创建应用程序、主窗口、桌面控件和单行文本输入框。 -
from xaj1 import *
导入自定义模块 xaj1 中的所有内容,这通常包含定义的类、函数和变量。xaj1 是你项目中的一个模块,它可能包含一些特定功能的实现。 -
类和初始化函数
class mywindows(qmainwindow, ui_mainwindow):

def __init__(self):
    super(mywindows, self).__init__()
    self.setupui(self)
①定义一个名为 mywindows 的类,继承了 qmainwindow 和 ui_mainwindow。
②在创建 mywindows 对象时,调用父类的构造函数进行初始化。
③调用 ui_mainwindow 的 setupui 方法,设置用户界面,将所有设计好的控件和布局添加到当前窗口实例中。
- 结尾代码:判断当前模块是否被直接执行
if __name__ == '__main__':
    app = qtwidgets.qapplication(sys.argv)
    window = mywindows()
    window.show()
    sys.exit(app.exec_())
①检查脚本是否被直接运行。
②初始化一个 qapplication 对象。
③创建并初始化主窗口对象。
⑤显示主窗口。
⑥启动主事件循环并运行应用程序,直到用户退出。
这些步骤是创建和运行任何 pyqt5 应用程序所必需的标准流程。其中第一行的代码经常会用到,这里详细解释:
if __name__ == '__main__':
这行代码检查当前模块是否是作为主程序运行。name 是一个特殊变量,当模块被直接运行时,其值为 main。如果模块是被导入的,其值将是模块的名称。因此,这行代码的意思是:只有当该脚本被直接运行时,下面的代码块才会被执行。
2.3.2 实现交互代码
下面介绍实现交互的代码,首先我们要知道先前我们布置的控件的名称,有两个途径:①用qtdesigner打开ui文件,在右侧对象查看器查看。②在转换后的py文件中查看。我们来举个例子,比如要知道“按钮1”的名称,经查看,名称是pushbutton:
- 途径①

- 途径②
然后我们才能开始对控件的交互功能进行实现。
下面对三个输出控件(单行文本、多行文本、绘图窗口)设置三个函数,描述其功能:
(1)函数1
对应lineedit控件
    def function_1 (self):
        #按钮1点击事件
        self.lineedit.settext("2024")
        #执行该函数时,会将名称为lineedit的控件文本内容设置为2024
(2)函数2
对应textedit控件
    def function_2 (self):
        # 按钮2点击事件
        a=self.lineedit.text() # 获取lineedit的文本内容
        a=int(a) # 由于获取的lineedit的文本内容是字符串,所以要转换为整数
        if a == 2024:
            self.textedit.settext("hello world")
            # 如果lineedit的文本内容为2024,则将textedit的文本内容设置为hello world

            self.textedit.append("今年是:")
            # 在textedit中追加文本,会在下一行显示
            self.textedit.append(f"{a}年")
            # 在textedit中追加文本,会在下一行显示,由于a是整数,所以要转换为字符串
(3)函数3
对应widget控件
我们要先在文件开头导入画图相关的包
from matplotlib.figure import figure
#用来创建图形,相当于画布
from matplotlib.backends.backend_qt5agg import figurecanvasqtagg as figurecanvas
#用来将matplotlib的图形嵌入到pyqt5的窗口中
import matplotlib.pyplot as plt
#一般用来绘图,这里用来调整中文字体,因为已经有了画图的figurecanvas
而后进行函数3的编写
    def function_3 (self):
        #按钮3点击事件
        # 创建 figurecanvas 并嵌入到 qwidget 中
        figure = figure()
        canvas = figurecanvas(figure)
        layout = qvboxlayout(self.widget)
        # 我的绘图窗口名称叫widget,所以这里是self.widget。
        # qvboxlayout是垂直布局,布局管理器用于管理widget中的控件,这里是figurecanvas
        layout.addwidget(canvas) # 将figurecanvas添加到布局管理器中

        # 设置 matplotlib 使用的字体
        plt.rcparams['font.sans-serif'] = ['simsun', 'microsoft yahei']  # 使用宋体和微软雅黑
        plt.rcparams['axes.unicode_minus'] = false  # 解决负号显示问题

        # 绘制折线图
        x = [1, 2, 3, 4, 5]
        y = [1, 4, 9, 16, 25]
        ax = figure.add_subplot(111)
        ax.plot(x, y, marker='o')
        ax.set_title("样例图")
        ax.set_xlabel("x轴")
        ax.set_ylabel("y轴")
        ax.grid(true)
        canvas.draw()
下面进行按钮与相应函数功能的连接:
在初始化函数中添加以下内容
		self.pushbutton.clicked.connect(self.function_1)
        # 按钮1点击事件,连接到function_1函数
        self.pushbutton_2.clicked.connect(self.function_2)
        self.pushbutton_3.clicked.connect(self.function_3)
完整主文件代码如下:
import sys
from pyqt5.qtwidgets import *
from pyqt5.qt import *
from pyqt5.qtcore import *
from pyqt5.qtwidgets import qapplication,qmainwindow,qdesktopwidget,qlineedit
from f0622test import *
#导入转换后的py文件,要用自己的转换后的py文件的名字,我这里是f0622test.py
from matplotlib.figure import figure
#用来创建图形,相当于画布
from matplotlib.backends.backend_qt5agg import figurecanvasqtagg as figurecanvas
#用来将matplotlib的图形嵌入到pyqt5的窗口中
import matplotlib.pyplot as plt
#一般用来绘图,这里用来调整中文字体,因为已经有了画图的figurecanvas


class mywindows(qmainwindow,ui_mainwindow):
    #继承自两个父类,一个是qmainwindow,一个是转换后的py文件的类,这里是ui_mainwindow

    def __init__(self):
        super(mywindows,self).__init__()
        self.setupui(self)
        self.pushbutton.clicked.connect(self.function_1)
        # 按钮1点击事件,连接到function_1函数
        self.pushbutton_2.clicked.connect(self.function_2)
        self.pushbutton_3.clicked.connect(self.function_3)
#......
    def function_1 (self):
        #按钮1点击事件
        self.lineedit.settext("2024")
        #执行该函数时,会将名称为lineedit的控件文本内容设置为2024
    def function_2 (self):
        # 按钮2点击事件
        a=self.lineedit.text() # 获取lineedit的文本内容
        a=int(a) # 由于获取的lineedit的文本内容是字符串,所以要转换为整数
        if a == 2024:
            self.textedit.settext("hello world")
            # 如果lineedit的文本内容为2024,则将textedit的文本内容设置为hello world

            self.textedit.append("今年是:")
            # 在textedit中追加文本,会在下一行显示
            self.textedit.append(f"{a}年")
            # 在textedit中追加文本,会在下一行显示,由于a是整数,所以要转换为字符串
        else:
            self.textedit.settext("你好世界")
            # 如果lineedit的文本内容不是2024,则将textedit的文本内容设置为输入错误
    def function_3 (self):
        #按钮3点击事件
        # 创建 figurecanvas 并嵌入到 qwidget 中
        figure = figure()
        canvas = figurecanvas(figure)
        layout = qvboxlayout(self.widget)
        # 我的绘图窗口名称叫widget,所以这里是self.widget。
        # qvboxlayout是垂直布局,布局管理器用于管理widget中的控件,这里是figurecanvas
        layout.addwidget(canvas) # 将figurecanvas添加到布局管理器中

        # 设置 matplotlib 使用的字体
        plt.rcparams['font.sans-serif'] = ['simsun', 'microsoft yahei']  # 使用宋体和微软雅黑
        plt.rcparams['axes.unicode_minus'] = false  # 解决负号显示问题

        # 绘制折线图
        x = [1, 2, 3, 4, 5]
        y = [1, 4, 9, 16, 25]
        ax = figure.add_subplot(111)
        ax.plot(x, y, marker='o')
        ax.set_title("样例图")
        ax.set_xlabel("x轴")
        ax.set_ylabel("y轴")
        ax.grid(true)
        canvas.draw()

if __name__ == '__main__':
    app = qtwidgets.qapplication(sys.argv)
    window = mywindows()
    window.show()
    sys.exit(app.exec_())
运行主文件代码,点击相应按钮即可实现相应功能。
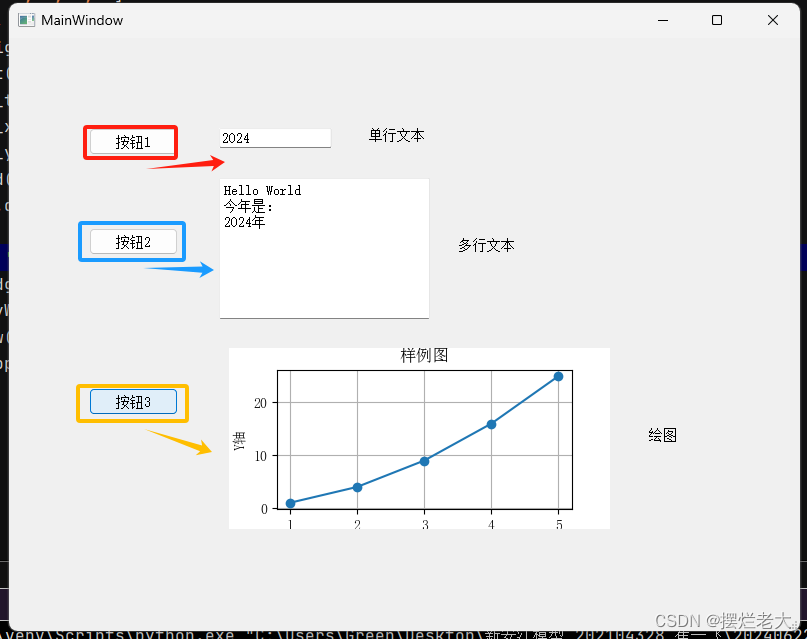
3结果展示


发表评论