前言
在使用app的时候,我们经常会在一些社交软件中聊天时发一些图片或者文件之类的多媒体文件,那在鸿蒙原生应用中,我们怎么开发这样的功能呢? 本文会给大家对这个功能点进行讲解,我们采用的是拉起系统组件来进行图片、文件的选择,拉起系统相机进行拍照的这样一种实现方式。
在文章开始之前,按照惯例,我们先展示本文demo效果图:

下面我们正式开始讲解。
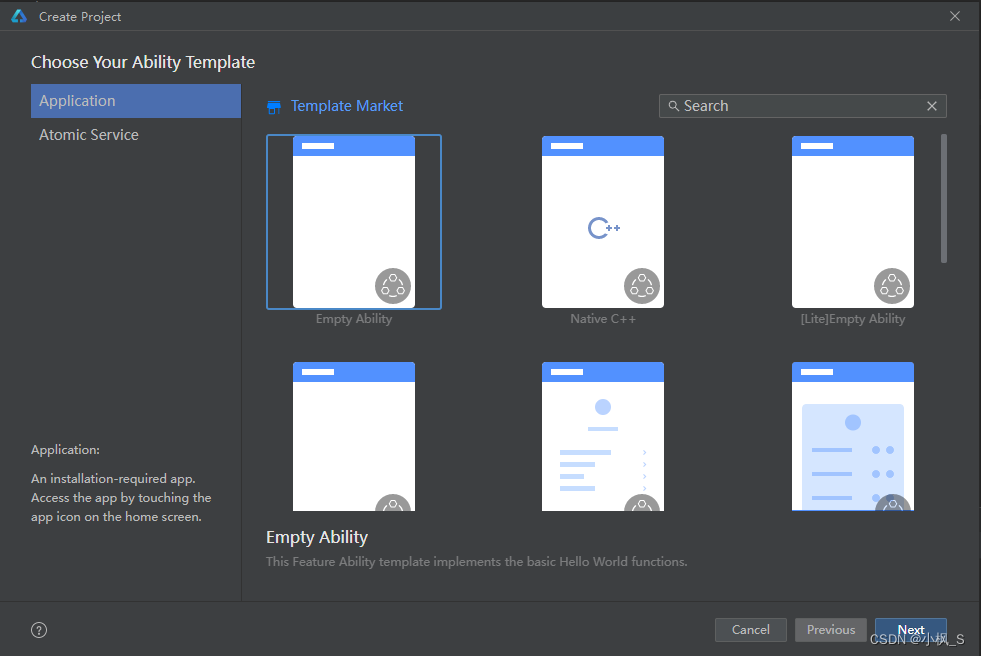
创建多媒体demo工程
我们使用empty 模板创建一个demo工程。

创建mediabean 实体类
在src->main->ets 下面创建bean文件夹,在文件夹下创建mediabean.ts文件
/**
 * 多媒体数据类
 */
export class mediabean {
  /**
   * 文件名称
   */
  public filename: string;
  /**
   * 文件大小
   */
  public filesize: number;
  /**
   * 文件类型
   */
  public filetype: string;
  /**
   * 本地存储地址
   */
  public localurl: string;
}
创建mediahelper工具类
在src->main->ets 下面创建helper文件夹,在文件夹下创建mediahelper.ts文件


/**
 * 多媒体辅助类
 */
export class mediahelper {
  private readonly tag: string = 'mediahelper';

  private mcontext: common.context;

  constructor(context: common.context) {
    this.mcontext = context;
  }

  /**
 * 选择图片
   */
  public selectpicture(): promise<mediabean> {

  }

  /**
 * 选择文件
   */
  public selectfile(): promise<mediabean> {
  }

  /**
 * 拍照
   */
  public async takephoto(context: common.uiabilitycontext): promise<mediabean> {

  }

  /**
 * 封装附件实体类
 *  * @param uri 文件路径
   */
  private async buildmediabean(uri: string): promise<mediabean> {
  }

  /**
 * 通过uri查找所选文件信息,插入到mediabean中
 * @param mediabean
 * @param uri
   */
  private async appendfileinfotomediabean(mediabean: mediabean, uri: string) {
  }
}
mediahelper 类定义了5个方法,
- selectpicture 提供选择图片功能
- selectfile 提供选择文件功能
- takephoto 提供拍照功能
- buildmediabean 内部方法,提供mediabean对象封装
- appendfileinfotomediabean 内部方法,提供追加查询所选文件的文件信息的功能
通过系统组件选择图片、文件或者拍照之后,系统只是简单的返回一个文件的uri,如果我们需要展示文件的名称、文件大小、文件类型,需要通过appendfileinfotomediabean 方法另外去获取。
下面我们针对这几个方法,增加具体的实现代码:
- selectpicture
/**
   * 选择图片
   */
  public selectpicture(): promise<mediabean> {

    try {
      let photoselectoptions = new picker.photoselectoptions();
      photoselectoptions.mimetype = picker.photoviewmimetypes.image_type;
      photoselectoptions.maxselectnumber = 1;
      let photopicker = new picker.photoviewpicker();
      return photopicker.select(photoselectoptions)
        .then((photoselectresult) => {
          log.info(this.tag, 'photoviewpicker.select successfully, photoselectresult uri: ' + json.stringify(photoselectresult));

          if (photoselectresult && photoselectresult.photouris && photoselectresult.photouris.length > 0) {
            let filepath = photoselectresult.photouris[0];
            log.info(this.tag, 'photoviewpicker.select successfully, photoselectresult uri: ' + filepath);
            return filepath;
          }

        }).catch((err) => {
          log.error(this.tag, 'photoviewpicker.select failed with err: ' + err);
          return err;
        }).then(async (filepath) => {
          const mediabean = await this.buildmediabean(filepath);
          return mediabean;
        });
    } catch (err) {
      log.error(this.tag, 'photoviewpicker failed with err: ' + err);
      return promise.reject(err);
    }
  }
选择图片的功能,我们通过系统组件 picker.photoviewpicker 来进行图片选择,通过配置photoselectoptions,指定选择的mimetype类型(这里photoviewmimetypes.image_type 图片类型) 、选择的图片最大数量 maxselectnumber ,这里我们实现单选功能,数值设置为1即可。
使用photopicker.select 拉起系统组件进行选择,然后在回调中获取图片的uri。
- selectfile
/**
   * 选择文件
   */
  public selectfile(): promise<mediabean> {
    try {
      let documentselectoptions = new picker.documentselectoptions();
      let documentpicker = new picker.documentviewpicker();
      return documentpicker.select(documentselectoptions)
        .then((documentselectresult) => {
          log.info(this.tag, 'documentviewpicker.select successfully, documentselectresult uri: ' + json.stringify(documentselectresult));

          if (documentselectresult && documentselectresult.length > 0) {
            let filepath = documentselectresult[0];
            log.info(this.tag, 'documentviewpicker.select successfully, documentselectresult uri: ' + filepath);
            return filepath;
          }

        }).catch((err) => {
          log.error(this.tag, 'photoviewpicker.select failed with err: ' + err);
          return err;
        }).then(async (filepath) => {

          const mediabean = await this.buildmediabean(filepath);
          return mediabean;

        });
    } catch (err) {
      log.error(this.tag, 'photoviewpicker failed with err: ' + err);
      return promise.reject(err);
    }
  }
选择文件的功能,我们通过系统组件 picker.documentviewpicker来进行文件选择,代码基本是跟图片选择是一样的,区别在于documentselectoptions,目前api9并没有配置项提供,具体关注后续的api版本情况。
- takephoto
/**
   * 拍照
   */
  public async takephoto(context: common.uiabilitycontext): promise<mediabean> {


    let want = {
      'uri': '',
      'action': wantconstant.action.action_image_capture,
      'parameters': {},
    };
    return context.startabilityforresult(want)
      .then((result) => {
        log.info(this.tag, `startability call back , ${json.stringify(result)}`);
        if (result.resultcode === 0 && result.want && stringutils.isnotnullorempty(result.want.uri)) {
          //拍照成功
          log.info(this.tag, 'takephoto successfully, takephotoresult uri: ' + result.want.uri);
          return result.want.uri;
        }
      }).catch((error) => {
        log.info(this.tag, `startability error , ${json.stringify(error)}`);
        return error;
      }).then(async (uri: string) => {
        const mediabean = await this.buildmediabean(uri);
        return mediabean;
      });
  }
拍照的功能,我们也是拉起相机来进行拍照的,我们使用 startabilityforresult 方法 + 配置拉起action (wantconstant.action.action_image_capture)的方式拉起系统相机,拍照结束后,在then中接收返回的数据,我们通过返回码result.resultcode 来判断是否进行了拍照,如果状态值===0,说明进行了拍照,我们再使用result.want.uri获取拍照后的照片uri。
- buildmediabean
  /**
   * 封装多媒体实体类
   *
   * @param uri 文件路径
   */
  private async buildmediabean(uri: string): promise<mediabean> {

    if (stringutils.isnullorempty(uri)) {
      return null;
    }

    const mediabean: mediabean = new mediabean();
    mediabean.localurl = uri;
    await this.appendfileinfotomediabean(mediabean, uri);
    return mediabean;
  }
这个方法的作用主要是封装一个多媒体实体类,并触发appendfileinfotomediabean 获取uri对应文件的一些文件信息。代码很简单,相信大家一目了然。
- appendfileinfotomediabean
/**
 * 通过uri查找所选文件信息,插入到mediabean中
 * @param mediabean
 * @param uri
   */
  private async appendfileinfotomediabean(mediabean: mediabean, uri: string) {

    if (stringutils.isnullorempty(uri)) {
      return;
    }
    let filelist: array<medialibrary.fileasset> = [];

    const parts: string[] = uri.split('/');
    const id: string = parts.length > 0 ? parts[parts.length - 1] : '-1';

    try {

      let media = medialibrary.getmedialibrary(this.mcontext);
      let mediafetchoptions: medialibrary.mediafetchoptions = {
        selections: medialibrary.filekey.id + '= ?',
        selectionargs: [id],
        uri: uri
      };

      let fetchfileresult = await media.getfileassets(mediafetchoptions);
      log.info(this.tag, `filelist getfileassetsfromtype fetchfileresult.count = ${fetchfileresult.getcount()}`);
      filelist = await fetchfileresult.getallobject();
      fetchfileresult.close();
      await media.release();

    } catch (e) {
      log.error(this.tag, "query: file data  exception ");
    }

    if (filelist && filelist.length > 0) {

      let fileinfoobj = filelist[0];
      log.info(this.tag, `file id = ${json.stringify(fileinfoobj.id)} , uri = ${json.stringify(fileinfoobj.uri)}`);
      log.info(this.tag, `file filelist displayname = ${fileinfoobj.displayname} ,size = ${fileinfoobj.size} ,mimetype = ${fileinfoobj.mimetype}`);

      mediabean.filename = fileinfoobj.displayname;
      mediabean.filesize = fileinfoobj.size;
      mediabean.filetype = fileinfoobj.mimetype;

    }
  }
这个方法的作用主要是通过uri查询文件的详细信息,包括文件名称、文件大小、文件类型。
- 通过uri获取文件id。
- 使用medialibrary.getmedialibrary获取media对象。
- 配置mediafetchoptions,主要是id,通过文件id来查找文件对象。
- 使用media.getfileassets查询文件对象结果,这里可以是批量操作,得到一个fetchfileresult对象。
- 遍历fileasset数组,得到文件信息。
这里列下fileasset的一些字段:
| 名称 | 类型 | 可读 | 可写 | 说明 |
|---|---|---|---|---|
| id | number | 是 | 否 | 文件资源编号 |
| uri | string | 是 | 否 | 文件资源uri(如:datashare:///media/image/2) |
| mimetype | string | 是 | 否 | 文件扩展属性 |
| mediatype8+ | mediatype | 是 | 否 | 媒体类型 |
| displayname | string | 是 | 是 | 显示文件名,包含后缀名 |
| title | string | 是 | 是 | 文件标题 |
| relativepath8+ | string | 是 | 是 | 相对公共目录路径 |
| parent8+ | number | 是 | 否 | 父目录id |
| size | number | 是 | 否 | 文件大小(单位:字节) |
| dateadded | number | 是 | 否 | 添加日期(添加文件时间到1970年1月1日的秒数值) |
| datemodified | number | 是 | 否 | 修改日期(修改文件时间到1970年1月1日的秒数值,修改文件名不会改变此值,当文件内容发生修改时才会更新) |
| datetaken | number | 是 | 否 | 拍摄日期(文件拍照时间到1970年1月1日的秒数值) |
| artist8+ | string | 是 | 否 | 作者 |
| audioalbum8+ | string | 是 | 否 | 专辑 |
| width | number | 是 | 否 | 图片宽度(单位:像素) |
| height | number | 是 | 否 | 图片高度(单位:像素) |
| orientation | number | 是 | 是 | 图片显示方向(顺时针旋转角度,如0,90,180 单位:度) |
| duration8+ | number | 是 | 否 | 持续时间(单位:毫秒) |
| albumid | number | 是 | 否 | 文件所归属的相册编号 |
| albumuri8+ | string | 是 | 否 | 文件所归属相册uri |
| albumname | string | 是 | 否 | 文件所归属相册名称 |
这里贴下mediahelper.ts的完整代码
import common from '@ohos.app.ability.common';
import picker from '@ohos.file.picker';
import medialibrary from '@ohos.multimedia.medialibrary';
import wantconstant from '@ohos.ability.wantconstant';
import { mediabean } from '../bean/mediabean';
import { stringutils } from '../utils/stringutils';
import { log } from '../utils/log';

/**
 * 多媒体辅助类
 */
export class mediahelper {
  private readonly tag: string = 'mediahelper';

  private mcontext: common.context;

  constructor(context: common.context) {
    this.mcontext = context;
  }

  /**
   * 选择图片
   */
  public selectpicture(): promise<mediabean> {

    try {
      let photoselectoptions = new picker.photoselectoptions();
      photoselectoptions.mimetype = picker.photoviewmimetypes.image_type;
      photoselectoptions.maxselectnumber = 1;
      let photopicker = new picker.photoviewpicker();
      return photopicker.select(photoselectoptions)
        .then((photoselectresult) => {
          log.info(this.tag, 'photoviewpicker.select successfully, photoselectresult uri: ' + json.stringify(photoselectresult));

          if (photoselectresult && photoselectresult.photouris && photoselectresult.photouris.length > 0) {
            let filepath = photoselectresult.photouris[0];
            log.info(this.tag, 'photoviewpicker.select successfully, photoselectresult uri: ' + filepath);
            return filepath;
          }

        }).catch((err) => {
          log.error(this.tag, 'photoviewpicker.select failed with err: ' + err);
          return err;
        }).then(async (filepath) => {
          const mediabean = await this.buildmediabean(filepath);
          return mediabean;
        });
    } catch (err) {
      log.error(this.tag, 'photoviewpicker failed with err: ' + err);
      return promise.reject(err);
    }
  }

  /**
   * 选择文件
   */
  public selectfile(): promise<mediabean> {
    try {
      let documentselectoptions = new picker.documentselectoptions();
      let documentpicker = new picker.documentviewpicker();
      return documentpicker.select(documentselectoptions)
        .then((documentselectresult) => {
          log.info(this.tag, 'documentviewpicker.select successfully, documentselectresult uri: ' + json.stringify(documentselectresult));

          if (documentselectresult && documentselectresult.length > 0) {
            let filepath = documentselectresult[0];
            log.info(this.tag, 'documentviewpicker.select successfully, documentselectresult uri: ' + filepath);
            return filepath;
          }

        }).catch((err) => {
          log.error(this.tag, 'photoviewpicker.select failed with err: ' + err);
          return err;
        }).then(async (filepath) => {

          const mediabean = await this.buildmediabean(filepath);
          return mediabean;

        });
    } catch (err) {
      log.error(this.tag, 'photoviewpicker failed with err: ' + err);
      return promise.reject(err);
    }
  }


  /**
   * 拍照
   */
  public async takephoto(context: common.uiabilitycontext): promise<mediabean> {


    let want = {
      'uri': '',
      'action': wantconstant.action.action_image_capture,
      'parameters': {},
    };
    return context.startabilityforresult(want)
      .then((result) => {
        log.info(this.tag, `startability call back , ${json.stringify(result)}`);
        if (result.resultcode === 0 && result.want && stringutils.isnotnullorempty(result.want.uri)) {
          //拍照成功
          log.info(this.tag, 'takephoto successfully, takephotoresult uri: ' + result.want.uri);
          return result.want.uri;
        }
      }).catch((error) => {
        log.info(this.tag, `startability error , ${json.stringify(error)}`);
        return error;
      }).then(async (uri: string) => {
        const mediabean = await this.buildmediabean(uri);
        return mediabean;
      });
  }


  /**
   * 封装多媒体实体类
   *
   * @param uri 文件路径
   */
  private async buildmediabean(uri: string): promise<mediabean> {

    if (stringutils.isnullorempty(uri)) {
      return null;
    }

    const mediabean: mediabean = new mediabean();
    mediabean.localurl = uri;
    await this.appendfileinfotomediabean(mediabean, uri);
    return mediabean;
  }

  /**
   * 通过uri查找所选文件信息,插入到mediabean中
   * @param mediabean
   * @param uri
   */
  private async appendfileinfotomediabean(mediabean: mediabean, uri: string) {

    if (stringutils.isnullorempty(uri)) {
      return;
    }
    let filelist: array<medialibrary.fileasset> = [];

    const parts: string[] = uri.split('/');
    const id: string = parts.length > 0 ? parts[parts.length - 1] : '-1';

    try {

      let media = medialibrary.getmedialibrary(this.mcontext);
      let mediafetchoptions: medialibrary.mediafetchoptions = {
        selections: medialibrary.filekey.id + '= ?',
        selectionargs: [id],
        uri: uri
      };

      let fetchfileresult = await media.getfileassets(mediafetchoptions);
      log.info(this.tag, `filelist getfileassetsfromtype fetchfileresult.count = ${fetchfileresult.getcount()}`);
      filelist = await fetchfileresult.getallobject();
      fetchfileresult.close();
      await media.release();

    } catch (e) {
      log.error(this.tag, "query: file data  exception ");
    }

    if (filelist && filelist.length > 0) {

      let fileinfoobj = filelist[0];
      log.info(this.tag, `file id = ${json.stringify(fileinfoobj.id)} , uri = ${json.stringify(fileinfoobj.uri)}`);
      log.info(this.tag, `file filelist displayname = ${fileinfoobj.displayname} ,size = ${fileinfoobj.size} ,mimetype = ${fileinfoobj.mimetype}`);

      mediabean.filename = fileinfoobj.displayname;
      mediabean.filesize = fileinfoobj.size;
      mediabean.filetype = fileinfoobj.mimetype;

    }
  }
}
api标记弃用问题
上面的代码,在api9实测是可以正常使用的,但是有一些api被标记为过期,有一些在官方文档注明即将停用,但是我没有找到可以平替的api,如果有读者知道的,麻烦评论区告诉我一声,谢谢。
- ohos.app.ability.wantconstant
官方提示让我们切换到 ohos.app.ability.wantconstant这个类下,可是我们用到wantconstant.action,这个action在 ohos.app.ability.wantconstant中没有定义,我在sdk中也没有找到action在哪一个类中定义; - medialibrary.getmedialibrary.getfileassets
我们需要使用getmedialibrary获取多媒体对象,调用getfileassets查询文件的多媒体信息,官方提示让我们使用ohos.file.picker,可笑的是picker中没有getfileassets 相关的方法,那我们通过picker只能拿到一个文件的uri,文件名称、文件大小这些常规的文件相关的数据都拿不到,那功能都无法开发,这也是我之前的一个疑问。
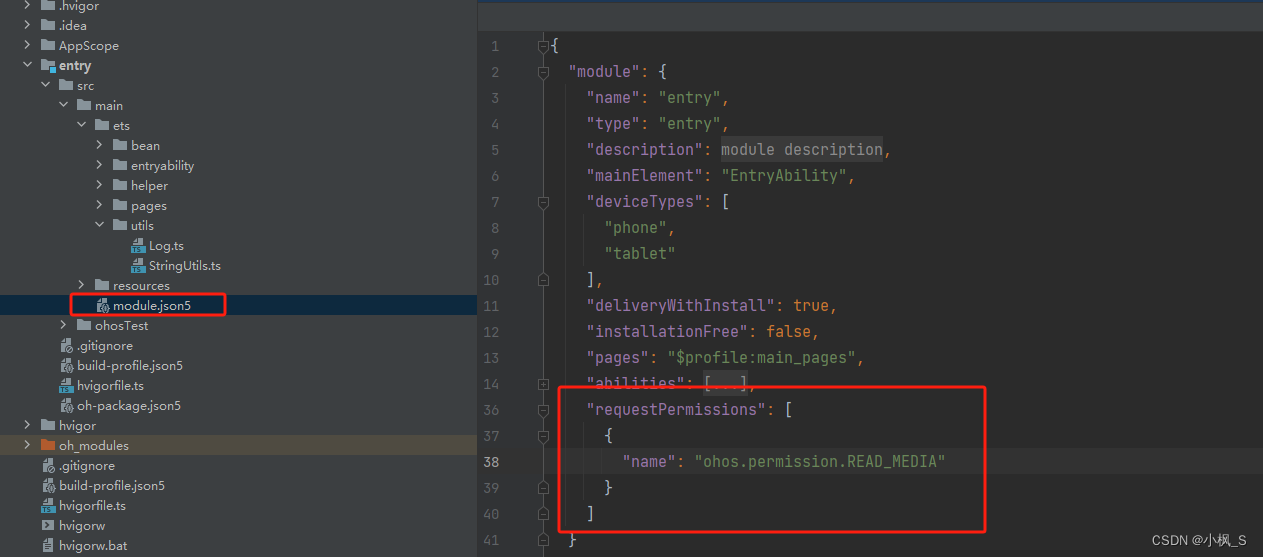
动态申请多媒体访问权限
我们读取文件的多媒体信息需要申请一个多媒体的读取权限 ohos.permission.read_media,这个权限需要在
module.json5中添加配置requestpermissions,在该节点下配置read_media权限,具体如下图:
由于这个read_media权限需要进行动态权限申请,因为还需要我们进行动态权限申请代码逻辑开发,这里由于篇幅原因,我就不过多赘述,后续如果对这块动态权限申请有不明白的地方,我再重新写一篇文章介绍,讲下动态申请权限,跳转系统权限设置页配置权限这些功能具体如何实现。
这次的demo,我们直接安装后,在系统设置中找到应用,把对应的权限开启即可(绕过权限动态申请)。
实现选择图片显示功能
下面我们编写ui页面,使用我们上面的mediahelper工具类选择图片、拍照,并将图片显示出来。
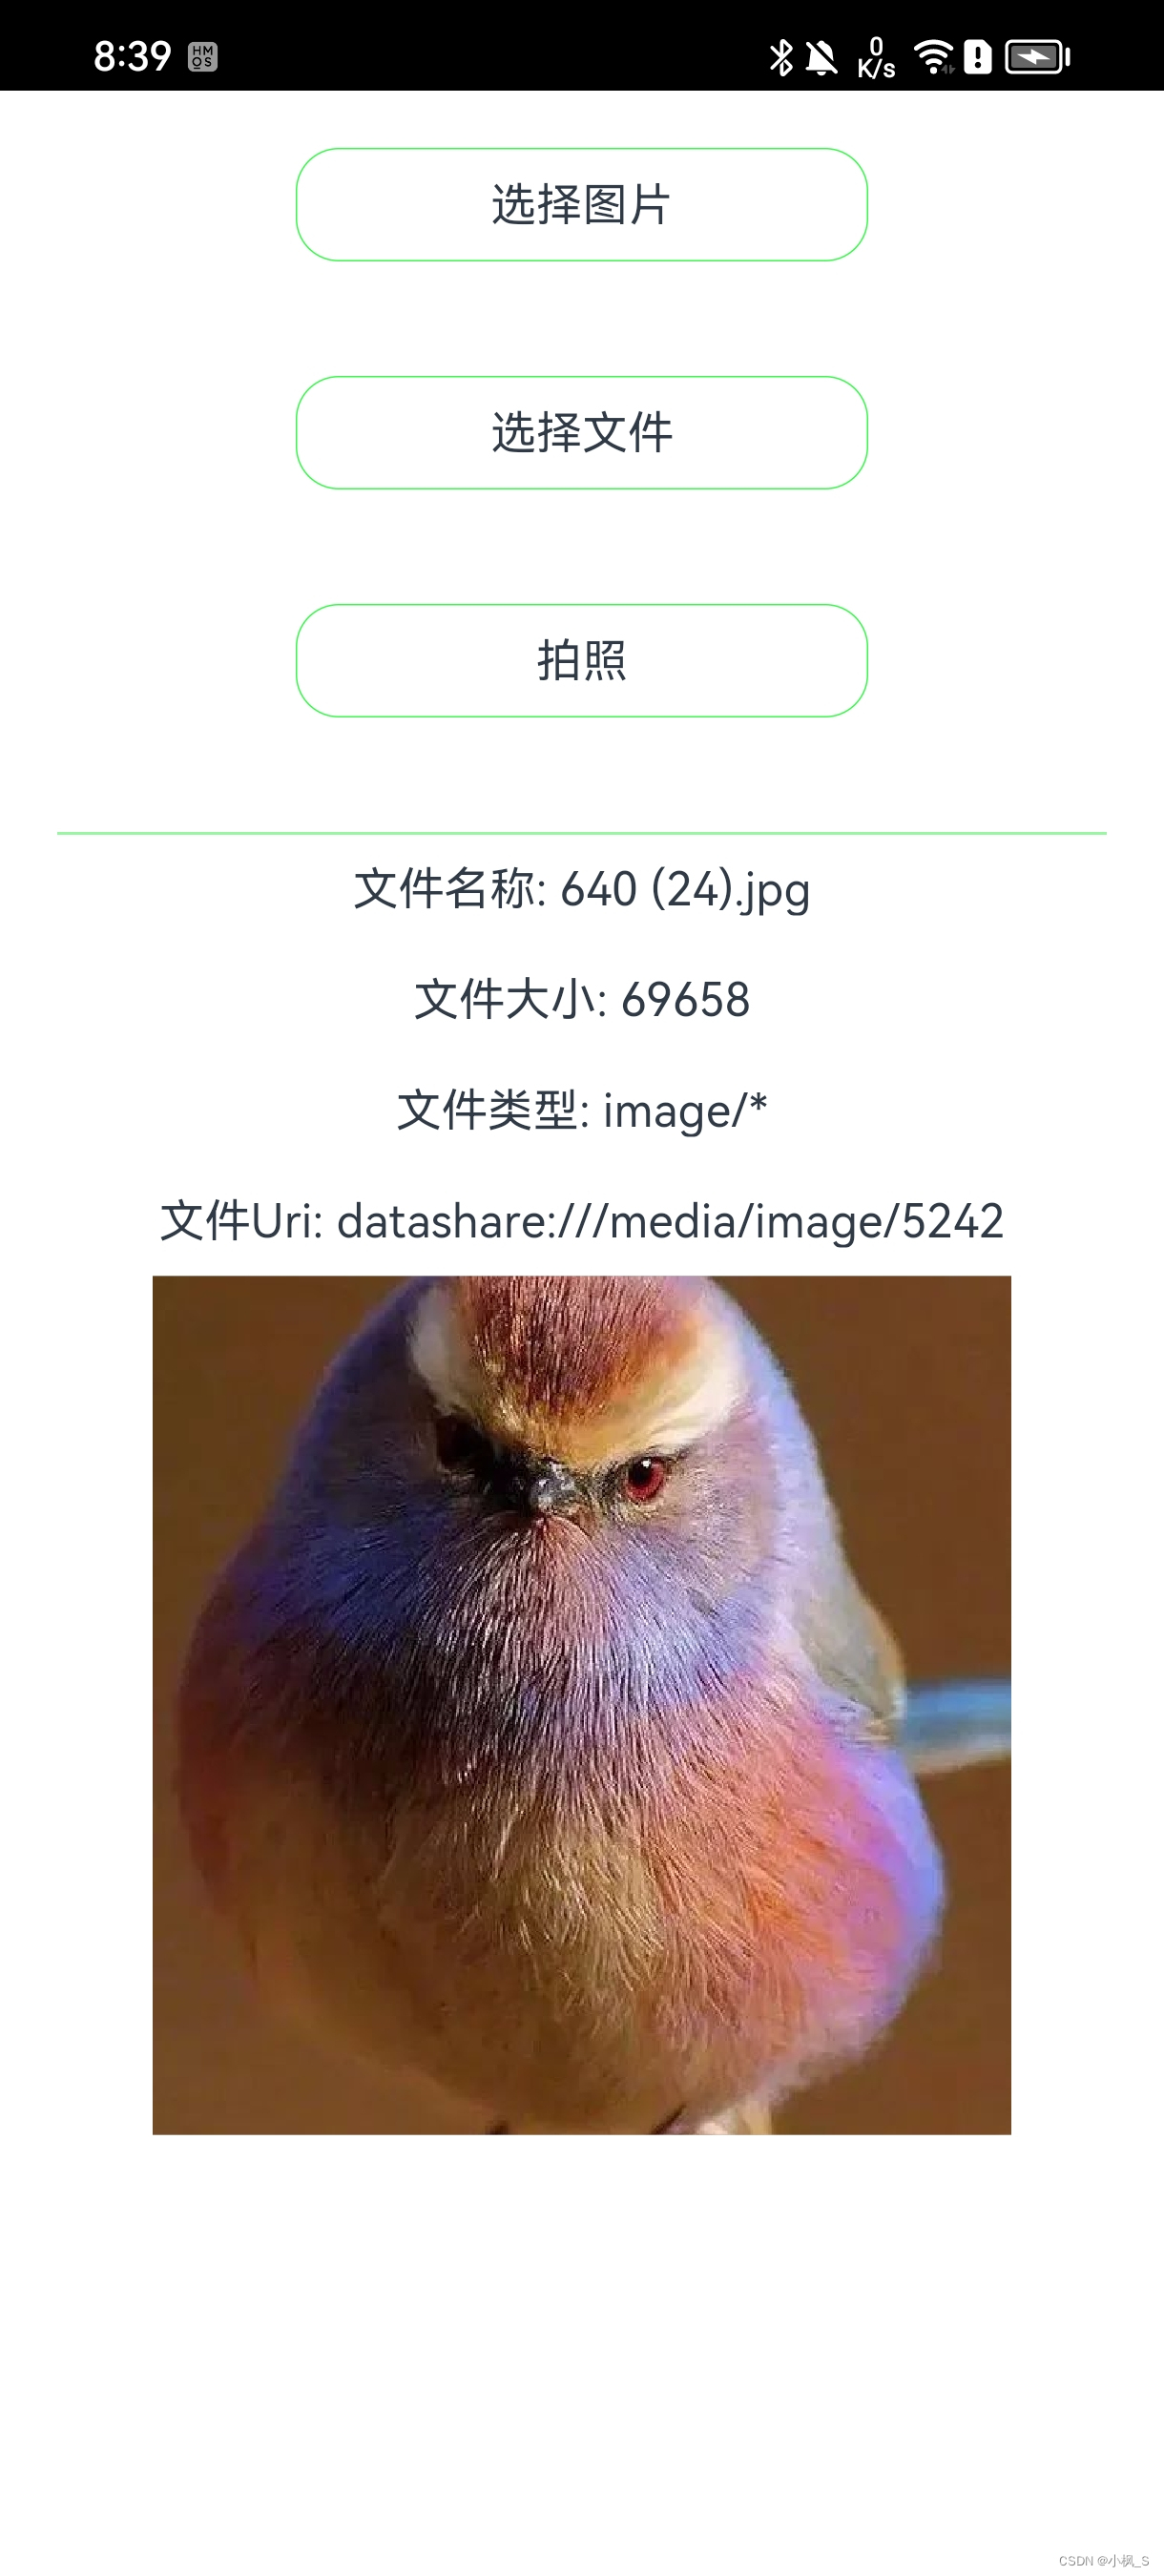
我们在index.ets文件中放三个按钮,以及显示文件名称、大小、文件类型以及文件路径、显示图片的控件。
完整的代码如下:
import common from '@ohos.app.ability.common';
import { mediabean } from '../bean/mediabean';
import { mediahelper } from '../helper/mediahelper';

@entry
@component
struct index {
  @state mediabean: mediabean = new mediabean();
  private mediahelper: mediahelper = new mediahelper(getcontext());

  build() {
    row() {
      column() {
        text('选择图片')
          .textalign(textalign.center)
          .width(200)
          .fontsize(16)
          .padding(10)
          .margin(20)
          .border({ width: 0.5, color: '#ff38f84b', radius: 15 })
          .onclick(() => {
            this.handleclick(mediaoption.picture)
          })

        text('选择文件')
          .textalign(textalign.center)
          .width(200)
          .fontsize(16)
          .padding(10)
          .margin(20)
          .border({ width: 0.5, color: '#ff38f84b', radius: 15 })
          .onclick(() => {
            this.handleclick(mediaoption.file)
          })

        text('拍照')
          .textalign(textalign.center)
          .width(200)
          .fontsize(16)
          .padding(10)
          .margin(20)
          .border({ width: 0.5, color: '#ff38f84b', radius: 15 })
          .onclick(() => {
            this.handleclick(mediaoption.takephoto)
          })

        divider()
          .width('100%')
          .height(0.5)
          .color('#ff99f6a2')
          .margin({ top: 20 })
          .padding({ left: 20, right: 20 })

        text(`文件名称: ${this.mediabean.filename ? this.mediabean.filename : ''}`)
          .textalign(textalign.center)
          .width('100%')
          .fontsize(16)
          .margin(10)

        text(`文件大小: ${this.mediabean.filesize ? this.mediabean.filesize : ''}`)
          .textalign(textalign.center)
          .width('100%')
          .fontsize(16)
          .margin(10)

        text(`文件类型: ${this.mediabean.filetype ? this.mediabean.filetype : ''}`)
          .textalign(textalign.center)
          .width('100%')
          .fontsize(16)
          .margin(10)

        text(`文件uri: ${this.mediabean.localurl ? this.mediabean.localurl : ''}`)
          .textalign(textalign.center)
          .width('100%')
          .fontsize(16)
          .margin(10)

        image(this.mediabean.localurl)
          .width(300)
          .height(300)
          .backgroundcolor(color.grey)

      }
      .width('100%')
      .height('100%')
    }
    .height('100%')
  }

  async handleclick(option: mediaoption) {
    let mediabean: mediabean;
    switch (option) {
      case mediaoption.picture:
        mediabean = await this.mediahelper.selectpicture();
        break;
      case mediaoption.file:
        mediabean = await this.mediahelper.selectfile();
        break;
      case mediaoption.takephoto:
        mediabean = await this.mediahelper.takephoto(getcontext() as common.uiabilitycontext);
        break;
      default:
        break;
    }

    if (mediabean) {

      this.mediabean = mediabean;

    }

  }
}

enum mediaoption {
  picture = 0,
  file = 1,
  takephoto = 2
}
打包测试
打包安装到真机上,需要我们给项目配置签名信息。我们点击file -> project structure ->project ,选择 signing configs面板,勾选 support harmonyos 跟automatically generate signature,自动生成调试签名,生成完毕后,运行安装到手机上。
使用拍照功能时,请使用真机运行,如果使用的本地模拟器运行,拍照后返回,uri可能会返回“”。
注意:由于我们没有实现多媒体读取权限动态申请权限,因此需要在手机系统设置-应用中找到该应用,开启多媒体权限,该权限默认是禁止的,开启后再打开应用操作即可。运行的具体的效果如文章开头贴图展示一般。
文本到此完毕,有疑问的请在评论区留言交流,谢谢阅读。


发表评论