
以下为作者观点:
几个月前,我职业生涯中第一次接触到 grpc 服务。在此之前,我一直在使用 soap,主要是使用 rest 和 graphql api,只听说过 grpc。实际上,它并不难,你可以轻松地使用它。经过一段时间的尝试和使用后,我决定创建一种 grpc 测试入门指南。
在本文中,我们将尝试了解 grpc 的一般概念以及如何使用 grpc 协议创建测试。为了提供广泛的示例,我决定使用以下客户端创建测试:
-
postman——对于那些不熟悉代码的人来说很容易理解
-
c# — 我最喜欢的编程语言。适合喜欢 java 或 c# 的老派人士。是的。对我来说入门比较容易。
-
python — 当今非常流行的脚本编程语言。
也可能还有其他编程语言,但我决定就此打住。不再介绍。让我们跳到 grpc 世界……
什么是 grpc?
根据wikipedia 的介绍,grpc 是一个高性能、开源的远程过程调用(rpc),最初由 google 设计。
编者注,根据百度百科介绍:grpc是一个现代的开源高性能远程过程调用(rpc)框架,可以在任何环境中运行。它可以高效地连接数据中心内和跨数据中心的服务,支持负载平衡、跟踪、运行状况检查和身份验证。它也适用于分布式计算的最后一英里,将设备、移动应用程序和浏览器连接到后端服务。grpc最初是由google创建的,它使用了一个通用的rpc基础设施称为stubby,用于连接大量微服务在其数据中心内部和之间运行了十多年。2015年3月, google决定构建stubby的下一个版本,并将其开源。grpc现在在许多组织中使用, 谷歌将为从微服务到计算的“最后一英里”的用例提供动力 (移动的、web和物联网)。
简单来说,它是关于调用远程服务器上的函数/方法以执行某些操作。让我们考虑一个具体的例子:
现在,我感觉我正在解释客户端-服务器架构的基础知识:),我们的想法实际上是调用服务器上实现的函数。
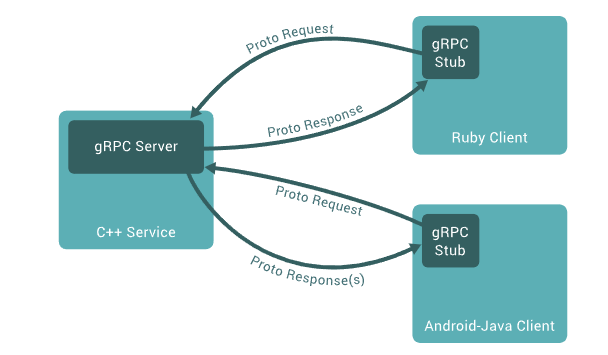
沟通实际上是如何发生的?
默认情况下,grpc 使用协议缓冲区。我将其称为契约。这是什么意思?这意味着,服务器和任何客户端都将使用相同的模式进行通信。很酷的是,协议缓冲区是一种与语言无关、与平台无关的可扩展机制,用于序列化结构化数据。
a) 数据类型。预期发送或接收的数据类型。例如,它可能是字符串、布尔值、数字。请阅读有关数据类型的更多信息。
b) 字段名称。你计划发送的字段的名称
c) 订单号。如 1、2、3、…n
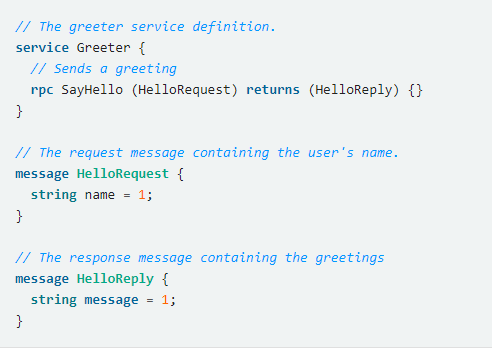
然后,一旦你指定了数据结构,就可以使用协议缓冲区编译器protoc从原型定义生成首选语言的数据访问类。一旦执行请求,它就会自动将其转换为字节并将其发送到服务器。服务器根据实施的逻辑返回响应。从测试的角度来看,可以使用不同的参数调用方法,服务器应该根据你的要求和实施的逻辑做出反应。理论已经足够了:)让我们开始实践吧。
测试服务器
为了简单起见,我提供了一个模拟用户管理系统的简单服务器。听起来很不可思议。它只包含三种方法:)
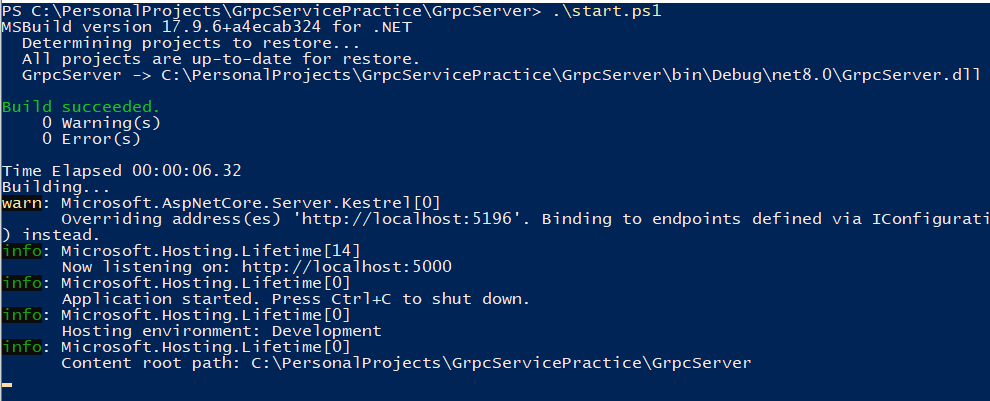
我们想要做的是在开始创建测试之前运行此服务器
先决条件
1.下载github 项目
2.按照自述文件说明运行服务器。步骤很简单
proto 文件
proto 文件可以在 grpcserver →protos 文件夹中找到
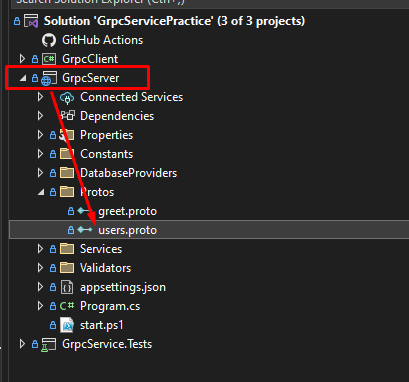
你将在其他客户端中使用此文件。因此,你可能需要复制它或记住它的位置
完成服务器后,我们就可以开始测试了。首先使用 postman 进行简单的测试
使用 postman 进行 grpc 测试
最后我们来到了最有趣的部分。我们将发送请求并创建测试。至少一个:)
测试创建
-
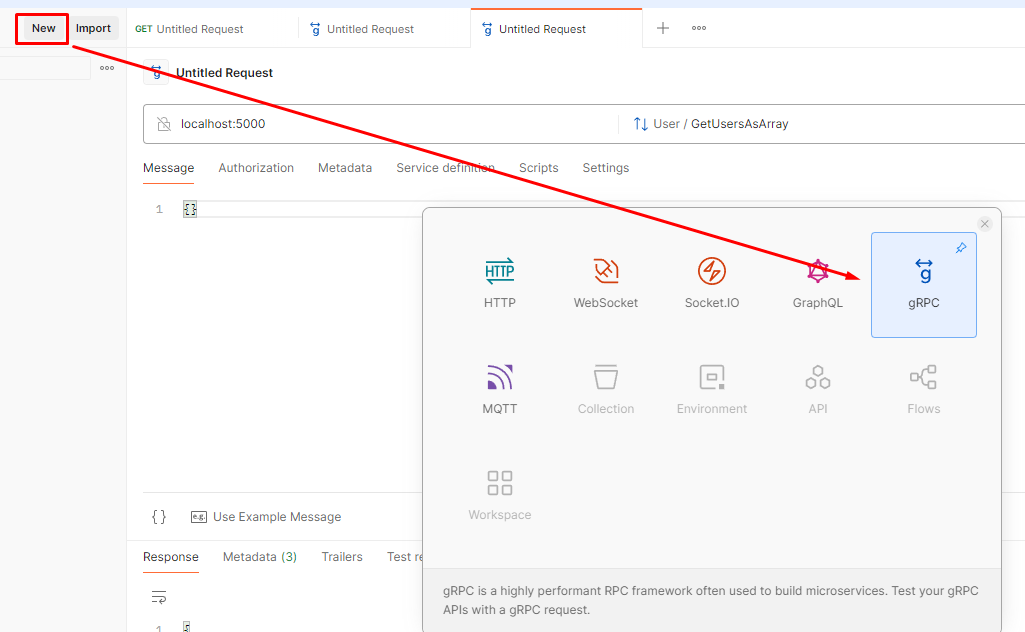
在 postman 中,我们可以发起一个新的请求并选择“grpc”。就这么简单。
-
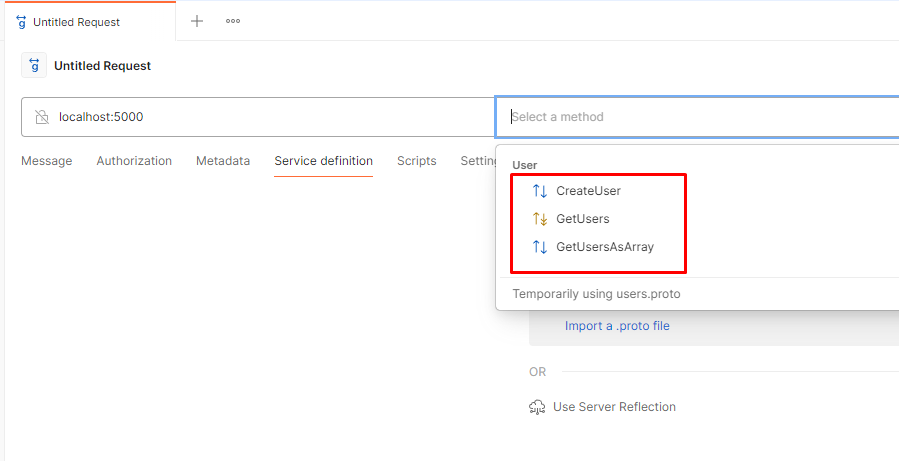
接下来,我们要指定服务器 url 并导入 .proto 文件。
注意:还有其他与 .proto 文件通信的选项。但在此阶段,我们想简化它。

-
一旦文件导入,可能已经可以在“选择方法”部分看到可用的请求
-
让我们尝试创建一个用户创建请求。选择方法后,我们需要准备一条消息。postman 已经包含一个非常有用的按钮用于示例生成 — “使用示例消息”。如果不喜欢某些值,可以更改这些值。
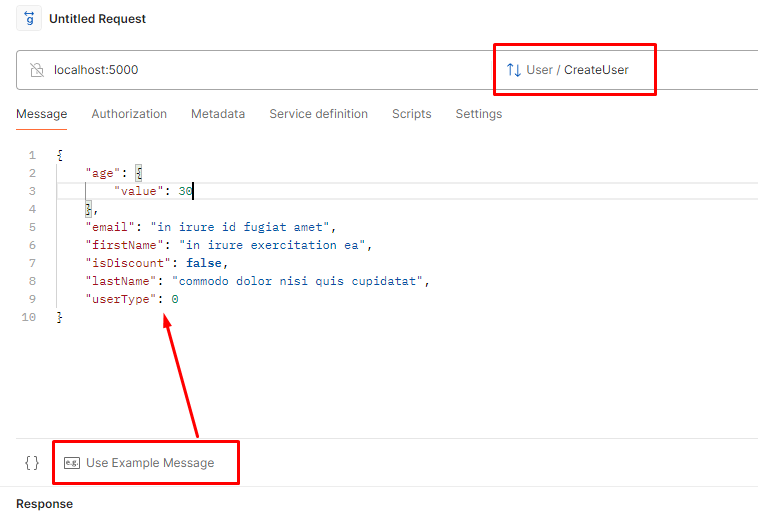
注意:本文中我们只使用“createuser”方法,但可以尝试其他方法。它也应该有效。
-
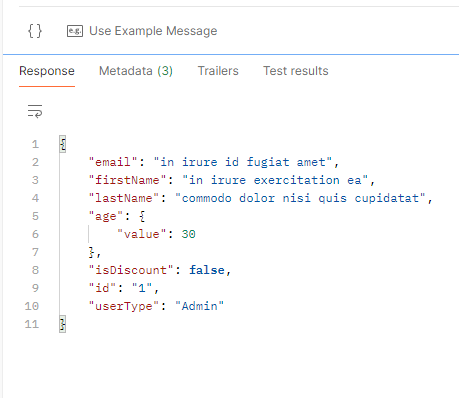
最后我们可以使用invoke,新创建的用户将会返回给我们。
-
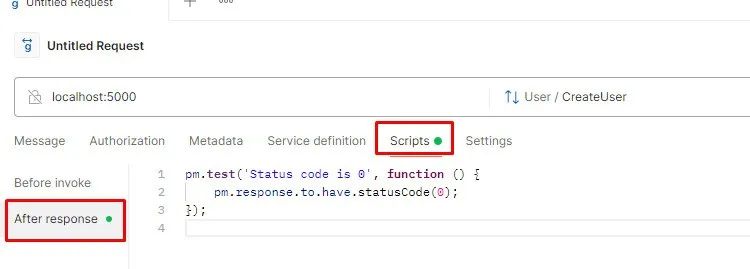
让我们从请求中进行一个简单的测试。让我们转到脚本并使用代码片段进行状态代码验证。在现实生活中,这还不够,但我们正在考虑概念
-
一旦再次运行测试,将看到结果。
下一步
在上面的例子中,我们仅考虑了简单的场景和非常原始的验证步骤。至于接下来的步骤,你可以考虑以下内容:
-
添加更多断言步骤。仅状态码验证是不够的
-
添加其他案例。我们仅考虑了一种积极情景。使用测试设计技术添加更多情景
-
尝试从 cli 运行它以运行它们继续集成。使用 postman cli 或 newman(此步骤与我们的主题无关,但记住它总是好的)
接下来,我们将尝试使用 c# 来实现自动化。请稍候...

使用 c# 客户端进行 grpc 测试
我们将把它分为项目准备和测试设计部分。
项目准备
1.首先,我们将创建一个新的 c# 项目。我使用的是 net8 目标框架和控制台应用程序。可以使用任何 .core/.net 版本。
2. 在我们的例子中,客户端和测试位于同一个项目中。因此,我们将所有 nuget 包安装到同一个项目中。为简单起见,我们将示例分为 grpc 相关包和测试相关包,以防想要分离项目。

grpc 客户端相关的包有:
测试相关的包有:
本项目中安装的附加软件包(可选):
3. 接下来,我们需要将.proto文件从服务器复制到客户端。
-
创建一个protos文件夹并添加.proto 文件。
-
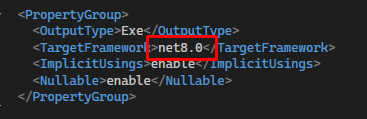
验证文件包含以下配置
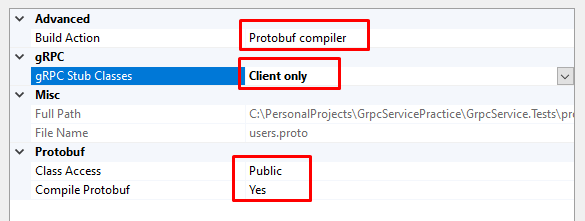
-
验证项目属性也设置为客户端

注意:在我们的示例中,我们直接复制了一个.proto文件。这不是唯一一种方式。实际上,可以.proto从某些存储(例如创建 nuget 包)引用文件。在这种情况下,如果有新版本可用,可以避免文件实现问题。
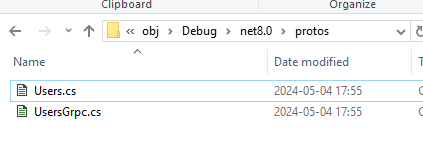
4. 是时候构建你的项目了。完成后,你可能会发现自动生成的类。我们已准备好创建测试
测试设计
1.首先我们需要建立一个频道和客户端。
[testfixture]
public class createuserstests
{
    private grpcchannel? _channel;
    private user.userclient? _userclient;

    [setup]
    public void setup()
    {
        // setup new channel and client for each test
        _channel = grpcchannel.foraddress(testcontext.parameters["server"]!);
        _userclient = new user.userclient(_channel);
    }

    [teardown]
    public void teardown()
    {
        // dispose the channel after each test
        _channel?.dispose();
    }
2.接下来我们实现测试逻辑
[test]
public async task createuser_withfullvaliddata_shouldbecreated()
{
    //arrange
    userrequestmodel requestmodel = new userfaker().generate();

    //act
    userresponsemodel? response = await _userclient!.createuserasync(requestmodel).responseasync;

    //assert
    response.should().notbenull();
    using (new assertionscope())
    {
        response.email.should().be(requestmodel.email);
        response.firstname.should().be(requestmodel.firstname);
        response.lastname.should().be(requestmodel.lastname);
        response.age.should().be(requestmodel.age);
        response.isdiscount.should().be(requestmodel.isdiscount);
        response.id.should().begreaterthan(0);
    }
}
var requestmodel = new userrequestmodel
{
email = "test@test.com",
firstname = "firstname",
lastname = "lastname",
//.....some other properties
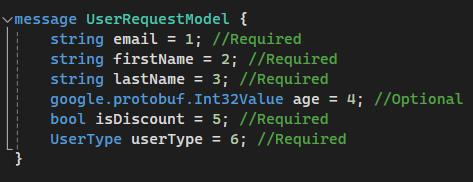
};该模型是基于 proto 消息契约生成的
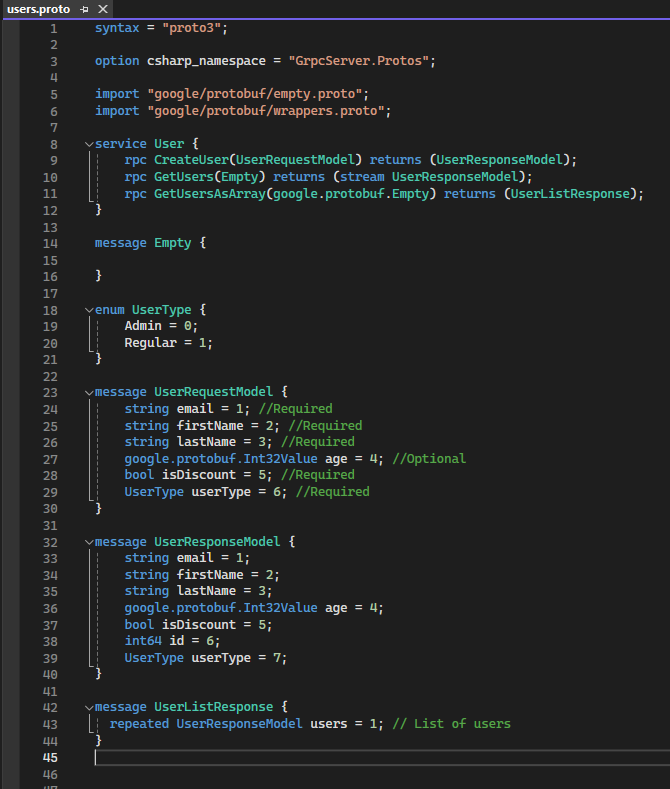
message userrequestmodel {
 string email = 1; //required
 string firstname = 2; //required
 string lastname = 3; //required
 google.protobuf.int32value age = 4; //optional
 bool isdiscount = 5; //required
 usertype usertype = 6; //required
}
service user {
rpc createuser(userrequestmodel) returns (userresponsemodel);
rpc getusers(empty) returns (stream userresponsemodel);
rpc getusersasarray(google.protobuf.empty) returns (userlistresponse);
}注意:还有另一个同步方法可用 - “createuser”
3. 测试已准备就绪。可以继续测试其他场景。
可能出现的负面情况
上述方法很容易适用于正面情况。不幸的是,如果尝试执行某些负面情况,grpc 调用将发生异常并导致测试失败。那么在这种情况下该怎么办?
有几种方法可以解决此问题:
在下面的例子中,我有一个验证年龄边界值的负面案例
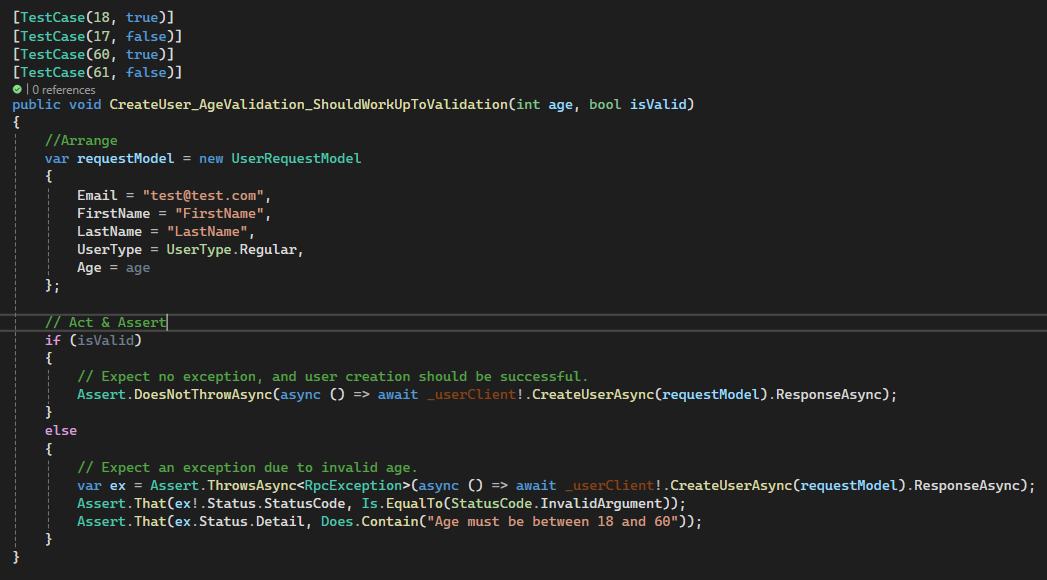
这是一个更复杂的方法。无论如何,让我们尝试创建一些简单的实现
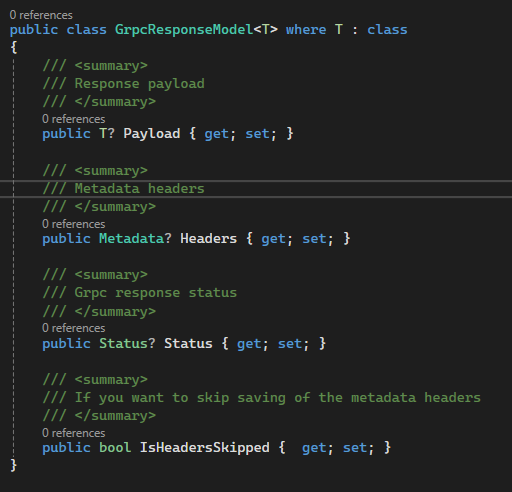
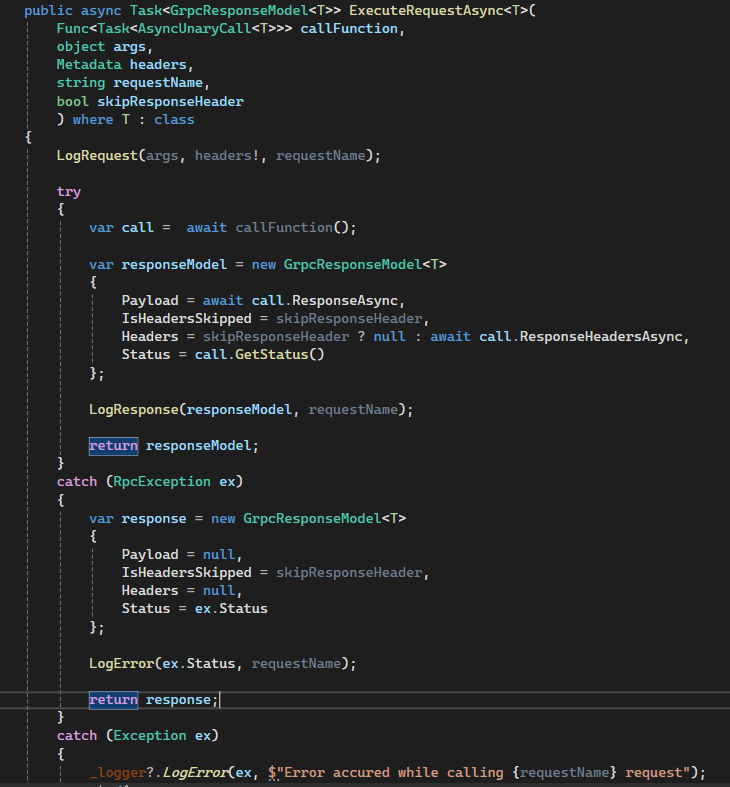
首先,让我们创建一个存储结果的模型。
其次,我们需要创建一个函数/方法来捕获异常并返回它
-
简单来说,需要在 try-catch 块内进行调用并首先捕获“rpcexception”。
-
无论是成功还是失败,都会返回一个带有状态代码的对象。成功的情况只会返回更多信息
最后,我们可以使用此方法来执行我们的调用
-
准备请求模型
-
使用准备好的方法并从内部调用请求
-
接收结果并执行断言
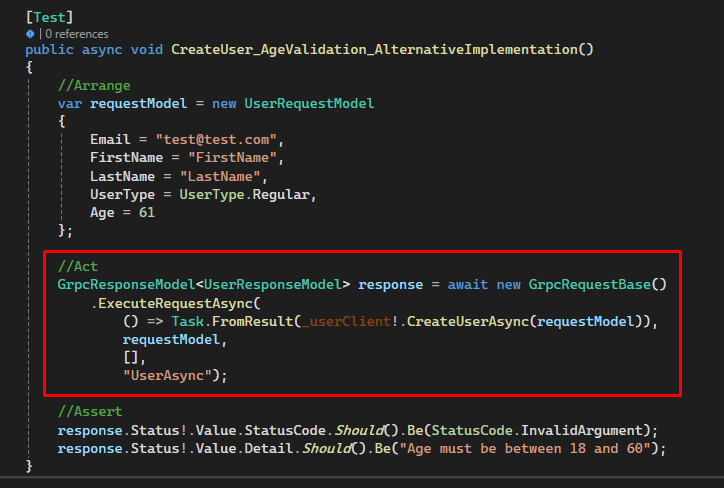
注意:此代码肯定需要重构。我建议使用“grpcrequestbase”类作为服务包装器的基类,例如“userservicerequests”或类似的东西。
下一步我们将使用 python 创建一个测试项目。
使用 python 客户端进行 grpc 测试
与以前一样,我们将把它分为项目准备和测试设计部分。
项目准备
我将使用 pipenv。因此,项目设置将如下所示
1.如果尚未安装 python,请先安装
2.安装 pipenv
pip install --upgrade pip
pip install pipenv
3.创建项目目录
mkdir my_grpc_project
cd my_grpc_project
4. 使用已安装的 python 版本初始化 pipenv 环境
pipenv -- python 3.8.25.激活pipenv shell
pipenv shell6.安装grpc相关包(grpc客户端)
pipenv install grpcio grpcio-tools7.安装测试相关包
pipenv install pytest pytest-asyncio --dev8. 应创建 pip 文件。它应类似于以下内容
[[source]]
url = "https://pypi.org/simple"
verify_ssl = true
name = "pypi"
[packages]
grpcio = "*"
grpcio-tools = "*"
[dev-packages]
pytest = "*"
pytest-asyncio = "*"
[requires]
python_version = "3.8"
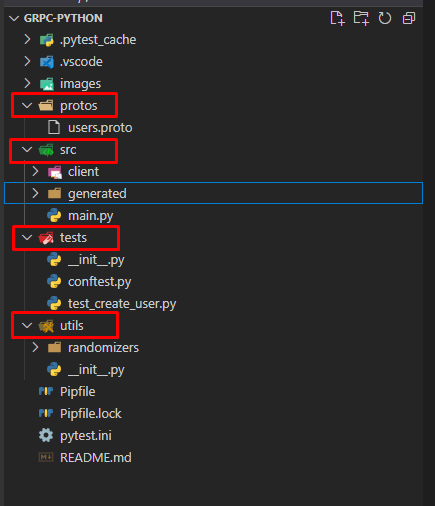
python_full_version = "3.8.2"9. 定义项目结构。例如:
“protos”——我们将放置 .proto 文件的文件夹
“src”——所有客户端代码都将位于其中
“tests” — 包含测试的文件夹
“utils”——不同的测试助手
生成 python grpc 文件并创建客户端
-
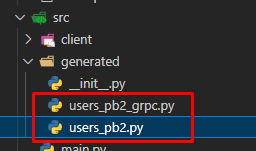
要从 .proto 文件生成 python grpc 文件,可以使用protoc带有 python grpc 插件的编译器。以下是生成它的命令
python -m grpc_tools.protoc -i./protos --python_out=./src/generated --grpc_python_out=./src/generated ./protos/users.proto此命令将在“src/generated”文件夹中生成 grpc 客户端文件
-
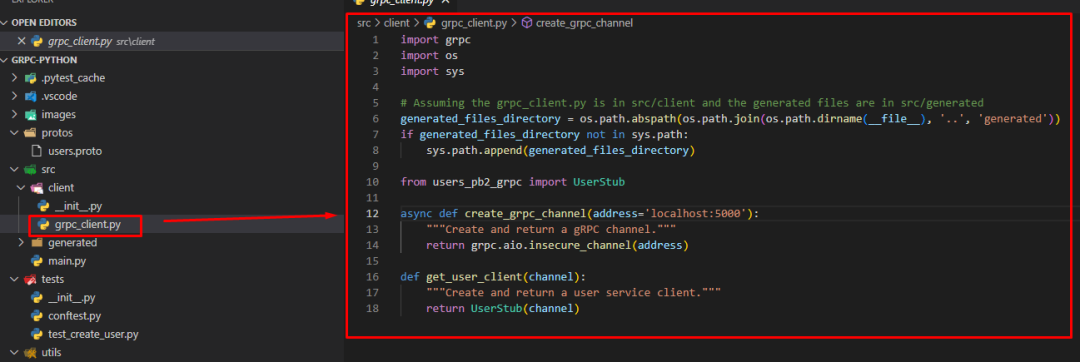
接下来我们将创建一个非常简单的客户端
- 让我们创建一个文件“grpc_client.py”
- 让我们在里面放一个简单的实现
import grpc
import os
import sys

# assuming the grpc_client.py is in src/client and the generated files are in src/generated
generated_files_directory = os.path.abspath(os.path.join(os.path.dirname(__file__), '..', 'generated'))
if generated_files_directory not in sys.path:
    sys.path.append(generated_files_directory)

from users_pb2_grpc import userstub

async def create_grpc_channel(address='localhost:5000'):
    """create and return a grpc channel."""
    return grpc.aio.insecure_channel(address)

def get_user_client(channel):
    """create and return a user service client."""
    return userstub(channel)
-
是时候创建测试了

测试设计
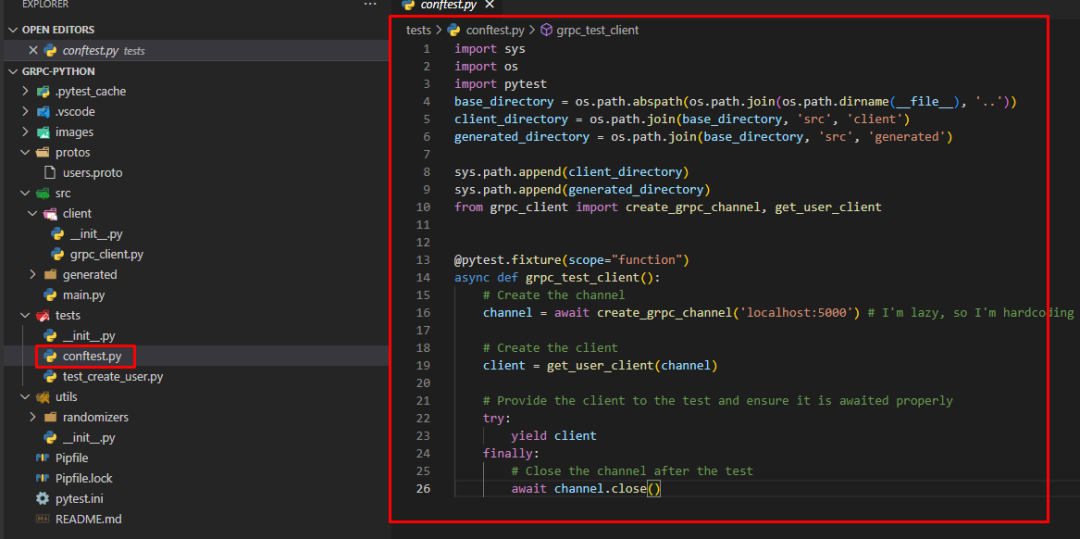
1.首先,我们将创建一个测试配置文件,在其中定义频道和用户客户端
导入系统导入操作系统
import sys
import os
import pytest
base_directory = os.path.abspath(os.path.join(os.path.dirname(__file__), '..'))
client_directory = os.path.join(base_directory, 'src', 'client')
generated_directory = os.path.join(base_directory, 'src', 'generated')

sys.path.append(client_directory)
sys.path.append(generated_directory)
from grpc_client import create_grpc_channel, get_user_client


@pytest.fixture(scope="function")
async def grpc_test_client():
    # create the channel
    channel = await create_grpc_channel('localhost:5000') # i'm lazy, so i'm hardcoding the port for this example. it should be read from a config file

    # create the client
    client = get_user_client(channel)

    # provide the client to the test and ensure it is awaited properly
    try:
        yield client
    finally:
        # close the channel after the test

        await channel.close()
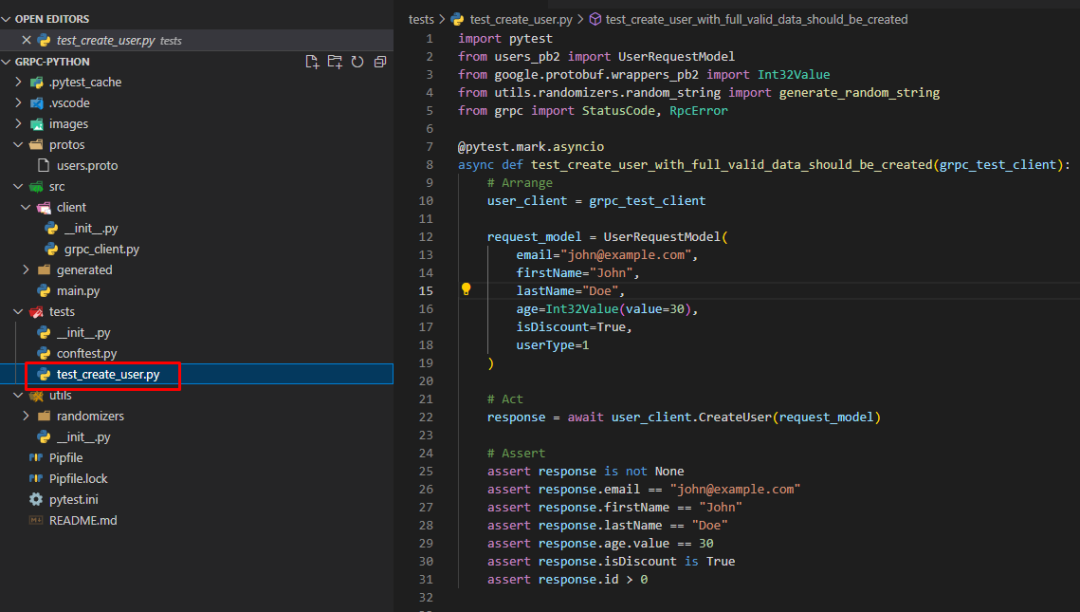
2. 最后我们可以创建测试。
我将添加正面和负面的案例
import pytest
from users_pb2 import userrequestmodel
from google.protobuf.wrappers_pb2 import int32value
from utils.randomizers.random_string import generate_random_string
from grpc import statuscode, rpcerror

@pytest.mark.asyncio
async def test_create_user_with_full_valid_data_should_be_created(grpc_test_client):
    # arrange
    user_client = grpc_test_client

    request_model = userrequestmodel(
        email="john@example.com",
        firstname="john",
        lastname="doe",
        age=int32value(value=30),
        isdiscount=true,
        usertype=1
    )

    # act
    response = await user_client.createuser(request_model)

    # assert
    assert response is not none
    assert response.email == "john@example.com"
    assert response.firstname == "john"
    assert response.lastname == "doe"
    assert response.age.value == 30
    assert response.isdiscount is true
    assert response.id > 0


@pytest.mark.asyncio
@pytest.mark.parametrize("chars_number, is_positive", [
    (3, true),
    (2, false),
    (100, true),
    (101, false)
])
async def test_create_user_last_name_validation(grpc_test_client, chars_number, is_positive):
    # arrange
    user_client = grpc_test_client
    request_model = userrequestmodel(
        email="test@test.com",
        firstname="firstname",
        lastname=generate_random_string(chars_number)
    )

    # act and assert
    if is_positive:
        # expect no exception, and user creation should be successful.
        response = await user_client.createuser(request_model)
        assert response is not none  # ensure some response logic if needed
    else:
        # expect an exception due to invalid last name length.
        with pytest.raises(rpcerror) as exc_info:
            await user_client.createuser(request_model)

        assert exc_info.value.code() == statuscode.invalid_argument
        if chars_number == 101:
            expected_message = "last name max length is 100"
        else:
            expected_message = "last name min length is 3"

        assert expected_message in exc_info.value.details()
注意:我知道这是偷懒的代码。我只是想和你分享一个基本的想法
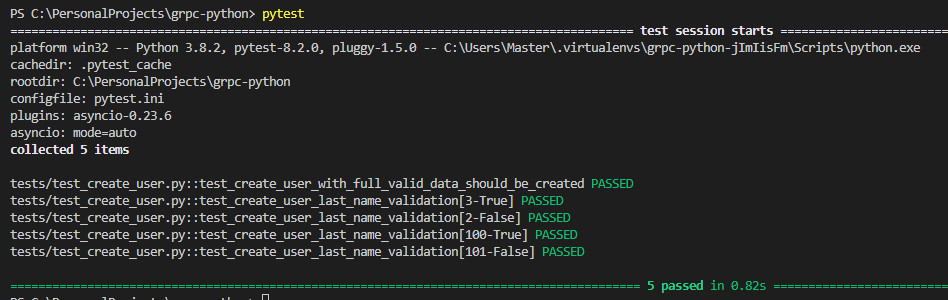
3.当然,让我们运行测试
-
使用以下命令激活虚拟环境:
pipenv shell-
使用命令运行测试:
pytest
结语
在本文中,我们简要回顾了如何使用 postman、net 和 python 客户端测试 grpc 服务。我想指出的是,有些部分没有包括在内,这些部分与发送和接收流作为参数有关。此类流有助于发送和接收任何数据类型的消息。也许这在未来会是一个很好的话题。
行动吧,在路上总比一直观望的要好,未来的你肯定会感 谢现在拼搏的自己!如果想学习提升找不到资料,没人答疑解惑时,请及时加入群: 759968159,里面有各种测试开发资料和技术可以一起交流哦。
最后: 下方这份完整的软件测试视频教程已经整理上传完成,需要的朋友们可以自行领取 【保证100%免费】
软件测试面试文档
我们学习必然是为了找到高薪的工作,下面这些面试题是来自阿里、腾讯、字节等一线互联网大厂最新的面试资料,并且有字节大佬给出了权威的解答,刷完这一套面试资料相信大家都能找到满意的工作。


发表评论