一、订阅和发布
redis 发布订阅 (pub/sub) 是一种消息通信模式:发送者 (pub) 发送消息,订阅者 (sub) 接收消息。
redis 客户端可以订阅任意数量的频道。
redis的发布和订阅
客户端订阅频道发布的消息
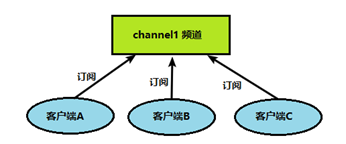
频道发布消息 订阅者就可以收到消息
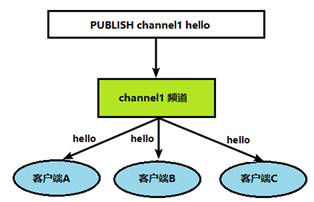
发布订阅的代码实现
1、 打开一个客户端订阅channel1
subscribe channel1

2、打开另一个客户端,给channel1发布消息hello
publish channel1 hello

返回的1是订阅者数量
3、打开第一个客户端可以看到发送的消息

二、事务
1.事务简介:
可以一次执行多个命令,本质是一组命令的集合。一个事务中的 所有命令都会序列化,按顺序地串行化执行而不会被其它命令插入,不许加塞。
单独的隔离的操作
官网说明
https://redis.io/docs/interact/transactions/
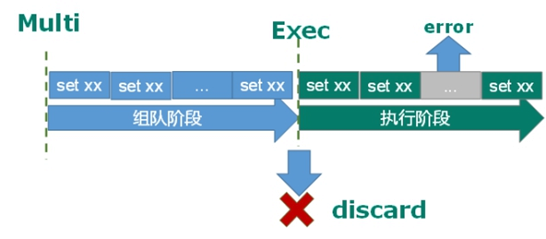
multi、exec、discard、watch。这四个指令构成了 redis 事务处理的基础。
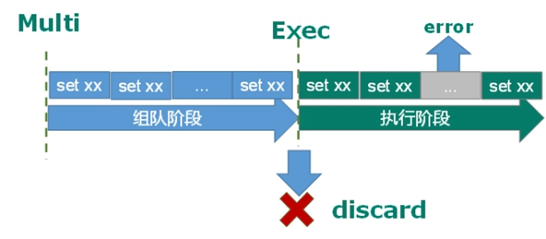
1.multi 用来组装一个事务;将命令存放到一个队列里面
2.exec 用来执行一个事务;//commit
3.discard 用来取消一个事务;//rollback
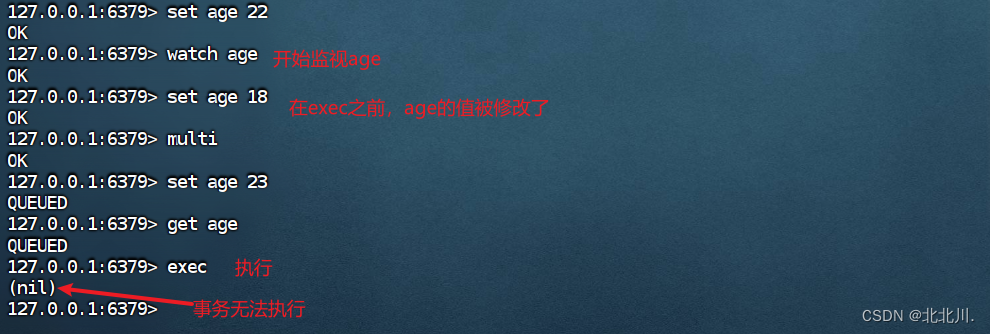
4.watch 用来监视一些 key,一旦这些 key 在事务执行之前被改变,则取消事务的执行。
例子:

有关事务,经常会遇到的是两类错误:
1.调用 exec 之前的错误
“调用 exec 之前的错误”,有可能是由于语法有误导致的,也可能时由于内存不足导致的。只要出现某个命令无法成功写入缓冲队列的情况,redis 都会进行记录,在客户端调用 exec 时,redis 会拒绝执行这一事务
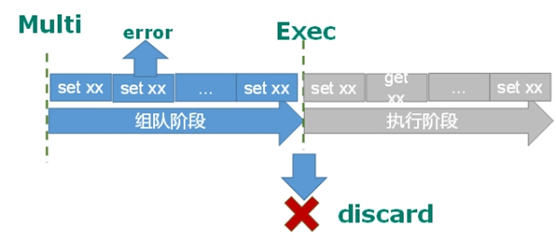

2.调用 exec 之后的错误

2.redis事务冲突
双十一去购物的时候使用同一张银行卡去付款
10000
一个请求想给金额减8000
一个请求想给金额减5000
一个请求想给金额减1000

解决方案
悲观锁
select * from biao where 1=1 for update;

悲观锁(pessimistic lock), 顾名思义,就是很悲观,
每次去拿数据的时候都认为别人会修改,所以每次在拿数据的时候都会上锁,
这样别人想拿这个数据就会block直到它拿到锁。
传统的关系型数据库里边就用到了很多这种锁机制,
比如行锁,表锁等,读锁,写锁等,都是在做操作之前先上锁。
12306抢票
乐观锁
version 1
查余额 10000 version:1
10000>8000 -8000 update uuuu set moner-=8000 where version=1 1.1
10000 -5000 update uuuuu set monty-=5000 where version=1
2000 2000>1000 update uuuu set monty-=1000 where version=1.1 1.2

version
select * from ttt where uid =1
version money
1 10000
乐观锁(optimistic lock), 顾名思义,就是很乐观,
每次去拿数据的时候都认为别人不会修改,所以不会上锁,
但是在更新的时候会判断一下在此期间别人有没有去更新这个数据,
可以使用版本号等机制。乐观锁适用于多读的应用类型,
这样可以提高吞吐量。redis就是利用这种check-and-set机制实现事务的。
3.watch
“watch”可以帮我们实现类似于“乐观锁”的效果,即 cas(check and set)。
执行顺序:multi(begin) -> exec(commit) -> discard(rollback)
watch 本身的作用是“监视 key 是否被改动过”,而且支持同时监视多个 key,只要还没真正触发事务,watch 都会尽职尽责的监视,一旦发现某个 key 被修改了,在执行 exec 时就会返回 nil,表示事务无法触发。
代码如下:
事务回滚:

三、java连接redis
1. 创建java项目
略
2. 添加redis的依赖
<dependency>
    <groupid>redis.clients</groupid>
    <artifactid>jedis</artifactid>
    <version>3.2.0</version>
</dependency>
3. 连接redis


四、redis整合springboot项目
1. 创建项目
略
2. 添加依赖
<dependency>

<groupid>org.springframework.boot</groupid>

<artifactid>spring-boot-starter-data-redis</artifactid>

</dependency>

<dependency>

<groupid>org.apache.commons</groupid>

<artifactid>commons-pool2</artifactid>

<version>2.6.0</version>

</dependency>

<dependency>

<groupid>redis.clients</groupid>

<artifactid>jedis</artifactid>

</dependency>
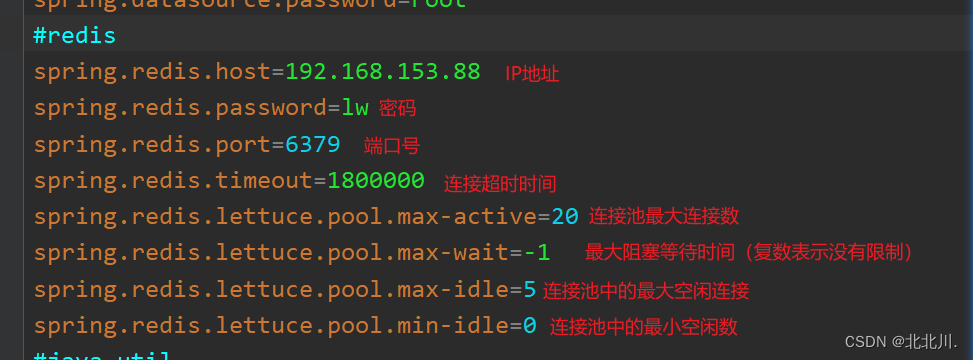
3. 编写配置文件
4. 设置配置类
package org.example.config;

import com.fasterxml.jackson.annotation.jsonautodetect;
import com.fasterxml.jackson.annotation.propertyaccessor;
import com.fasterxml.jackson.databind.objectmapper;
import org.springframework.cache.cachemanager;
import org.springframework.cache.annotation.cachingconfigurersupport;
import org.springframework.cache.annotation.enablecaching;
import org.springframework.context.annotation.bean;
import org.springframework.context.annotation.configuration;
import org.springframework.data.redis.cache.rediscacheconfiguration;
import org.springframework.data.redis.cache.rediscachemanager;
import org.springframework.data.redis.connection.redisconnectionfactory;
import org.springframework.data.redis.core.redistemplate;
import org.springframework.data.redis.serializer.jackson2jsonredisserializer;
import org.springframework.data.redis.serializer.redisserializationcontext;
import org.springframework.data.redis.serializer.redisserializer;
import org.springframework.data.redis.serializer.stringredisserializer;
import redis.clients.jedis.jedispoolconfig;

import java.time.duration;


@enablecaching
@configuration
public class redisconfig extends cachingconfigurersupport {
    /**
     * 连接池的设置
     *
     * @return
     */
    @bean
    public jedispoolconfig getjedispoolconfig() {
        jedispoolconfig jedispoolconfig = new jedispoolconfig();
        return jedispoolconfig;
    }
    /**
     * redistemplate
     * @param factory
     * @return
     */
    @bean
    public redistemplate<string, object> redistemplate(redisconnectionfactory factory) {
        redistemplate<string, object> template = new redistemplate<>();
        redisserializer<string> redisserializer = new stringredisserializer();
        jackson2jsonredisserializer jackson2jsonredisserializer = new jackson2jsonredisserializer(object.class);
        objectmapper om = new objectmapper();
        // 指定要序列化的域,field,get和set,以及修饰符范围,any是都有包括private和public
        om.setvisibility(propertyaccessor.all, jsonautodetect.visibility.any);
        // 指定序列化输入的类型,类必须是非final修饰的,final修饰的类,比如string,integer等会跑出异常
        om.enabledefaulttyping(objectmapper.defaulttyping.non_final);
        jackson2jsonredisserializer.setobjectmapper(om);
        template.setconnectionfactory(factory);
        //key序列化方式
        template.setkeyserializer(redisserializer);
        //value序列化
        template.setvalueserializer(jackson2jsonredisserializer);
        //value hashmap序列化
        template.sethashvalueserializer(jackson2jsonredisserializer);
        return template;
    }
    /**
     * 缓存处理
     * @param factory
     * @return
     */
    @bean
    public cachemanager cachemanager(redisconnectionfactory factory) {
        redisserializer<string> redisserializer = new stringredisserializer();
        jackson2jsonredisserializer jackson2jsonredisserializer = new jackson2jsonredisserializer(object.class);
//解决查询缓存转换异常的问题
        objectmapper om = new objectmapper();
        om.setvisibility(propertyaccessor.all, jsonautodetect.visibility.any);
        om.enabledefaulttyping(objectmapper.defaulttyping.non_final);
        jackson2jsonredisserializer.setobjectmapper(om);
// 配置序列化(解决乱码的问题),过期时间600秒
        rediscacheconfiguration config = rediscacheconfiguration.defaultcacheconfig()
                .entryttl(duration.ofseconds(600))
                .serializekeyswith(redisserializationcontext.serializationpair.fromserializer(redisserializer))
                .serializevalueswith(redisserializationcontext.serializationpair.fromserializer(jackson2jsonredisserializer))
                .disablecachingnullvalues();
        rediscachemanager cachemanager = rediscachemanager.builder(factory)
                .cachedefaults(config)
                .build();
        return cachemanager;
    }
}
五、注解缓存
spring缓存注解
从3.1开始,spring引入了对cache的支持。其使用方法和原理都类似于spring对事务管理的支持。spring cache是作用在方法上的,其核心思想是这样的:当我们在调用一个缓存方法时会把该方法参数和返回结果作为一个键值对存放在缓存中,等到下次利用同样的参数来调用该方法时将不再执行该方法,而是直接从缓存中获取结果进行返回。所以在使用spring cache的时候我们要保证我们缓存的方法对于相同的方法参数要有相同的返回结果。
使用spring cache需要我们做两方面的事:
1. 声明某些方法使用缓存
2. 配置spring对cache的支持
和spring对事务管理的支持一样,spring对cache的支持也有基于注解和基于xml配置两种方式。下面我们先来看看基于注解的方式。(基于配置的自己私下去了解即可)
基于注解的支持
@cacheable
@cacheable可以标记在一个方法上,也可以标记在一个类上。
当标记在一个方法上时表示该方法是支持缓存的,当标记在一个类上时则表示该类所有的方法都是支持缓存的。对于一个支持缓存的方法,spring会在其被调用后将其返回值缓存起来,以保证下次利用同样的参数来执行该方法时可以直接从缓存中获取结果,而不需要再次执行该方法。
@cacheable 的作用 主要针对方法配置,能够根据方法的请求参数对其结果进行缓存
@cacheable可以指定三个属性,value、key和condition。
| 参数 | 解释 | example |
| value | 缓存的名称,在 spring 配置文件中定义,必须指定至少一个 | 例如: @cacheable(value=”mycache”) @cacheable(value={”cache1”,”cache2”}
|
| key | 缓存的 key,可以为空,如果指定要按照 spel 表达式编写,如果不指定,则缺省按照方法的所有参数进行组合 | @cacheable(value=”testcache”,key=”#username”) |
| condition | 缓存的条件,可以为空,使用 spel 编写,返回 true 或者 false,只有为 true 才进行缓存 | @cacheable(value=”testcache”,condition=”#username.length()>2”) |
a. value属性指定cache名称
value其表示当前方法的返回值是会被缓存在哪个cache上的,对应cache的名称。其可以是一个cache也可以是多个cache,当需要指定多个cache时其是一个数组。
 @cacheable("cache1")//cache是发生在cache1上的
   public user find(integer id) {
      returnnull;
   }

   @cacheable({"cache1", "cache2"})//cache是发生在cache1和cache2上的
   public user find(integer id) {
      returnnull;
   }
b. 使用key属性自定义key
key属性是用来指定spring缓存方法的返回结果时对应的key的。该属性支持springel表达式。当我们没有指定该属性时,spring将使用默认策略生成key。我们这里先来看看自定义策略
自定义策略是指我们可以通过spring的el表达式来指定我们的key。这里的el表达式可以使用方法参数及它们对应的属性。使用方法参数时我们可以直接使用“#参数名”或者“#p参数index”。下面是几个使用参数作为key的示例。
@cacheable(value="users", key="#id")
   public user find(integer id) {
      return  null;
   }

// p  param 参数   0
   @cacheable(value="users", key="#p0")
   public user find(integer id) {
      returnnull;
   }

   @cacheable(value="users", key="#user.id")
   public user find(user user) {
      returnnull;
   }

   @cacheable(value="users", key="#p0.id")
   public user find(user user) {
      returnnull;
   }
除了上述使用方法参数作为key之外,spring还为我们提供了一个root对象可以用来生成key。通过该root对象我们可以获取到以下信息。
| 属性名称 | 描述 | 示例 |
| methodname | 当前方法名 | #root.methodname |
| method | 当前方法 | #root.method.name |
| target | 当前被调用的对象 | #root.target |
| targetclass | 当前被调用的对象的class | #root.targetclass |
| args | 当前方法参数组成的数组 | #root.args[0] |
| caches | 当前被调用的方法使用的cache | #root.caches[0].name |
当我们要使用root对象的属性作为key时我们也可以将“#root”省略,因为spring默认使用的就是root对象的属性。如:
 @cacheable(value={"users", "xxx"}, key="caches[1].name")
   public user find(user user) {
      returnnull;
   }
condition属性指定发生的条件
有的时候我们可能并不希望缓存一个方法所有的返回结果。通过condition属性可以实现这一功能。condition属性默认为空,表示将缓存所有的调用情形。其值是通过springel表达式来指定的,当为true时表示进行缓存处理;当为false时表示不进行缓存处理,即每次调用该方法时该方法都会执行一次。如下示例表示只有当user的id为偶数时才会进行缓存。
 @cacheable(value={"users"}, key="#user.id", condition="#user.id%2==0")
   public user find(user user) {
      system.out.println("find user by user " + user);
      return user;
   }
@cacheput
在支持spring cache的环境下,对于使用@cacheable标注的方法,spring在每次执行前都会检查cache中是否存在相同key的缓存元素,如果存在就不再执行该方法,而是直接从缓存中获取结果进行返回,否则才会执行并将返回结果存入指定的缓存中。@cacheput也可以声明一个方法支持缓存功能。与@cacheable不同的是使用@cacheput标注的方法在执行前不会去检查缓存中是否存在之前执行过的结果,而是每次都会执行该方法,并将执行结果以键值对的形式存入指定的缓存中。
一般使用在保存,更新方法中。
@cacheput也可以标注在类上和方法上。使用@cacheput时我们可以指定的属性跟 @cacheable是一样的。
 @cacheable(cachenames = "user", key = "#id")//每次都会执行方法,并将结果存入指定的缓存中
   public user find(integer id) {
      return null;
   }
@cacheevict
@cacheevict是用来标注在需要清除缓存元素的方法或类上的。当标记在一个类上时表示其中所有的方法的执行都会触发缓存的清除操作。@cacheevict可以指定的属性有value、key、condition、allentries和beforeinvocation。其中value、key和condition的语义与@cacheable对应的属性类似。即value表示清除操作是发生在哪些cache上的(对应cache的名称);key表示需要清除的是哪个key,如未指定则会使用默认策略生成的key;condition表示清除操作发生的条件。下面我们来介绍一下新出现的两个属性allentries和beforeinvocation。
1、 allentries属性
allentries是boolean类型,表示是否需要清除缓存中的所有元素。默认为false,表示不需要。当指定了allentries为true时,spring cache将忽略指定的key。有的时候我们需要cache一下清除所有的元素,这比一个一个清除元素更有效率。
@cacheevict(value="users",key = "#id", allentries=true)
public void delete(integer id) {
   system.out.println("delete user by id: " + id);
}
2、 beforeinvocation属性
清除操作默认是在对应方法成功执行之后触发的,即方法如果因为抛出异常而未能成功返回时也不会触发清除操作。使用beforeinvocation可以改变触发清除操作的时间,当我们指定该属性值为true时,spring会在调用该方法之前清除缓存中的指定元素。
@cacheevict(value="users",key = "#id", beforeinvocation=true)
public void delete(integer id) {
   system.out.println("delete user by id: " + id);
}
六、springboot基于注解的redis缓存
1.开启注解缓存

2. 添加缓存
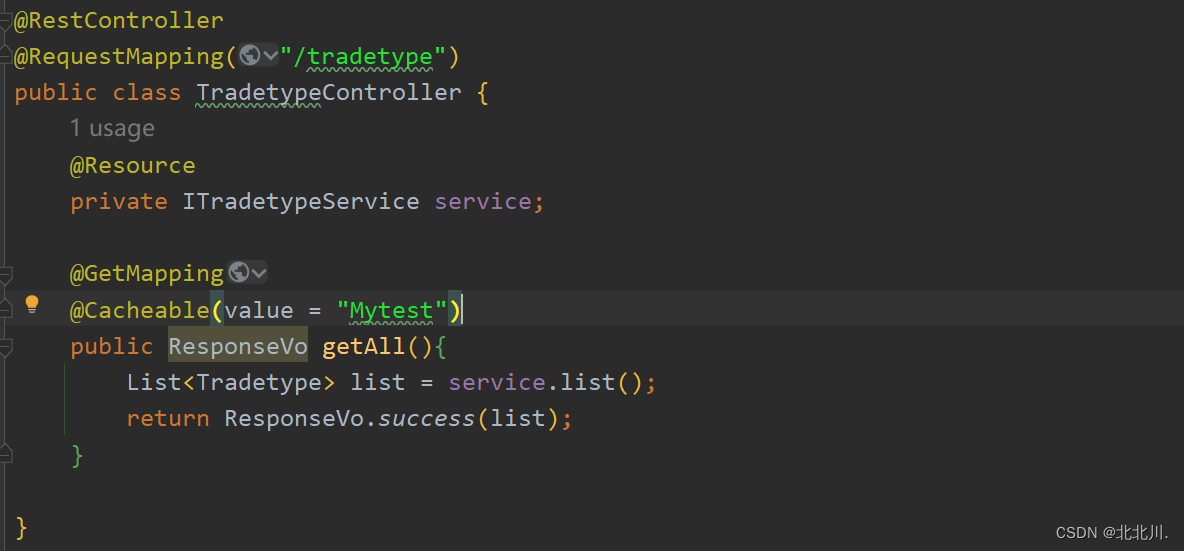
3. 测试
第一次访问,控制台会打印数据
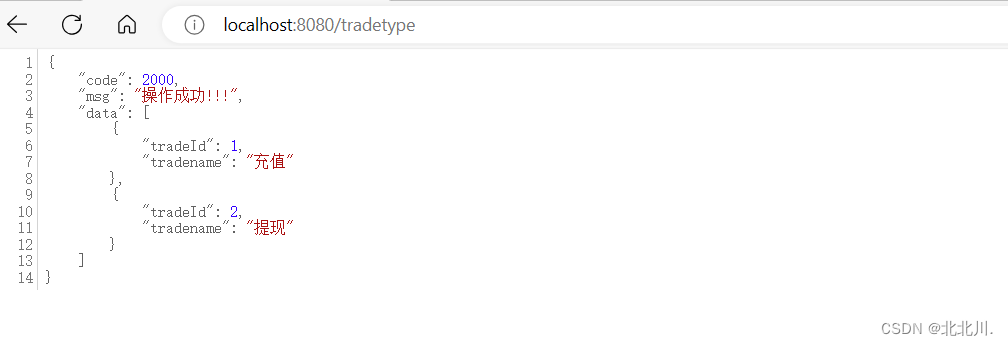
 缓存之后,清空控制台,再次访问,直接通过缓存获取


发表评论