1. asr介绍与对比
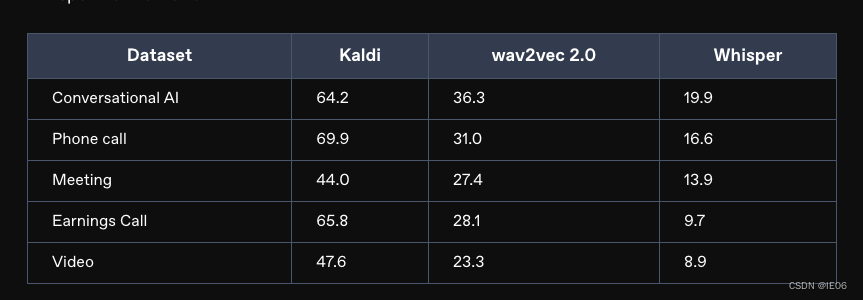
常见的asr包括wav2letter++, openseq2seq, vosk, speechbrain, nvidia nemo, and fairseq.等等。下面对比3种asr技术:kaldi,wav2vec 2.0,whisper
首先是e2e(端到端神经网络)模型,常见的是connectionist temporal classification (ctc)。ctc需要依赖prefix beam search和language model re-scoring来提高精确度,因此速度会变慢。kaldi和wav2vec是基于e2e的模型。
然后是encoder/decoder模型,效果通常比ctc要好。whisper就是这样的一个模型。
测试数据为deepgram’s internal validation sets中任意选取的50个文件。指标为 word error rate (wer)
wer基于levenshtein distance,统计出3种错误: substitutions, insertions, and deletions。wer = substitutions + insertions + deletions) / number of words spoken.
对比结果如下:
2. whisper原始版本
2.1 openai-whisper
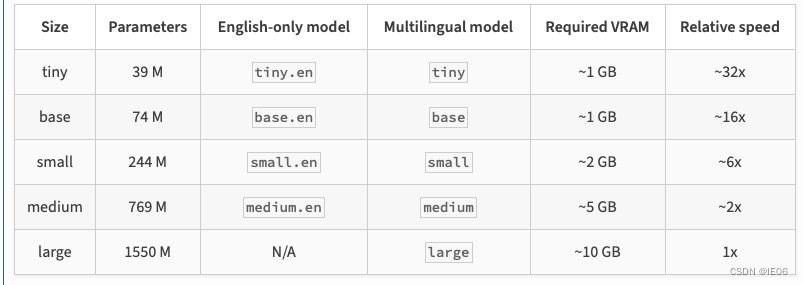
这应该是最快的使用方式了。安装pip install -u openai-whisper,接着安装ffmpeg,随后就可以使用了。模型清单如下:
第一种方式,使用命令行:
whisper japanese.wav --language japanese --model medium
另一种方式,使用python调用:
import whisper
model = whisper.load_model("base")
result = model.transcribe("audio.mp3",initial_prompt='以下是普通话的句子。')
print(result["text"])
3 各种加速版本
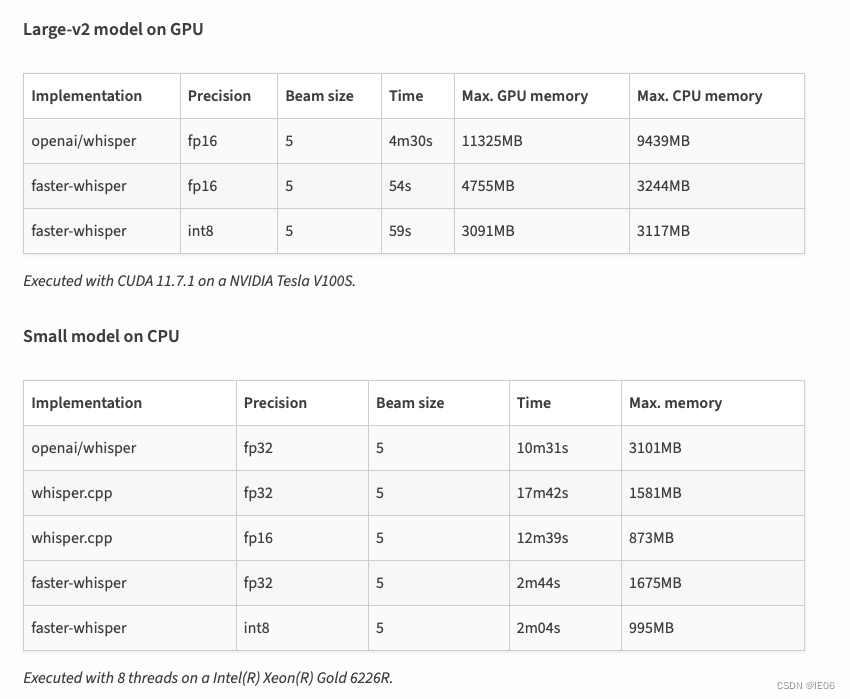
3.1 faster-whisper
安装也一样:pip install -u faster-whisper,速度对比:
3.2 whisper-jax
是whisper在gpu上的加速版本,首先安装库:
pip install jax jaxlib git+https://github.com/sanchit-gandhi/whisper-jax.git datasets soundfile librosa
调用代码为:
from whisper_jax import flaxwhisperpipline
import jax.numpy as jnp
pipeline = flaxwhisperpipline("openai/whisper-tiny", dtype=jnp.bfloat16, batch_size=16)
%time text = pipeline('test.mp3')
3.3 whisper-openvino
是intel系列的cpu上加速的版本。安装库:pip install git+https://github.com/zhuzilin/whisper-openvino.git
调用方法:whisper carmack.mp3 --model tiny.en --beam_size 3
4. whsper.cpp
git地址为:https://github.com/ggerganov/whisper.cpp
4.1 普通用法
相关项目为ggerganov/whisper.cpp,去huggingface上下载需要的模型,比如large-v2对应的是ggml-large-v2.bin。下载时记得加上–resume-download参数。
然后执行make编译。
如果你有魔法的话,上述两步可以二合一:make large-v2
注意编译时带上如下选项:
gpu:whisper_cublas=1 make -j
opencl gpu: whisper_clblast=1 make -j
blas cpu:whisper_openblas=1 make -j
在运行之前要转换一下音频文件:
ffmpeg -i from.wav -af silenceremove=stop_periods=-1:stop_duration=1:stop_threshold=-30db -ac 1 -ar 16000 to.wav
然后使用下面的代码输出语音识别的结果:
./main -l zh --prompt 以下是普通话的对话。 -m ggml-large-v2.bin -np -f 1.wav
其中-np表示去除所有的log
4.2 量化用法
量化代码如下:
make quantize
./quantize models/ggml-base.en.bin models/ggml-base.en-q5_0.bin q5_0
# run the examples as usual, specifying the quantized model file
./main -m models/ggml-base.en-q5_0.bin ./samples/gb0.wav
4.3 mac上使用coreml加速encoder
安装下面的库:
pip install ane_transformers -i https://pypi.tuna.tsinghua.edu.cn/simple
pip install openai-whisper -i https://pypi.tuna.tsinghua.edu.cn/simple
pip install coremltools -i https://pypi.tuna.tsinghua.edu.cn/simple
然后转模型:./models/generate-coreml-model.sh base.en,会生成文件models/ggml-base.en-encoder.mlmodelc,这样encoder就会使用这个文件。
然后编译加上coreml的代码:
make clean
whisper_coreml=1 make -j
使用方法和之前一样:./main -m models/ggml-base.en.bin -f samples/jfk.wav
4.4 使用openvino
encoder可以用openvino加速。首先使用pip安装openvino,然后执行下面的命令:
python convert-whisper-to-openvino.py --model base.en
会生成ggml-base.en-encoder-openvino.xml/.bin文件。
然后编译:
cmake -b build -dwhisper_openvino=1
cmake --build build -j --config release
运行./main -m models/ggml-base.en.bin -f samples/jfk.wav
4.5 python接口
三种方式:
##  pip install whisper_cpp_python,建议用这种
from whisper_cpp_python import whisper
whisper = whisper(model_path="./models/ggml-large-v3.bin")
%time output = whisper.transcribe('3.wav',language='zh',prompt='以下是普通话的句子。')
print(output)
## pip install git+https://github.com/stlukey/whispercpp.py
from whispercpp import whisper
w = whisper('tiny')
result = w.transcribe("myfile.mp3")
text = w.extract_text(result)
## pip install whispercpp
from whispercpp import whisper
w = whisper.from_pretrained("tiny.en")
w.transcribe_from_file("/path/to/audio.wav")
有时需要用ffmpeg处理一下音频:
import ffmpeg
import numpy as np
try:
    y, _ = (
        ffmpeg.input("/path/to/audio.wav", threads=0)
        .output("-", format="s16le", acodec="pcm_s16le", ac=1, ar=sample_rate)
        .run(
            cmd=["ffmpeg", "-nostdin"], capture_stdout=true, capture_stderr=true
        )
    )
except ffmpeg.error as e:
    raise runtimeerror(f"failed to load audio: {e.stderr.decode()}") from e
arr = np.frombuffer(y, np.int16).flatten().astype(np.float32) / 32768.0
w.transcribe(arr)
4.6 拓展应用

5. sherpa下的onnx版本
参考https://k2-fsa.github.io/sherpa/onnx/pretrained_models/whisper/export-onnx.html
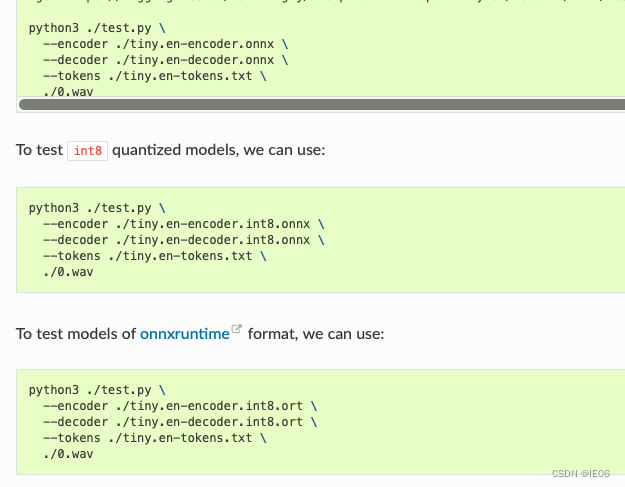
下载示例代码并转码,例如转tiny模型。转码的结果包括encoder,decoder和tokens。其中encoder,decoder都包含普通版本和量化版本,然后将onnx转为onnxruntime格式:
git clone https://github.com/k2-fsa/sherpa-onnx/
cd sherpa-onnx/scripts/whisper
python3 ./export-onnx.py --model tiny.en
python3 -m onnxruntime.tools.convert_onnx_models_to_ort --optimization_style=fixed ./
接下来进行测试:


发表评论