vue 中监听生命周期事件
vue2 提供了一些生命周期事件的方式,在组件销毁后触发一个事件,父组件可监听到该事件,然后执行某些操作。
命名为 hook:hookname ,前面的 hook: 是固定写法,比如 hook:mounted 、 hook:beforedestroy 。
常见的添加自定义事件的写法
{
  mounted() {
      this.onresize = () => {
        console.log('onresize')
      }
      window.addeventlistener('resize', this.onresize)
    },
    beforedestroy() {
      window.removeeventlistener('resize', this.onresize)
    }
}
这种写法存在两个小问题:
- 添加了额外的变量
onresize,感觉有点多余; - 监听
resize的逻辑分散在不同的生命周期中,不好维护。
使用监听生命周期事件的方式优化:
{
  mounted() {
    const onresize = () => {
      console.log('onresize')
    }
    window.addeventlistener('resize', onresize)
    // hook:lifehook $once 只执行一次
    this.$once('hook:beforedestroy', () => {
      window.removeeventlistener('resize', onresize)
    })
  }
}
凡在销毁时执行的操作,都可这样优化。
有人说方式1的问题不大,也没有优化多少,似乎没有多少用。
再看一个场景:
希望在子组件挂载时通知父组件
通常的写法:
// soncomponent.vue
{
  mounted() {
    this.$emit('mounted')
  }
}
在父组件中监听子组件触发的事件:
<template>
  <div>
    <soncomponent @mounted="onmounted" />
  </div>
</template>
<script>
  export default {
    methods: {
      onmounted() {
        console.log('onmounted')
      }
    }
  }
</script>
问题解决了,但是 soncomponent 是自己写的组件,具有完全的控制权,如果是第三方组件呢?
上面的方法就无招了。
生命周期事件可以解决这个问题:
在模板上监听组件生命周期
<template>
  <el-input @hook:mounted="onmounted" @hook:beforedestroy="onbeforedestroy" />
</template>
<script>
  export default {
    methods: {
      onmounted() {
        console.log('el-input onmounted')
      },
      onbeforedestroy() {
        console.log('el-input onbeforedestroy')
      }
    }
  }
</script>
生命周期事件在监听第三方组件的生命周期时很有用。
vue3 生命周期事件吗?
vue3 提供了 vue:hookname 的写法,比如 vue:mounted 、 vue:unmounted 。
<script setup>
  import {
    ref
  } from 'vue'
  const input = ref('')
  function whenmounted(params) {
    console.log('whenmounted')
    console.log(params)
  }
  function whenbeforeunmount() {
    console.log('whenbeforeunmount')
  }
  function whenupdated() {
    console.log('whenupdated')
  }
</script>
<template>
  <el-input v-model="input" @vue:mounted="whenmounted" @vue:beforeunmount="whenbeforeunmount" @vue:updated="whenupdated" />
</template>
this.$once和this.$on不再支持,可使用第三方库解决。
这些生命周期事件抛出的数据是组件的 vnode 对象,通过它,可获取到
el、props、ref等组件的重要属性。
比如,可获取
el,然后手动修改它,以达到某种目的。
jsx 中如何监听生命周期事件呢?
vue3 提供了 onvnodehookname 方法,可以监听组件的生命周期事件。
onvnodemounted 、 onvnodebeforeunmount 、 onvnodeupdated 等。
export default function mybutton(props, { slots }) {
  function onvnodemounted(vnode) {
    console.log('vnode mounted', vnode)
  }
  return (
    <button onvnodemounted={onvnodemounted}>
      {{
        default: () => slots.default?.() ?? '按钮',
      }}
    </button>
  )
}
在模板中也是能使用这些方法的,但是不推荐,使用
@vue:hook更直观。
vue:hook和onvnodexxx在 vue3 的文档中没有找到,说明这些 api 可能不稳定,不要频繁使用它们。
通过 vnode 操作 html
项目中 animate.css 和 element-plus 一起使用,animate 的 [disabled] 样式属性权重太高,导致 element-plus 分页有禁用样式。

可以在分页组件挂载和更新后移除 disabled 属性,使用 onvnodemounted 和 onvnodeupdated 事件实现。
<elpagination
    onvnodemounted={removepaginationdisabled}
    onvnodeupdated={removepaginationdisabled} />
removepaginationdisabled 的参数是一个 vnode 对象,可通过
el属性拿到 html 模板,然后手动修改它。
vue3 父子组件的生命周期的执行顺序是怎样的?
通过两个组件,可以观察到:
<!-- parent.vue -->
<script setup>
  import {
    onbeforemount,
    onbeforeunmount,
    onbeforeupdate,
    onmounted,
    onunmounted,
    onupdated,
    ref,
  } from 'vue'
  import myinput from './myinput.vue'
  const myinput = ref('')
  function whenbeforemount() {
    console.log('son vue:beforemount')
  }
  function whenmounted() {
    console.log('son vue:mounted')
  }
  function whenbeforeupdate() {
    console.log('son vue:beforeupdate')
  }
  function whenupdated(vnode) {
    console.log('son vue:updated')
    console.log(vnode)
  }
  function whenbeforeunmount() {
    console.log('son vue:beforeunmount')
  }
  function whenunmounted() {
    console.log('son vue:unmounted')
  }
  console.log('parent setup')
  onbeforemount(() => {
    console.log('parent onbeforemount')
  })
  onmounted(() => {
    console.log('parent onmounted')
  })
  onbeforeupdate(() => {
    console.log('parent onbeforeupdate')
  })
  onupdated(() => {
    console.log('parent onupdated')
  })
  onbeforeunmount(() => {
    console.log('parent onbeforeunmount')
  })
  onunmounted(() => {
    console.log('parent onunmounted')
  })
</script>
<template>
  <div class="init-options">
    <p>this is p tag {{ myinput }}</p>
    <myinput v-model="myinput" @vue:beforemount="whenbeforemount" @vue:mounted="whenmounted" @vue:beforeupdate="whenbeforeupdate" @vue:updated="whenupdated" @vue:beforeunmount="whenbeforeunmount" @vue:unmounted="whenunmounted" />
  </div>
</template>
myinput.vue 作为子组件:
<script setup>
import {
onbeforemount,
onbeforeunmount,
onbeforeupdate,
onmounted,
onunmounted,
onupdated,
ref,
} from 'vue'
console.log('son setup')
const props = defineprops({
modelvalue: {
type: string,
default: '',
},
})
const emits = defineemits(['update:modelvalue'])
const input = ref(props.modelvalue)
onbeforemount(() => {
console.log('son onbeforemount')
})
onmounted(() => {
console.log('son onmounted')
})
onbeforeupdate(() => {
console.log('son onbeforeupdate')
})
onupdated(() => {
console.log('son updated')
})
onbeforeunmount(() => {
console.log('son onbeforeunmount')
})
onunmounted(() => {
console.log('son onunmounted')
})
function oninput(e) {
input.value = e.target.value
emits('update:modelvalue', e.target.value)
}
</script>
<template>
<div>
<input :value="input" @input="oninput" />
<p>{{ input }}</p>
</div>
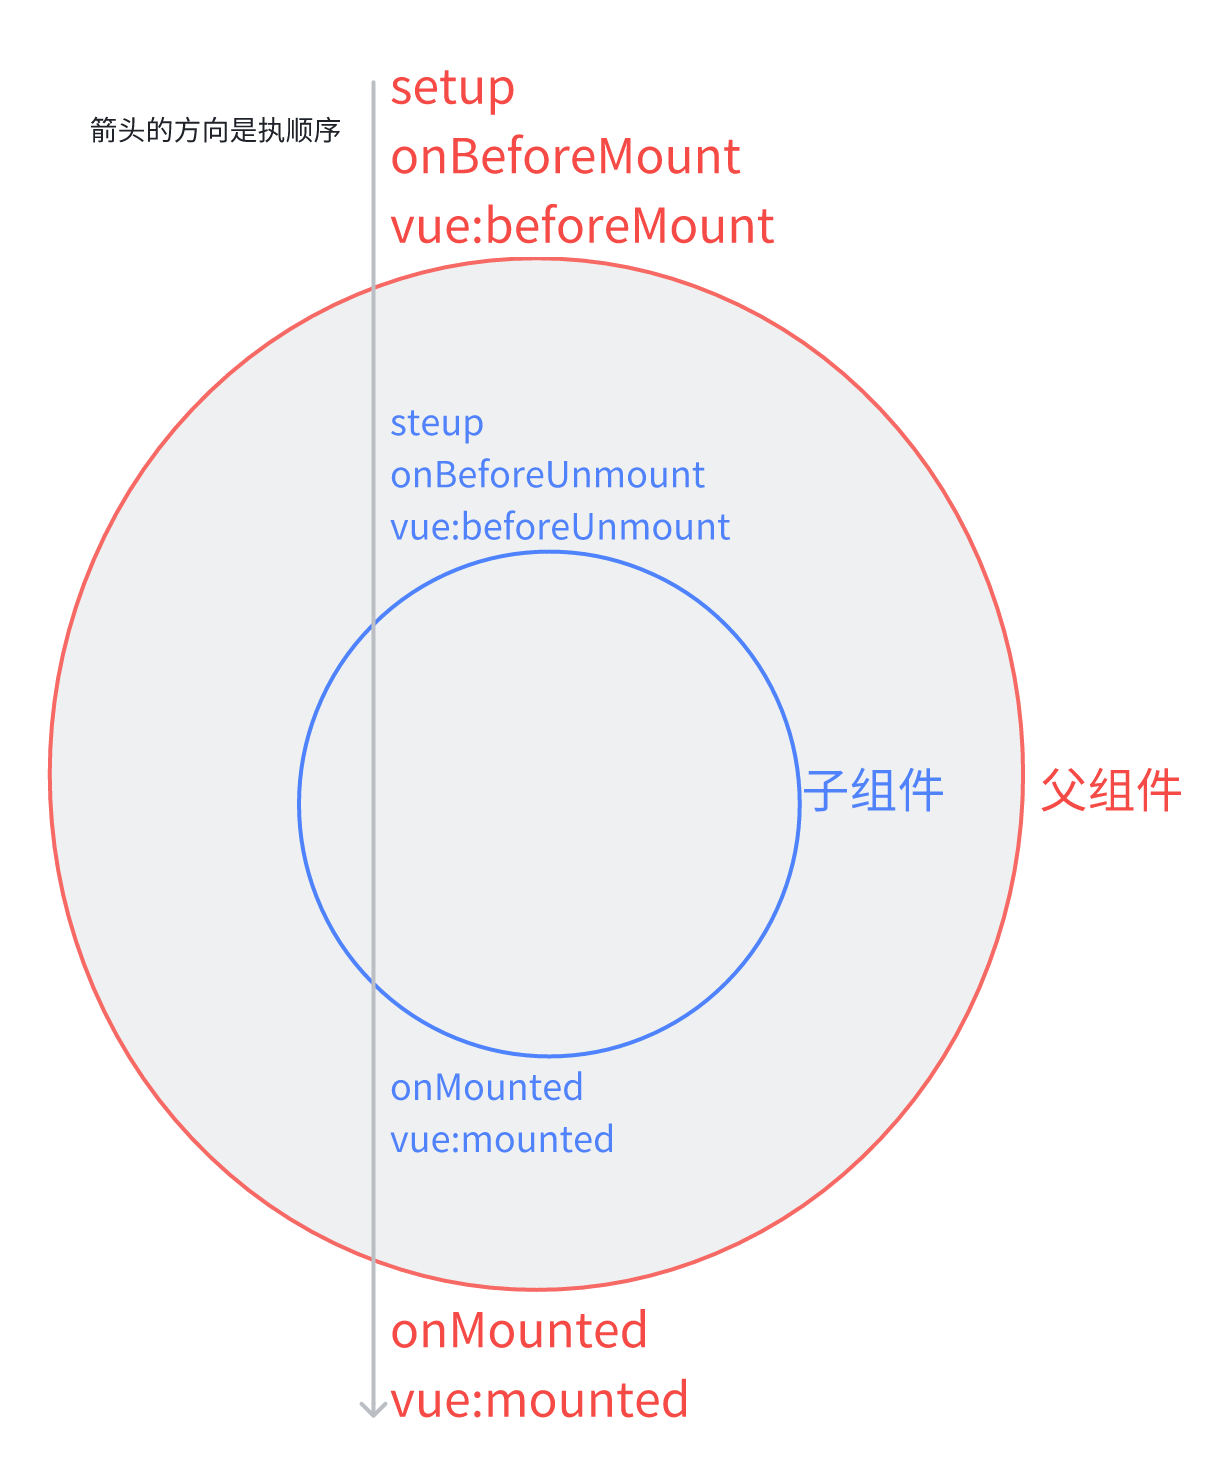
</template>vue3 的父子生命周期执行顺序是:
组件挂载
parent setup
parent onbeforemount
parent vue:beforemount
   son setup
   son onbeforemount
   son vue:beforemount
   son onmounted
   son vue:mounted
parent onmounted
# 类似两个圈,或者洋葱模型
# 父组件挂载阶段先进入后挂载
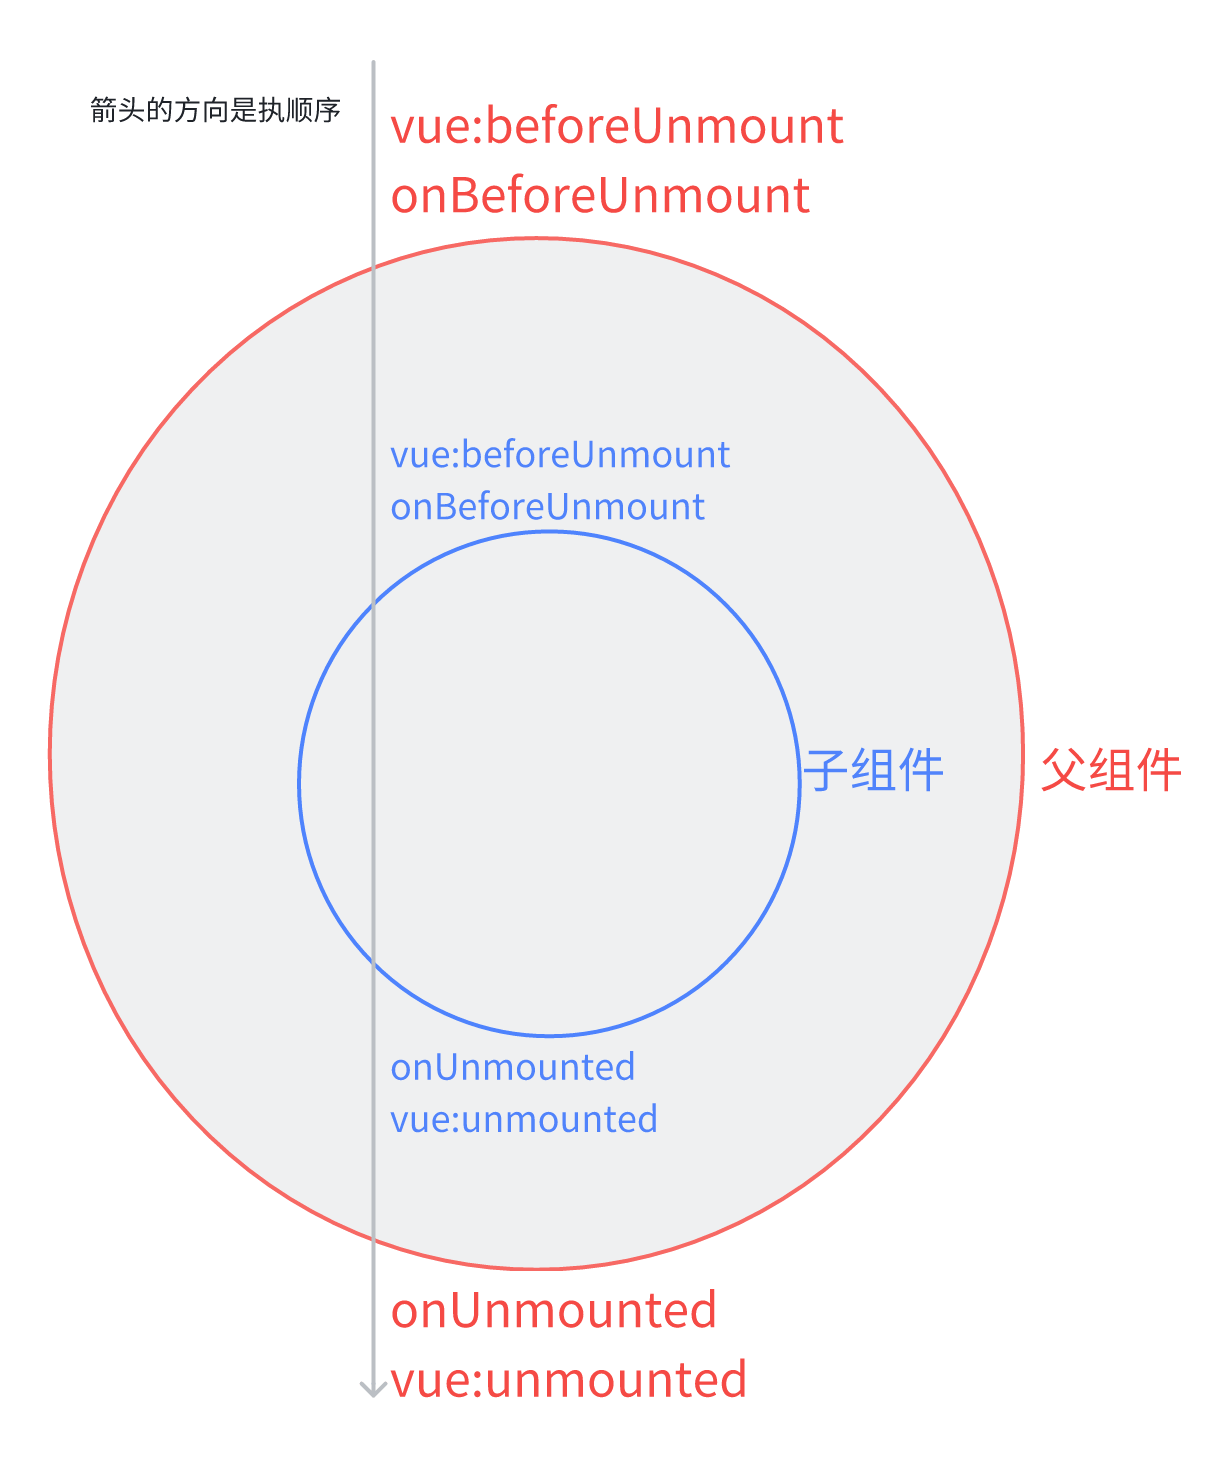
销毁
parent onbeforeunmount
   son vue:beforeunmount # !生命周期事件先触发
   son onbeforeunmount
   son onunmounted
   son vue:unmounted # ! 生命周期事件后触发
parent onunmounted
# 也类似洋葱模型
更新
parent onbeforeupdate
   son onbeforeupdate
   son vue:beforeupdate
   son updated
   son vue:updated
parent onupdated
# 也类似两个圈 父组件先进入更新阶段,后更新
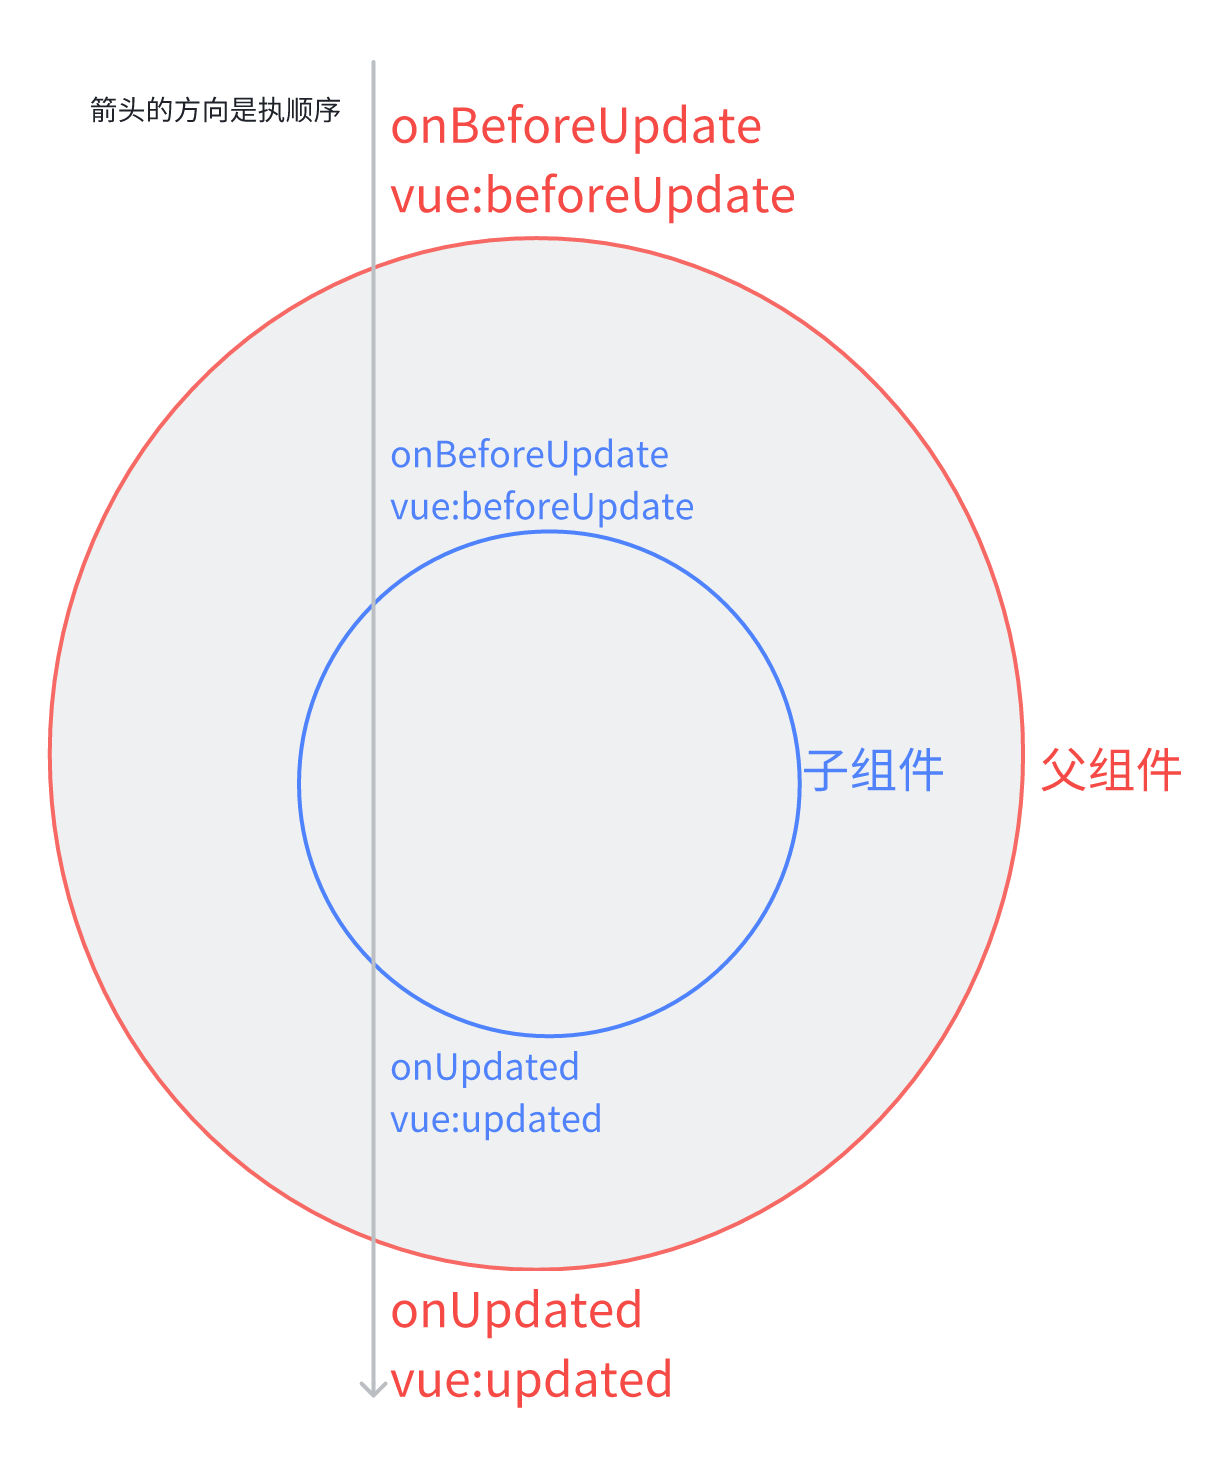
规律:父子组件的生命周期执行顺序类似一个两个圈,setup beforexxx 在前方,xxxed 在后方,子组件的圈在内部。
生命周期事件在相应的生命周期钩子执行后触发,但是
vue:beforeunmount先于onbeforeunmount执行,这点特殊。
小结
- vue2 监听生命周期事件的方式:
@hook:hookname。 - vue3 的方式
@vue:hookname或者onvnodehookname。 - vue3 的父子组件每个阶段的生命周期执行顺序是两个圈,setup onbeforexxx 在前方,xxxed 在后方,子组件的圈在内部。
vue:hookname在 vue3 的文档中没有找到,说明这些 api 可能不稳定,不要频繁使用它们。
到此这篇关于vue 中监听生命周期事件的文章就介绍到这了,更多相关vue监听生命周期事件内容请搜索代码网以前的文章或继续浏览下面的相关文章希望大家以后多多支持代码网!


发表评论