写在前面
其实很多公司或者资深的开发都有自己快速创建项目的脚手架的,有的是魔改代码生成器实现,有的直接基于t4,razorengine等模板引擎打造;但无论如何,其最终目的其实就是搭建一个自定义项目模板(脚手架)。
今天我们聊聊:如何基于官方的cli donet new 命令创建自己的项目模板。
什么是项目模板
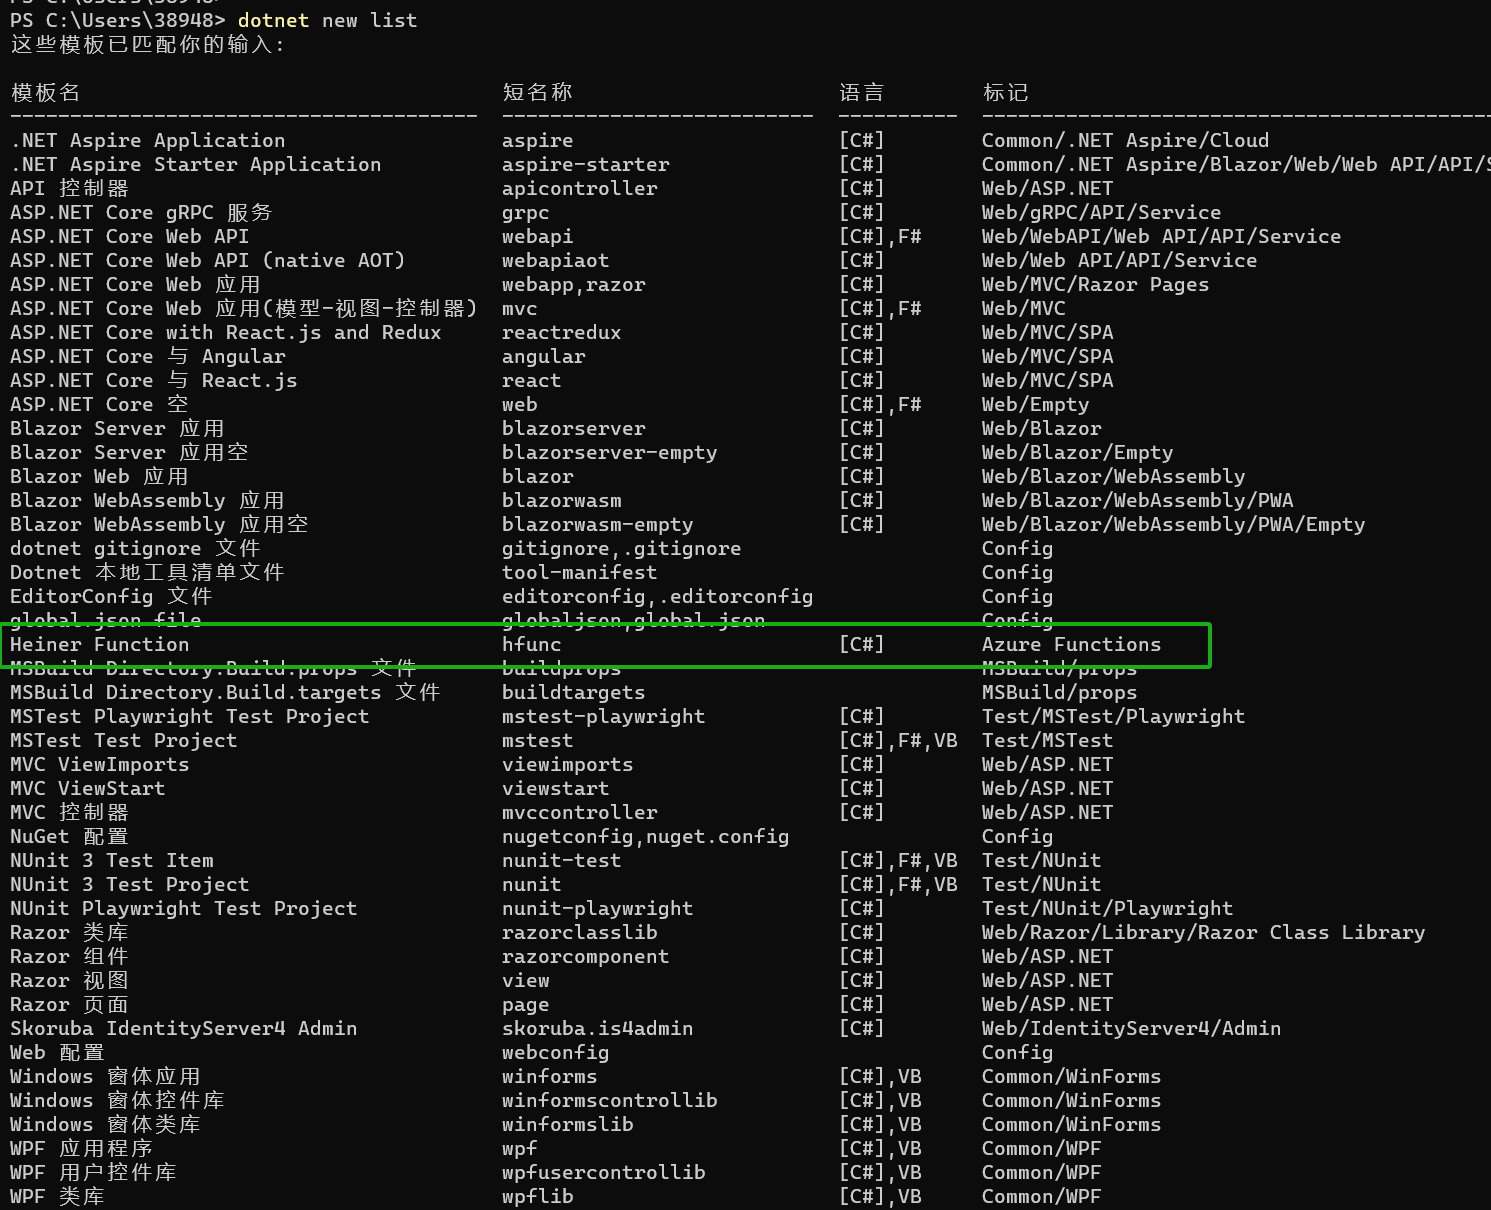
我想用一个命令来说明:
dotnet new list

到这里大家就非常熟悉了,原来大家平时创建项目都是基于已有的模板创建的(红圈部分大家应该不陌生);我们今天目的就是创建一个这样的模板,并在vs新建项目时可供选择创建项目,或者使用cli命令直接创建;
当然,还有公开模板:
https://dotnetnew.azurewebsites.net/
创建自己的模板
1、先准备好一个项目
这里准备的项目就是平时普通的项目,后面会以这个项目为蓝本创建模板;因为我最近使用azure function类型项目比较多,我就以function项目为例,其他类型项目同理的;
项目结构图:
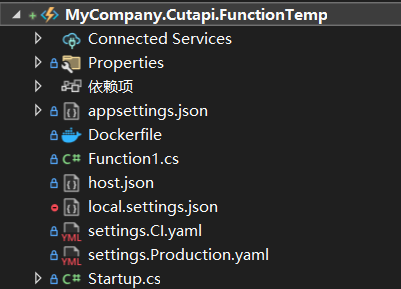
项目文件结构:
d:.
│  appsettings.ci.json
│  appsettings.development.json
│  appsettings.json
│  appsettings.production.json
│  dockerfile
│  function1.cs
│  host.json
│  local.settings.json
│  mycompany.cutapi.functiontemp.csproj #这个名字后面要被替换的
│  settings.ci.yaml
│  settings.production.yaml
│  startup.cs
│
├─build
│      cd.yaml
│      ci.yaml
│      _deploy.yaml
│
└─deploy
    │  kustomization.yaml
    │
    ├─base
    │      deploy.yaml
    │      kustomization.yaml
    │
    ├─ci
    │      deploy.yaml
    │      kustomization.yaml
    │
    └─prod
            deploy.yaml
            kustomization.yaml
可以看到其实有很多跟构建,部署等有关的配置文件;
function1.cs
#模板项目的命名空间
namespace mycompany.cutapi.functiontemp
{
    public class function1
    {
        private readonly stopwatch _sw;
        private readonly iextractsegmentservice _extractsegmentservice;
        private readonly ilogger<function1> _logger;
        public function1(iextractsegmentservice extractsegmentservice, ilogger<function1> logger)
        {
            _sw = new stopwatch();
            _extractsegmentservice = extractsegmentservice;
            _logger = logger;
        }
		#模板项目的functionname 和一些跟队列有关的配置,这些后面都要
        [functionname("function1")]
        [return: servicebus("cutapi-queue1-notify", connection = "servicebusconnection")]
        public async task<videotranscodenotify> run([servicebustrigger("cutapi-queue1", connection = "servicebusconnection")] servicebusreceivedmessage message
            , string messageid
            , servicebusmessageactions messageactions
            , int32 deliverycount
            , datetime enqueuedtimeutc
            , ilogger log
            )
        {
            _sw.start();
            var messagebody = encoding.utf8.getstring(message.body);
            log.loginformation($"{environment.machinename} -> function1 begin ->{messageid}: {messagebody}");
            await messageactions.completemessageasync(message);
            var result = new videotranscodenotify();
            try
            {
                //todo...
            }
            catch (exception ex)
            {
                log.logerror(ex, $"{environment.machinename} -> {messageid}:function1 exception:{ex.message}");
            }
            _sw.stop();
            log.loginformation($"{environment.machinename} function1 over ->{messageid} elapsed: {_sw.elapsed}");
            return result;
        }
    }
}
以这个文件为例,模板项目里很多文件内容都可以按自定义参数被替换;当然文件名也可以替换;
2、创建配置文件
在项目根目录下创建配置文件:/.template.config/template.json
结构如下:
├─.template.config
│ template.json
内容:
{
  "author": "heiner wang", //作者
  "classifications": [ "azure functions" ], //项目归类 classifications 还会出现在“tags”列中
  "name": "heiner function", //项目全名,用户应看到的模板名称。
  "identity": "heinerfunction", //项目唯一id
  "shortname": "hfunc", //项目简写
  "tags": {
    "language": "c#",
    "type": "project"
  },
  "sourcename": "mycompany.cutapi.functiontemp", //运行模板时使用 -n 或 --name 选项提供要替换的值,不写了话项目名称不变
  "prefernamedirectory": true, //创建项目的目录层级;
  "symbols": { //自定义语法
    //自定义参数,新项目命名空间
    "namespace": {
      "type": "parameter",
      "datatype": "text", //文本类型
      "defaultvalue": "heiner.function",
      "replaces": "mycompany.cutapi.functiontemp" //项目里这个值将会被替换掉
      //"filerename": "mycompany.cutapi.functiontemp" //也可以指定替换文件名
    },
    "functionname": {
      "type": "parameter",
      "datatype": "text",
      "defaultvalue": "function1",
      "replaces": "function1"
    },
    "queuename": {
      "type": "parameter",
      "datatype": "text",
      "defaultvalue": "cutapi-queue1",
      "replaces": "cutapi-queue1"
    },
    "enableredis": {
      "type": "parameter",
      "datatype": "bool", #布尔类型的
      "defaultvalue": "true"
    }
  }
}更多参数请参考:https://github.com/dotnet/templating/wiki/reference-for-template.json
代码段过滤
cs文件
//enableredis是自定义参数
#if (enableredis)
            connectionmultiplexer redisconnection = connectionmultiplexer.connect(appsettings.getconnectionstring("redis"));
            builder.services.addsingleton<iconnectionmultiplexer>(redisconnection);
            builder.services.addsingleton<idatabase>(c => redisconnection.getdatabase());
#endif
项目文件
<itemgroup>
  <packagereference include="microsoft.azure.functions.extensions" version="1.1.0" />
  <packagereference include="microsoft.azure.webjobs.extensions.durabletask" version="2.9.0" />
  <packagereference include="microsoft.azure.webjobs.extensions.servicebus" version="5.9.0" />
  <packagereference include="microsoft.net.sdk.functions" version="4.1.1" />
  <packagereference include="microsoft.visualstudio.azure.containers.tools.targets" version="1.19.5" />
</itemgroup>
<itemgroup condition="'$(enableredis)' == 'true' ">
  <packagereference include="stackexchange.redis" version="2.6.48" />
</itemgroup>
模板文件加入如下配置
"symbols":{...},
"sources": [
{
"modifiers": [
{
"condition": "(!enableredis)", //enableredis!=true
"exclude": [ //排除下面的文件(这里仅做示例),后面的模板项目当设置参数:enableredis==false时,下面的文件就被过滤掉了
"src/mycompany.cutapi.functiontemp/redis.cs",
]
}
]
}
] 3、执行模板安装
这一步是将根据配置文件,将普通项目安装成一个项目模板,理论上创建自定义模板到这步就完成了;
项目根目录执行:
dotnet new install .
这里命令后面的`.` 是安装当前目录的项目的意思;
dotnet new install d:\mycompany.cutapi.functiontemp
也可以这样,用绝对路径
更新模板
强制覆盖安装
dotnet new install . --force
先删除再安装
#先删除
dotnet new uninstall .
#重新安装
dotnet new install .
后面的.都代表在项目根目录执行,后面不再赘述;
4、检查安装结果
dotnet new list
无论用cli还是vs 都可以看到我们项目模板了,创建模板成功;
参考
5、推送到nuget服务端(可选)
这步是可选的! 注意!很多内部模板要脱密处理后再执行推送,请勿将机密信息推送到公网;
1、模板项目根目录创建文件mycompany.cutapi.functiontemp.nuspec
<?xml version="1.0"?>
<package >
<metadata>
	<id>heinerfunction</id>
	<version>1.0.0</version>
	<authors>heiner wang</authors>
	<owners>heiner wang</owners>
	<requirelicenseacceptance>false</requirelicenseacceptance>
	<description>xxx 公司 azure function 快速模板.</description>
	<tags>dotnet-new;template</tags>
</metadata>
<files>
	<file src="**\*" target="content"/>
</files>
</package>
2、生成nuget包
在项目根目录执行
nuget pack mycompany.cutapi.functiontemp.nuspec
生成nuget包:
heinerfunction.1.0.0.nupkg
3、推送到服务端
nuget push heinerfunction.1.0.0.nupkg -source https://api.nuget.org/v3/index.json -apikey your_api_key
这步的--source参数,如果你有搭建好自己的nuget服务端的话改成你自己的;
如何使用一个模板
模板有了,怎么用这个就简单了;
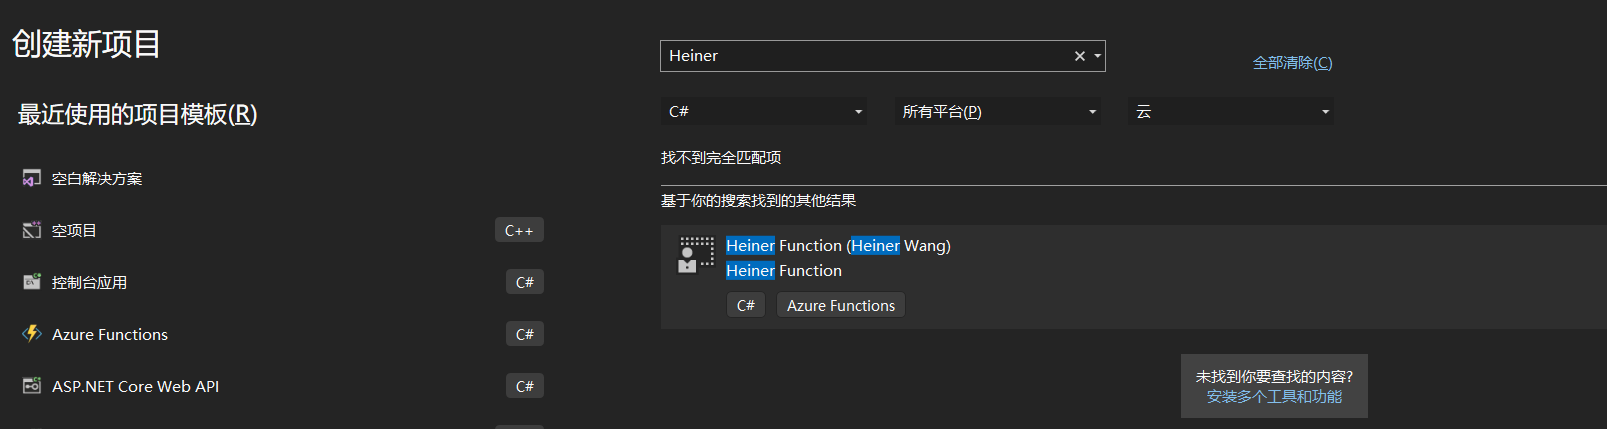
vs使用
在创建项目时直接选择自定义模板

不过这样的话,自定义参数都是用默认值,所以我还是更推荐用命令行方式;
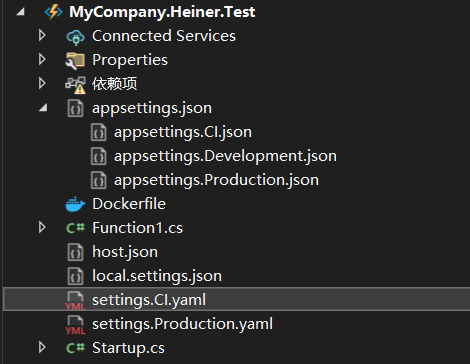
命令行使用(推荐)
大家做demo的时候都应该执行过这样的命令,其实这就是使用了官方shotname为console的模板
dotnet new console -n myconsoleapp1
一样,自定义模板命令为:
#默认参数
dotnet new hfunc -n mycompany.heiner.test
#指定参数
dotnet new hfunc -n mycompany.heiner.test  --namespace mycompany.heiner.test --functionname function-live-record --queuename cutapi-live-record --enableredis false
创建成功
[参考]
https://learn.microsoft.com/zh-cn/dotnet/core/tools/custom-templates
https://cloud.tencent.com/developer/article/2319366
https://github.com/dotnet/templating/wiki/reference-for-template.json
到此这篇关于c#如何创建一个可快速重复使用的项目模板的文章就介绍到这了,更多相关c#如何创建一个可快速重复使用的项目模板内容请搜索代码网以前的文章或继续浏览下面的相关文章希望大家以后多多支持代码网!


发表评论