1、首先安装
npm install vue-jsmind
2、在main.js 里面引入
import jm from 'vue-jsmind'
vue.use(jm)
if (window.jsmind) {
    vue.prototype.jsmind = window.jsmind
}
3、页面使用
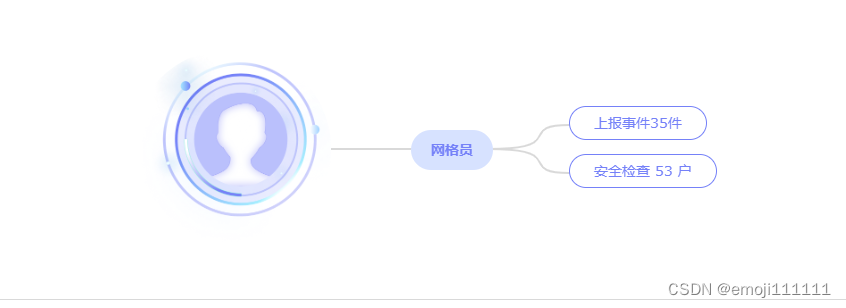
//后端返回的数据
data:[
    {rylx: "网格员", xgnr: "上报事件35件"}
    {rylx: "网格员", xgnr: "安全检查 53 户"}
]
最终结果
<template>
      <div id="jsmind_container_box"></div>
</template>

<script>
import rooticon from '@/assets/images/img_ry.png'

export default {
    props: {
        data: {
            type: array
        }
    },
    computed: {
        findparentid() {
            return function(item) {
                var parentitem = this.testdata.filter(p => {
                    return item.rylx == p.topic
                })
                return parentitem[0].id
            }
        },
        uniqueitem() {
            return function(arr) {
                var uniquearr = [...new set(arr.map(item => item.rylx))].map(rylx =>
                    arr.find(item => item.rylx === rylx)
                )
                return uniquearr
            }
        }
    },
    data() {
        return {
            testdata: [],
            mind: {
                /* 元数据,定义思维导图的名称、作者、版本等信息 */
                meta: {
                    name: '思维导图',
                    author: '****',
                    version: '0.2'
                },
                /* 数据格式声明 */
                format: 'node_array',
                /* 数据内容 */
                data: []
            },
            styles: {
                level1: {
                    background: '#d7e2ff',
                    color: '#7581f8',
                    borderradius: '80px',
                    fontweight: 'bold',
                    boxshadow: 'none',
                    borderradius: '80px',
                    fontsize: '14px',
                    border: 'none',
                    padding: '12px 20px'
                },
                level2: {
                    background: '#ffffff',
                    color: '#7581f8',
                    borderradius: '80px',
                    fontweight: '400',
                    boxshadow: 'none',
                    borderradius: '80px',
                    border: '1px solid #7581f8',
                    fontsize: '14px',
                    color: '#7581f8',
                    padding: '8px 24px'
                }
            }
        }
    },
    mounted() {
        this.handlemind()
    },
    methods: {
        handlemind() {
            var that = this
            const root = {
                id: 'root',
                topic: '',
                'background-image': rooticon,
                width: '200',
                height: '200',
                isroot: 'true'
            }
            var middleindex = parseint(that.data.length / 2)
            var newarr = this.uniqueitem(that.data)
            newarr.foreach((item, index) => {
                let query = {
                    id: string(index),
                    parentid: 'root',
                    topic: item.rylx,
                    direction: middleindex == '1' ? 'right' : index < middleindex ? 'left' : 'right'
                }

                that.testdata.push(query)
            })
            that.data.foreach((item, index) => {
                if (item.xgnr.length) {
                    let childitem = {
                        id: index + '0',
                        parentid: this.findparentid(item),
                        topic: item.xgnr,
                        direction: 'left'
                    }
                    that.testdata.push(childitem)
                }
            })

            that.testdata.unshift(root)
            that.mind.data = that.testdata
            that.init()
            that.applystyles()
        },
        init() {
            var options = {
                container: 'jsmind_container_box',
                editable: false,
                view: {
                    engine: 'canvas', // 思维导图各节点之间线条的绘制引擎
                    line_width: 2, // 思维导图线条的粗细
                    line_color: '#d9d9d9' // 思维导图线条的颜色
                },
                layout: {
                    hspace: 80, // 节点之间的水平间距
                    vspace: 10, // 节点之间的垂直间距
                    pspace: 10 // 节点与连接线之间的水平间距(用于容纳节点收缩/展开控制器)
                }
            }
            this.jm = jsmind.show(options)
            this.jm.show(this.mind)
        },

        applystyles() {
            const root = this.jm.get_root()._data.view
            root.element.style.borderradius = '699px'
            root.element.style.backgroundsize = 'cover'
            root.element.style.boxshadow = 'none'
            this.repeatitem(this.jm.get_root().children, this.styles.level1)
        },
        repeatitem(nodes, style) {
            for (let i = 0; i < nodes.length; i++) {
                const node = nodes[i]
                node._data.view.element.style.color = style.color
                node._data.view.element.style.fontsize = style.fontsize
                node._data.view.element.style.borderradius = style.borderradius
                node._data.view.element.style.background = style.background
                node._data.view.element.style.fontweight = style.fontweight
                node._data.view.element.style.boxshadow = style.boxshadow
                node._data.view.element.style.border = style.border
                node._data.view.element.style.padding = style.padding
                if (nodes[i].children.length) {
                    this.repeatitem(nodes[i].children, this.styles.level2)
                }
            }
        }
    }
}
</script>
<style scoped>
#jsmind_container_box {
    width: 100%;
    height: 302px !important;
    border: 1px solid #d9d9d9;
}
</style>
总结
到此这篇关于vue2使用思维导图jsmind的文章就介绍到这了,更多相关vue2使用思维导图jsmind内容请搜索代码网以前的文章或继续浏览下面的相关文章希望大家以后多多支持代码网!


发表评论