场景:横向商品栏,把原有的滚动条改成自定义的样式,并且给两边加上箭头可以调整,可以拖动商品和滚轮实现滚动条效果。
js
appservice.directive('customscrollbar', function() {
    return {
        restrict: 'a',
        transclude: true,
        scope: {
            enablemousewheel: '=?' // default false
        },
        template: `
            <div class="customscrollbar">
                <div class="scrollcontent">
                    <div class="detailcontent" ng-mouseenter="enablemousewheel === true && enablewheelscroll()" ng-mouseleave="enablemousewheel === true && disablewheelscroll()" id="detailcontent" ng-transclude>
                    </div>
                    <div class="scrollbarcontent">
                        <div class="scrollbar">
                            <div class="scrollbar-thumb"></div>
                        </div>
                        <img src="./images/home/icon_left.png" alt="left arrow" class="scroll-arrow left">
                        <img src="./images/home/icon_right.png" alt="right arrow" class="scroll-arrow right">
                    </div>
                </div>
            </div>
        `,
        link: function(scope, element) {
            if (scope.enablemousewheel === undefined) {
                scope.enablemousewheel = false;
            }
            var content = element.find('.detailcontent');
            var scrollbar = element.find('.scrollbar');
            var thumb = element.find('.scrollbar-thumb');
            var leftarrow = element.find('.scroll-arrow.left');
            var rightarrow = element.find('.scroll-arrow.right');
            checkarrowvisibilitybyinit();
            content.scroll(function() {
                var scrollleft = content.scrollleft();
                var scrollratio = scrollleft / (content[0].scrollwidth - content.width());
                var newleft = scrollratio * (scrollbar.width() - thumb.width());
                thumb.css('left', newleft);
                checkarrowvisibilitybyscroll(scrollleft);
            });
            leftarrow.click(function() {
                var newscrollleft = content.scrollleft() - 500;
                content.animate({scrollleft: newscrollleft}, 500);
            });
            rightarrow.click(function() {
                var newscrollleft = content.scrollleft() + 500;
                content.animate({scrollleft: newscrollleft}, 500);
            });
            var isdragging = false;
            var startx, startleft;
            thumb.mousedown(function(e) {
                isdragging = true;
                startx = e.pagex;
                startleft = thumb.position().left;
                e.preventdefault();
            });
            $(document).mousemove(function(e) {
                if (isdragging) {
                    var offsetx = e.pagex - startx;
                    var newleft = math.min(math.max(0, startleft + offsetx), scrollbar.width() - thumb.width());
                    var scrollratio = newleft / (scrollbar.width() - thumb.width());
                    var newscrollleft = scrollratio * (content[0].scrollwidth - content.width());
                    thumb.css('left', newleft);
                    content.scrollleft(newscrollleft);
                }
            }).mouseup(function() {
                isdragging = false;
            });
            function checkarrowvisibilitybyinit() {
                if (content.width() >= content[0].scrollwidth) {
                    leftarrow.hide();
                    rightarrow.hide();
                } else {
                    leftarrow.hide(); //init content.scrollleft() = 0;
                    rightarrow.show();
                }
            }
            function checkarrowvisibilitybyscroll(scrollleft) {
                if (scrollleft === 0) {
                    leftarrow.hide();
                } else {
                    leftarrow.show();
                }
                if (scrollleft >= content[0].scrollwidth - content.width()) {
                    rightarrow.hide();
                } else {
                    rightarrow.show();
                }
            }
            //============ enable wheel scrolling when mouse enters
            scope.enablewheelscroll = function() {
                element.on('wheel', function(e) {
                    e.preventdefault();
                    const delta = e.originalevent.deltay;
                    content.scrollleft(content.scrollleft() + delta);
                });
            };
            scope.disablewheelscroll = function() {
                element.off('wheel');
            };
            //============ end
            //============ implement scrollbar effect when dragging products with the mouse
            var isfinancialcontentmousedown = false;
            var startx;
            var scrollleft;
            content.on('mousedown', function(e) {
                isfinancialcontentmousedown = true;
                startx = e.pagex - $(this).offset().left;
                scrollleft = $(this).scrollleft();
            });
            content.on('mousemove', function(e) {
                if (!isfinancialcontentmousedown) return;
                e.preventdefault();
                const x = e.pagex - $(this).offset().left;
                const walk = (x - startx) * 3;
                $(this).scrollleft(scrollleft - walk);
            });
            $(document).on('mouseup', function() {
                isfinancialcontentmousedown = false;
            });
            content.on('mouseleave', function() {
                isfinancialcontentmousedown = false;
            });
            //============end
        }
    };
});
css
/*customscroll*/
.customscrollbar .detailcontent{width: 100%;display: flex;margin-top: 102px;gap: 30px;overflow-y: auto;overflow-x: hidden;}
.customscrollbar .scrollcontent{position: relative}
.customscrollbar .scrollbarcontent{width: 100%;display: flex;justify-content: center;margin-top: 40px}
.customscrollbar .scrollbar {width: 410px;height: 6px;background-color: #dad2d2;position: absolute;bottom: 0;left: 50%;cursor: pointer;border-radius: 15px;transform: translatex(-50%);}
.customscrollbar .scrollbar-thumb {width: 96px;height: 133%;background-color: #e43134;position: absolute;left: 0;cursor: pointer;border-radius: 15px;top:-1px}
.customscrollbar .scroll-arrow {position: absolute;top:  calc(50% - 40px);;transform: translatey(-50%);cursor: pointer;}
.customscrollbar .scroll-arrow.left {left: 0;transform: translatex(-150%);width: 44px;height: 44px;}
.customscrollbar .scroll-arrow.right {right: 0;transform: translatex(150%);width: 44px;height: 44px;}
html
<!--  custom-scrollbar="home"可以改成 custom-scrollbar,
						加了home是为了后面可能有多个滚动条的时候添加的唯一标识,但代码还没实现,遇到再改-->
				<div custom-scrollbar="home">
				<!-- 里面的item自己填上,一般都是循环load items出来-->
					<div class="box textbg fundbg">
						<span class="text">{{'webpage.body.home.a'|translate}}</span>
					</div>
					<div class="box textbg bondbg">
						<span class="text">{{'webpage.body.home.b'|translate}}</span>
					</div>
					<div class="box textbg structurebg">
						<span class="text">{{'webpage.body.home.c'|translate}}</span>
					</div>
					<div class="box textbg cryptocurrencybg">
						<span class="text">{{'webpage.body.home.d'|translate}}</span>
					</div>
					<div class="box textbg swapsbg">
						<span class="text">{{'webpage.body.home.e'|translate}}</span>
					</div>
				</div>
效果
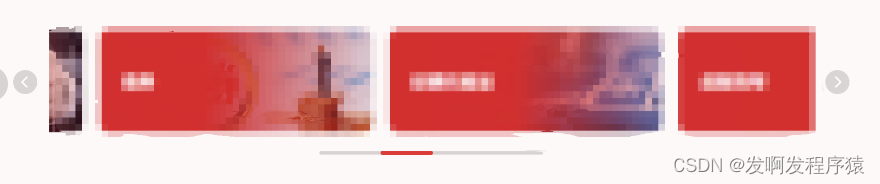
到此这篇关于angularjs 指令实现自定义滚动条效果的文章就介绍到这了,更多相关angularjs 自定义滚动条内容请搜索代码网以前的文章或继续浏览下面的相关文章希望大家以后多多支持代码网!


发表评论