.net中有多少种定时器一文介绍过.net中至少有6种定时器,但精度都不是特别高,一般在15ms~55ms之间。在一些特殊场景,可能需要高精度的定时器,这就需要我们自己实现了。本文将讨论高精度定时器实现的思路。
高精度定时器
一个定时器至少需要考虑三部分功能:计时、等待、触发模式。计时是进行时间检查,调整等待的时间;等待则是用来跳过指定的时间间隔。触发模式是指定时器每次tick的时间固定还是每次定时任务时间间隔固定。比如定时器时间间隔10ms,定时任务耗时7ms,是每隔10ms触发一次定时任务,还是等定时任务执行完后等10ms再触发下一个定时任务。
计时
windows提供了可用于获取高精度时间戳或者测量时间间隔的api。系统原生api是queryperformancecounter (qpc)。在.net种提供了system.diagnostics.stopwatch类获取高精度时间戳,它内部也是通过queryperformancecounter (qpc)进行高精度计时。queryperformancecounter (qpc)使用硬件计数器作为其基础。硬件计时器由三个部分组成:时钟周期生成器、计数时钟周期的计数器和检索计数器值的方法。这三个分量的特征决定了queryperformancecounter (qpc)的分辨率、精度、准确性和稳定性[1]。它的精度可以高达几十纳秒,用来实现高精度定时器基本没什么问题。
等待
等待策略通常有两种:
- 自旋:让cpu空转等待,一直占用cpu时间。
- 阻塞:让线程进入阻塞状态,出让cpu时间片,满足等待时间后切换回运行状态。
自旋等待
自旋等待可以使用thread.spinwait(int iteration)来实现,参数iteration是迭代次数。由于cpu速度可能是动态的,所以很难根据iteration计算消耗的时间,最好是结合stopwatch使用:
void spin(stopwatch w, int duration)
{
    var current = w.elapsedmilliseconds;
    while ((w.elapsedmilliseconds - current) < duration)
        thread.spinwait(5);
}
由于自旋是以消耗cpu为代价的,上述代码运行时,cpu处于满负荷工作状态(使用率持续保持100%左右),因此短暂的等待可以考虑自旋,长时间运行的定时器不太建议使用该方法。
阻塞等待
阻塞等待需要操作系统能够及时把定时器线程调度回运行状态。默认情况下,windows的系统的计时器精度为15ms左右。如果是线程阻塞,出让其时间片进行等待,然后再被调度运行的时间至少是一个时间切片15ms左右。要通过阻塞实现高精度计时,则需要减少时间切片的长度。windows系统api提供了timeendperiod可以把计时器精度修改到1ms,在使用计时器服务之前立即调用timeendperiod,并在使用完计时器服务后立即调用timeendperiod。timeendperiod和timeendperiod必须成对出现。
在windows 10, version 2004之前,
timeendperiod会影响全局windows设置,所有进程都会使用修改后的计时精度。从windows 10, version 2004开始,只有调用timeendperiod的进程收到影响。
设置更高的精度可以提高等待函数中超时间隔的准确性。 但是,它也可能会降低整体系统性能,因为线程计划程序更频繁地切换任务。 高精度还可以阻止 cpu 电源管理系统进入节能模式。 设置更高的分辨率不会提高高分辨率性能计数器的准确性。
通常我们使用thread.sleep来挂起线程等待,sleep的参数最小为1ms,但实际上很不稳定,实测发现大部分时候稳定在阻塞2ms。我们可以采用sleep(0)或者thread.yield结合stopwatch计时的方式修正。
void wait(stopwatch w, int duration)
{
    var current = w.elapsedmilliseconds;
    while ((w.elapsedmilliseconds - current) < duration)
        thread.sleep(0);
}
thread.sleep(0)和thread.yield在 cpu 高负载情况下非常不稳定,可能会产生更多的误差。因此误差修正最好通过自旋方式实现。
还有一种阻塞的方式是多媒体定时器timesetevent,也是网上关于高精度定时器提得比较多的一种方式。它是winmm.dll中的函数,稳定性和精度都比较高,能提供1ms的精度。
官方文档中说timesetevent是一个过时的方法,建议使用createtimerqueuetimer替代[3]。但createtimerqueuetimer的精度和稳定性都不如多媒体定时器,所以在需要高精度定时器时,还是要用timesetevent。以下是封装多媒体定时器的例子
public enum timererror
{
    mmsyserr_noerror = 0,
    mmsyserr_error = 1,
    mmsyserr_invalparam = 11,
    mmsyserr_nocando = 97,
}
public enum repeatetype
{
    time_oneshot=0x0000,
    time_periodic = 0x0001
}
public enum callbacktype
{
    time_callback_function = 0x0000,
    time_callback_event_set = 0x0010,
    time_callback_event_pulse = 0x0020,
    time_kill_synchronous = 0x0100
}
public class highprecisiontimer
{
    private delegate void timercallback(int id, int msg, int user, int param1, int param2);
    [dllimport("winmm.dll", entrypoint = "timegetdevcaps")]
    private static extern timererror timegetdevcaps(ref timercaps ptc, int cbtc);
    [dllimport("winmm.dll", entrypoint = "timesetevent")]
    private static extern int timesetevent(int delay, int resolution, timercallback callback, int user, int eventtype);
    [dllimport("winmm.dll", entrypoint = "timekillevent")]
    private static extern timererror timekillevent(int id);
    private static timercaps _caps;
    private int _interval;
    private int _resolution;
    private timercallback _callback;
    private int _id;
    static highprecisiontimer()
    {
        timegetdevcaps(ref _caps, marshal.sizeof(_caps));
    }
    public highprecisiontimer()
    {
        running = false;
        _interval = _caps.periodmin;
        _resolution = _caps.periodmin;
        _callback = new timercallback(timereventcallback);
    }
    ~highprecisiontimer()
    {
        timekillevent(_id);
    }
    public int interval
    {
        get { return _interval; }
        set
        {
            if (value < _caps.periodmin || value > _caps.periodmax)
                throw new exception("invalid interval");
            _interval = value;
        }
    }
    public bool running { get; private set; }
    public event action ticked;
    public void start()
    {
        if (!running)
        {
            _id = timesetevent(_interval, _resolution, _callback, 0,
                (int)repeatetype.time_periodic | (int)callbacktype.time_kill_synchronous);
            if (_id == 0) throw new exception("failed to start timer");
            running = true;
        }
    }
    public void stop()
    {
        if (running)
        {
            timekillevent(_id);
            running = false;
        }
    }
    private void timereventcallback(int id, int msg, int user, int param1, int param2)
    {
        ticked?.invoke();
    }
}
触发模式
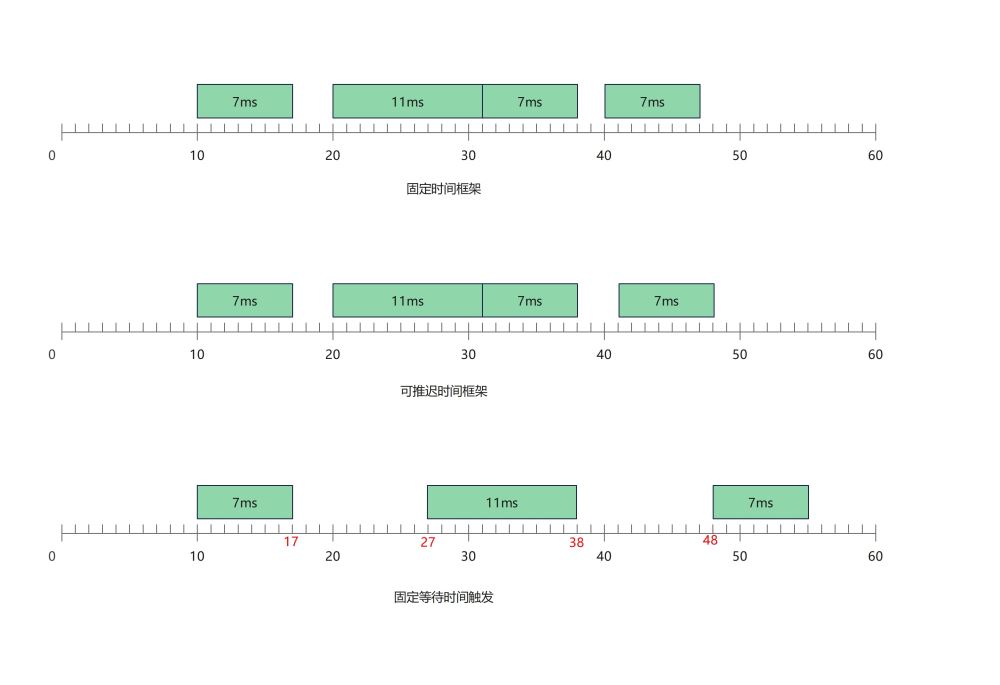
由于定时任务执行时间不确定,并且可能耗时超过定时时间间隔,定时器的触发可能会有三种模式:固定时间框架,可推迟时间框架,固定等待时间。
- 固定时间框架:尽量按照设定的时间来执行任务,只要任务不是始终超时,就可以回到原来的时间框架上
- 可推迟时间框架:也是尽量按照设定的时间执行任务,但是超时的任务会推迟时间框架。
- 固定等待时间:不管任务执行时长,每次任务执行结束到下一次任务开始执行间的等待时间固定。
假定时间间隔为10ms,任务执行的时间在7~11ms之间,下图中显示了三种触发模式的区别。

其实还有一种触发模式:任务执行时长大于时间间隔时,只要时间间隔一到,就执行定时任务,多个定时任务并发执行。之所以这里没有提及这种模式,是因为在高精度定时场景中,执行任务的时间开销很有可能大于定时器的时间间隔,如果开启新线程执行定时任务,可能会占用大量线程,这个需要结合实际情况考虑如何执行定时任务。这里讨论的是默认在定时器线程上执行定时任务。
到此这篇关于.net中如何实现高精度定时器的文章就介绍到这了,更多相关.net定时器内容请搜索代码网以前的文章或继续浏览下面的相关文章希望大家以后多多支持代码网!


发表评论