介绍:
在python编程中,有时我们需要根据特定的数据生成excel文件。本文将介绍如何使用wxpython和pandas模块来实现这个目标。我们将创建一个简单的gui应用程序,允许用户选择输出文件夹和输入的excel文件,并根据excel文件中每个单元格的字段名组合生成多个excel文件。
c:\pythoncode\new\genxlsbyxls.py
1. 准备工作
在开始之前,确保您已经安装了wxpython和pandas模块。如果没有安装,可以使用以下命令进行安装:
pip install wxpythonpip install pandas
2. 创建gui窗口
首先,我们需要创建一个gui窗口,以便用户可以选择输出文件夹和输入的excel文件。我们将使用wxpython模块来创建窗口和按钮,并将事件与相应的回调函数关联起来。
import wx
import os
import pandas as pd

class myframe(wx.frame):
    def __init__(self, parent, title):
        super(myframe, self).__init__(parent, title=title, size=(400, 200))

        panel = wx.panel(self)

        self.output_dir_btn = wx.button(panel, label="选择输出文件夹")
        self.bind(wx.evt_button, self.on_select_output_dir, self.output_dir_btn)

        self.input_file_btn = wx.button(panel, label="选择excel文件")
        self.bind(wx.evt_button, self.on_select_input_file, self.input_file_btn)

        self.start_btn = wx.button(panel, label="开始生成")
        self.bind(wx.evt_button, self.on_start_generation, self.start_btn)

        sizer = wx.boxsizer(wx.vertical)
        sizer.add(self.output_dir_btn, 0, wx.all|wx.expand, 5)
        sizer.add(self.input_file_btn, 0, wx.all|wx.expand, 5)
        sizer.add(self.start_btn, 0, wx.all|wx.expand, 5)
        panel.setsizer(sizer)

    def on_select_output_dir(self, event):
        dlg = wx.dirdialog(self, "选择输出文件夹", style=wx.dd_default_style)
        if dlg.showmodal() == wx.id_ok:
            self.output_dir = dlg.getpath()
            print("输出文件夹:", self.output_dir)
        dlg.destroy()

    def on_select_input_file(self, event):
        dlg = wx.filedialog(self, "选择excel文件", wildcard="excel files (*.xlsx)|*.xlsx",
                            style=wx.fd_open | wx.fd_file_must_exist)
        if dlg.showmodal() == wx.id_ok:
            self.input_file = dlg.getpath()
            print("输入文件:", self.input_file)
        dlg.destroy()

    def on_start_generation(self, event):
        if not hasattr(self, 'output_dir') or not hasattr(self, 'input_file'):
            wx.messagebox("请先选择输出文件夹和excel文件", "错误", wx.ok | wx.icon_error)
            return

        df = pd.read_excel(self.input_file)

        for i, col in enumerate(df.iloc[:, 0]):
            column_names = col.split(',')
            file_name = f"{i+1}.xlsx"
            file_path = os.path.join(self.output_dir, file_name)

            df_new = pd.dataframe(columns=column_names)
            df_new.to_excel(file_path, index=false)

        wx.messagebox("生成完成", "提示", wx.ok | wx.icon_information)
        self.close()

app = wx.app()
frame = myframe(none, "excel文件生成器")
frame.show()
app.mainloop()```

在上述代码中,我们创建了一个`myframe`类,继承自wxpython的`frame`类。该类表示我们的应用程序窗口,并包含了选择输出文件夹和选择excel文件的按钮。

**3. 实现回调函数**

接下来,我们需要实现与按钮关联的回调函数。这些函数将在用户点击相应的按钮时被调用。

```python
    def on_select_output_dir(self, event):
        dlg = wx.dirdialog(self, "选择输出文件夹", style=wx.dd_default_style)
        if dlg.showmodal() == wx.id_ok:
            self.output_dir = dlg.getpath()
            print("输出文件夹:", self.output_dir)
        dlg.destroy()

    def on_select_input_file(self, event):
        dlg = wx.filedialog(self, "选择excel文件", wildcard="excel files (*.xlsx)|*.xlsx",
                            style=wx.fd_open | wx.fd_file_must_exist)
        if dlg.showmodal() == wx.id_ok:
            self.input_file = dlg.getpath()
            print("输入文件:", self.input_file)
        dlg.destroy()

    def on_start_generation(self, event):
        if not hasattr(self, 'output_dir') or not hasattr(self, 'input_file'):
            wx.messagebox("请先选择输出文件夹和excel文件", "错误", wx.ok | wx.icon_error)
            return

        df = pd.read_excel(self.input_file)

        for i, col in enumerate(df.iloc[:, 0]):
            column_names = col.split(',')
            file_name = f"{i+1}.xlsx"
            file_path = os.path.join(self.output_dir, file_name)

            df_new = pd.dataframe(columns=column_names)
            df_new.to_excel(file_path, index=false)

        wx.messagebox("生成完成", "提示", wx.ok | wx.icon_information)
        self.close()
在上述代码中,on_select_output_dir函数用于选择输出文件夹,并将选择的路径存储在self.output_dir变量中。on_select_input_file函数类似地用于选择输入的excel文件,并将选择的文件路径存储在self.input_file变量中。
on_start_generation函数是最重要的回调函数。它首先读取选择的excel文件,并逐个单元格解析字段名组合。然后,根据字段名组合创建新的dataframe,并将其保存为一个新的excel文件,文件名为序号加上.xlsx后缀。生成的excel文件将保存在选择的输出文件夹中。
4. 运行应用程序
最后,我们需要创建一个wx.app对象并运行应用程序的主循环。
app = wx.app()
frame = myframe(none, "excel文件生成器")
frame.show()
app.mainloop()
这段代码创建了一个wx.app对象和一个myframe对象,并将应用程序的主循环交给app.mainloop()处理。
5. 效果演示
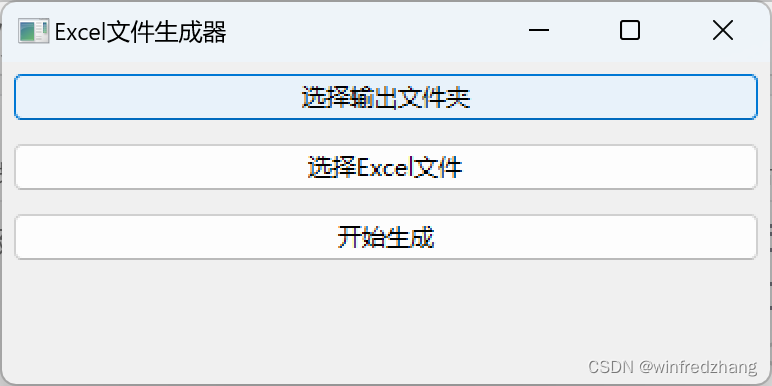
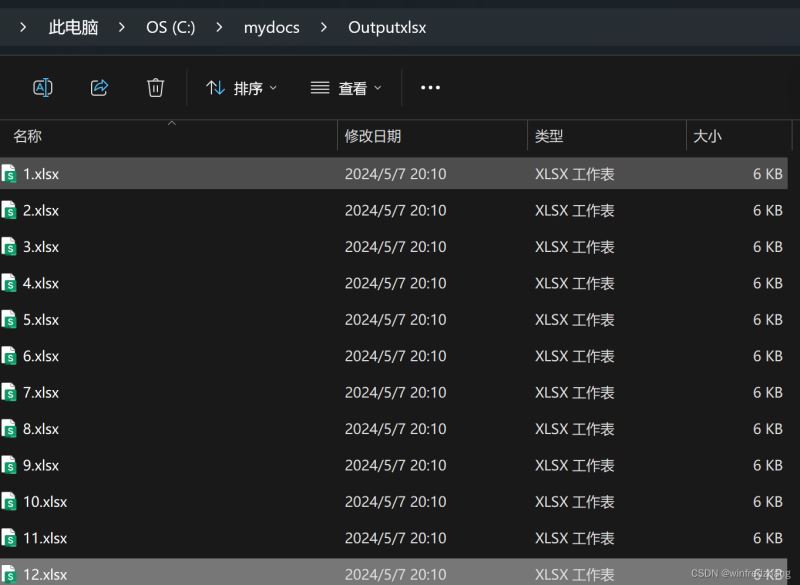
现在,我们已经完成了整个程序的编写。运行程序后,将会出现一个gui窗口,您可以通过点击按钮选择输出文件夹和输入的excel文件。当您点击"开始生成"按钮后,程序将根据excel文件中的字段名组合生成多个excel文件,并保存在指定的输出文件夹中。
这个程序提供了一个简单而实用的方法来根据excel文件中的字段名组合生成多个excel文件。您可以根据自己的需求进行修改和扩展,以满足更复杂的场景。
总结:
本文介绍了如何使用wxpython和pandas模块创建一个简单的gui应用程序,用于根据excel文件中的字段名组合生成多个excel文件。通过选择输出文件夹和输入的excel文件,程序能够自动解析字段名组合,并生成对应的excel文件。这种方法可以方便地处理大量数据,并将其保存为易于管理和使用的excel文件。
以上就是使用wxpython和pandas模块生成excel文件的代码实现的详细内容,更多关于wxpython pandas生成excel的资料请关注代码网其它相关文章!


发表评论