前言
强化各个知识点,以实战融合,以下两个demo从实战提取
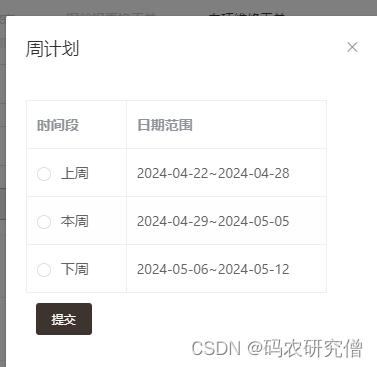
1. 单个弹窗
部署按钮框以及确定的方法即可
截图如下所示:
以下demo整体逻辑如下:
- 点击“生成周月计划”按钮会触发
showweekplandialog方法,该方法会先检查是否选择了数据,然后调用calculateweekperiods方法计算时间段并显示周计划对话框 - 在周计划对话框中,选择时间段后点击提交按钮会触发
submitweekplan方法,该方法会检查是否选择了时间段,然后执行dosubmitweekplan方法提交周计划,并在操作成功后关闭周计划对话框并清空选中的时间段
<template>
  <div>
    <el-button type="primary" size="small" plain @click="showweekplandialog">生成周月计划</el-button>
    <el-dialog title="周计划" :visible.sync="showweekplandialogbox" :append-to-body="true" width="20%">
      <el-radio-group v-model="selectedperiod" @change="handleperiodchange">
        <el-table :data="weekperiods" border>
          <el-table-column label="时间段" width="100">
            <template slot-scope="scope">
              <el-radio :label="scope.row.label"></el-radio>
            </template>
          </el-table-column>
          <el-table-column prop="daterange" label="日期范围" width=200></el-table-column>
        </el-table>
      </el-radio-group>
      <el-button type="primary" size="small" @click="submitweekplan" style="margin: 10px;">提交</el-button>
    </el-dialog>
  </div>
</template>
<script>
import moment from 'moment';
export default {
  data() {
    return {
      showweekplandialogbox: false, // 控制周计划对话框的显示
      selectedperiod: '', // 选中的时间段
      weekperiods: [], // 时间段数组
    };
  },
  methods: {
    showweekplandialog() {
      if (this.selectionlist.length === 0) { // 检查是否选择了数据
        this.$message.warning("请选择至少一条数据");
        return;
      }
      // 确保选中数据后计算时间段
      this.calculateweekperiods();
      this.showweekplandialogbox = true; // 显示周计划对话框
    },
    calculateweekperiods() {
      const today = moment();
      const dayofweek = today.isoweekday();
      // 计算本周的起始日期和结束日期
      const startdatethisweek = today.clone().startof('isoweek');
      const enddatethisweek = today.clone().endof('isoweek');
      // 计算上周和下周的起始日期和结束日期
      const startdatelastweek = startdatethisweek.clone().subtract(1, 'week');
      const enddatelastweek = startdatelastweek.clone().endof('isoweek');
      const startdatenextweek = startdatethisweek.clone().add(1, 'week');
      const enddatenextweek = startdatenextweek.clone().endof('isoweek');
      // 格式化日期范围
      const formatdaterange = (startdate, enddate) => {
        return `${startdate.format('yyyy-mm-dd')}~${enddate.format('yyyy-mm-dd')}`;
      };
      // 生成周期数组
      const weekperiods = [
        { label: '上周', daterange: formatdaterange(startdatelastweek, enddatelastweek) },
        { label: '本周', daterange: formatdaterange(startdatethisweek, enddatethisweek) },
        { label: '下周', daterange: formatdaterange(startdatenextweek, enddatenextweek) }
      ];
      this.weekperiods = weekperiods;
    },
    submitweekplan() {
      if (this.selectedperiod === '') { // 检查是否选择了时间段
        this.$message.warning("请选择一个时间段");
        return;
      }
      // 执行提交周计划的操作
      this.dosubmitweekplan();
    },
    dosubmitweekplan() {
      // 在这里执行提交周计划的操作,可以调用api等
      console.log("提交周计划");
      this.showweekplandialogbox = false; // 关闭周计划对话框
      // 清空选中的时间段,以便下次使用
      this.selectedperiod = '';
      this.$message({
        type: "success",
        message: "操作成功!"
      });
    }
  }
};
</script>
2. 多级弹窗
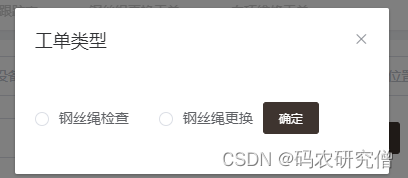
在上面弹窗前加入一层弹窗
之后才是
整体逻辑如下:
- 按钮逻辑流程: 确保每个按钮的点击触发正确的逻辑流程,比如点击第一个按钮后显示第一个对话框,点击第一个对话框的确定按钮后显示第二个对话框,以此类推
- 数据传递: 确保在不同的对话框之间正确传递数据,比如第一个对话框选择的选项需要传递到第二个对话框
- 错误处理: 考虑每个步骤中进行错误处理,比如在确认选项时确保用户选择了正确的选项,或者在提交周计划时确保选择了时间段
对应demo如下:
<template>
  <div>
    <el-button type="primary" size="small" plain @click="showoptionsdialog">生成周月计划</el-button>
    <!-- 第一个对话框 -->
    <el-dialog title="工单类型" :visible.sync="showoptionsdialogbox" :append-to-body="true" width="20%">
      <!-- 在此设置检查或更换选项 -->
      <el-radio-group v-model="selectedoption">
        <el-radio label="检查">钢丝绳检查</el-radio>
        <el-radio label="更换">钢丝绳更换</el-radio>
      </el-radio-group>
      <!-- 点击确定后显示第二个对话框 -->
      <el-button type="primary" size="small" @click="confirmoptions" style="margin: 10px;">确定</el-button>
    </el-dialog>
    <!-- 第二个对话框 -->
    <el-dialog title="周计划" :visible.sync="showweekplandialogbox" :append-to-body="true" width="20%">
      <el-radio-group v-model="selectedperiod">
        <el-table :data="weekperiods" border>
          <el-table-column label="时间段" width="100">
            <template slot-scope="scope">
              <el-radio :label="scope.row.label"></el-radio>
            </template>
          </el-table-column>
          <el-table-column prop="daterange" label="日期范围" width=200></el-table-column>
        </el-table>
      </el-radio-group>
      <el-button type="primary" size="small" @click="submitweekplan" style="margin: 10px;">提交</el-button>
    </el-dialog>
  </div>
</template>
<script>
import moment from 'moment';
export default {
  data() {
    return {
      // 控制第一个对话框的显示
      showoptionsdialogbox: false,
      showweekplandialogbox: false, // 显示框,一开始为false,才有弹窗
      selectedoption: '', // 如果不初始化,后续会无法选中
      selectedperiod: '', // 如果不初始化,后续会无法选中
      weekperiods: []
    };
  },
  methods: {
    showoptionsdialog() {
      this.showoptionsdialogbox = true;
    },
    confirmoptions() {
      if (!this.selectedoption) {
        this.$message.warning("请选择检查或更换");
        return;
      }
      this.showoptionsdialogbox = false;
      // 如果需要根据选项动态生成周期,在这里调用相应的方法生成周期数组
      this.generateweekperiods();
      this.showweekplandialogbox = true; // 打开第二个对话框
    },
    generateweekperiods() {
      const today = moment();
      const dayofweek = today.isoweekday();
      // 计算本周的起始日期和结束日期
      const startdatethisweek = today.clone().startof('isoweek');
      const enddatethisweek = today.clone().endof('isoweek');
      // 计算上周和下周的起始日期和结束日期
      const startdatelastweek = startdatethisweek.clone().subtract(1, 'week');
      const enddatelastweek = startdatelastweek.clone().endof('isoweek');
      const startdatenextweek = startdatethisweek.clone().add(1, 'week');
      const enddatenextweek = startdatenextweek.clone().endof('isoweek');
      // 格式化日期范围
      const formatdaterange = (startdate, enddate) => {
        return `${startdate.format('yyyy-mm-dd')}~${enddate.format('yyyy-mm-dd')}`;
      };
      // 生成周期数组
      const weekperiods = [
        { label: '上周', daterange: formatdaterange(startdatelastweek, enddatelastweek) },
        { label: '本周', daterange: formatdaterange(startdatethisweek, enddatethisweek) },
        { label: '下周', daterange: formatdaterange(startdatenextweek, enddatenextweek) }
      ];
      this.weekperiods = weekperiods;
    },
    submitweekplan() {
      if (this.selectedperiod === '') {
        this.$message.warning("请选择一个时间段");
        return;
      }
      // 在这里执行提交周计划的操作,传递选中的周期和选项等参数
      this.dosubmitweekplan();
    },
    dosubmitweekplan() {
      // 在这里执行提交周计划的操作,传递选中的周期和选项等参数
      console.log("提交周计划");
      this.showweekplandialogbox = false;
      this.$message({
        type: "success",
        message: "操作成功!"
      });
    }
  }
};
</script>
到此这篇关于vue按照顺序实现多级弹窗(附demo)的文章就介绍到这了,更多相关vue多级弹窗内容请搜索代码网以前的文章或继续浏览下面的相关文章希望大家以后多多支持代码网!


发表评论