http:
https:
nginx的ssl模块安装
进入到目录的sbin目录下,输入
#注意这里是大写的v,小写的只显示版本号
./nginx -v
如果出现 (configure arguments: --with-http_ssl_module), 则已安装(下面的步骤可以跳过,直接进行第五步)。
一般情况下都是不存在ssl模块的,接下来进入到你的解压缩后的nginx目录,注意这里不是nginx安装目录,是解压缩后的目录。
./configure --prefix=/usr/local/nginx --with-http_stub_status_module --with-http_ssl_module
然后执行
make
#切记不要执行make install,否则会重新安装nginx
接下来使用新的nginx文件替换掉之前安装目录sbin下的nginx,注意这里的替换的时候可以先将之前的文件备份下,停掉nginx服务。
./nginx -s stop #停止nginx服务

#替换之前的nginx
cp /usr/nginx/objs/nginx /usr/local/nginx/sbin
成功之后,进入到nginx安装目录下,查看ssl时候成功
#注意这里是大写的v,小写的只显示版本号
./nginx -v
#可以看到这里出现了configure arguments: --with-http_ssl_module   证明已经安装成功
nginx.conf
#user nobody;
worker_processes 1;
#error_log logs/error.log;
#error_log logs/error.log notice;
#error_log logs/error.log info;
#pid logs/nginx.pid;
events {
worker_connections 1024;
}
http {
include mime.types;
default_type application/octet-stream;
#log_format main '$remote_addr - $remote_user [$time_local] "$request" '
# '$status $body_bytes_sent "$http_referer" '
# '"$http_user_agent" "$http_x_forwarded_for"';
#access_log logs/access.log main;
sendfile on;
#tcp_nopush on;
#keepalive_timeout 0;
keepalive_timeout 65;
#gzip on;
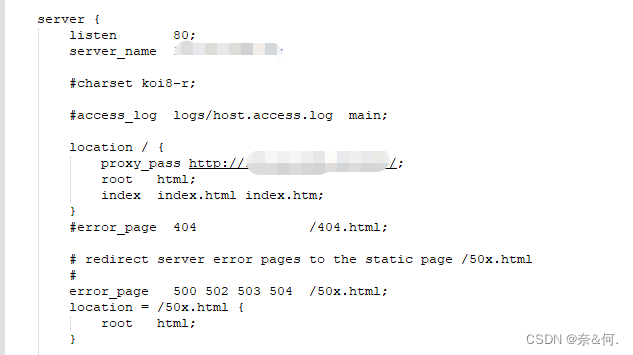
server {
listen 80;
server_name ip;
#charset koi8-r;
#access_log logs/host.access.log main;
location / {
proxy_pass http://ip:端口/;
root html;
index index.html index.htm;
}
#error_page 404 /404.html;
# redirect server error pages to the static page /50x.html
#
error_page 500 502 503 504 /50x.html;
location = /50x.html {
root html;
}
# proxy the php scripts to apache listening on 127.0.0.1:80
#
#location ~ \.php$ {
# proxy_pass http://127.0.0.1;
#}
# pass the php scripts to fastcgi server listening on 127.0.0.1:9000
#
#location ~ \.php$ {
# root html;
# fastcgi_pass 127.0.0.1:9000;
# fastcgi_index index.php;
# fastcgi_param script_filename /scripts$fastcgi_script_name;
# include fastcgi_params;
#}
# deny access to .htaccess files, if apache's document root
# concurs with nginx's one
#
#location ~ /\.ht {
# deny all;
#}
}
# another virtual host using mix of ip-, name-, and port-based configuration
#
#server {
# listen 8000;
# listen somename:8080;
# server_name somename alias another.alias;
# location / {
# root html;
# index index.html index.htm;
# }
#}
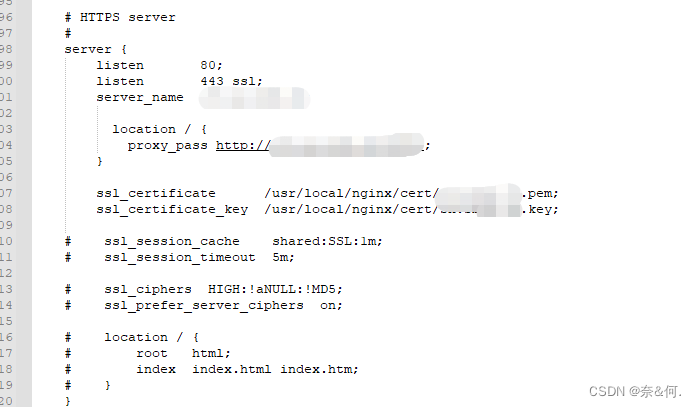
# https server
#
server {
listen 80;
listen 443 ssl;
server_name ip;
location / {
proxy_pass http://ip:端口/;
}
ssl_certificate /cert.pem;
ssl_certificate_key /cert.key;
# ssl_session_cache shared:ssl:1m;
# ssl_session_timeout 5m;
# ssl_ciphers high:!anull:!md5;
# ssl_prefer_server_ciphers on;
# location / {
# root html;
# index index.html index.htm;
# }
}
}
到此这篇关于nginx配置同时支持http和https的两种方式的文章就介绍到这了,更多相关nginx配置同时支持http和https内容请搜索代码网以前的文章或继续浏览下面的相关文章希望大家以后多多支持代码网!


发表评论