使用
index.js
import vue from 'vue'
import vuex from 'vuex'
import getters from './getters'
import app from './modules/app'
import settings from './modules/settings'
import user from './modules/user'
import system from './modules/system'

vue.use(vuex)

const store = new vuex.store({
    modules: {
        app,
        settings,
        user,
        system
    },
    getters
})

export default store
getters.js
const getters = {
    sidebar: state => state.app.sidebar,
    device: state => state.app.device,
    token: state => state.user.token,
    avatar: state => state.user.avatar,
    name: state => state.user.name,
    currentuserinfo: state => state.system.currentuserinfo,
    count: state => state.system.count,
}
export default getters
system.js
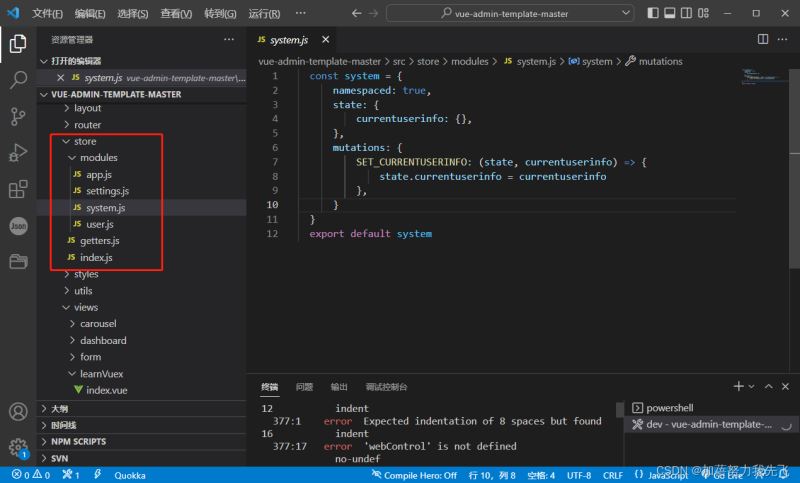
  const system = {
      namespaced: true,
      state: {
          currentuserinfo: {},
          count: 0,
      },
      mutations: {
          set_currentuserinfo: (state, currentuserinfo) => {
              state.currentuserinfo = currentuserinfo
          },
          set_count: (state, count) => {
              state.count = count
          },
      }
  }
  export default system
全局使用:main.js文件中
import store from './store'

new vue({
    el: '#app',
    router,
    store,
    render: h => h(app)
})
vuex概述
vuex是实现组件全局状态(数据)管理的一种机制,可以方便的实现组件之间的数据共享
使用vuex管理数据的好处:
a.能够在vuex中集中管理共享的数据,便于开发和后期进行维护
b.能够高效的实现组件之间的数据共享,提高开发效率
c.存储在vuex中的数据是响应式的,当数据发生改变时,页面中的数据也会同步更新
vuex中的核心特性
vuex中的主要核心概念如下:
- state
- mutation
- action
- getter
a.state
state提供唯一的公共数据源,所有共享的数据都要统一放到store中的state中存储
例如,打开项目中的store.js文件,在state对象中可以添加我们要共享的数据,如:count:0
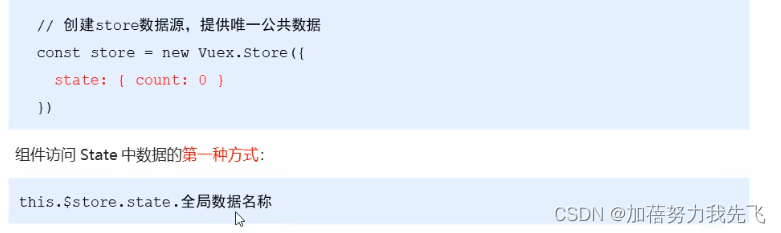
在组件中访问state的方式:
1).this.$store.state.全局数据名称 如:this.$store.state.count
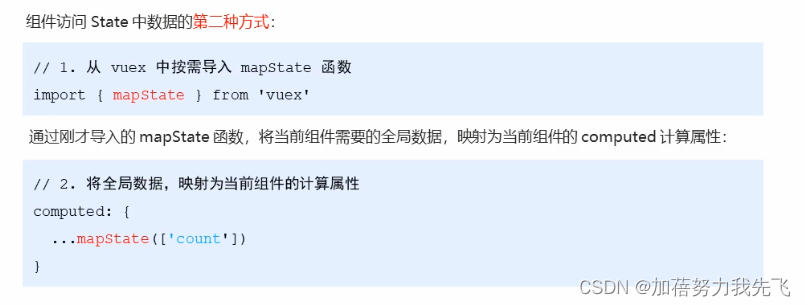
2).先按需导入mapstate函数: import { mapstate } from 'vuex'
然后数据映射为计算属性: computed:{ ...mapstate(['全局数据名称']) }this.$store.state.全局数据名称-组件访问state中的数据的第一种方式
//访问
console.log("1111",this.$store.state.system.count);
<h3>当前最新的count值为:{{$store.state.system.count}}</h3>
组件访问state中的数据的第二种方式:按需导入
 2).先按需导入mapstate函数: import { mapstate } from 'vuex'
 //将全局数据,用展开运算符映射为当前组件的计算属性
   // 然后数据映射为计算属性: computed:{ ...mapstate(['count']) }
 mapstate()可以传入对象或者数组
 传入数组用法: mapstate(['counte', 'name','age'])
// 传入对象用法:可以重命名store中的数据
  ...mapstate({
   scounter: state => state.name,
   ......
 })
 computed:{
   ...mapstate({
      count: state => state.system.count,
      ......
    }),
  }
b.mutation
mutation用于修改变更$store中的数据
只能通过mutation变更store数据,不可以直接操作store中的数据通过这种方式虽然操作起来稍微繁琐点,但是可以集中监控所有的数据变化
this.$store.commit是触发mutation的第一种方式
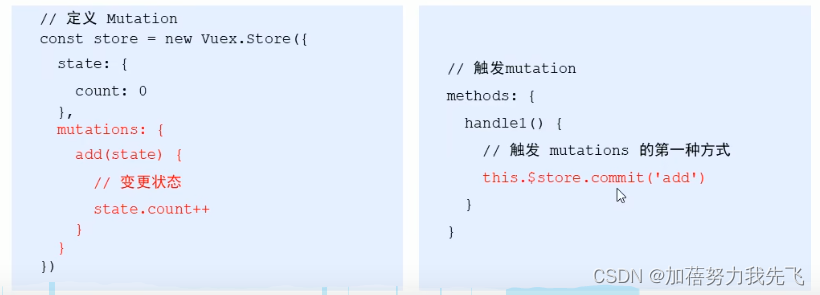
1.定义:
  const system = {
      namespaced: true,
      state: {
          count: 0,
      },
      mutations: {
          add(state) {
             //变更状态
              state.count++
          }
      }
  }
  export default system
2.使用
<template>
  <div>
    <h3>当前最新的count值为:{{$store.state.system.count}}</h3>
    <el-button type="primary" @click="btnhandler1">+1</el-button>
  </div>
</template>

<script>
export default {
  name: 'addition',
  props: {
  },
  data() {
    return {
    }
  },
  computed: {},
  mounted() {},
  methods: {
    btnhandler1() {
      this.$store.commit("system/add")
    },
  }
}
</script>

<style scoped>
</style>
1.传参—定义
mutations: {
          add(state) {
              state.count++
          },
          addn(state, step) {
              state.count += step
          }
      }
2.传参-使用
methods: {
    btnhandler1() {
      this.$store.commit("system/add")
    },
    btnhandler2(val){
      // commit 的作用就是调用某个mutation函数
      this.$store.commit("system/addn",val)
    },

  }
触发mutation的第二种方式,按需导入
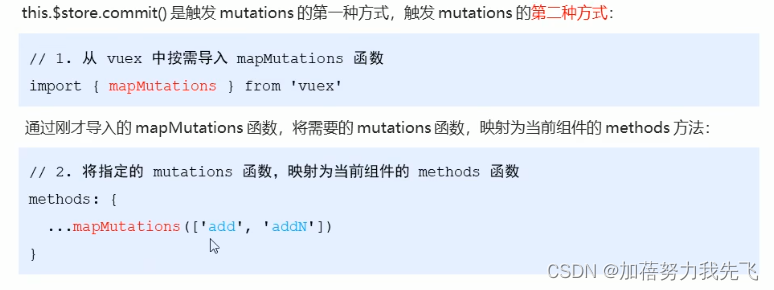
从vuex中按需导入mapmutations 函数
import { mapmutations } from 'vuex'通过刚才导入的mapmutations 函数,将需要的mapmutations 函数,映射为当前组件的methods方法:
sub(state) {
     state.count--
},
subn(state, step) {
     state.count -= step
},
method:{
...mapmutations({
sub: 'system/sub'
}),
btnhandler1(){
this.sub()//直接引用
},
btnhandler2(val){
this.subn(val)
},
}c.action
action用于处理异步任务
如果通过异步操作变更数据,必须通过action,而不能使用mutation,但action中还是要通过出发mutation的方式间接变更数据
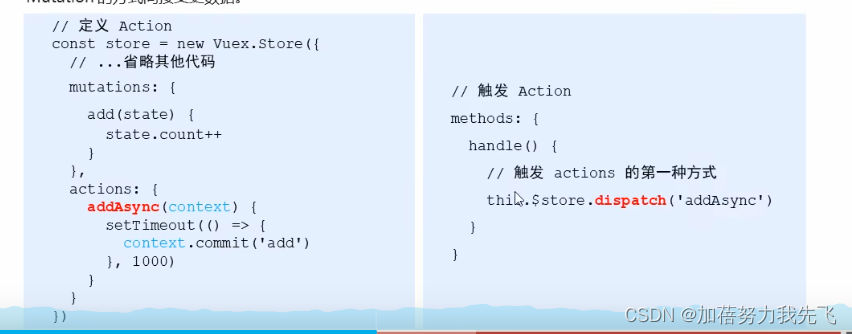
this.$store.dispatch()是触发actions的第一种方式
actions: {
          addasync(content) {
              settimeout(() => {
                  // 在actions中,不能直接修改state中的数据
                  // 必须通过content.commit() 去触发某个mutations才行
                  content.commit('add')
              }, 1000)
          }

      }
methods: {
// 异步的让count自增+1
btnhandler3(){
// 这里的dispatch函数,专门用来触发actions
this.$store.dispatch('system/addasync')
},
}actions携带参数
触发actions异步任务时携带参数
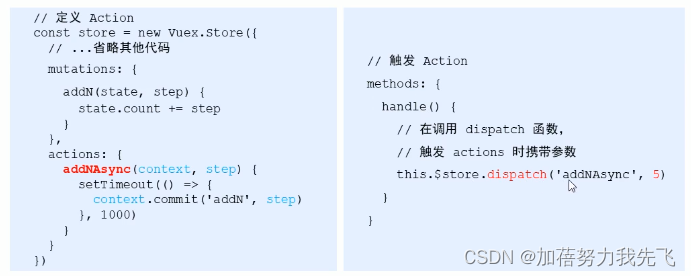
      actions: {
          addnasync(content, step) {
              settimeout(() => {
                  // 在actions中,不能直接修改state中的数据
                  // 必须通过content.commit() 去触发某个mutations才行
                  content.commit('addn', step)
              }, 1000)
          },

      }
methods: {
btnhandler4(){
// 这里的dispatch函数,专门用来触发actions,传参
this.$store.dispatch('system/addnasync',3)
},
}触发actions的第二种方式:按需导入
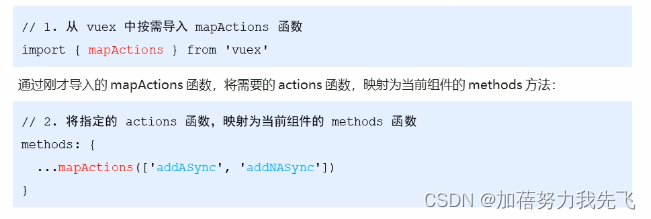
      actions: {
          subasync(content) {
              settimeout(() => {
                  // 在actions中,不能直接修改state中的数据
                  // 必须通过content.commit() 去触发某个mutations才行
                  content.commit('sub')
              }, 1000)
          },
          subnasync(content, step) {
              settimeout(() => {
                  // 在actions中,不能直接修改state中的数据
                  // 必须通过content.commit() 去触发某个mutations才行
                  content.commit('subn', step)
              }, 1000)
          },
}
import {mapactions } from 'vuex'
methods:{
...mapactions({
subasync: 'system/subasync',
subnasync: 'system/subnasync',
}),
btnhandler3(){
this.subasync()
},
btnhandler4(){
this.subnasync(3)
},
}d.getter
getter用于对store中的数据进行加工处理形成新的数据
它只会包装store中保存的数据,并不会修改store中保存的数据,当store中的数据发生变化时,getter生成的内容也会随之变化
打开store.js文件,添加getters,如下:
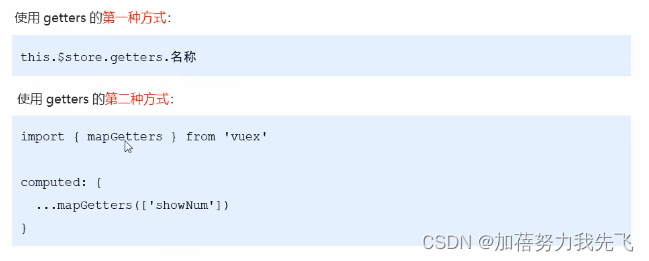
使用getters的第一种方式
//system.js文件中的  getters中的shownum
<h3>{{$store.getters['system/shownum']}}</h3>
console.log('$store.state',this.$store.getters['system/shownum']);
使用getters的第二种方式
<h3>{{shownum}}</h3> computed: {
...mapgetters({
shownum: 'system/shownum',
})
},代码总结
system.js
  const system = {
      namespaced: true,
      state: {
          currentuserinfo: {},
          count: 0,
      },
      //   只有mutations中定义的函数,才有全力修改state中的数据
      mutations: {
          //   set_currentuserinfo: (state, currentuserinfo) => {
          //       state.currentuserinfo = currentuserinfo
          //   },
          //   set_count: (state, count) => {
          //       state.count = count
          //   },
          add(state) {
              state.count++
          },
          addn(state, step) {
              state.count += step
          },
          sub(state) {
              state.count--
          },
          subn(state, step) {
              state.count -= step
          },
      },
      actions: {
          addasync(content) {
              settimeout(() => {
                  // 在actions中,不能直接修改state中的数据
                  // 必须通过content.commit() 去触发某个mutations才行
                  content.commit('add')
              }, 1000)
          },
          addnasync(content, step) {
              settimeout(() => {
                  // 在actions中,不能直接修改state中的数据
                  // 必须通过content.commit() 去触发某个mutations才行
                  content.commit('addn', step)
              }, 1000)
          },
          subasync(content) {
              settimeout(() => {
                  // 在actions中,不能直接修改state中的数据
                  // 必须通过content.commit() 去触发某个mutations才行
                  content.commit('sub')
              }, 1000)
          },
          subnasync(content, step) {
              settimeout(() => {
                  // 在actions中,不能直接修改state中的数据
                  // 必须通过content.commit() 去触发某个mutations才行
                  content.commit('subn', step)
              }, 1000)
          },

      },
      getters: {
          //添加了一个shownum的属性
          shownum(state) {
              return '最新的count值为:【' + state.count + '】';
          }
      }
  }
  export default system
src\views\learnvuex\index.vue
<template>
  <div>
    <my-addition ></my-addition>
    <p>----------------------</p>
    <my-subtranction ></my-subtranction>

  </div>
</template>

<script>
// 导入
import addition from '@/components/addition';
import subtranction from '@/components/subtranction';
// import subtranction from '../../components/addition';
export default {
  name: 'learnvuex',
  props: {},
  //   注册
  components: {
    'my-addition': addition,
    'my-subtranction': subtranction
  },
  data() {
    return {

    }
  },
  computed: {},
  mounted(){
    console.log("1111",this.$store.state.system.count);

  },
}
</script>

<style scoped>
</style>
src\components\addition\index.vue
<template>
  <div>
    <h3>当前最新的count值为:{{$store.state.system.count}}</h3>
    <h3>{{$store.getters['system/shownum']}}</h3>
    <el-button type="primary" @click="btnhandler1">+1</el-button>
    <el-button type="primary" @click="btnhandler2(2)">+2</el-button>
    <el-button type="primary" @click="btnhandler2(3)">+3</el-button>

    <el-button type="primary" @click="btnhandler3">+1 async</el-button>
    <el-button type="primary" @click="btnhandler4">+3 async</el-button>
  </div>
</template>

<script>
export default {
  name: 'addition',
  props: {
  },
  data() {
    return {
    }
  },
  computed: {},
  mounted() {
    console.log('$store.state',this.$store.getters['system/shownum']);
  },
  methods: {
    btnhandler1() {
      this.$store.commit("system/add")
    },
    btnhandler2(val){
      // commit 的作用就是调用某个mutation函数
      this.$store.commit("system/addn",val)
    },
    // 异步的让count自增+1
    btnhandler3(){
      // 这里的dispatch函数,专门用来触发actions
      this.$store.dispatch('system/addasync')
    },
    //
    btnhandler4(){
      // 这里的dispatch函数,专门用来触发actions
      this.$store.dispatch('system/addnasync',3)
    },

  }
}
</script>
<style scoped>
</style>
\src\components\subtranction\index.vue
<template>
<div>
  <h3>当前最新的count值为:{{count}}</h3>
  <h3>{{shownum}}</h3>
  <el-button type="primary" @click="btnhandler1">-1</el-button>
  <el-button type="primary" @click="btnhandler2(2)">-2</el-button>
  <el-button type="primary" @click="btnhandler2(3)">-3</el-button>

  <el-button type="primary" @click="btnhandler3">-1  async</el-button>
  <el-button type="primary" @click="btnhandler4">-3  async</el-button>
</div>
</template>

<script>
import { mapstate,mapmutations,mapactions,mapgetters } from 'vuex'
export default {
  name: 'subtranction',
  props: {},
  data(){
    return{

    }
  },
  computed: {
    ...mapstate({
      count: state => state.system.count,
    }),
    ...mapgetters({
      shownum: 'system/shownum',
    })

  },
  mounted(){
    console.log("mapstate",this.count);
  },
  methods:{
    ...mapmutations({
      sub: 'system/sub',
      subn: 'system/subn',
    }),
    ...mapactions({
      subasync: 'system/subasync',
      subnasync: 'system/subnasync',
    }),
    btnhandler1(){
      this.sub()
    },
    btnhandler2(val){
      this.subn(val)
    },
    btnhandler3(){
      this.subasync()
    },
    btnhandler4(){
      this.subnasync(3)
    },
  }
}
</script>

<style scoped>

</style>
以上就是vue全家桶-vuex深入讲解的详细内容,更多关于vue全家桶-vuex的资料请关注代码网其它相关文章!


发表评论