使用linux启动nacos
前提你需要满足一下配置:
具体的配置需求参考nacos的中文网站:
- 64 bit os,支持 linux/unix/mac/windows,推荐选用 linux/unix/mac。
- 64 bit jdk 1.8+;下载 & 配置。
- maven 3.2.x+;下载 & 配置。之后才开始配置nacos
在linux中配置nacos
在官网下载你需要的nacos的版本
然后再再linux环境下
rz #导入nacos的压缩包
mkdir /usr/local/nacos #创建nacos用来储藏nacos的解压文件
tar -zxvf 压缩包所在路径 -c /usr/local/nacos #把nacos的配置文件解压到我们指定的目录位置
#此处c大写
#-z: z代表的是gzip, 通过gzip命令处理文件,gzip可以对文件压缩或者解压
#-c: c代表create,即创建新的包文件
#-x: x代表的是extract,实现从包文件中还原文件,提取,解压文件
#-v: v代表的是verbose,显示命令的执行过程
#-f: f代表的是file,用于指定包文件的名称
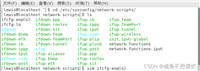
cd /usr/local/nacos/bin #进入nacos的bin目录
置
第一个关键配置
vim startup.sh #大概是这个位置
#[ ! -e "$java_home/bin/java" ] && #java_home=$home/usr/local/jdk1.8.0_171/bin/java
#[ ! -e "$java_home/bin/java" ] && #java_home=/usr/java
#[ ! -e "$java_home/bin/java" ] && #java_home=/opt/taobao/java
#[ ! -e "$java_home/bin/java" ] && unset java_home
找到这个位置之后按i进入插入模式 insert mode
把第一个带有$home的后面改为自己在linux中jdk的安装位
第二个关键配置
进入事先在linux中配置好的数据库
mysql -u root -p

enter password: xxxxx
进入数据库
cteate database nacos;  #创建一个用来装nacos-mysql.sql的内容

use nacos  #使用这个数据库

source /usr/local/nacos/conf/nacos-mysql.sql  #执行这个文件目录下的sql文件
第三个关键配置
cd ..  #返回上一层目录
cd conf #进入config目录
vim application.properties  #打开这个文件

#下面的配置,nacos自带有,只需要把注解打开然后换上自己数据库的配置即可

spring.datasource.platform=mysql

count of db:

db.num=1

connect url of db:

#地址用自己虚拟机的ip地址 加刚刚在数据库中创建的这个

db.url.0=jdbc:mysql://192.168.26.130:3306/nacos?characterencoding=utf8&connecttimeout=1000&sockettimeout=3000&autoreconnect=true&useunicode=true&usessl=false&servertimezone=utc
db.user.0=root  #自己数据库的账号
db.password.0=root  #自己数据库的密码
ending
启动nacos
在/usr/local/nacos/bin下输入 standalone是单机启动
./startup.sh -m standalone 启动nacos 或者 sh startup.sh -m standalone
会出现
nacos is starting with standalone
nacos is starting,you can check the /usr/local/nacos/logs/start.out
我们可以cat -n /usr/local/nacos/logs/start.out
如果出现
   2
     3           ,--.
     4         ,--.'|
     5     ,--,:  : |                                           nacos 1.4.1
     6  ,`--.'`|  ' :                       ,---.               running in stand alone mode, all function modules
     7  |   :  :  | |                      '   ,'\   .--.--.    port: 8848
     8  :   |   \ | :  ,--.--.     ,---.  /   /   | /  /    '   pid: 21759
     9  |   : '  '; | /       \   /     \.   ; ,. :|  :  /`./   console: http://192.168.26.130:8848/nacos/index.html
    10  '   ' ;.    ;.--.  .-. | /    / ''   | |: :|  :  ;_
    11  |   | | \   | \__\/: . ..    ' / '   | .; : \  \    `.      https://nacos.io
    12  '   : |  ; .' ," .--.; |'   ; :__|   :    |  `----.   \
    13  |   | '`--'  /  /  ,.  |'   | '.'|\   \  /  /  /`--'  /
    14  '   : |     ;  :   .'   \   :    : `----'  '--'.     /
    15  ;   |.'     |  ,     .-./\   \  /            `--'---'
    16  '---'        `--`---'     `----'
    17
    18  2023-04-04 08:46:06,573 info bean 'org.springframework.security.access.expression.method.defaultmethodsecurityexpressionhandler@20435c40' of type [org.springframework.security.access.expression.method.defaultmethodsecurityexpressionhandler] is not eligible for getting processed by all beanpostprocessors (for example: not eligible for auto-proxying)
    19
    20  2023-04-04 08:46:06,582 info bean 'methodsecuritymetadatasource' of type [org.springframework.security.access.method.delegatingmethodsecuritymetadatasource] is not eligible for getting processed by all beanpostprocessors (for example: not eligible for auto-proxying)
    21
    22  2023-04-04 08:46:07,065 info tomcat initialized with port(s): 8848 (http)
    23
    24  2023-04-04 08:46:07,467 info root webapplicationcontext: initialization completed in 4090 ms
    25
    26  2023-04-04 08:46:09,942 info initializing executorservice 'applicationtaskexecutor'
    27
    28  2023-04-04 08:46:10,083 info adding welcome page: class path resource [static/index.html]
    29
    30  2023-04-04 08:46:10,498 info creating filter chain: ant [pattern='/**'], []
    31
    32  2023-04-04 08:46:10,533 info creating filter chain: any request, [org.springframework.security.web.context.request.async.webasyncmanagerintegrationfilter@35293c05, org.springframework.security.web.context.securitycontextpersistencefilter@7fe083b1, org.springframework.security.web.header.headerwriterfilter@2a492f2a, org.springframework.security.web.csrf.csrffilter@1b58ff9e, org.springframework.security.web.authentication.logout.logoutfilter@5a62b2a4, org.springframework.security.web.savedrequest.requestcacheawarefilter@486be205, org.springframework.security.web.servletapi.securitycontextholderawarerequestfilter@4b4dd216, org.springframework.security.web.authentication.anonymousauthenticationfilter@620aa4ea, org.springframework.security.web.session.sessionmanagementfilter@16afbd92, org.springframework.security.web.access.exceptiontranslationfilter@56b78e55]
    33
    34  2023-04-04 08:46:10,620 info initializing executorservice 'taskscheduler'
    35
    36  2023-04-04 08:46:10,642 info exposing 2 endpoint(s) beneath base path '/actuator'
    37
    38  2023-04-04 08:46:10,774 info tomcat started on port(s): 8848 (http) with context path '/nacos'
    39
    40  2023-04-04 08:46:10,777 info nacos started successfully in stand alone mode. use external storage
    41
表示成功
最后的最后
配置防火墙
firewall-cmd --zone=public --add-port=8848/tcp --permanent

firewall-cmd --reload
一切准备就绪http://192.168.26.130:8848/nacos启动它
用户名:nacos
密码:nacos
默认值
到此这篇关于详解如何使用linux启动nacos的文章就介绍到这了,更多相关使用linux启动nacos内容请搜索代码网以前的文章或继续浏览下面的相关文章希望大家以后多多支持代码网!


发表评论