
 我要评论
我要评论一、效果展示
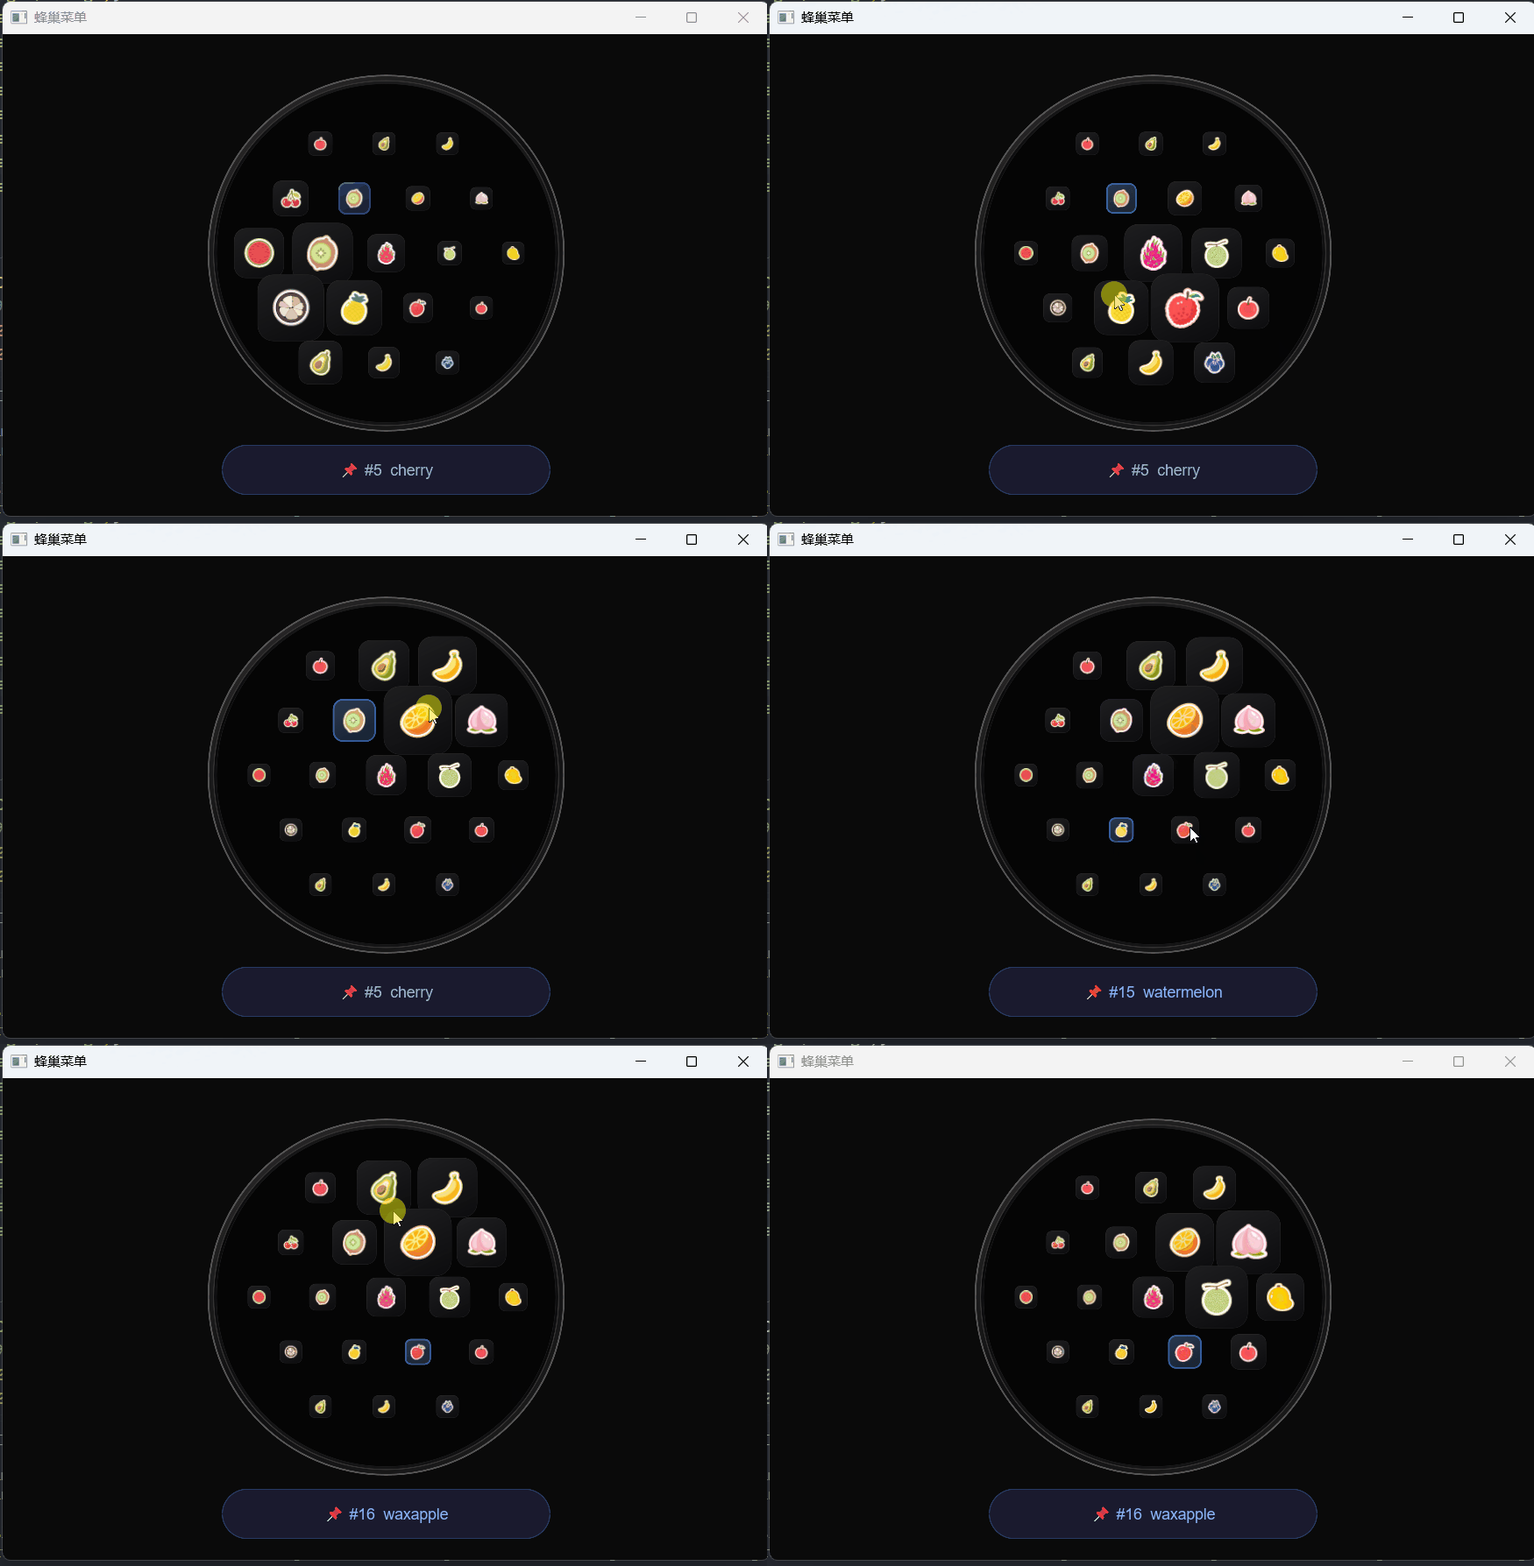
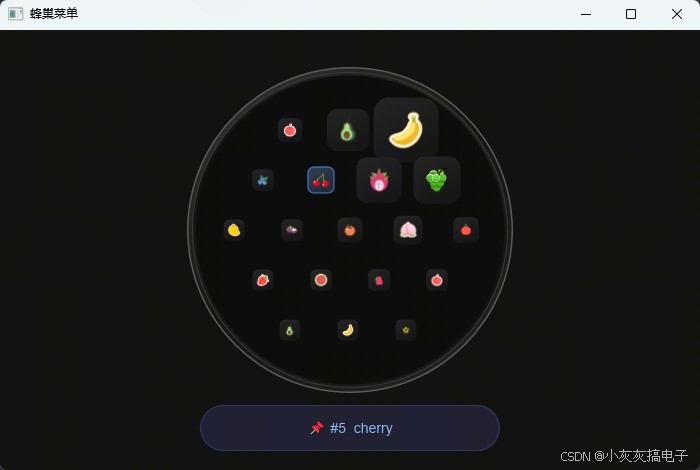
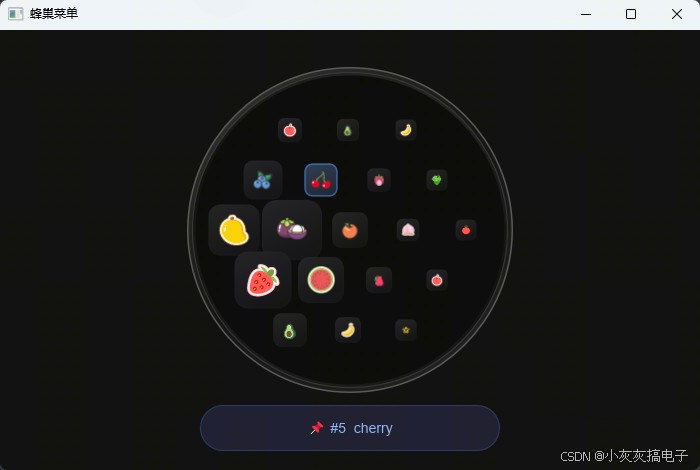
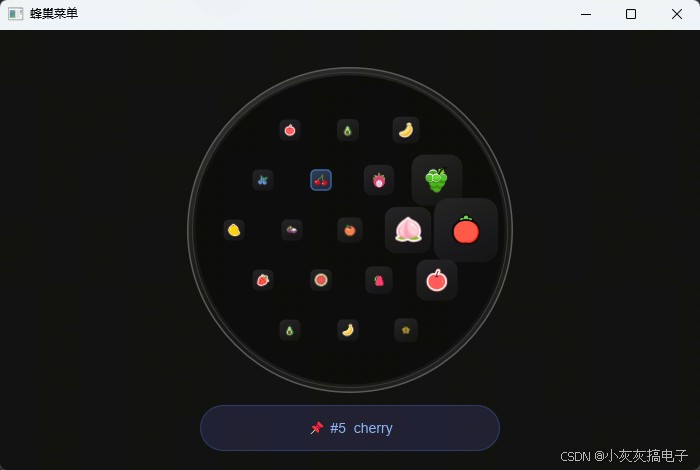
二、源码分享
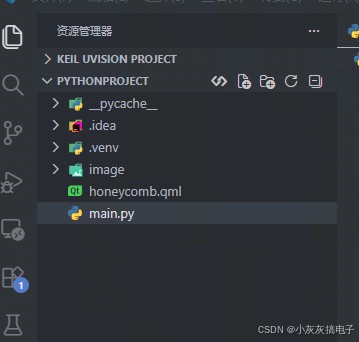
1、工程结构
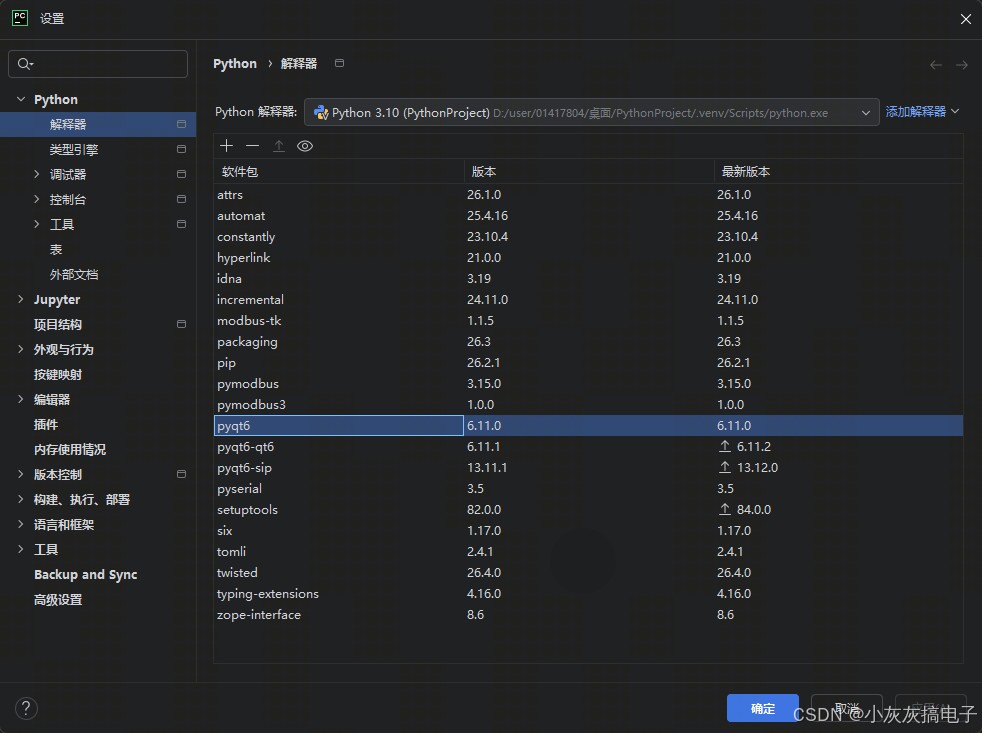
2、库安装
3、main.py
import sys
import math
import os
from pyqt6.qtwidgets import qapplication, qwidget
from pyqt6.qtcore import qt, qrectf
from pyqt6.qtgui import (
    qpainter, qcolor, qlineargradient, qpen, qbrush,
    qpainterpath, qpixmap, qfont
)


class honeycombwidget(qwidget):

    # ─── 原始设计参数(700×480 基准)───
    _orig_cx = 350.0
    _orig_cy = 220.0
    _orig_r = 155.0
    _orig_offset_y = 22.0
    _orig_base_size = 54.0
    _orig_panel_w = 300.0
    _orig_panel_h = 46.0
    _orig_panel_gap = 24.0

    # ─── 图标数据(21 个六角网格位置,设计坐标)───
    _icon_data = [
        # 第1行 (y=100, 3个)
        {"basex": 290, "basey": 100, "name": "apple",       "image": "image/apple.svg"},
        {"basex": 348, "basey": 100, "name": "avocado",     "image": "image/avocado.svg"},
        {"basex": 406, "basey": 100, "name": "banana",      "image": "image/banana.svg"},
        # 第2行 (y=150, 5个)
        {"basex": 205, "basey": 150, "name": "bayberry",    "image": "image/bayberry.svg"},
        {"basex": 263, "basey": 150, "name": "blueberry",   "image": "image/blueberry.svg"},
        {"basex": 321, "basey": 150, "name": "cherry",      "image": "image/cherry.svg"},
        {"basex": 379, "basey": 150, "name": "dragonfruit", "image": "image/dragonfruit.svg"},
        {"basex": 437, "basey": 150, "name": "grape",       "image": "image/grape.svg"},
        # 第3行 (y=200, 5个, 中间行)
        {"basex": 234, "basey": 200, "name": "mango",       "image": "image/mango.svg"},
        {"basex": 292, "basey": 200, "name": "mangosteen",  "image": "image/mangosteen.svg"},
        {"basex": 350, "basey": 200, "name": "orange",      "image": "image/orange.svg"},
        {"basex": 408, "basey": 200, "name": "peach",       "image": "image/peach.svg"},
        {"basex": 466, "basey": 200, "name": "persimmon",   "image": "image/persimmon.svg"},
        # 第4行 (y=250, 5个)
        {"basex": 205, "basey": 250, "name": "pineapple",   "image": "image/pineapple.svg"},
        {"basex": 263, "basey": 250, "name": "strawberry",  "image": "image/strawberry.svg"},
        {"basex": 321, "basey": 250, "name": "watermelon",  "image": "image/watermelon.svg"},
        {"basex": 379, "basey": 250, "name": "waxapple",    "image": "image/waxapple.svg"},
        {"basex": 437, "basey": 250, "name": "apple",       "image": "image/apple.svg"},
        # 第5行 (y=300, 3个)
        {"basex": 290, "basey": 300, "name": "avocado",     "image": "image/avocado.svg"},
        {"basex": 348, "basey": 300, "name": "banana",      "image": "image/banana.svg"},
        {"basex": 406, "basey": 300, "name": "bayberry",    "image": "image/bayberry.svg"},
    ]

    def __init__(self):
        super().__init__()
        self.setwindowtitle("蜂巢菜单")
        self.setminimumsize(320, 360)
        self.resize(560, 440)

        # ─── 状态变量 ───
        self.bulge_cx = 350.0
        self.bulge_cy = 245.0
        self.selected_index = -1
        self.is_pressed = false

        # ─── 加载 svg 图标为 qpixmap ───
        self._icon_pixmaps = {}
        self._base_dir = os.path.dirname(os.path.abspath(__file__))
        for icon in self._icon_data:
            path = os.path.join(self._base_dir, icon["image"])
            if path not in self._icon_pixmaps:
                pm = qpixmap(path)
                if pm.isnull():
                    pm = qpixmap(64, 64)
                    pm.fill(qcolor("#333"))
                self._icon_pixmaps[path] = pm

    # ═══════════════════════════════════════════════
    #  动态布局:根据当前窗口尺寸实时计算所有参数
    #  尽量让 r = min(w,h)/2,同时保证面板不超出窗口
    # ═══════════════════════════════════════════════

    @property
    def _scale(self):
        """缩放系数 = 当前半径 / 原始半径(延迟计算,供其他属性使用)"""
        return self._cur_r / self._orig_r

    @property
    def _scaled_panel_h(self):
        """信息面板高度(随缩放)"""
        return self._orig_panel_h * self._scale

    @property
    def _scaled_gap(self):
        """圆与面板之间的间距(随缩放)"""
        return self._orig_panel_gap * self._scale

    @property
    def _cur_r(self):
        """
        圆形半径:
        - 宽度方向:w / 2
        - 高度方向:(h - 面板高度 - 间距) / 2,确保圆+面板全部可见
        取两者较小值,保证任何窗口比例都不会溢出
        """
        h = self.height()
        # r * (1 + panel_h/r + gap/r) <= h/2
        # r <= h * r / (2*(r + panel_h + gap))
        r_from_h = (h * self._orig_r /
                    (2 * (self._orig_r + self._orig_panel_h + self._orig_panel_gap)))
        return min(self.width() / 2.0, r_from_h)

    @property
    def _cx(self):
        """圆心 x(窗口水平居中)"""
        return self.width() / 2.0

    @property
    def _cy(self):
        """圆心 y:圆 + 面板整体在窗口内垂直居中"""
        panel_h = self._scaled_panel_h
        gap = self._scaled_gap
        total_h = 2 * self._cur_r + gap + panel_h
        margin_top = (self.height() - total_h) / 2
        return margin_top + self._cur_r

    @property
    def _scaled_offset_y(self):
        return self._orig_offset_y * self._scale

    @property
    def _visual_cy(self):
        return self._cy + self._scaled_offset_y

    @property
    def _scaled_base_size(self):
        return self._orig_base_size * self._scale

    # ─── 坐标变换:设计坐标 → 屏幕坐标 ───

    def _sx(self, x):
        """设计 x → 屏幕 x(以圆心为基准缩放)"""
        return self._cx + (x - self._orig_cx) * self._scale

    def _sy(self, y):
        """设计 y → 屏幕 y(以圆心为基准缩放)"""
        return self._cy + (y - self._orig_cy) * self._scale

    def _sd(self, d):
        """设计距离 → 屏幕距离"""
        return d * self._scale

    # ═══════════════════════════════════════════════
    #  点击检测(全部在屏幕坐标下进行)
    # ═══════════════════════════════════════════════

    def find_icon_at(self, mx, my):
        best_idx = -1
        best_dist = float('inf')
        for i, icon in enumerate(self._icon_data):
            sx = self._sx(icon["basex"])
            sy = self._sy(icon["basey"] + self._orig_offset_y)
            dx = sx - mx
            dy = sy - my
            dist = math.sqrt(dx * dx + dy * dy)

            # 圆形裁剪
            cdx = sx - self._cx
            cdy = sy - self._visual_cy
            cdist = math.sqrt(cdx * cdx + cdy * cdy)

            if cdist <= self._cur_r - self._sd(14) and dist < self._scaled_base_size / 2 and dist < best_dist:
                best_dist = dist
                best_idx = i
        return best_idx

    # ═══════════════════════════════════════════════
    #  辅助绘制:圆角矩形
    # ═══════════════════════════════════════════════

    @staticmethod
    def _draw_round_rect(painter, x, y, w, h, radius, fill_brush=none, pen=none):
        path = qpainterpath()
        r = min(radius, w / 2, h / 2)
        path.moveto(x + r, y)
        path.lineto(x + w - r, y)
        path.arcto(x + w - 2 * r, y, 2 * r, 2 * r, 90, -90)
        path.lineto(x + w, y + h - r)
        path.arcto(x + w - 2 * r, y + h - 2 * r, 2 * r, 2 * r, 0, -90)
        path.lineto(x + r, y + h)
        path.arcto(x, y + h - 2 * r, 2 * r, 2 * r, 270, -90)
        path.lineto(x, y + r)
        path.arcto(x, y, 2 * r, 2 * r, 180, -90)
        path.closesubpath()
        if fill_brush is not none:
            painter.fillpath(path, fill_brush)
        if pen is not none:
            painter.setpen(pen)
            painter.drawpath(path)

    def _draw_gradient_round_rect(self, painter, x, y, w, h, radius,
                                  c1, c2, pen=none):
        grad = qlineargradient(x, y, x + w, y)
        grad.setcolorat(0.0, qcolor(c1))
        grad.setcolorat(0.5, qcolor(c2))
        grad.setcolorat(1.0, qcolor(c1))
        self._draw_round_rect(painter, x, y, w, h, radius,
                              fill_brush=qbrush(grad), pen=pen)

    # ═══════════════════════════════════════════════
    #  绘制:三层金属边框(跟随圆心 + 半径缩放)
    # ═══════════════════════════════════════════════

    def _draw_bezel(self, painter):
        cx, cy = self._cx, self._cy
        cr = self._cur_r
        s = self._scale

        # 外层装饰环(间隙 8px × scale)
        gap_o = self._sd(8)
        ox = cx - cr - gap_o
        oy = cy - cr - gap_o
        ow = oh = cr * 2 + gap_o * 2
        pen_outer = qpen(qcolor("#555"), max(1.0, 1.5 * s))
        self._draw_gradient_round_rect(painter, ox, oy, ow, oh, cr + gap_o,
                                        "#2e2e2e", "#0f0f0f", pen=pen_outer)

        # 中层倒角(间隙 3px × scale)
        gap_m = self._sd(3)
        mx_ = cx - cr - gap_m
        my_ = cy - cr - gap_m
        mw = mh = cr * 2 + gap_m * 2
        pen_mid = qpen(qcolor("#333"), max(0.8, s))
        self._draw_gradient_round_rect(painter, mx_, my_, mw, mh, cr + gap_m,
                                        "#222", "#0a0a0a", pen=pen_mid)

        # 内层(黑色表盘底色)
        ix = cx - cr
        iy = cy - cr
        iw = ih = cr * 2
        pen_inner = qpen(qcolor("#1a1a1a"), max(0.5, 0.5 * s))
        self._draw_round_rect(painter, ix, iy, iw, ih, cr,
                              fill_brush=qbrush(qcolor("#050505")), pen=pen_inner)

    # ═══════════════════════════════════════════════
    #  绘制:蜂巢图标网格 + 鱼眼凸起
    # ═══════════════════════════════════════════════

    def _draw_icons(self, painter):
        s = self._scale
        vis_cy = self._visual_cy
        clip_r = self._cur_r - self._sd(14)
        base_sz = self._scaled_base_size

        # 鱼眼高斯衰减分母(与面积成正比,保持视觉一致)
        falloff = 5500.0 * s * s

        for i, icon in enumerate(self._icon_data):
            bx = self._sx(icon["basex"])
            by = self._sy(icon["basey"] + self._orig_offset_y)

            # 圆形裁剪检测
            cdx = bx - self._cx
            cdy = by - vis_cy
            cdist = math.sqrt(cdx * cdx + cdy * cdy)
            if cdist > clip_r:
                continue

            # 鱼眼凸起系数(鼠标位置已在屏幕坐标中)
            mdx = bx - self.bulge_cx
            mdy = by - self.bulge_cy
            mdist2 = mdx * mdx + mdy * mdy
            bulge = 0.38 + 0.82 * math.exp(-mdist2 / falloff)
            scaled_sz = base_sz * bulge

            is_selected = (i == self.selected_index)

            # 瓦片位置(居中)
            tx = bx - scaled_sz / 2
            ty = by - scaled_sz / 2
            radius = scaled_sz * 0.24

            # 渐变颜色
            if is_selected:
                c1, c2 = "#2a3a50", "#152030"
            else:
                c1, c2 = "#1e1e20", "#0c0c0e"

            # 绘制瓦片背景
            if is_selected:
                pen_tile = qpen(qcolor("#4a8eff80"), max(1.0, 1.5 * s))
            else:
                pen_tile = qpen(qcolor("#3a3a3a50"), max(0.4, 0.5 * s))

            self._draw_gradient_round_rect(painter, tx, ty, scaled_sz, scaled_sz,
                                            radius, c1, c2, pen=pen_tile)

            # 绘制图标(居中,占瓦片 60%)
            icon_sz = scaled_sz * 0.60
            icon_x = bx - icon_sz / 2
            icon_y = by - icon_sz / 2

            path = os.path.join(self._base_dir, icon["image"])
            pm = self._icon_pixmaps.get(path)
            if pm and not pm.isnull():
                target_rect = qrectf(icon_x, icon_y, icon_sz, icon_sz)
                source_rect = qrectf(0, 0, pm.width(), pm.height())
                painter.drawpixmap(target_rect, pm, source_rect)

    # ═══════════════════════════════════════════════
    #  绘制:底部信息面板(尺寸 / 字号随窗口缩放)
    # ═══════════════════════════════════════════════

    def _draw_info_panel(self, painter):
        s = self._scale
        panel_w = self._sd(self._orig_panel_w)
        panel_h = self._scaled_panel_h
        panel_x = self._cx - panel_w / 2
        panel_y = self._cy + self._cur_r + self._scaled_gap

        has_selection = self.selected_index >= 0

        if has_selection:
            bg_color = qcolor("#1a1a2e")
            border_color = qcolor("#4a8eff40")
            text_color = qcolor("#8ab4f8")
            icon = self._icon_data[self.selected_index]
            text = f"📌 #{self.selected_index}  {icon['name']}"
        else:
            bg_color = qcolor("#111118")
            border_color = qcolor("#222")
            text_color = qcolor("#555")
            text = "点击图标查看详情"

        pen = qpen(border_color, max(0.8, s))
        self._draw_round_rect(painter, panel_x, panel_y, panel_w, panel_h,
                              panel_h / 2, fill_brush=qbrush(bg_color), pen=pen)

        # 文字居中(字号随缩放)
        font = qfont()
        font.setpixelsize(max(10, int(14 * s)))
        font.setweight(qfont.weight.light)
        painter.setfont(font)
        painter.setpen(text_color)

        pad = self._sd(10)
        text_rect = qrectf(panel_x + pad, panel_y, panel_w - 2 * pad, panel_h)
        painter.drawtext(text_rect,
                         qt.alignmentflag.alignhcenter | qt.alignmentflag.alignvcenter,
                         text)

    # ═══════════════════════════════════════════════
    #  paintevent — 主绘制入口
    # ═══════════════════════════════════════════════

    def paintevent(self, event):
        painter = qpainter(self)
        painter.setrenderhint(qpainter.renderhint.antialiasing, true)
        painter.setrenderhint(qpainter.renderhint.smoothpixmaptransform, true)

        # 背景
        painter.fillrect(self.rect(), qcolor("#0a0a0a"))

        # 三层金属边框
        self._draw_bezel(painter)

        # 蜂巢图标
        self._draw_icons(painter)

        # 底部信息面板
        self._draw_info_panel(painter)

        painter.end()

    # ═══════════════════════════════════════════════
    #  鼠标事件
    # ═══════════════════════════════════════════════

    def mousepressevent(self, event):
        if event.button() == qt.mousebutton.leftbutton:
            self.is_pressed = true
            self.update()

    def mousereleaseevent(self, event):
        if event.button() == qt.mousebutton.leftbutton:
            self.is_pressed = false
            pos = event.position()
            self.selected_index = self.find_icon_at(pos.x(), pos.y())
            self.update()

    def mousemoveevent(self, event):
        if self.is_pressed:
            pos = event.position()
            self.bulge_cx = pos.x()
            self.bulge_cy = pos.y()
            self.update()

    # ═══════════════════════════════════════════════
    #  resizeevent — 窗口大小变化时自动重绘
    # ═══════════════════════════════════════════════

    def resizeevent(self, event):
        super().resizeevent(event)
        self.update()


def main():
    app = qapplication(sys.argv)
    widget = honeycombwidget()
    widget.show()
    sys.exit(app.exec())


if __name__ == "__main__":
    main()
三、实现原理
本程序的核心是**“设计坐标 + 动态缩放”的布局方案,配合鱼眼凸起算法与圆形裁剪**,在任意窗口尺寸下都能保持蜂巢网格的视觉一致性。下面按模块拆解关键实现细节。
1、坐标系统:设计坐标 → 屏幕坐标
代码中所有图标位置都定义在一套 700×480 的“设计坐标系” 下(_orig_cx=350、_orig_cy=220、_orig_r=155)。运行时通过 _scale 属性把设计坐标等比映射到实际窗口:
@property
def _scale(self):
    return self._cur_r / self._orig_r

def _sx(self, x):
    return self._cx + (x - self._orig_cx) * self._scale

def _sy(self, y):
    return self._cy + (y - self._orig_cy) * self._scale
_sx/_sy:以圆心为基准,把设计坐标缩放平移到屏幕坐标;_sd:把设计距离(如半径、间距)等比缩放到屏幕距离。
这套方案的好处是:所有绘制逻辑都只写一遍,窗口无论拉大还是缩小,蜂巢网格、边框、面板都会同步缩放,不会出现错位或溢出。
2、动态半径计算:保证圆 + 面板不溢出
_cur_r 是动态布局的关键,它同时受宽度和高度约束:
@property
def _cur_r(self):
    h = self.height()
    r_from_h = (h * self._orig_r /
                (2 * (self._orig_r + self._orig_panel_h + self._orig_panel_gap)))
    return min(self.width() / 2.0, r_from_h)
- 宽度约束:
w / 2,保证圆不会超出左右边界; - 高度约束:
h * r / (2*(r + panel_h + gap)),把底部信息面板的高度和间距也计入,保证“圆 + 面板”整体垂直居中且不溢出。
取两者较小值,因此任何窗口比例下都不会出现裁剪或溢出。
3、鱼眼凸起算法(fisheye bulge)
这是蜂巢菜单“跟随鼠标起伏”的视觉核心。每个图标在绘制前,会根据它到鼠标的距离计算一个凸起系数:
falloff = 5500.0 * s * s
mdist2 = mdx * mdx + mdy * mdy
bulge = 0.38 + 0.82 * math.exp(-mdist2 / falloff)
scaled_sz = base_sz * bulge
- 鼠标越近,
mdist2越小,exp(-mdist2/falloff)越接近 1,图标被放大到约1.2倍; - 鼠标越远,系数趋近
0.38,图标缩小,形成“凹陷”的对比; falloff随缩放系数s平方变化,保证不同窗口尺寸下凸起范围视觉一致。
4、圆形裁剪:只显示圆内的图标
蜂巢网格是矩形的,但表盘是圆形的。因此每个图标绘制前都要做一次圆形裁剪判断:
cdx = bx - self._cx
cdy = by - vis_cy
cdist = math.sqrt(cdx * cdx + cdy * cdy)
if cdist > clip_r:
    continue
clip_r = self._cur_r - self._sd(14) 比圆半径略小,留出内边距。只有落在圆内的图标才会被绘制,圆外的自动跳过,从而形成干净的圆形表盘效果。
5、点击检测:屏幕坐标下的最近邻匹配
鼠标释放时,find_icon_at 会在屏幕坐标下遍历所有图标,找到距离鼠标最近且满足条件的那个:
if cdist <= self._cur_r - self._sd(14) and dist < self._scaled_base_size / 2 and dist < best_dist:
    best_dist = dist
    best_idx = i
三个条件缺一不可:
- 在圆内:与绘制时的裁剪逻辑一致;
- 在图标半径内:
dist < base_size / 2,避免误点; - 距离最近:多个图标重叠时取最近者。
6、三层金属边框与渐变绘制
_draw_bezel 用三层圆角矩形叠加出金属质感:
- 外层:间隙
8px × scale,深灰渐变 + 描边; - 中层:间隙
3px × scale,更深的渐变; - 内层:纯黑表盘底色。
每层都通过 _draw_gradient_round_rect 绘制水平线性渐变(c1 → c2 → c1),模拟金属高光。所有间隙、线宽都乘以 _scale,保证缩放后层次感不变。
7、信息面板:随缩放的自适应布局
底部面板的位置由圆心、半径和间距共同决定:
panel_y = self._cy + self._cur_r + self._scaled_gap
- 面板始终紧贴圆的下方,间距随缩放;
- 选中图标时显示
📌 #序号 名称,未选中时显示提示文字; - 字号
max(10, int(14 * s))随缩放,保证小窗口下依然可读。
8、事件驱动重绘
整个交互依赖 qt 的事件机制:
mousemoveevent:按住鼠标移动时更新bulge_cx / bulge_cy并调用update()触发重绘,形成鱼眼跟随效果;mousereleaseevent:松手时执行点击检测,更新selected_index;resizeevent:窗口尺寸变化时自动重绘,所有动态属性(_cur_r、_cx、_cy等)都会重新计算。
由于所有几何参数都是属性(property)延迟计算,每次 paintevent 都会读取最新值,因此无需手动维护状态同步。
以上就是python利用pyqt实现蜂巢菜单的完整代码的详细内容,更多关于python pyqt蜂巢菜单的资料请关注代码网其它相关文章!





发表评论