1. vscode 配置 pyqt_designer
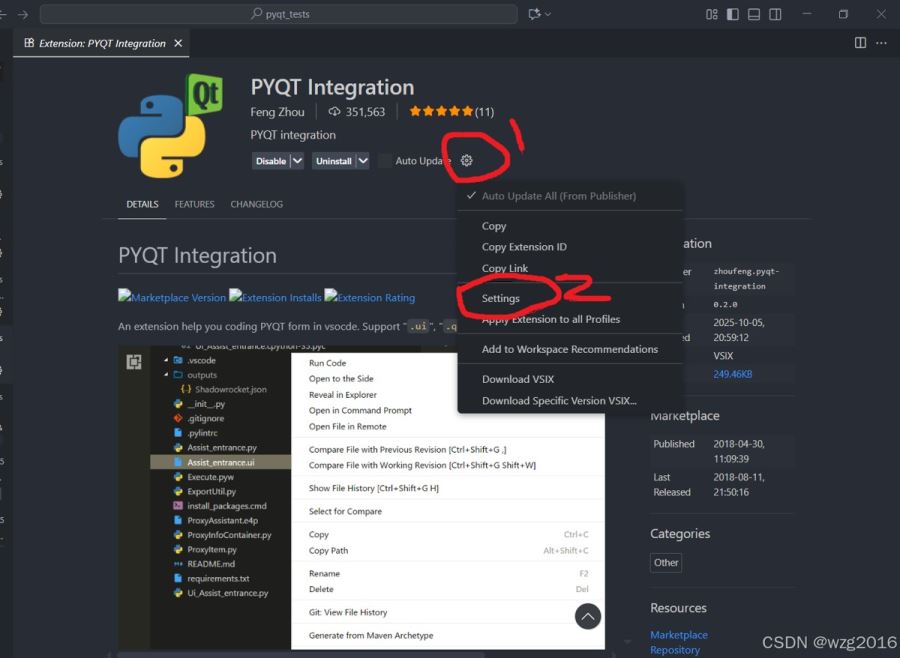
给 vscode 安装插件 “pyqt integration”,点击 “pyqt integration” 插件界面的齿轮,选择“settings”,进入该插件的设置页面:
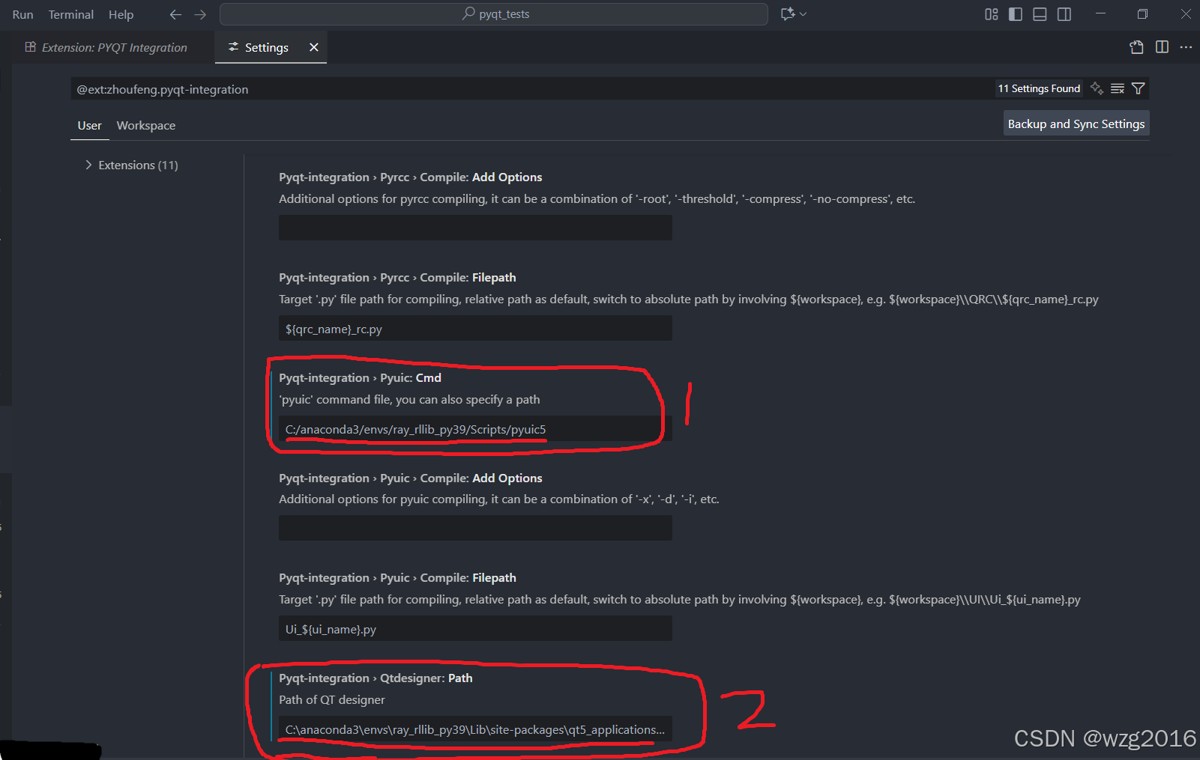
进入以下界面:
配置1:设置 pyuic 的路径
pyuic用于将gui界面的 .ui 文件转换为 .py 文件。
找到 “pyqt-integration > pyuic: cmd”,填入安装pyqt5的虚拟环境中pyuic的绝对路径,如下:
d:\data\...\venv_qt\scripts\pyuic5
配置2:设置 qt designer 的路径
qt designer 是 qt 用来设计 gui 的软件,通过拖拽组件可以快速构建gui。
找到 " pyqt-integration > qtdesigner: path ",输入虚拟环境中qt designer的绝对路径,如下:
d:\data\...\venv_qt\lib\site-packages\qt5_applications\qt\bin\designer
配置结果如下图所示:
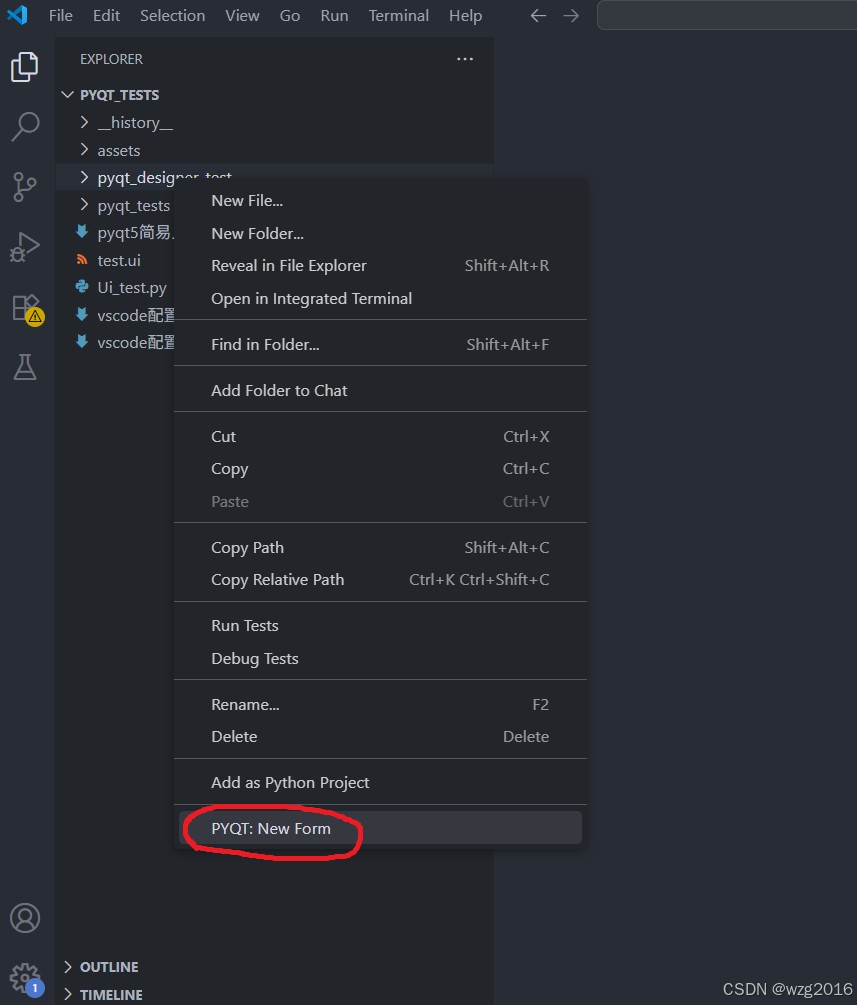
## 2. 创建 .ui 文件
在 vscode 的文件目录下,点击鼠标右键,选择“pyqt:new form”, 创建 qt 的 ui 界面,自动调用qt-designer打开
vscode自动调用qt-designer打开,创建并打开一个.ui文件,这里以创建 “main window”为例,介绍后续使用方法。
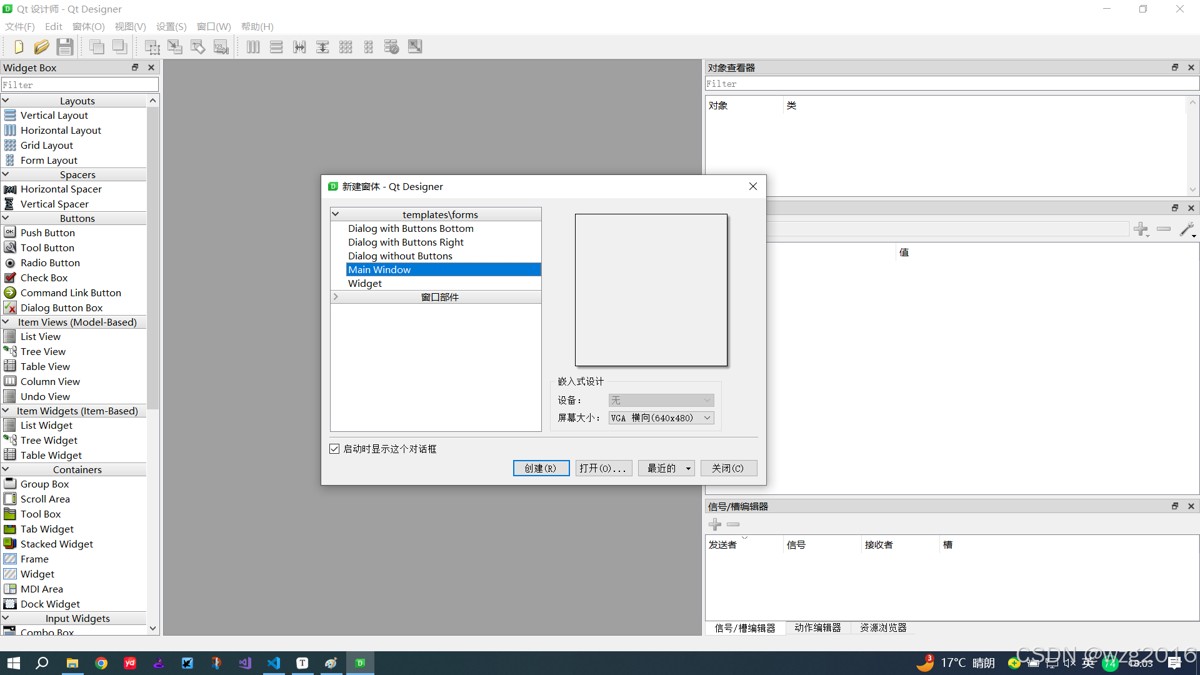
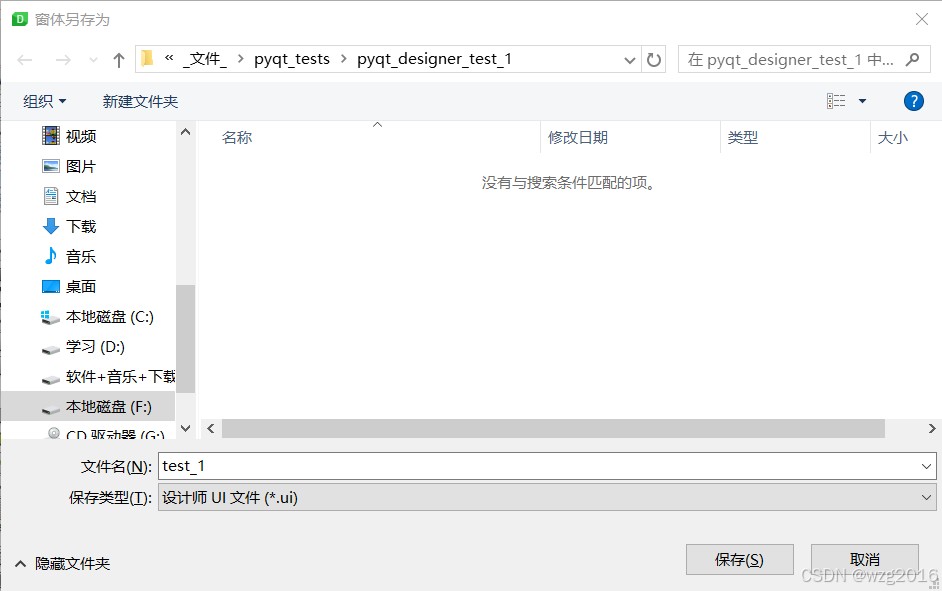
创建一个 “main window”,从左侧拖进来一个 button之后,“ctrl+s"保存,弹出如下对话框,保存为 .ui 文件
关闭qt-designer.
回到 vscode, 在刚刚保存的 .ui 文件上,鼠标右键,
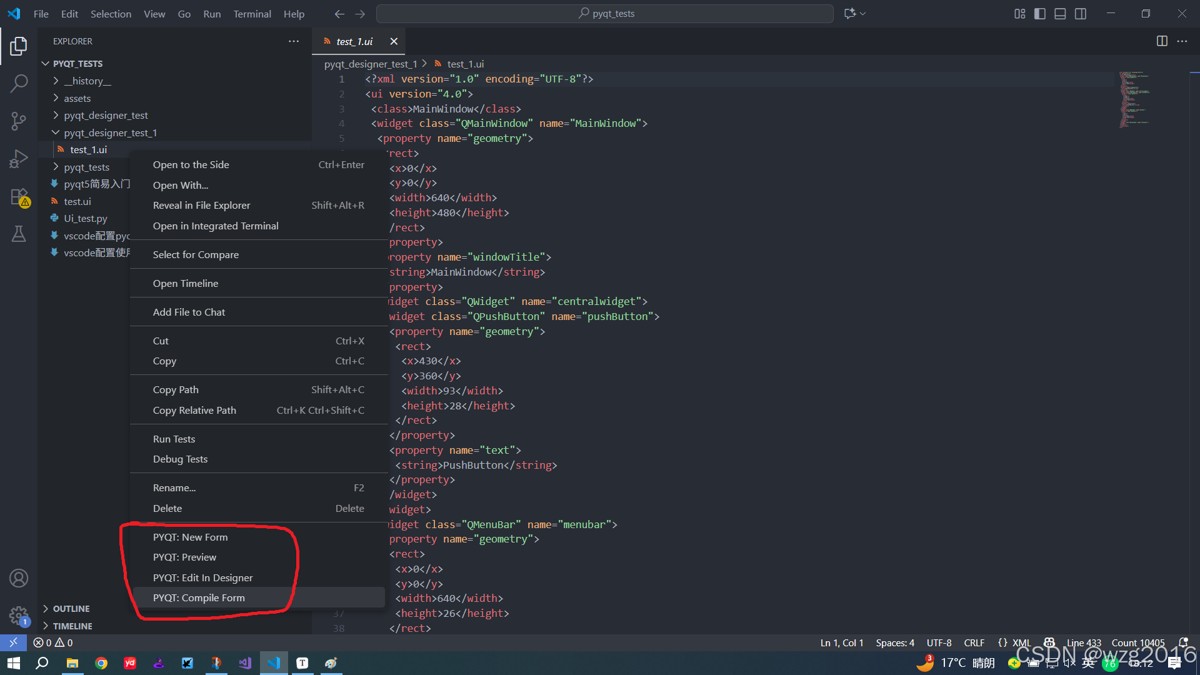
- pyqt:new form : 用于创建一个新的.ui文件/界面
- pyqt:preview: 会显示 .ui 界面的效果
- pyqt:edit in designer: 用 qt-designer 重新打开 .ui 文件进行编辑
- pyqt: compile form 将 .ui 文件编译为 .py 文件,创建了一个python类,供后续界面功能的开发使用。
2. 编译 .ui 文件 得到 .py 文件
在vscode中,在上一步创建的 .ui 文件上,点击鼠标右键,选择 ”pyqt: compile form“ 选项,得到.py 文件,如下:
# -*- coding: utf-8 -*-
# form implementation generated from reading ui file 'f:\_文件_\pyqt_tests\pyqt_designer_test_1\test_1.ui'
#
# created by: pyqt5 ui code generator 5.15.9
#
# warning: any manual changes made to this file will be lost when pyuic5 is
# run again.  do not edit this file unless you know what you are doing.
from pyqt5 import qtcore, qtgui, qtwidgets
class ui_mainwindow(object):
    def setupui(self, mainwindow):
        mainwindow.setobjectname("mainwindow")
        mainwindow.resize(640, 480)
        self.centralwidget = qtwidgets.qwidget(mainwindow)
        self.centralwidget.setobjectname("centralwidget")
        # 这里是对应组件的设置
        self.pushbutton = qtwidgets.qpushbutton(self.centralwidget)
        self.pushbutton.setgeometry(qtcore.qrect(430, 360, 93, 28))
        self.pushbutton.setobjectname("pushbutton")
        mainwindow.setcentralwidget(self.centralwidget)
        self.menubar = qtwidgets.qmenubar(mainwindow)
        self.menubar.setgeometry(qtcore.qrect(0, 0, 640, 26))
        self.menubar.setobjectname("menubar")
        mainwindow.setmenubar(self.menubar)
        self.statusbar = qtwidgets.qstatusbar(mainwindow)
        self.statusbar.setobjectname("statusbar")
        mainwindow.setstatusbar(self.statusbar)
        self.retranslateui(mainwindow)
        qtcore.qmetaobject.connectslotsbyname(mainwindow)
    def retranslateui(self, mainwindow):
        _translate = qtcore.qcoreapplication.translate
        mainwindow.setwindowtitle(_translate("mainwindow", "mainwindow"))
        self.pushbutton.settext(_translate("mainwindow", "pushbutton"))
3. 简单使用 .ui 定义的界面,添加槽函数
from pyqt5.qtwidgets import qapplication, qmainwindow
import sys
from ui_test_1 import ui_mainwindow
# 定义一个槽函数
def on_btn_ok():
    print("hello world")
# 创建一个空界面
app = qapplication(sys.argv)
main_window = qmainwindow()  # 创建以恶搞窗口
# 调用ui文件编译得到的头文件,配置main_window
ui = ui_mainwindow()        # 常见一个窗口配置类的类对象
ui.setupui(main_window)     # 用 ui 类装饰 创建的 main_window
# 给 ui 界面中的pushbutton组件添加槽函数
ui.pushbutton.clicked.connect(on_btn_ok)
# 显示窗口
main_window.show()
sys.exit(app.exec_())
4. 高级使用 .ui 定义的界面
继承 qmainwindow, 与 第三步生成的 ui_mainwindow 类,创建一个新的类,管理ui界面中的所有组件,以及添加槽函数。
from pyqt5.qtwidgets import qapplication, qmainwindow
import sys
from ui_test_1 import ui_mainwindow
# 继承 ui_mainwindow 与 qmainwindow 创建新类
class mymainwindow(qmainwindow,ui_mainwindow): #这里也要记得改
    def __init__(self,parent =none):
        super(mymainwindow,self).__init__(parent) # qmainwindow 初始化
        self.setupui(self)  # 用 ui_mainwindow 的 setupui 函数给 qmainwindow 添加组件
        # 给qmainwindow 的组件添加槽函数
        self.pushbutton.clicked.connect(self.slot_on_btn_clicked)
    # 定义槽函数
    def slot_on_btn_clicked(self):
        print("hello world!")
if __name__ == "__main__":
    app = qapplication(sys.argv)
    w = mymainwindow()
    w.show()
    sys.exit(app.exec_())
到此这篇关于vscode 配置使用pyqt5的详细步骤的文章就介绍到这了,更多相关vscode 使用pyqt5内容请搜索代码网以前的文章或继续浏览下面的相关文章希望大家以后多多支持代码网!


发表评论