@scheduled注解是 spring boot 提供的定时任务配置工具,用于控制任务执行时间。
使用方法:
- 先启用定时器配置,添加注解@enablescheduling,可在@springbootapplication或者@configuration或者@component等spring能够扫描到的地方;
- 在spring能够识别的类中定义没有返回值和参数的方法,在方法上使用@scheduled注解;
@scheduled注解的参数解释:
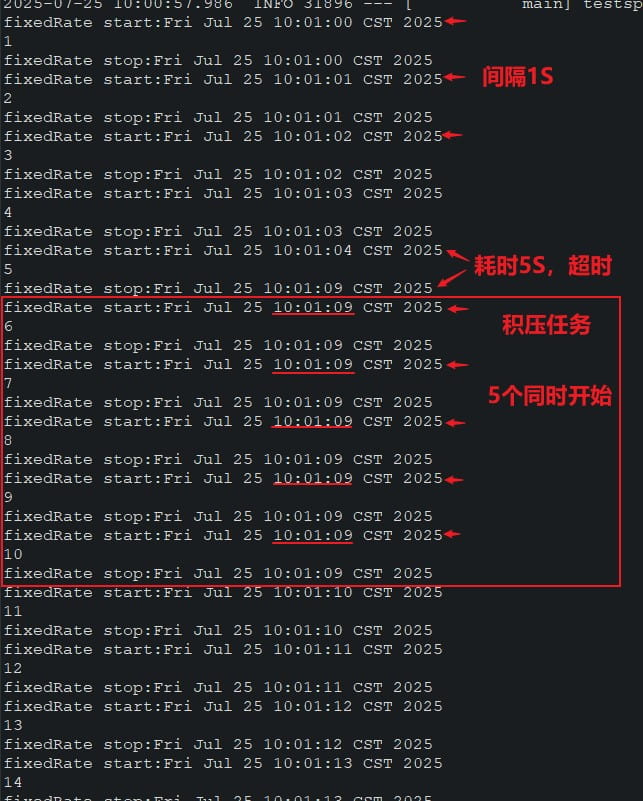
- fixedrate:固定速率(ms),按照每次任务的开始时间间隔执行(定时器启动的时候每次开始时间就已确定),上一次任务执行时间超过后面的任务开始时间,后面任务会积压到队列里,等这个时间很长的任务结束后,队列里的积压任务全部同时放行;
- fixedratestring:同上,字符串类型,支持${}占位符,可灵活配置;
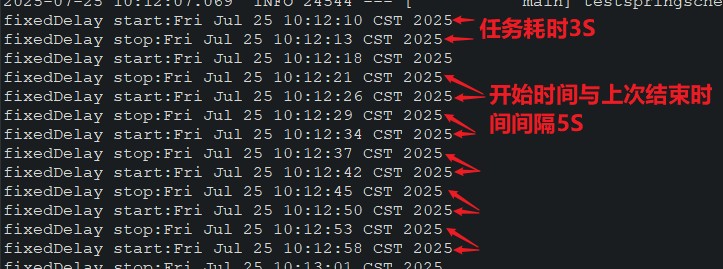
- fixeddelay:固定延迟(ms),以上次的结束时间开始延迟一定时间执行下一次,不会积压;
- fixeddelaystring:同上,字符串类型,支持${}占位符,可灵活配置;
- initialdelay:延迟启动定时器时间(ms),指定一段时间后才开始启动定时器;
- initialdelaystring:同上,字符串类型,支持${}占位符,可灵活配置;
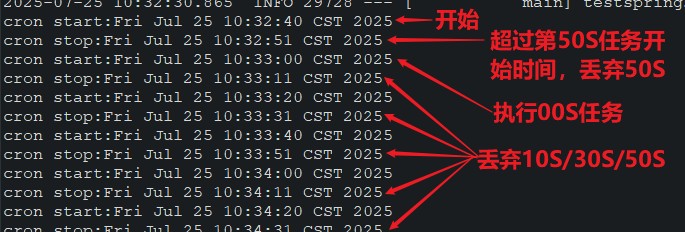
- cron:cron表达式,比上面的更灵活,字符串类型,支持${}占位符,上次任务如果超时会自动丢弃当前时间应该执行的任务;(跟linux的cron稍有区别,linux的是“分时日月周”,这个是“秒分时日月周[年]”,多了秒和可省略的年)
- zone:时区,一般默认即可,自动使用服务器时区,也可指定如“asia/shanghai”;
ps:占位符可以只占string的一部分;定时器里如果抛出异常不会影响下一次任务;对cron的简单理解,可以把每个字段的设置都解释为一个整数数组,例如在秒字段上的0/10,可以解释成[0, 10, 20, 30, 40, 50],在月字段上的*表示所有值,可解释成[1, 2, 3, 4, 5, 6, 7, 8, 9, 10, 11, 12],也就是每个月都有;
测试代码:
启动类:
package testspringschedule;
import org.springframework.boot.springapplication;
import org.springframework.boot.autoconfigure.springbootapplication;
import org.springframework.scheduling.annotation.enablescheduling;
@springbootapplication
@enablescheduling
public class testspringschedule {
	public static void main(string[] args) {
		system.out.println("main start");
		springapplication.run(testspringschedule.class, args);
	}
}
测试fixedrate:
package testspringschedule;
import java.util.date;
import org.springframework.scheduling.annotation.scheduled;
import org.springframework.stereotype.component;
//@configuration
@component
//@enablescheduling
public class myrateschedule {
@scheduled(fixedrate = 5000, initialdelay = 3000, zone = "asia/shanghai")
// @scheduled(fixedratestring = "5000", initialdelaystring = "3000")
// @scheduled(fixedratestring = "${abc:5}000", initialdelaystring = "${def:3000}")
public void test1() {
system.out.println("fixedrate start:" + new date());
try {
thread.sleep(1000);
} catch (interruptedexception e) {
e.printstacktrace();
}
system.out.println("fixedrate stop:" + new date());
}
private int i = 0;
// @scheduled(fixedrate = 1000, initialdelay = 3000)
public void test2() {
system.out.println("fixedrate start:" + new date());
i++;
system.out.println(i);
if (i == 5) {
try {
thread.sleep(5000);
} catch (interruptedexception e) {
e.printstacktrace();
}
}
system.out.println("fixedrate stop:" + new date());
}
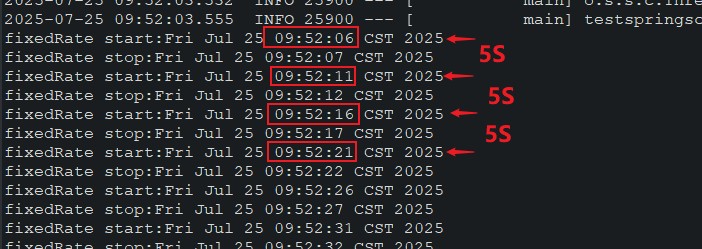
}test1()执行结果,开始时间都是间隔5s:
test2()执行结果,开始时间间隔1s,超时积压多个任务等上一个任务结束后全部同时执行;
测试fixeddelay:
package testspringschedule;
import java.util.date;
import org.springframework.scheduling.annotation.scheduled;
import org.springframework.stereotype.component;
@component
public class mydelayschedule {
	@scheduled(fixeddelay = 5000, initialdelay = 3000)
	public void test1() {
		system.out.println("fixeddelay start:" + new date());
		try {
			thread.sleep(3000);
		} catch (interruptedexception e) {
			e.printstacktrace();
		}
		system.out.println("fixeddelay stop:" + new date());
	}
}
执行结果:
测试cron:
package testspringschedule;
import java.util.date;
import org.springframework.scheduling.annotation.scheduled;
import org.springframework.stereotype.component;
@component
public class mycronschedule {
@scheduled(cron = "50/2 * * * * ?")
// @scheduled(cron = "${s:1/2 * * * * ?}")
// @scheduled(cron = "${s:0/5} * * * * ?")
public void test1() {
system.out.println("cron:" + new date());
}
// @scheduled(cron = "0/10 * * * * ?")
public void test2() {
system.out.println("cron start:" + new date());
try {
thread.sleep(11000);
} catch (interruptedexception e) {
e.printstacktrace();
}
system.out.println("cron stop:" + new date());
}
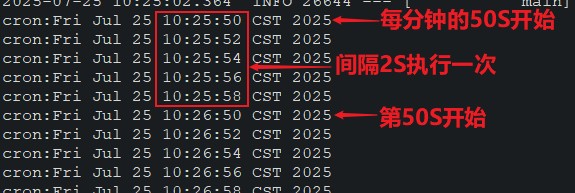
}test1()执行结果:
test2()执行结果,超时丢弃:
也可以实现schedulingconfigurer接口,使用配置类进行线程池、异常处理、拒绝策略等的一些配置:(默认配置所有定时器都是单线程串行的)
package testspringschedule;
import java.util.concurrent.threadpoolexecutor;
import org.springframework.context.annotation.configuration;
import org.springframework.scheduling.annotation.schedulingconfigurer;
import org.springframework.scheduling.concurrent.threadpooltaskscheduler;
import org.springframework.scheduling.config.scheduledtaskregistrar;
import org.springframework.util.errorhandler;
@configuration
public class myscheduleconfig implements schedulingconfigurer {
	@override
	public void configuretasks(scheduledtaskregistrar taskregistrar) {
		final threadpooltaskscheduler taskscheduler = new threadpooltaskscheduler();
        taskscheduler.setpoolsize(50);
        taskscheduler.setthreadgroupname("scheduled-group");
        taskscheduler.setrejectedexecutionhandler(new threadpoolexecutor.discardpolicy());
        taskscheduler.seterrorhandler(new errorhandler() {
			@override
			public void handleerror(throwable t) {
				system.out.println("发生未捕获异常:");
				t.printstacktrace();
			}
		});
        taskscheduler.initialize();
        taskregistrar.settaskscheduler(taskscheduler);
	}
}
到此这篇关于springboot使用@scheduled定时器的文章就介绍到这了,更多相关springboot @scheduled定时器内容请搜索代码网以前的文章或继续浏览下面的相关文章希望大家以后多多支持代码网!


发表评论