实验环境
实验步骤
一、nginx优化
1、安装nginx1.28(192.168.10.40)
添加nginx官方源
tee /etc/yum.repos.d/nginx.repo <<eof
[nginx-stable]
name=nginx stable repo
baseurl=http://nginx.org/packages/centos/\$releasever/\$basearch/
gpgcheck=1
enabled=1
gpgkey=https://nginx.org/keys/nginx_signing.key
module_hotfixes=true

[nginx-mainline]
name=nginx mainline repo
baseurl=http://nginx.org/packages/mainline/centos/\$releasever/\$basearch/
gpgcheck=1
enabled=0
gpgkey=https://nginx.org/keys/nginx_signing.key
module_hotfixes=true
eof
dnf -y install nginx
2、编写nginx基本启动文件(192.168.10.40)
mkdir /nginxconf
vim /nginxconf/nginx.conf
添加:
events {}
http {
    server {
    }
}
检查配置文件语法
nginx -c /nginxconf/nginx.conf -t

启动nginx服务
nginx -c /nginxconf/nginx.conf
ss -antpl | grep nginx

3、自定义网站目录(192.168.10.40)
(1)修改配置文件
vim /nginxconf/nginx.conf
添加:
events {}
http {
    server {
    root /mysite;
    }
}
(2)创建网站目录并授权
mkdir /mysite
echo "nginx" > /mysite/index.html
chown -r nginx:nginx /mysite/
(3)重载nginx服务
nginx -c /nginxconf/nginx.conf -s reload
ss -anplt | grep nginx
(4)访问网页
curl 127.0.0.1

4、虚拟主机(基于域名)(192.168.10.40)
(1)修改配置文件
vim /nginxconf/nginx.conf
添加:
events {}
http {
    server {
    server_name www.test1.com;
    root /mysite;
    }
    server {
    server_name www.test2.com;
    root /mysite2;
    }
}
(2)创建网站目录并授权
echo "web1" > /mysite/index.html
mkdir /mysite2
echo "web2" > /mysite2/index.html
chown -r nginx:nginx /mysite2
(3)设置域名解析
vim /etc/hosts
添加:
192.168.10.40   www.test1.com
192.168.10.40   www.test2.com
(4)重载nginx服务
nginx -c /nginxconf/nginx.conf -s reload
(5)通过域名访问
curl www.test1.com

curl www.test2.com

5、虚拟主机(基于端口)(192.168.10.40)
(1)修改配置文件
vim /nginxconf/nginx.conf
修改:
events {}
http {
    server {
    listen 80;
    root /mysite;
    }
    server {
    listen 81;
    root /mysite2;
    }
}
(2)重载ngix服务
nginx -c /nginxconf/nginx.conf -s reload
(3)通过端口访问
curl 127.0.0.1

curl 127.0.0.1:81

6、location匹配模式(192.168.10.40)
location 是 nginx 配置中最重要的指令之一,用于匹配请求的 uri(路径),并定义如何处理这些请求(如代理、重定向、返回静态文件等)
(1)基本语法
location [匹配模式] uri {

    # 配置指令

}- [匹配模式]:可以是前缀匹配、正则匹配、精确匹配
- uri:要匹配的路径
(2)匹配模式类型
匹配模式 | 语法示例 | 说明 |
精确匹配 | location = /path | 只匹配完全相同的路径(优先级最高) |
前缀匹配 | location /prefix | 匹配以 /prefix 开头的路径(按最长匹配优先) |
正则匹配(区分大小写) | location ~ \.php$ | 使用正则表达式匹配(区分大小写,第一个匹配成功的生效) |
正则匹配(不区分大小写) | `location ~* .(jpg png)` | 正则匹配不区分大小写 |
通用匹配 | location / | 匹配所有未被其他 location 匹配的请求(优先级最低) |
(3)修改配置文件
vim /nginxconf/nginx.conf
修改:
events {}
http {
    server {
    listen 80;
    location = /exact-match {
        return 200 "精确匹配\n";
    }
    location /prefix {
        return 200 "前缀匹配\n";
    }
    location ~ \.php$ {
        return 200 "区分大小写的正则匹配\n";
    }
    location ~* \.(jpg|png)$ {
        return 200 "不区分大小写的正在匹配\n";
    }
    location / {
        return 200 "通用匹配\n";
    }
    location ~ /\.ht {
        deny all;
    }
    }
}
(4)重载nginx服务
nginx -c /nginxconf/nginx.conf -s reload
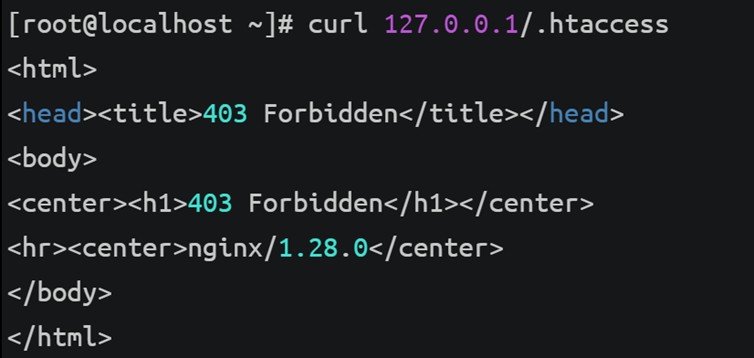
(5)实验curl测试不同路径
curl 127.0.0.1/exact-match

curl 127.0.0.1/prefix/hello

curl 127.0.0.1/test.php

curl 127.0.0.1/image.png

curl 127.0.0.1/any-other-path

curl 127.0.0.1/.htaccess
7、隐藏服务版本号(192.168.10.40)
默认情况下,nginx 会在 http 响应头中显示版本号(如 server: nginx/1.25.3),这可能存在安全风险。
查看百度的http响应头信息
curl -i http://www.baidu.com/
服务器类型:百度前端使用 bfe
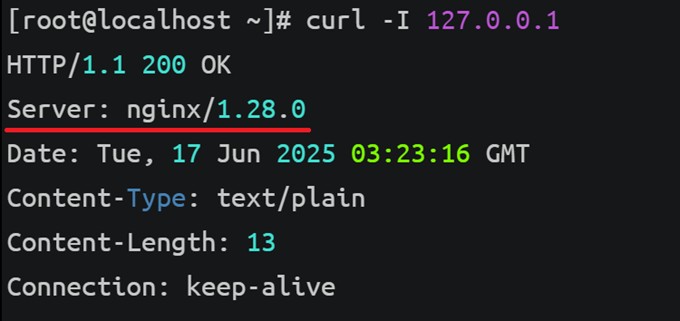
查看安装的nginx响应头信息
curl -i 127.0.0.1
(1)修改配置文件
vim /nginxconf/nginx.conf
添加:
events {}
http {
    server_tokens off;
    server {
    listen 80;
    location = /exact-match {
        return 200 "精确匹配\n";
    }
    location /prefix {
        return 200 "前缀匹配\n";
    }
    location ~ \.php$ {
        return 200 "区分大小写的正则匹配\n";
    }
    location ~* \.(jpg|png)$ {
        return 200 "不区分大小写的正在匹配\n";
    }
    location / {
        return 200 "通用匹配\n";
    }
    location ~ /\.ht {
        deny all;
    }
    }
}
(2)重载nginx服务
nginx -c /nginxconf/nginx.conf -s reload
(3)检查响应头
curl -i 127.0.0.1

8、定义进程数量(192.168.10.40)
(1)查看nginx工作进程数
ps -ef | grep nginx

(2)修改配置文件(设置为两个工作进程)
vim /nginxconf/nginx.conf
添加:
worker_processes 2;
events {}
http {
……
或者使用worker_processes auto; 自动匹配 cpu 核心数
(3)重启nginx服务
nginx -c /nginxconf/nginx.conf -s stop
nginx -c /nginxconf/nginx.conf
(4)查看nginx工作进程数
ps -ef | grep nginx

9、cpu亲和性(192.168.10.40)
worker_cpu_affinity 是 nginx 中用于 绑定 worker 进程到特定 cpu 核心 的指令,目的是通过 减少 cpu 上下文切换 和 提高缓存命中率 来优化性能,尤其在多核服务器上效果显著。
(1)修改配置文件
vim /nginxconf/nginx.conf
添加:
worker_processes 2;
worker_cpu_affinity 0101 1010;
events {}
http {
……
(2)重载nginx服务
nginx -c /nginxconf/nginx.conf -s reload
10、设置进程打开文件数量
worker_rlimit_nofile 是 nginx 的核心配置指令,用于 设置每个 worker 进程能打开的最大文件描述符(file descriptor)数量,直接影响 nginx 的并发处理能力。
(1)安装ab测试工具(192.168.10.41)
dnf -y install httpd-tools
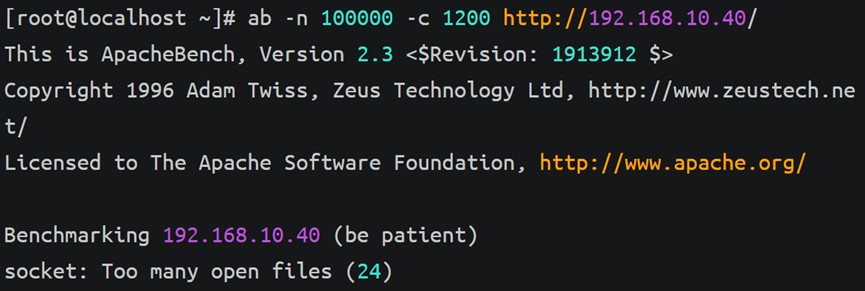
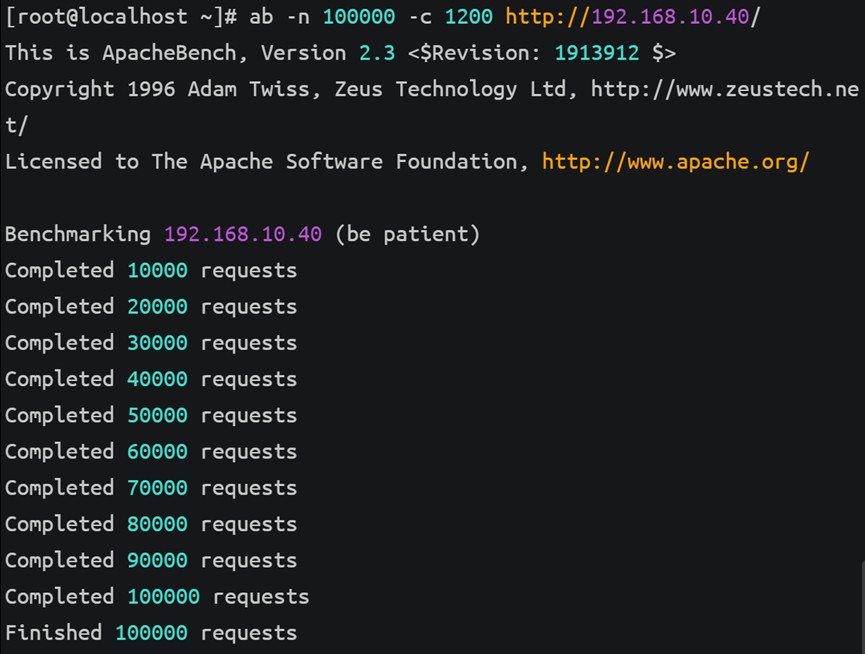
(2)对nginx服务器进行压力测试(192.168.10.41)
ab -n 100000 -c 1020 http://192.168.10.40/

ab -n 100000 -c 1200 http://192.168.10.40/
ulimit -n

当并发超过1020后报错,是由于系统对单个进程可打开文件描述符数量的限制导致的。默认情况下,linux 系统通常限制为 1024 个文件描述符。
(3)设置linux 系统中单个进程可打开的文件描述符数量(192.168.10.40,192.168.10.41)
vim /etc/security/limits.conf
在最后添加:
*               soft    nofile          65535
*               hard    nofile          65535
重新登录用户使其生效
ulimit -n

(4)修改nginx配置文件(192.168.10.40)
vim /nginxconf/nginx.conf
添加:
worker_processes 2;
worker_cpu_affinity 0101 1010;
worker_rlimit_nofile 65535;
events {}
http {
……
(5)重载nginx服务(192.168.10.40)
nginx -c /nginxconf/nginx.conf -s reload
(6)对nginx服务器进行压力测试(192.168.10.41)
ab -n 100000 -c 1200 http://192.168.10.40/
或
ab -n 100000 -c 1200 -r http://192.168.10.40/
-r:不退出接收错误,继续测试
(7)关闭nginx服务(192.168.10.40)
nginx -c /nginxconf/nginx.conf -s stop
二、nginx模块(192.168.10.40)
参考官网帮助文档:http://nginx.org/en/docs/
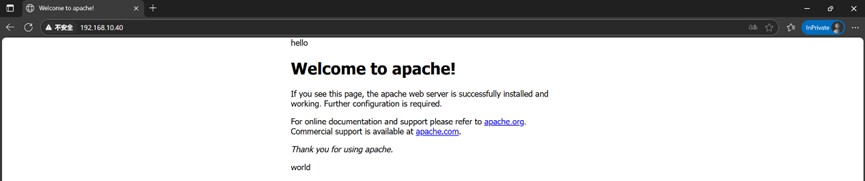
1、http_addition_module模块
http_addition_module 是 nginx 的一个官方模块,主要用于动态合并 http 响应体。该模块允许将多个 http 响应体合并为单个响应体,从而减少 http 请求次数,提高网站性能和用户体验。
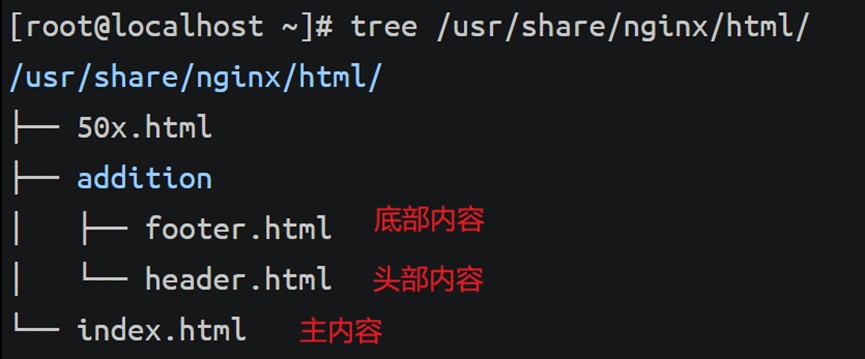
(1)创建存放目录并创建文件
cd /usr/share/nginx/html/
mkdir addition
cd addition/
echo "hello" > header.html
echo "world" > footer.html
(2)修改nginx配置文件
vim /etc/nginx/conf.d/default.conf
添加:
        add_before_body /addition/header.html;
        add_after_body /addition/footer.html;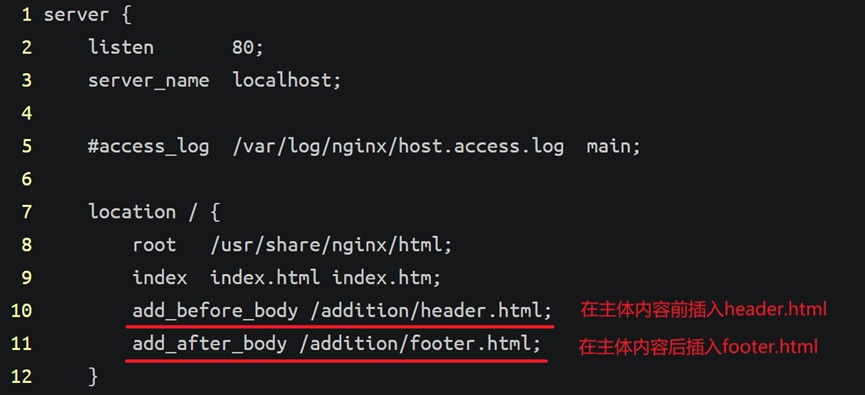
(3)启动nginx服务
systemctl start nginx
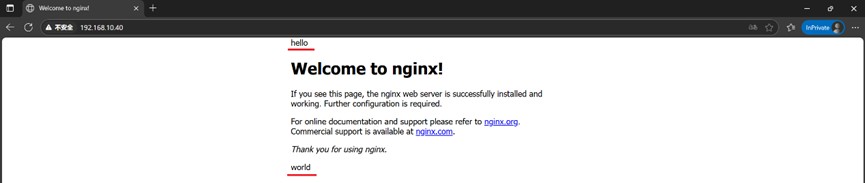
(4)访问验证
使用浏览器访问192.168.10.40
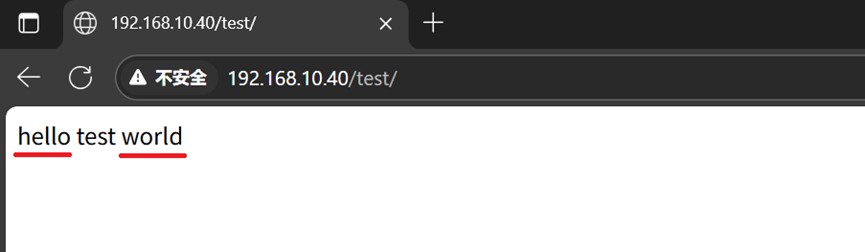
(5)创建test网页目录并访问验证
mkdir /usr/share/nginx/html/test
echo "test" > /usr/share/nginx/html/test/index.html
访问192.168.10.40/test
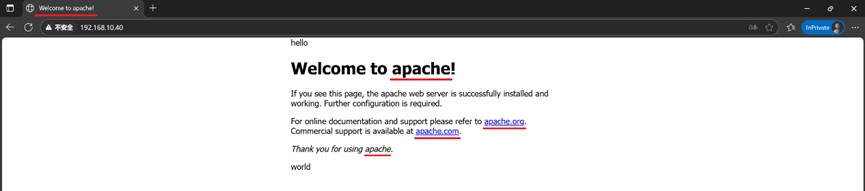
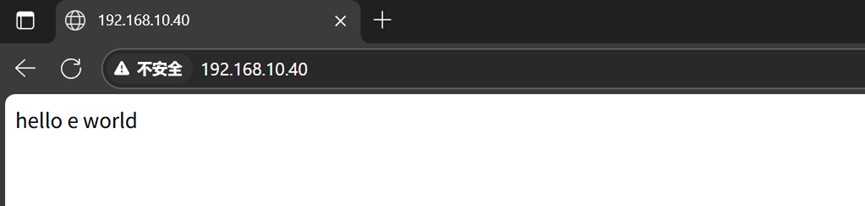
2、http_sub_module模块
http_sub_module 是 nginx 的一个官方模块,用于在响应内容中执行字符串替换操作。这个模块非常实用,特别是当你需要对上游服务器返回的内容进行修改但又无法直接修改源内容时。
(1)修改nginx配置文件
vim /etc/nginx/conf.d/default.conf
添加:
        sub_filter_once off;
        sub_filter 'nginx' 'apache';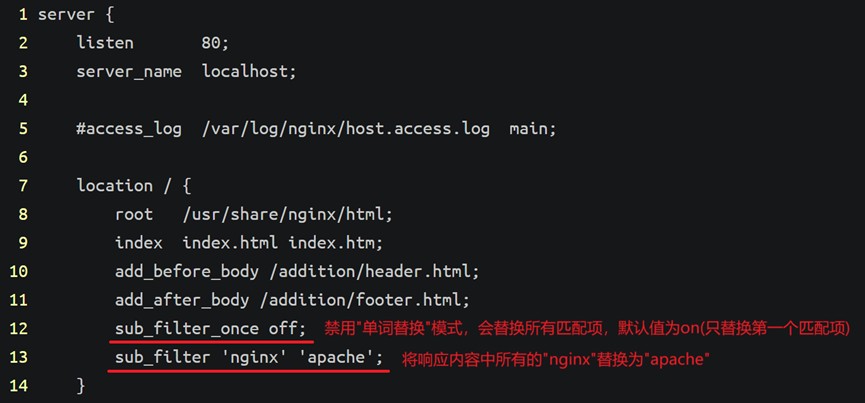
(2)重启nginx服务
systemctl restart nginx
(3)访问验证
使用浏览器访问192.168.10.40
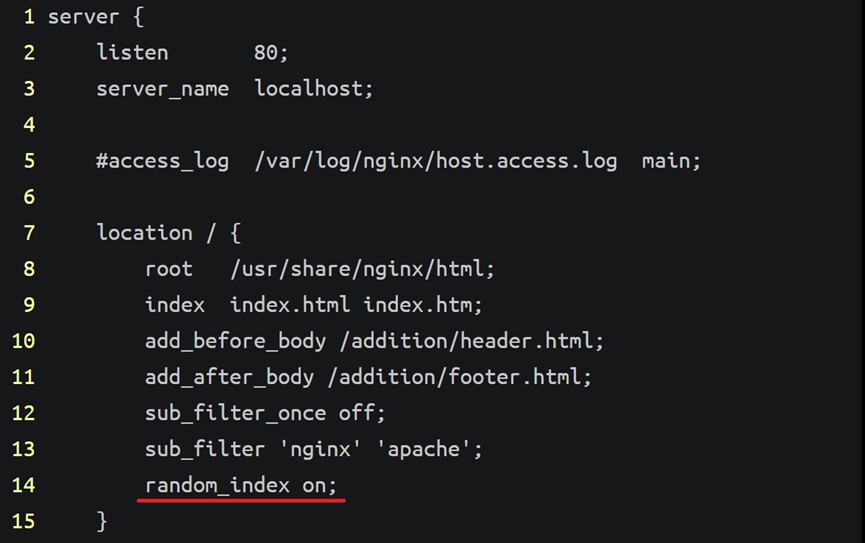
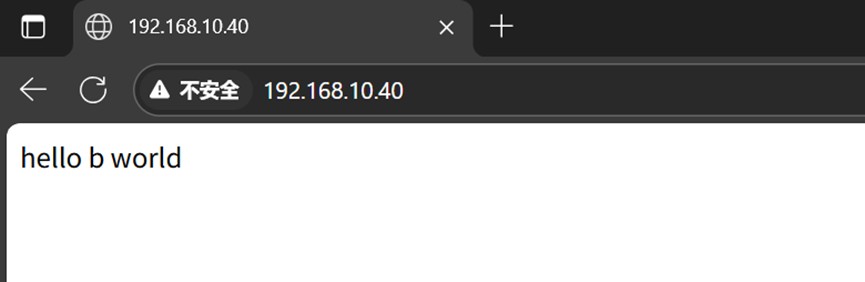
3、http_random_index_module模块
http_random_index_module 是 nginx 的一个内置模块,用于在请求以斜杠(/)结尾的目录时,随机选择一个文件作为索引文件返回。这个模块特别适用于需要展示随机内容的场景,如轮换展示不同主页、随机图片展示等。
(1)修改nginx配置文件
vim /etc/nginx/conf.d/default.conf
添加:
random_index on;
(2)重启nginx服务
systemctl restart nginx
(3)创建多个网页
for i in {a..e};do echo $i > /usr/share/nginx/html/$i.html;done(4)访问验证
使用浏览器访问192.168.10.40


4、http_mp4_module模块
http_mp4_module 是 nginx 的官方模块,专门用于处理 mp4 视频文件的伪流媒体(pseudo-streaming)请求。该模块使 nginx 能够支持视频的时间范围请求(range requests),实现视频的拖放播放和部分加载。
(1)上传视频文件到/usr/share/nginx/html目录
(2)修改nginx配置文件
vim /etc/nginx/conf.d/default.conf
添加:
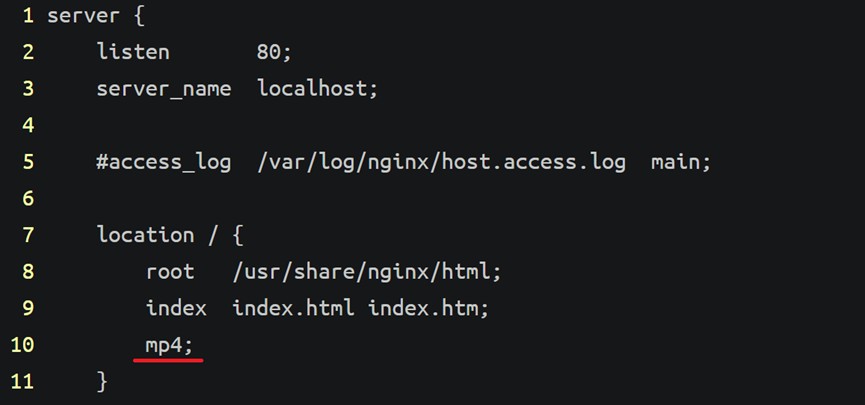
(3)重启nginx服务
systemctl restart nginx
(4)访问验证
使用浏览器访问192.168.10.40/2025-06-16.mp4

5、http_ssl_module模块
http_ssl_module 是 nginx 的核心模块,用于提供 https 安全连接支持。它是现代 web 服务的安全基础,能够实现数据加密传输、身份验证和完整性保护。
(1)使用openssl 生成自签名证书
cd /etc/nginx/
生成私钥
openssl genrsa -out nginx-selfsigned.key 2048
创建证书签名请求(csr)
openssl req -new -key nginx-selfsigned.key -out nginx-selfsigned.csr -subj "/cn=cn/o=lkk.com/c=cn/st=beijing/l=beijing"
生成自签名证书
openssl x509 -req -days 365 -in nginx-selfsigned.csr -signkey nginx-selfsigned.key -out nginx-selfsigned.crt
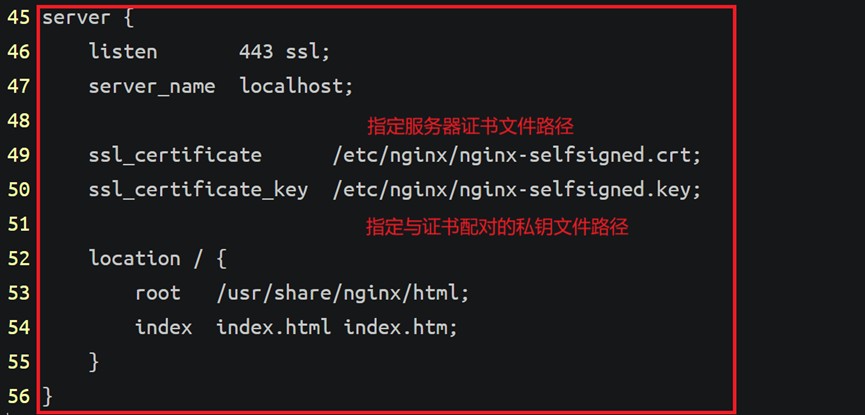
(2)修改配置文件
vim /etc/nginx/conf.d/default.conf
添加:
server {
    listen       443 ssl;
    server_name  localhost;

    ssl_certificate      /etc/nginx/nginx-selfsigned.crt;
    ssl_certificate_key  /etc/nginx/nginx-selfsigned.key;

    location / {
        root   /usr/share/nginx/html;
        index  index.html index.htm;
    }
}
(3)重启nginx服务
systemctl restart nginx
(4)访问验证
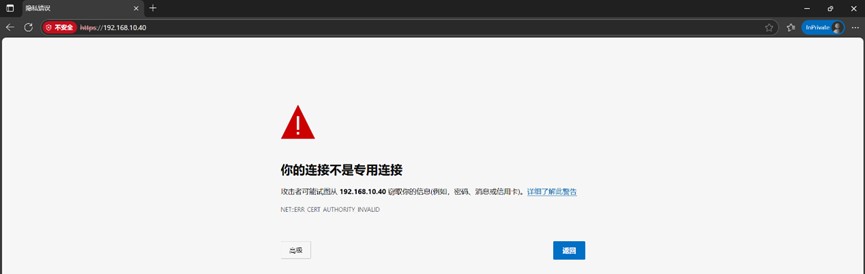
使用浏览器访问https;//192.168.10.40
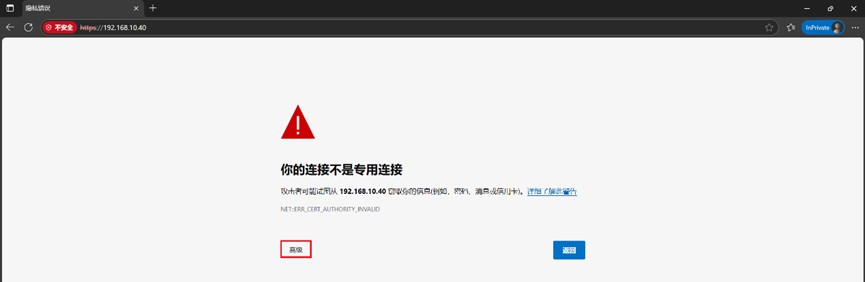
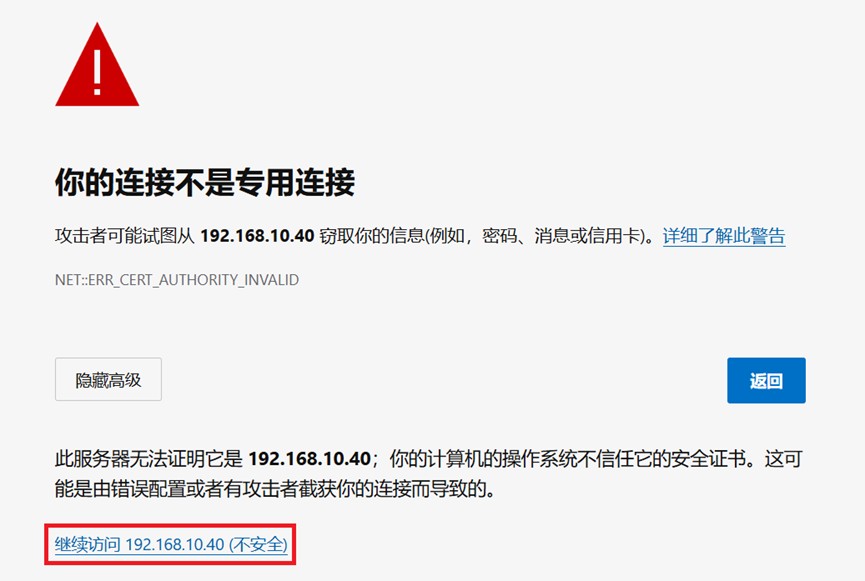

由于自签名证书未经第三方ca机构验证,浏览器会持续显示安全警告
三、nginx优化
1、gzip优化(192.168.10.40)
使用 gzip 压缩功能,可能为我们节约带宽,加快传输速度,有更好的体验,也为我们节约成本。
nginx 启用压缩功能需要你来 ngx_http_gzip_module 模块,apache 使用的是 mod_deflate。
一般我们需要压缩的内容有:文本,js,html,css,对于图片,视频,flash 什么的不压缩,同时也要注意,我们使用 gzip 的功能是需要消耗 cpu 的。
(1)将index.html网页内容增多
使用复制粘贴在<p>内容</p>


(2)访问验证
打开浏览器,右键打开检查选择网络,访问192.168.10.40查看响应文件大小
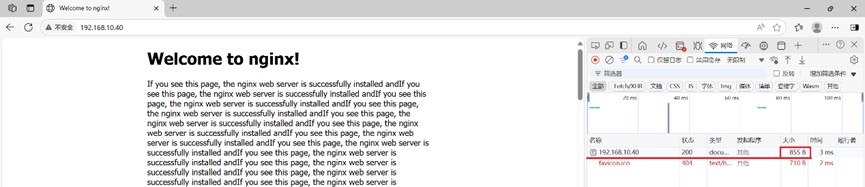
看到大小为31.8k没有压缩
(3)修改配置文件
vim /etc/nginx/nginx.conf
修改:
    gzip  on;
    gzip_types text/plain text/css application/json application/javascript text/xml application/xml application/xml+rss text/javascript;
    gzip_min_length 1k;
    gzip_comp_level 6;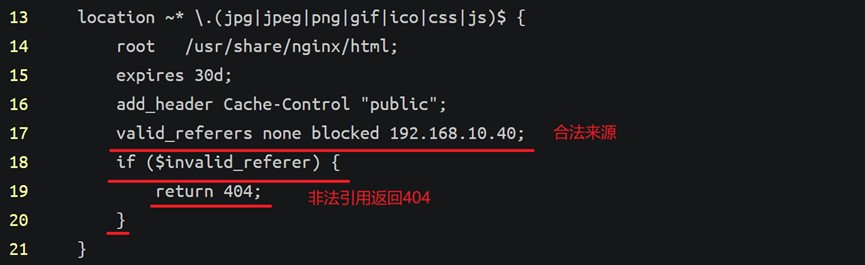
(4)重启nginx服务
systemctl restart nginx
(5)访问验证
先清除浏览器缓存
打开浏览器,右键打开检查选择网络,访问192.168.10.40查看响应文件大小
看到大小为855b已压缩
2、expires 缓存优化(192.168.10.40)
缓存,主要针对于图片,css,js 等元素更改机会比较少的情况下使用,特别是图片,占用带宽大,我们完全可以设置图片在浏览器本地缓存 365d,css,js,html 可以缓存个 10 来天,这样用户第一次打开加载慢一点,第二次,就非常快了。
(1)上传devops.png图片到/usr/share/nginx/html目录
(2)创建index.html文件
vim /usr/share/nginx/html/index.html
添加:
<!doctype html>
<html>
<head>
<title>welcome to nginx!</title>
</head>
<body>
<h1>welcome to nginx!</h1>
<img src="devops.png">
</body>
</html>
(3)修改配置文件
vim /etc/nginx/conf.d/default.conf
添加:
    location ~* \.(jpg|jpeg|png|gif|ico|css|js)$ {
        root   /usr/share/nginx/html;
        expires 30d;
        add_header cache-control "public";
    }
(4)重启nginx服务
systemctl restart nginx
(5)访问验证
使用浏览访问192.168.10.40/devops.png
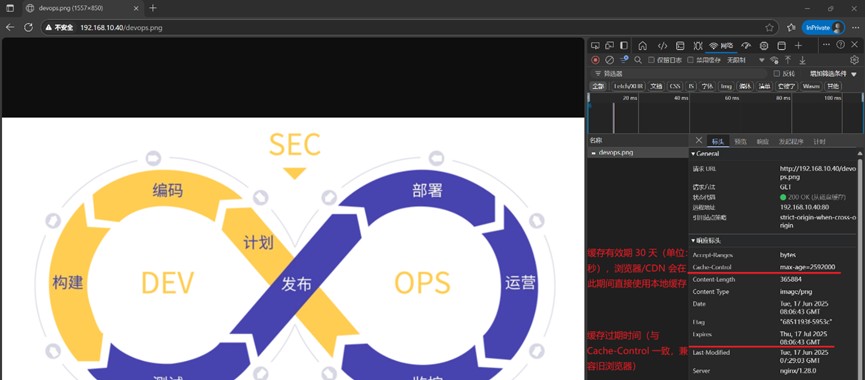
解析:
cache-control的值max-age=2592000:缓存有效期 30 天(单位:秒),浏览器/cdn 会在此期间直接使用本地缓存
expires的值thu, 17 jul 2025 08:06:43 gmt:缓存过期时间(与 cache-control 一致,兼容旧浏览器)
3、配置防盗链
nginx防盗链是一种保护服务器资源不被外部网站非法引用,消耗网络流量的重要技术手段,尤其适用于图片、视频、css/js等静态资源。解决办法有几种:1:水印,品牌宣传,你的带宽,服务器足够 2:防火墙,直接控制,前提是你知道 ip 来源 3:防盗链策略。
这里的方法是直接给予404错误提示
(1)配置盗用图片的服务器(192.168.10.41)
安装nginx1.28
添加nginx官方源
tee /etc/yum.repos.d/nginx.repo <<eof
[nginx-stable]
name=nginx stable repo
baseurl=http://nginx.org/packages/centos/\$releasever/\$basearch/
gpgcheck=1
enabled=1
gpgkey=https://nginx.org/keys/nginx_signing.key
module_hotfixes=true

[nginx-mainline]
name=nginx mainline repo
baseurl=http://nginx.org/packages/mainline/centos/\$releasever/\$basearch/
gpgcheck=1
enabled=0
gpgkey=https://nginx.org/keys/nginx_signing.key
module_hotfixes=true
eof
dnf -y install nginx
编写网页
vim /usr/share/nginx/html/index.html
修改:
<!doctype html>
<html>
<head>
<title>welcome to my web!</title>
<body>
<h1>welcome to my web!</h1>
</body>
</html>
启动nginx服务
systemctl start nginx
访问网页
使用浏览器访问192.168.10.41

(2)盗用192.168.10.40网站的图片(192.168.10.41)
使用浏览器访问192.168.10.40,右击图片复制图像链接

使192.168.10.41服务器盗用192.168.10.40网站的图片
vim /usr/share/nginx/html/index.html
添加:
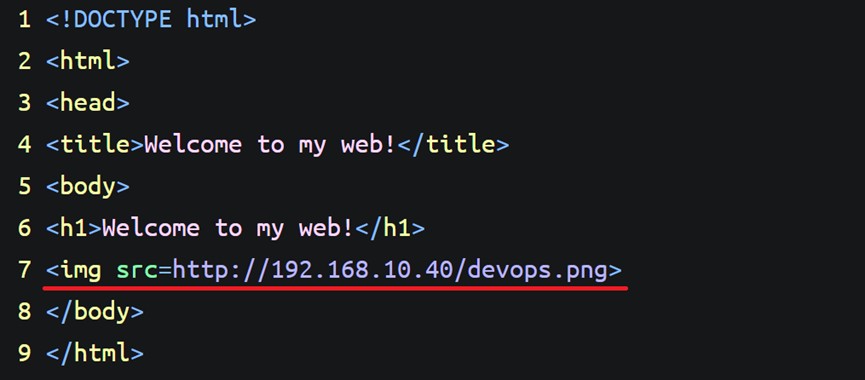
使用浏览器访问192.168.10.41
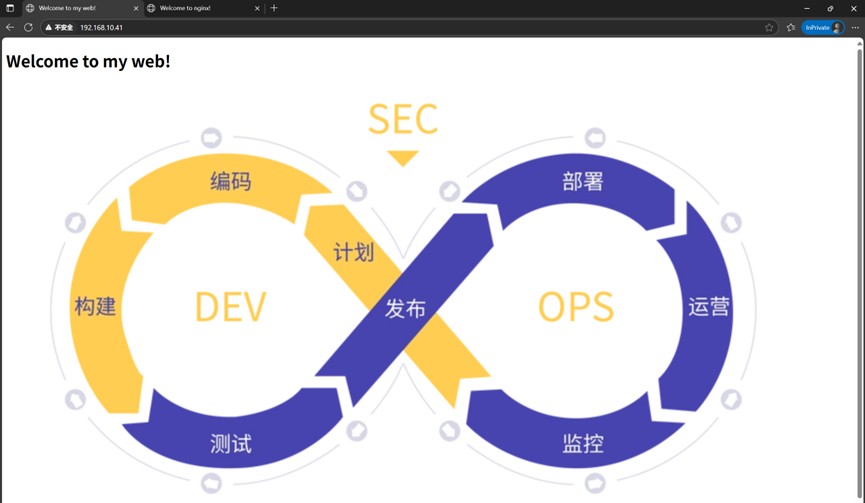
图片已盗用
(3)查看日志(192.168.10.40)
查看日志格式
vim /etc/nginx/nginx.conf

监控日志
tail -f /var/log/nginx/access.log
使用浏览器访问192.168.10.41

解析:
字段 | 值 | 说明 |
客户端ip | 192.168.10.1 | 请求来源的ip地址(内网用户) |
标识占位符 | - - | 依次为 远程用户(通常为-)和 认证用户(未启用则为-) |
请求时间 | [17/jun/2025:17:57:04 +0800] | 北京时间 2025年6月17日 17:57:04 |
请求方法 | "get /devops.png http/1.1" | 通过http/1.1协议get请求/devops.png文件 |
状态码 | 200 | 请求成功(服务器返回http 200 ok) |
响应大小 | 365884 | 返回的png图片大小为365,884字节(约357kb) |
referer | "http://192.168.10.41/" | 请求来自192.168.10.41的页面(防盗链关键字段) |
user-agent | "mozilla/5.0 (...)" | 客户端为edge浏览器(基于chromium 137内核) |
附加信息 | "-" | 通常用于记录cookie或会话id(此处为空) |
(4)开启盗链(192.168.10.40)
vim /etc/nginx/conf.d/default.conf
添加:
        valid_referers none blocked 192.168.10.40;
        if ($invalid_referer) {
            return 404;
        }
(5)访问验证
使用浏览器访问192.168.10.41

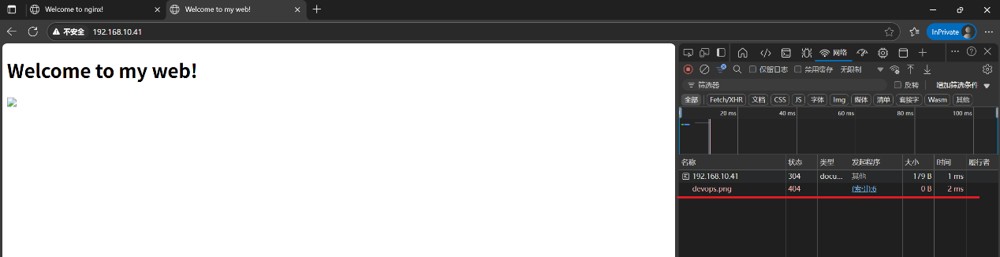
图片已经无法显示,状态码返回404
4、实现 http 到 https 的重定向(192.168.10.40)
(1)修改配置文件
vim /etc/nginx/conf.d/default.conf
添加:
return 301 https://$host$request_uri;

return 301:使用 301 永久重定向状态码
(2)重启nginx服务
systemctl restart nginx
(3)访问验证
使用浏览访问192.168.10.40

浏览器会自动跳转的https
总结
以上为个人经验,希望能给大家一个参考,也希望大家多多支持代码网。


发表评论