nginx配置文件相关的参数保存在以下几个成员中,从main函数(nginx.c中)开始,一步一步查看ngx_cycle_s 中与配置相关的成员是如何赋值的:
struct ngx_cycle_s {
    void                  ****conf_ctx;
	...
    ngx_str_t                 conf_file;
    ngx_str_t                 conf_param;
    ngx_str_t                 conf_prefix;
    ngx_str_t                 prefix;
	...
};
一:ngx_process_options 函数,忽略其他不相干部分
static ngx_int_t
ngx_process_options(ngx_cycle_t *cycle)
{
    u_char  *p;
    size_t   len;

    if (ngx_prefix) {
    	//如果执行命令时指定路径,就会进入这个条件,所以省略了
		//例如 ./nginx -p /home/dmj
       ....
    } else {
		...
		//ngx_conf_prefix  = "/conf"
        ngx_str_set(&cycle->conf_prefix, ngx_conf_prefix);
        //ngx_prefix = "usr/local/nginx"
        ngx_str_set(&cycle->prefix, ngx_prefix);
    }

    if (ngx_conf_file) {
        cycle->conf_file.len = ngx_strlen(ngx_conf_file);
        cycle->conf_file.data = ngx_conf_file;
    } else {
    	//ngx_conf_path= "conf/nginx.conf"
        ngx_str_set(&cycle->conf_file, ngx_conf_path);
    }
	 //合并前缀路径与文件名得到此时cycle->conf_file = "/usr/local/nginx//conf/nginx.conf"
    if (ngx_conf_full_name(cycle, &cycle->conf_file, 0) != ngx_ok) {
        return ngx_error;
    }
	//cycle->conf_prefix 指向 cycle->conf_file 也为"/usr/local/nginx//conf/nginx.conf"
	//但是该指针长度只取了前缀路径部分"/usr/local/nginx//conf/"
    for (p = cycle->conf_file.data + cycle->conf_file.len - 1;
         p > cycle->conf_file.data;
         p--)
    {
        if (ngx_path_separator(*p)) {
            cycle->conf_prefix.len = p - cycle->conf_file.data + 1;
            cycle->conf_prefix.data = cycle->conf_file.data;
            break;
        }
    }

	....
    return ngx_ok;
}
经过上诉代码,至此将ngx_cycle_s 中配置文件路径相关的成员赋值了,此时conf_param及 conf_ctx未赋值
struct ngx_cycle_s {
    void                  ****conf_ctx;
	...
    ngx_str_t                 conf_file;	//“usr/local/nginx//conf/nginx.conf”
    ngx_str_t                 conf_param;
    ngx_str_t                 conf_prefix;	//“usr/local/nginx//conf/
    ngx_str_t                 prefix;		//"usr/local/nginx"
	...
};
二:先不管conf_param,着重看下conf_ctx成员
他是一个4级指针,里面包含了所有配置文件的配置信息,也就是说nginx.conf 文件中的内容,经过解析后都会保存到conf_ctx 指针
2.1 ngx_preinit_modules函数
功能如下:
- 给ngx_modules 中的模块的 name , index赋值
- 同时统计模块总数 静态全局 ngx_modules数组大小+ngx_max_dynamic_modules(定义为128)
ngx_modules大小与conf_ctx指向的数组大小一致,后面会有提到,因此先简单说明下其初始化的时候
ngx_int_t
ngx_preinit_modules(void)
{
    ngx_uint_t  i;

    for (i = 0; ngx_modules[i]; i++) {
        ngx_modules[i]->index = i;
        ngx_modules[i]->name = ngx_module_names[i];
    }

    ngx_modules_n = i;
    ngx_max_module = ngx_modules_n + ngx_max_dynamic_modules;

    return ngx_ok;
}
2.2 ngx_init_cycle函数
在这里做了很多初始化的操作,函数太长,这里只截取函数内与配置相关的代码
2.2.1 conf_ctx 分配内存,大小与模块个数相同的,ngx_max_module 就是模块的总数(静态 数组 + 动态大小128)
   cycle->conf_ctx = ngx_pcalloc(pool, ngx_max_module * sizeof(void *));
    if (cycle->conf_ctx == null) {
        ngx_destroy_pool(pool);
        return null;
    }
2.2.2 将静态数组ngx_modules 拷贝进cycle->modules,此时还有动态的128个没有模块数据
ngx_int_t
ngx_cycle_modules(ngx_cycle_t *cycle)
{
    /*
     * create a list of modules to be used for this cycle,
     * copy static modules to it
     */

    cycle->modules = ngx_pcalloc(cycle->pool, (ngx_max_module + 1)
                                              * sizeof(ngx_module_t *));
    if (cycle->modules == null) {
        return ngx_error;
    }

    ngx_memcpy(cycle->modules, ngx_modules,
               ngx_modules_n * sizeof(ngx_module_t *));

    cycle->modules_n = ngx_modules_n;

    return ngx_ok;
}
2.2.3 调用create_conf 函数为核心模块创建配置结构体,那非核心模块呢?
 for (i = 0; cycle->modules[i]; i++) {
 		//非核心模块,查找下一个模块
        if (cycle->modules[i]->type != ngx_core_module) {
            continue;
        }

        module = cycle->modules[i]->ctx;

        if (module->create_conf) {
            rv = module->create_conf(cycle);//创建一个默认值的ngx_core_conf_t
            if (rv == null) {
                ngx_destroy_pool(pool);
                return null;
            }
            cycle->conf_ctx[cycle->modules[i]->index] = rv;//将配置结构体放入配置项列表
        }
    }
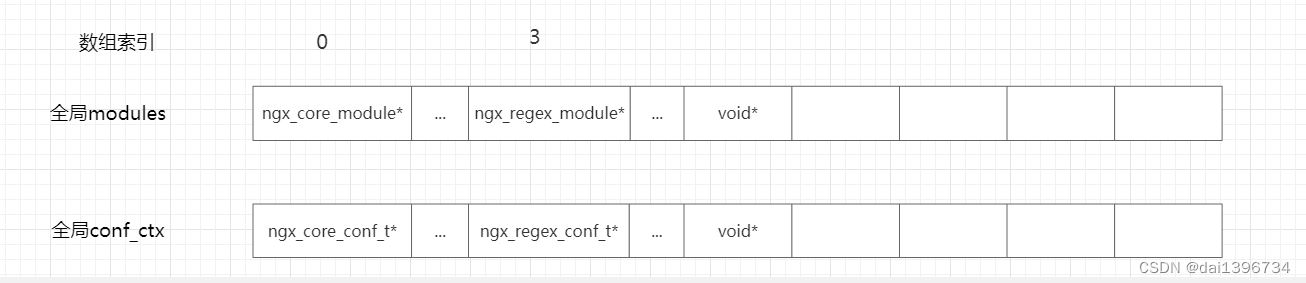
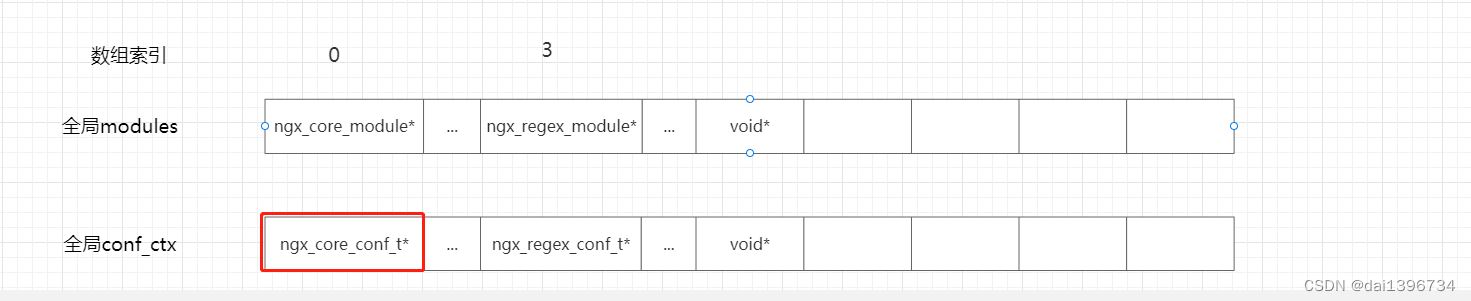
下表为nginx定义模块类型为ngx_core_module的模块,此时因为cycle->modules只有静态数组中的模块,而下面表格所列只有ngx_core_module和ngx_regex_module在静态数组中,因此
| 核心模块 | 创建配置结构体接口实现 | 配置结构体类型 |
|---|---|---|
| ngx_core_module | ngx_core_module_create_conf | ngx_core_conf_t |
| ngx_errlog_module | 无 | 无 |
| ngx_regex_module | ngx_regex_create_conf | ngx_regex_conf_t |
| ngx_openssl_module | ngx_openssl_create_conf | ngx_openssl_conf_t |
| ngx_events_module | 无 | 无 |
| ngx_http_module | 无 | 无 |
| ngx_mail_module | 无 | 无 |
| ngx_google_perftools_module | ngx_google_perftools_create_conf | ngx_google_perftools_conf_t |
| ngx_stream_module | 无 | 无 |
此时内存大概是这样分布,其余的都还只是指针,未指向特定结构体
2.2.4 调用ngx_conf_parse函数,解析配置文件
    conf.ctx = cycle->conf_ctx; //配置结构体列表
    conf.cycle = cycle;
    conf.pool = pool;
    conf.log = log;
    conf.module_type = ngx_core_module;
    conf.cmd_type = ngx_main_conf;

if (ngx_conf_parse(&conf, &cycle->conf_file) != ngx_conf_ok) {
        environ = senv;
        ngx_destroy_cycle_pools(&conf);
        return null;
    }
三:这个函数很重要,单独拎出来说明
ngx_conf_parse全部内容就不贴了,贴几个关键代码:
char *
ngx_conf_parse(ngx_conf_t *cf, ngx_str_t *filename)
{

    ....
	//打开文件,并将文件信息放入cf
    if (filename) {

        /* open configuration file */
        fd = ngx_open_file(filename->data, ngx_file_rdonly, ngx_file_open, 0);
        ...
        cf->conf_file->file.fd = fd;
        cf->conf_file->file.name.len = filename->len;
        cf->conf_file->file.name.data = filename->data;
        cf->conf_file->file.offset = 0;
        cf->conf_file->file.log = cf->log;
        cf->conf_file->line = 1;

        type = parse_file;
	...
	//循环读取文件内容
    for ( ;; ) {

        /******************************************
        1.读取文件内容,每次读取一个buf大小(4k),如果文件内容不足4k则全部读取到buf中.
        2.扫描buf中的内容,每次扫描一个token就会存入cf->args中,然后返回.
        3.返回后调用ngx_conf_parse函数会调用*cf->handler和ngx_conf_handler(cf, rc)函数处理.
        3.如果是复杂配置项,会调用上次执行的状态继续解析配置文件.
        *****************************************/
        rc = ngx_conf_read_token(cf);

        /*
         * ngx_conf_read_token() may return
         *
         *    ngx_error             there is error
         *    ngx_ok                the token terminated by ";" was found
         *    ngx_conf_block_start  the token terminated by "{" was found
         *    ngx_conf_block_done   the "}" was found
         *    ngx_conf_file_done    the configuration file is done
         */

        if (rc == ngx_error) {
            goto done;
        }
		//循环结束
        if (rc == ngx_conf_block_done) {
            goto done;
        }
        //循环结束
        if (rc == ngx_conf_file_done) {
            goto done;
        }


        /* rc == ngx_ok || rc == ngx_conf_block_start */
        //cf->handler初始为空,需要在ngx_conf_handler配置
        if (cf->handler) {
            /*
             * the custom handler, i.e., that is used in the http's
             * "types { ... }" directive
             */
            rv = (*cf->handler)(cf, null, cf->handler_conf);
            if (rv == ngx_conf_ok) {
                continue;
            }
       		...
        }

		//常规内容处理
        rc = ngx_conf_handler(cf, rc);

        if (rc == ngx_error) {
            goto failed;
        }
    }

	...
}
代码包含2部分:
- 上半部分,文件信息读入
- 下半部分,循环遍历文件内容
前面部分已经描述了,配置文件路径是如何得到的,在这里重新将文件信息赋值进ngx_conf_t 结构体 cf中,以便传入后面的函数去读取文件内容,不多描述,讲下第2点循环遍历文件内容,这里有几个关键点
- 循环何时退出?
- 内容如何读取?
- 内容如何放入全局的conf_ctx中
3.1 循环何时退出?
从for ( ;; ) 代码开始看,正常的情况下是在块结束(rc == ngx_conf_block_done也就是 字符"}")和文件结束(rc == ngx_conf_file_done)时退出,文件读取结束退出理解,但是块结束怎么就退出了?
块中不还有块吗?类似下图这种,道理也很简单,块里面读取过程都一样,是一种递归的调用,块里面遇到块会继续调用ngx_conf_parse函数,只是nginx把这些过程都放到模块的接口去了

3.2 内容如何读取
ngx_conf_read_token就是对文件内容的读取,上面代码也有注释,
读取文件内容,每次读取一个buf大小(4k),如果文件内容不足4k则全部读取到buf中.扫描buf中的内容,每次扫描一个token就会存入cf->args中,然后返回.
扫描buf中的内容,每次扫描一个token就会存入cf->args中,然后返回.
什么情况下回返回呢?
- - 读到了一个配置项,比如(模块内也一样): “worker_processes 1;” 、 “index index.html index.htm;”
- - 读到了一个模块名,比如:“http { "
- - 块结束,比如:”}"
返回后调用ngx_conf_parse函数会调用*cf->handler和ngx_conf_handler(cf, rc)函数处理.
如果是复杂配置项,会调用上次执行的状态继续解析配置文件.
所以一次读一个token出来,也就是一个配置项,放入cf->args
3.3 内容如何放入全局的conf_ctx中?
我们来看ngx_conf_handler函数,也只贴重要部分
static ngx_int_t
ngx_conf_handler(ngx_conf_t *cf, ngx_int_t last)
{
char *rv;
void *conf, **confp;
ngx_uint_t i, found;
ngx_str_t *name;
ngx_command_t *cmd;
//cf->args->elts 不是包含了配置项的名字和值吗?为什么可以取到名字?
//因为cf->args->elts是一个链表,首节点就是配置项名字,并且每个元素都以'\0'结尾了
name = cf->args->elts;
found = 0;
//遍历模块
for (i = 0; cf->cycle->modules[i]; i++) {
cmd = cf->cycle->modules[i]->commands;
if (cmd == null) {
continue;
}
//遍历模块的配置项
for ( /* void */ ; cmd->name.len; cmd++) {
if (name->len != cmd->name.len) {
continue;
}
//匹配配置项的名字
if (ngx_strcmp(name->data, cmd->name.data) != 0) {
continue;
}
found = 1;
if (cf->cycle->modules[i]->type != ngx_conf_module
&& cf->cycle->modules[i]->type != cf->module_type)
{
continue;
}
/* is the directive's location right ? */
//匹配配置项的类型
if (!(cmd->type & cf->cmd_type)) {
continue;
}
...
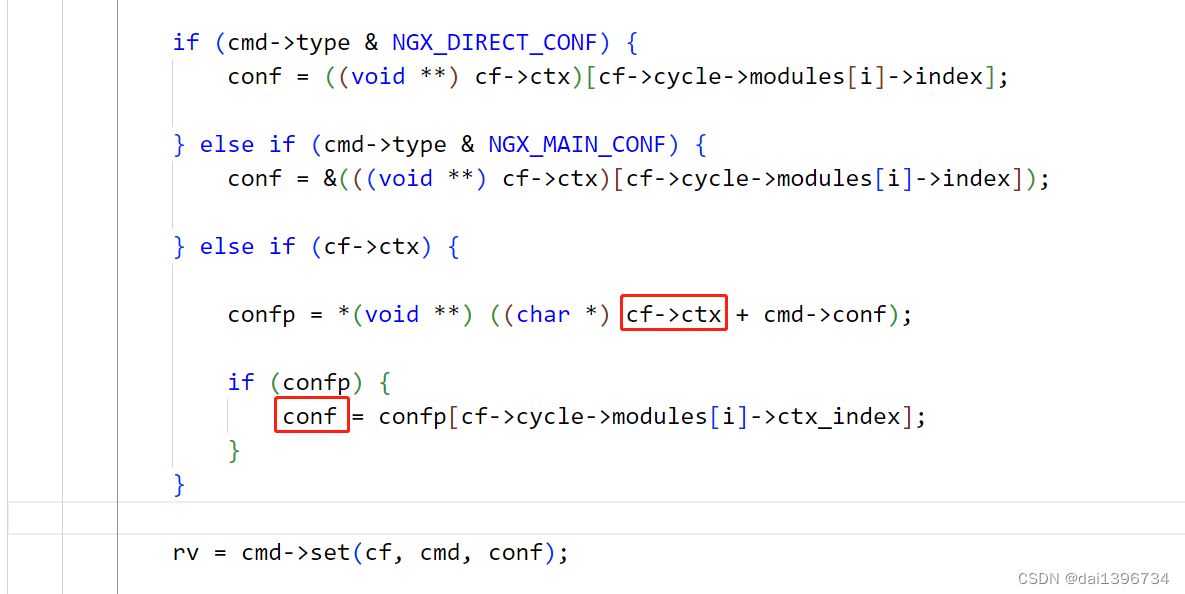
/* set up the directive's configuration context */
conf = null;
if (cmd->type & ngx_direct_conf) {
conf = ((void **) cf->ctx)[cf->cycle->modules[i]->index];
} else if (cmd->type & ngx_main_conf) {
conf = &(((void **) cf->ctx)[cf->cycle->modules[i]->index]);
} else if (cf->ctx) {
confp = *(void **) ((char *) cf->ctx + cmd->conf);
if (confp) {
conf = confp[cf->cycle->modules[i]->ctx_index];
}
}
rv = cmd->set(cf, cmd, conf);
...
}
}
...
}
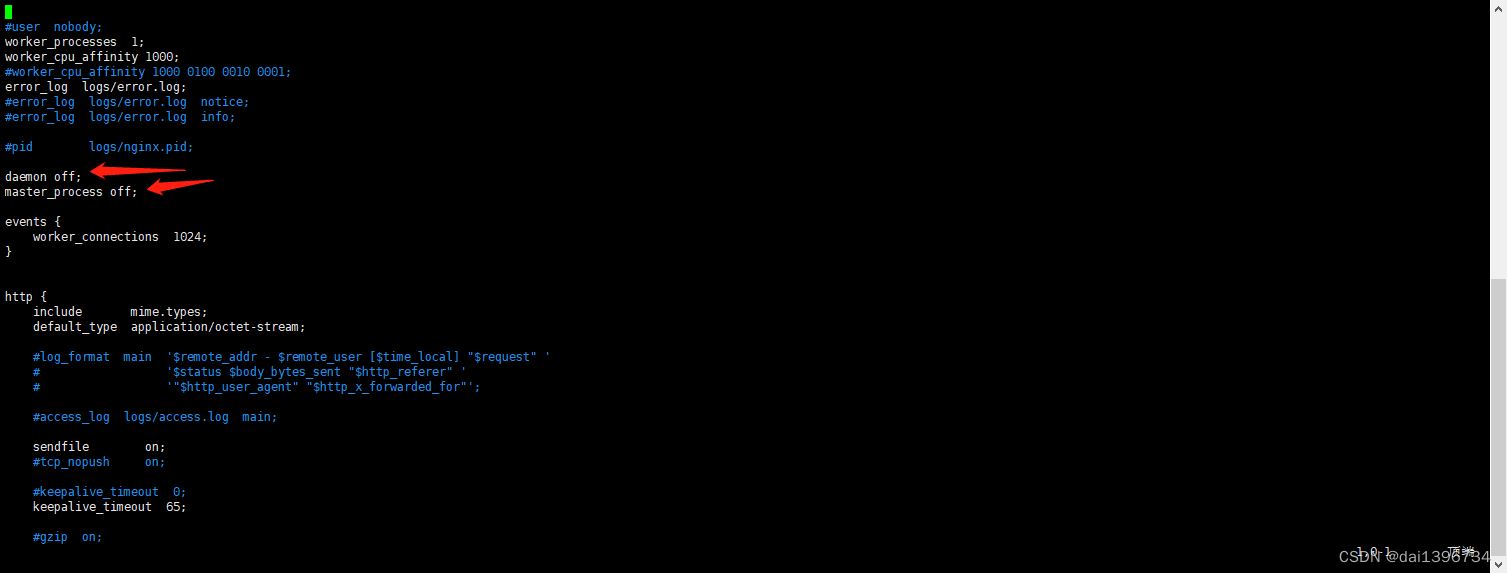
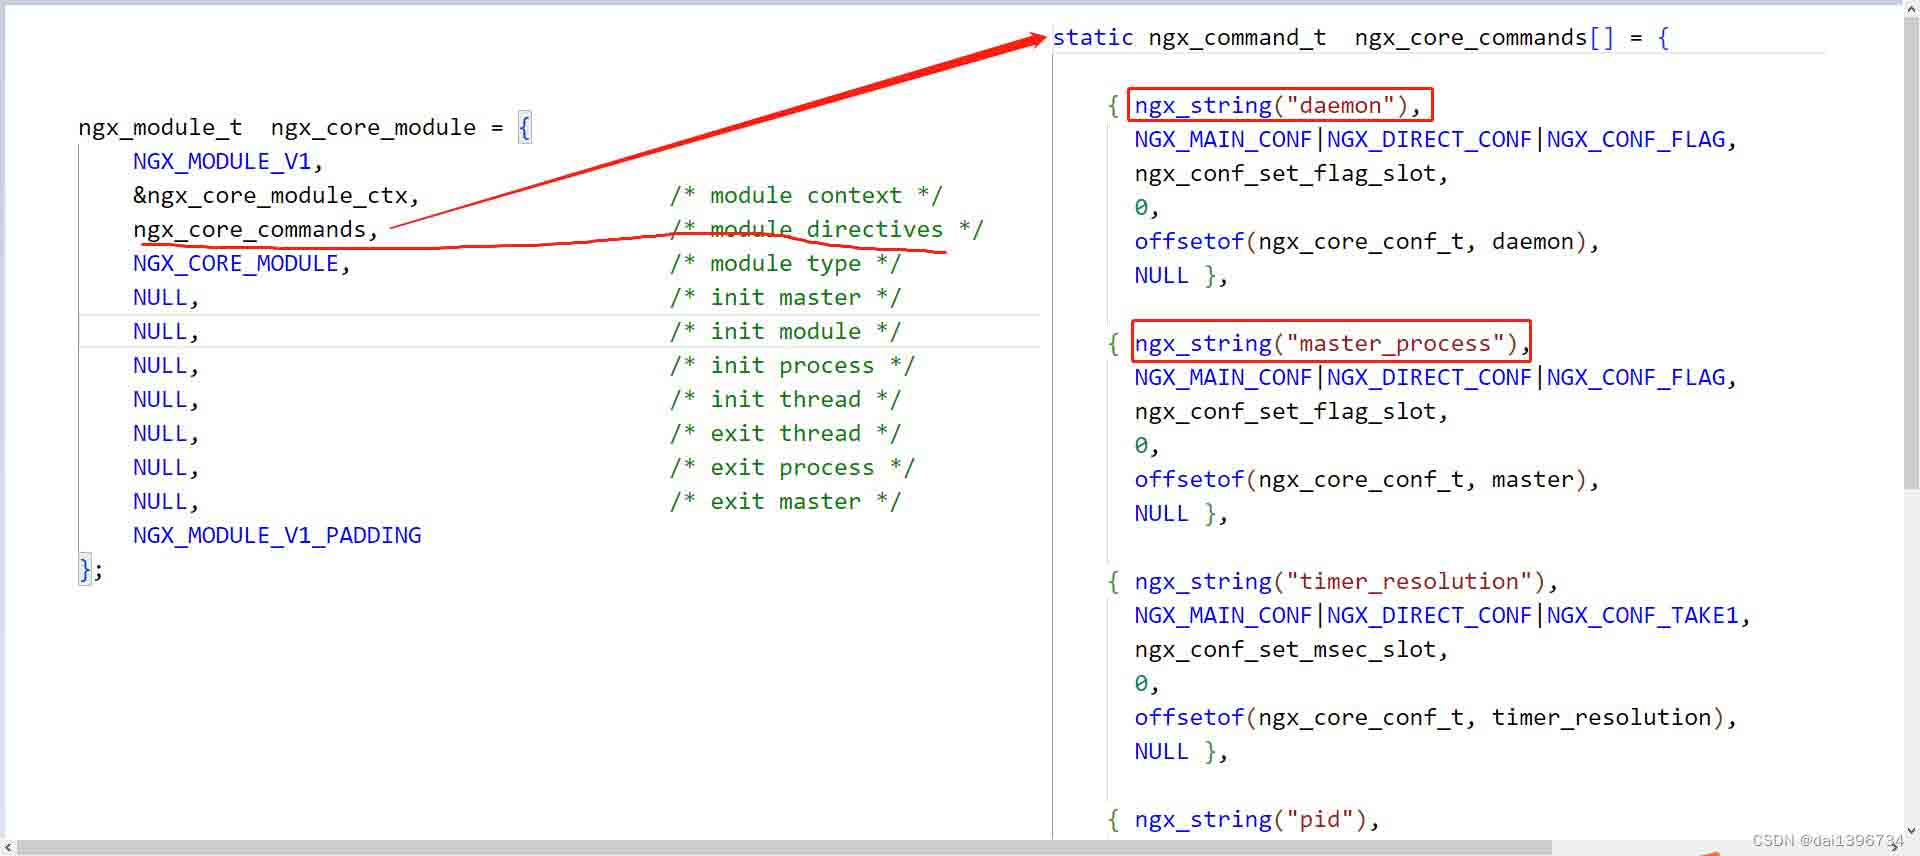
函数逻辑也很简单,遍历所有模块的所有配置项,比如配置文件读取到deamon off;时,或 读取master_process时
就会找到ngx_core_module模块及其配置项ngx_core_commands
找到后,根据配置项类型从全局conf_ctx中取出指针,该指针指向包含存储该配置项信息的结构体,然后调用模块配置项的接口set函数,处理该信息,set接口会如何处理?继续往下看
四 以http块信息读取来说明set的作用
一般来说信息会存储到指定的配置结构体中,比如deamon,master_process,会将其信息存入ngx_core_conf_t
经过之前的代码引入和说明,我们可以简洁的将ngx_conf_parse函数调用过程贴出来
1、ngx_conf_parse
	 for ( ;; ) {
	    rc = ngx_conf_read_token(cf);
	    //常规内容处理
	    rc = ngx_conf_handler(cf, rc);
	 }
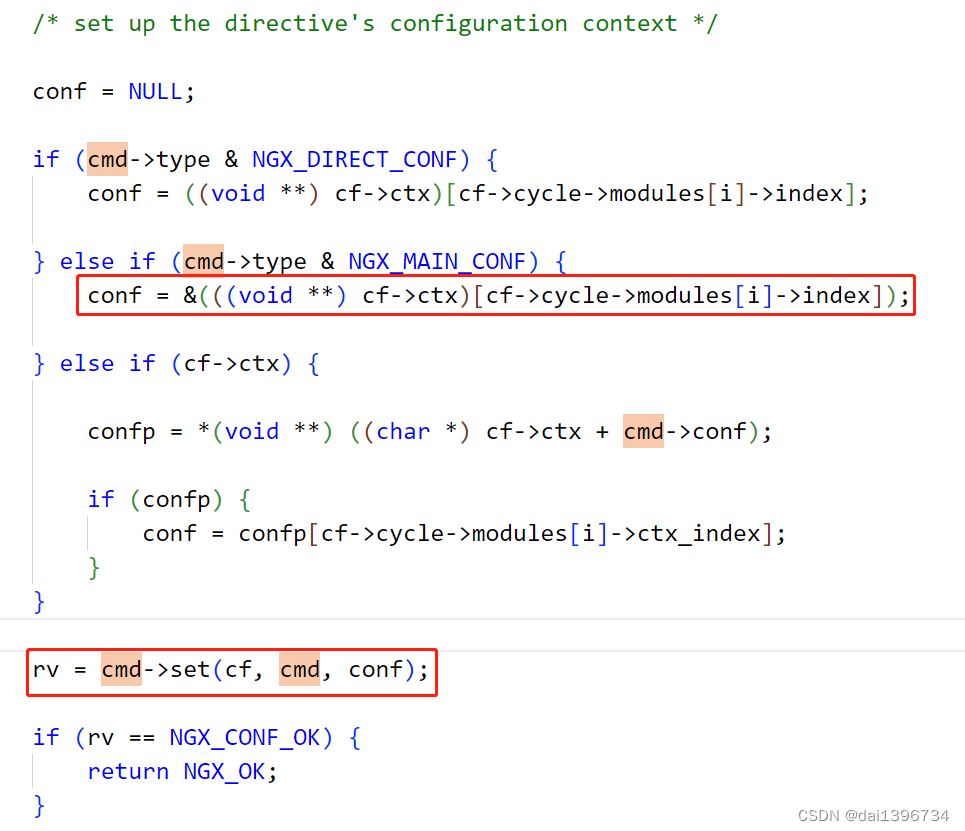
2、ngx_conf_handler,conf的取值可能不同,第一次看有点绕,但是没关系,你只要明白这玩意的目的是为了取出对应的配置结构体就行,然后set的目的就是设置该结构体的信息
	...
    if (cmd->type & ngx_direct_conf)
    {
        conf = ((void **)cf->ctx)[cf->cycle->modules[i]->index];
    }
    else if (cmd->type & ngx_main_conf)
    {
        conf = &(((void **)cf->ctx)[cf->cycle->modules[i]->index]);
    }
    else if (cf->ctx)
    {

        confp = *(void **)((char *)cf->ctx + cmd->conf);

        if (confp)
        {
            conf = confp[cf->cycle->modules[i]->ctx_index];
        }
    }

    rv = cmd->set(cf, cmd, conf);
	...
4.1 当读取到http时,遍历模块及其配置项,调用其set接口
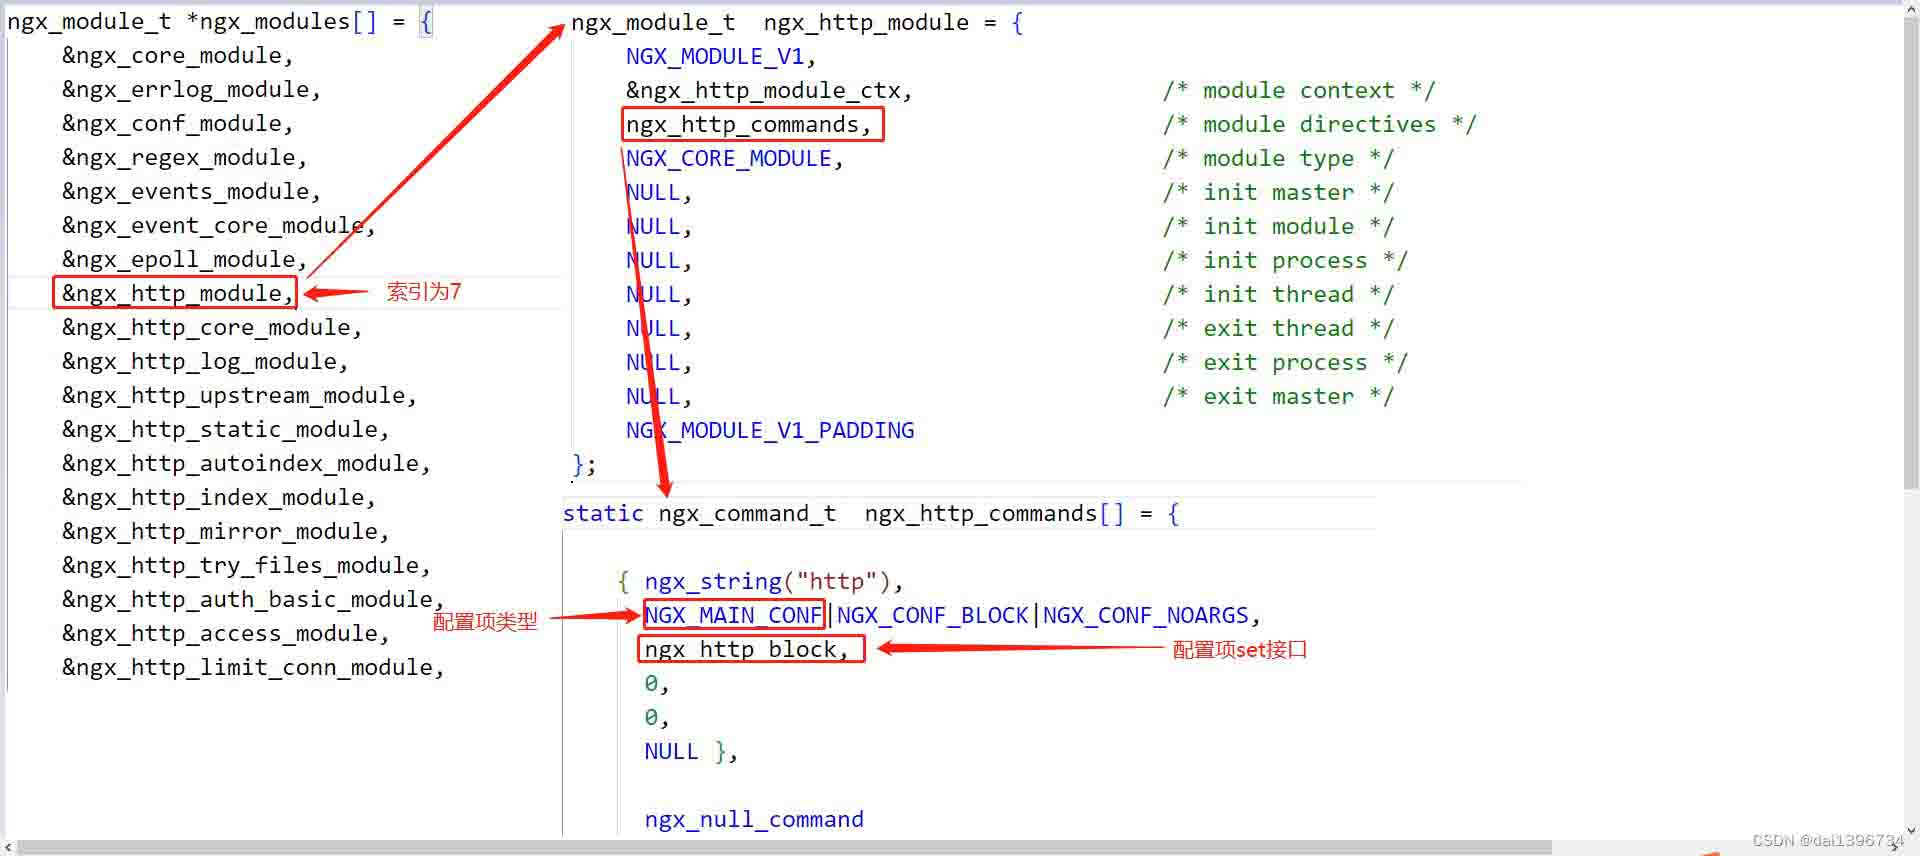
依上图及源码,会调用ngx_http_block函数来处理http这个配置信息,其函数如下:
static char *
ngx_http_block(ngx_conf_t *cf, ngx_command_t *cmd, void *conf)
调用函数前,先搞清楚其传参,如下图,前2个参数好理解,后一个参数是什么意思?前面也说了是找出其配置结构体的位置指针
可以这样理解,conf指向conf_ctx的第7个元素

继续了解ngx_http_block函数,从源码可以看出该函数做了以下几件事
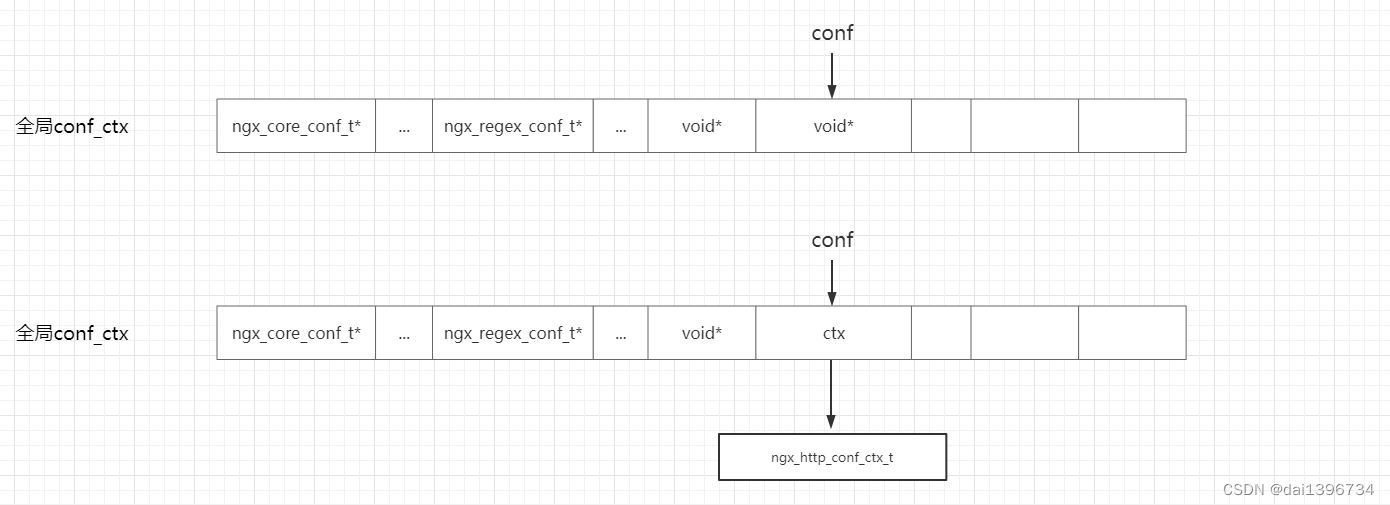
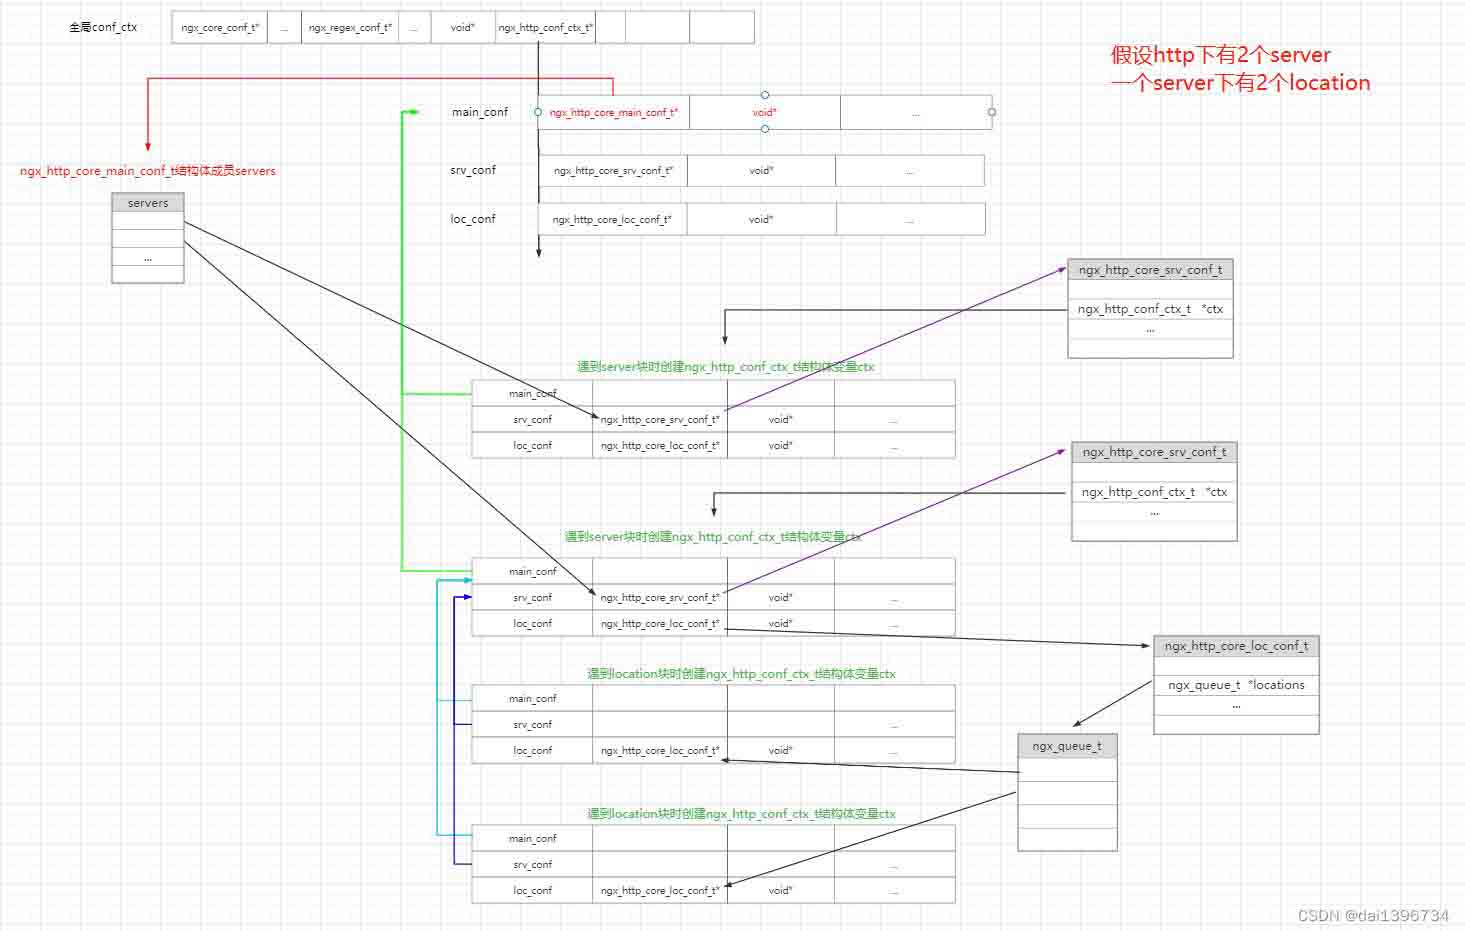
4.1.1 ngx_http_conf_ctx_t结构体的分配,如下图代码所示,注意此时的conf就是上图红框标识的conf
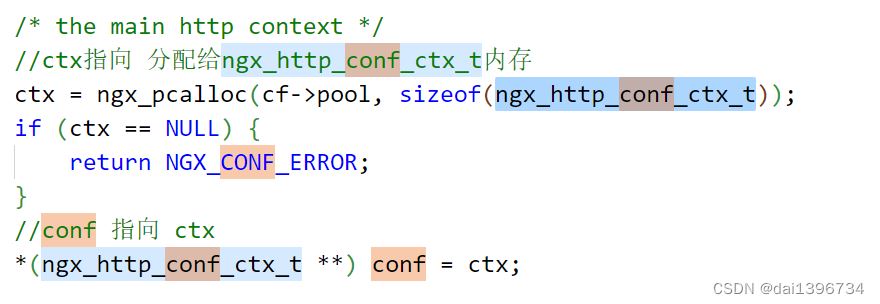
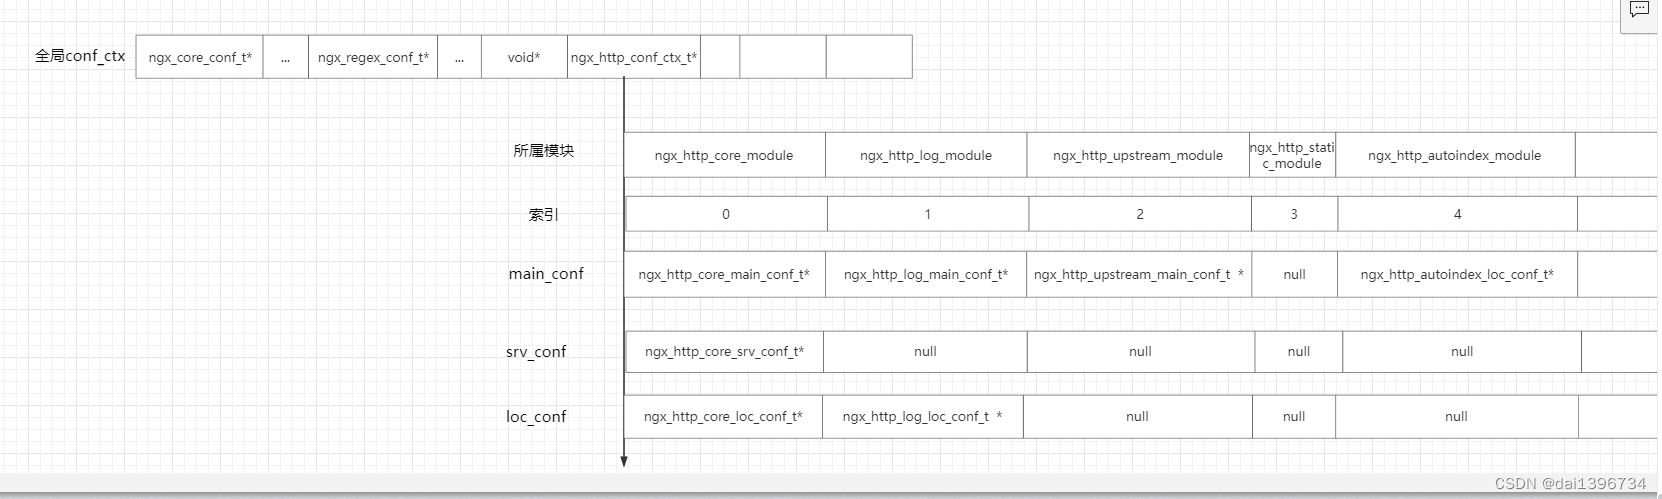
此时conf_ctx 内存如下图,此时 http配置项的结构体已经挂到全局conf_ctx上来了
4.1.2 统计http模块个数,并为每个http模块ctx_index赋值

4.1.3 为ngx_http_conf_ctx_t结构体的3个成员的分配内存,有多少个http模块就分配多少个指针给其成员,为什么要这么分配?
typedef struct {
    void        **main_conf;
    void        **srv_conf;
    void        **loc_conf;
} ngx_http_conf_ctx_t;
4.1.4 为每个http模块创建其配置结构体,与为全局conf_ctx分配内存,创建配置结构体一样,都是其数组内部指针指向不同的结构体,而这些结构体就是为了保持配置文件中的信息,内存分配如下图,篇幅有限只显示了前几个http模块,注意:这里的索引就是第2步中模块的ctx_index
4.1.5 继续解析http块内的配置信息,调用ngx_conf_parse函数
过程大致与“第三”大节一样,此时有几个变量要注意,其中ctx 就是上图的ngx_http_conf_ctx_t,模块类型和配置类型都变了,如下代码:
	cf->ctx = ctx;
	cf->module_type = ngx_http_module;
    cf->cmd_type = ngx_http_main_conf;
    rv = ngx_conf_parse(cf, null);
最后调用ngx_conf_handler函数时,
看起来没变化,其实上图中
- cf->ctx为ngx_http_conf_ctx_t
- cf->cmd_type = ngx_http_main_conf
因此最终conf=confp[cf->cycle->modules[i]->ctx_index]?为什么这么取?可以先看下cmd->conf如何定义的
struct ngx_command_s {
    ngx_str_t             name;
    ngx_uint_t            type;
    char               *(*set)(ngx_conf_t *cf, ngx_command_t *cmd, void *conf);
    ngx_uint_t            conf;
    ngx_uint_t            offset;
    void                 *post;
};
取值如下图
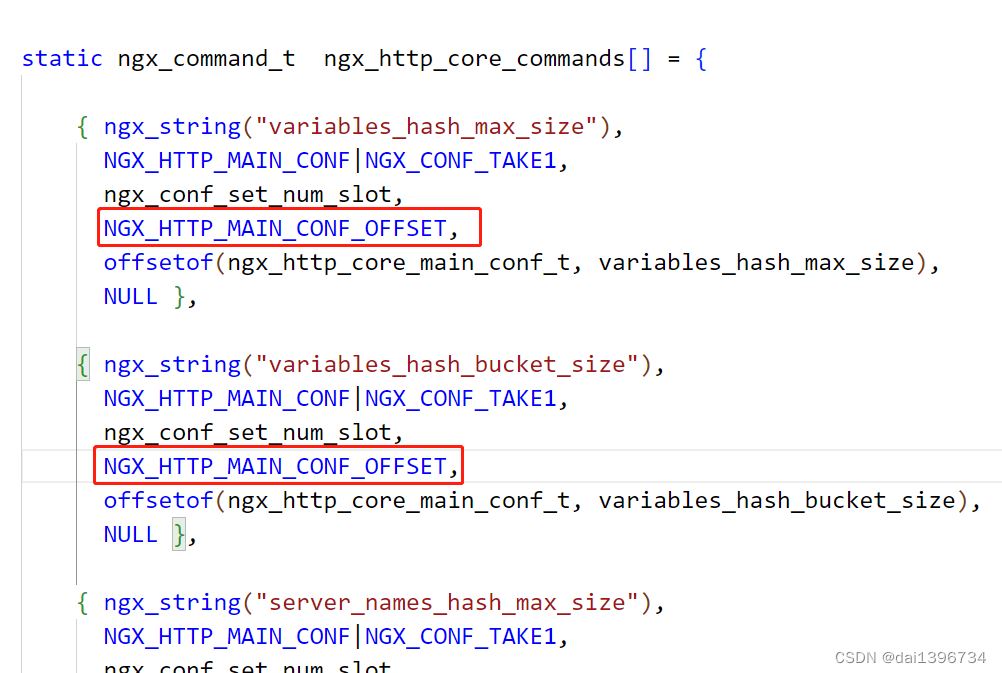
该宏定义如下,是找到成员变量在结构体中的偏移,也就可以根据cmd.conf找到是配置结构体在ngx_http_conf_ctx_t结构体中的哪个数组(main_conf、ser_conf、loc_conf),然后再根据模块的ctx_index找到其对应的配置结构体
#define ngx_http_main_conf_offset  offsetof(ngx_http_conf_ctx_t, main_conf)
#define ngx_http_srv_conf_offset   offsetof(ngx_http_conf_ctx_t, srv_conf)
#define ngx_http_loc_conf_offset   offsetof(ngx_http_conf_ctx_t, loc_conf)
4.2 遇到server块怎么处理?
函数就不展开了,是ngx_http_core_module模块的ngx_http_core_server,读者可以自己去读源码
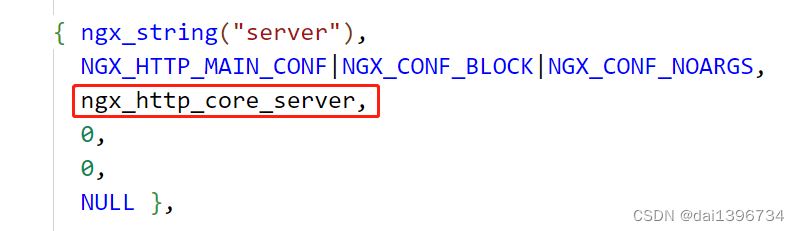
过程与遇到http块差不多
- 创建一个ngx_http_conf_ctx_t结构体变量ctx
- 将其main_conf指向http块的main_conf位置,如图绿色线部分,为srv_conf 和loc_conf重新分配内存,
- 获取srv_conf 数组中索引ngx_http_core_module.ctx_index的结构体,就是索引为0的结构体,也是ngx_http_core_srv_conf_t结构体,将其结构体成员ctx指向一开始创建的ctx,下图右边部分的图示
- 将获取到的ngx_http_core_srv_conf_t结构体放入ngx_http_core_main_conf_t结构体,如图坐标红色箭头的图示,这样不管遇到多少个server块都能将其信息保存,同时也能反向查找到
- 继续解析文件,调用ngx_conf_parse
   /* parse inside server{} */
   pcf = *cf;
   cf->ctx = ctx;
   cf->cmd_type = ngx_http_srv_conf;
   rv = ngx_conf_parse(cf, null);
4.3 遇到location块怎么处理?
同样会遇到块location,和上面一样,直接查看ngx_http_core_location函数,此时的cf->ctx 为 解析server块时创建的ngx_http_conf_ctx_t
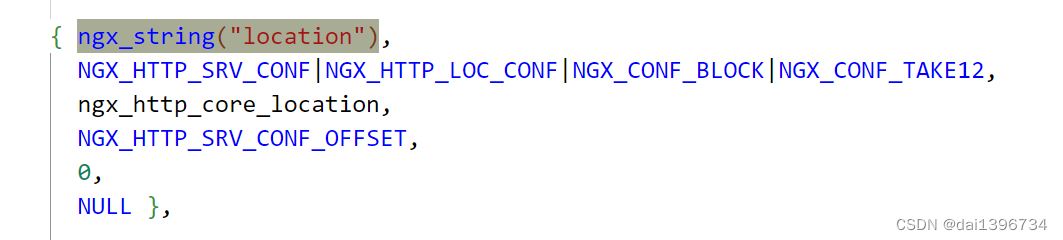
过程与上面的处理差不多,
- 依然会创建ngx_http_conf_ctx_t结构体变量ctx
- 其main_conf与server_conf指向上一级,也就是处理server块时创建的ngx_http_conf_ctx_t的结构体main_conf与server_conf,而location则新分配内存
这里有个不同,就是多个location块怎么处理?
看下面代码,注意ctx代码为处理当前location生成的ngx_http_conf_ctx_t,而pctx为上一级也就是server块生成的ngx_http_conf_ctx_t
	ngx_http_core_loc_conf_t  *clcf, *pclcf;
	clcf = ctx->loc_conf[ngx_http_core_module.ctx_index];
    clcf->loc_conf = ctx->loc_conf;

	pclcf = pctx->loc_conf[ngx_http_core_module.ctx_index];
 	if (ngx_http_add_location(cf, &pclcf->locations, clcf) != ngx_ok) {
        return ngx_conf_error;
    }
在看ngx_http_add_location,这就不展开了,目的是将当前location的配置结构体ngx_http_core_loc_conf_t 放入上一级的locations中取,如下图:
结构体分配完成后会继续ngx_conf_parse,此时不会在遇到块了,所以会将配置信息放入特殊的结构体中,然后再一一退出递归(因为此时ngx_conf_parse还是在递归中)。
总结
以上为个人经验,希望能给大家一个参考,也希望大家多多支持代码网。


发表评论