一、了解什么是android studio
android studio 是开发 android 应用程序的官方 ide,基于 intellij idea。你可以从官网android studio下载最新版本的 android studio。在项目开始之前,请确认已经安装好android studio和完成相关的环境配置。
二、了解什么是sqlite
sqlite 是一个软件库,实现了自给自足的、无服务器的、零配置的、事务性的 sql 数据库引擎。sqlite 是在世界上最广泛部署的 sql 数据库引擎。他有诸多的优点。
- 轻量级:sqlite是一个嵌入式数据库,它以一个独立的、自给自足的文件形式存在,不需要额外的服务器进程或配置。它的库文件大小较小,占用的系统资源较少,适合在资源有限的环境中使用。
- 易于使用:sqlite提供了简单的api和易于理解的sql查询语言,使得开发人员可以轻松地进行数据库操作。它使用标准的sql语法,并提供了广泛的查询、插入、更新和删除功能。
- 高性能:由于sqlite是一个本地文件数据库,它可以直接访问数据,而无需网络连接。这使得数据库操作的速度非常快,并且可以在本地执行复杂的查询和事务。
- 跨平台支持:sqlite数据库可以在多个操作系统和平台上运行,包括windows、linux、mac和移动设备平台(如android和ios)。这使得开发人员可以使用相同的数据库技术来开发跨平台的应用程序。
想要学习sqlite数据库的可以点击了解sqlite教程,本文不做过多介绍。
三、创建项目文件
打开android studio,创建一个新的空白项目。

接下来设置应用程序的基本信息,如应用程序名和包名,指定程序的安卓版本等。
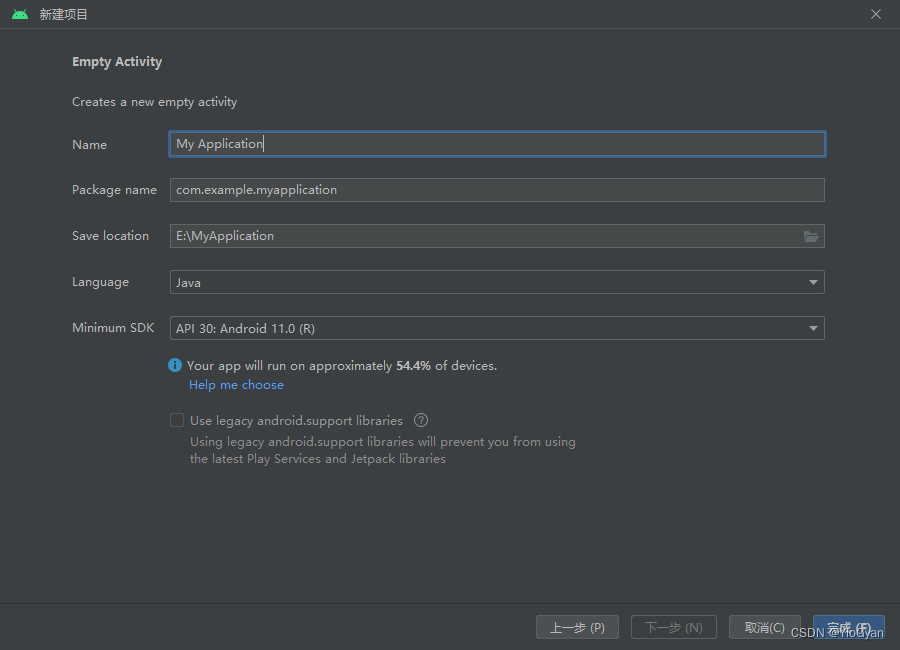
设置完成后点击完成,完成一个空项目的创建。
四、创建活动文件和布局文件
在项目工程结构下的java目录下的包含你项目名的软件包下新建活动文件。一般项目会自带有一个默认活动。(叫这个名字👉mainactivity)
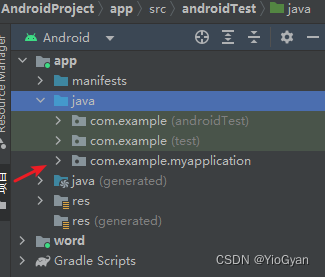
右击软件包,创建一个名为registeractivity的活动,勾选第一个选项,创建完成活动后android studio会自动帮你创建对应的一个布局文件。


因为刚创建出来的布局文件是空白的,需要我们自己添加按钮或者文本,以下是一个布局页面的示例,可以根据自己需求更改。布局元素自行了解,不再过多叙述。
activity_register.xml
<?xml version="1.0" encoding="utf-8"?>
<linearlayout xmlns:android="http://schemas.android.com/apk/res/android"
    xmlns:app="http://schemas.android.com/apk/res-auto"
    xmlns:tools="http://schemas.android.com/tools"
    android:layout_width="match_parent"
    android:layout_height="match_parent"
    android:orientation="vertical"
    tools:context=".registeractivity">
    <textview
        android:layout_width="wrap_content"
        android:layout_height="wrap_content"
        android:text="注册"
        android:textsize="40dp"
        android:layout_gravity="center"
        />
    <linearlayout
        android:layout_width="wrap_content"
        android:layout_height="wrap_content"
        android:layout_gravity="center"
        android:layout_margintop="50dp"
        >
        <textview
            android:layout_width="wrap_content"
            android:layout_height="wrap_content"
            android:text="用户名:"
            android:textsize="20dp"
            android:layout_marginright="20dp"
            android:layout_margintop="3dp"
            />
        <edittext
            android:id="@+id/rusername"
            android:layout_width="200dp"
            android:layout_height="wrap_content"
            android:hint="请输入你的用户名"/>
    </linearlayout>
    <linearlayout
        android:layout_width="wrap_content"
        android:layout_height="wrap_content"
        android:layout_gravity="center"
        android:layout_margintop="50dp"
        >
        <textview
            android:layout_width="wrap_content"
            android:layout_height="wrap_content"
            android:text="密码:"
            android:textsize="20dp"
            android:layout_marginright="20dp"
            android:layout_margintop="3dp"
            />
        <edittext
            android:id="@+id/rpassword"
            android:layout_width="200dp"
            android:layout_height="wrap_content"
            android:hint="请入你的密码"/>
    </linearlayout>
    <linearlayout
        android:layout_width="wrap_content"
        android:layout_height="wrap_content"
        android:layout_gravity="center"
        android:layout_margintop="50dp"
        >
        <textview
            android:layout_width="wrap_content"
            android:layout_height="wrap_content"
            android:text="电话:"
            android:textsize="20dp"
            android:layout_marginright="20dp"
            android:layout_margintop="3dp"
            />
        <edittext
            android:id="@+id/rphone"
            android:layout_width="200dp"
            android:layout_height="wrap_content"
            android:hint="请输入你的电话"/>
    </linearlayout>
    <linearlayout
        android:layout_width="wrap_content"
        android:layout_height="wrap_content"
        android:layout_gravity="center"
        android:layout_margintop="50dp"
        >
        <textview
            android:layout_width="wrap_content"
            android:layout_height="wrap_content"
            android:text="邮箱:"
            android:textsize="20dp"
            android:layout_marginright="20dp"
            android:layout_margintop="3dp"
            />
        <edittext
            android:id="@+id/remil"
            android:layout_width="200dp"
            android:layout_height="wrap_content"
            android:hint="请输入你的邮箱"/>
    </linearlayout>
    <button
        android:onclick="register"
        android:id="@+id/mregister"
        android:layout_gravity="center"
        android:layout_margintop="40dp"
        android:layout_width="200dp"
        android:layout_height="wrap_content"
        android:textsize="20dp"
        android:text="注册"
        />
    <button android:id="@+id/fh" android:onclick="gobak"
        android:layout_gravity="center"
        android:layout_margintop="40dp"
        android:layout_width="200dp"
        android:layout_height="wrap_content"
        android:textsize="20dp"
        android:text="返回登录"
        />
</linearlayout>
注册页面有了当然少不了登录页面,用上述的方法创建一个登录页面,同样给出一个示例页面。
login_activity.xml
<?xml version="1.0" encoding="utf-8"?>
<linearlayout xmlns:android="http://schemas.android.com/apk/res/android"
    xmlns:app="http://schemas.android.com/apk/res-auto"
    xmlns:tools="http://schemas.android.com/tools"
    android:layout_width="match_parent"
    android:layout_height="match_parent"
    android:orientation="vertical"
    tools:context=".loginactivity">
    <textview
        android:layout_width="wrap_content"
        android:layout_height="wrap_content"
        android:layout_gravity="center"
        android:text="登录"
        android:textsize="50dp"/>
    <linearlayout
        android:layout_width="wrap_content"
        android:layout_height="wrap_content"
        android:layout_gravity="center"
        android:layout_margintop="50dp"
        >
        <textview
            android:layout_width="wrap_content"
            android:layout_height="wrap_content"
            android:text="用户名:"
            android:textsize="20dp"
            android:layout_marginright="20dp"
            android:layout_margintop="3dp"
            />
        <edittext
            android:id="@+id/lusername"
            android:layout_width="200dp"
            android:layout_height="wrap_content"
            android:hint="请输入你的用户名"/>
    </linearlayout>
    <linearlayout
        android:layout_width="wrap_content"
        android:layout_height="wrap_content"
        android:layout_gravity="center"
        android:layout_margintop="50dp"
        >
        <textview
            android:layout_width="wrap_content"
            android:layout_height="wrap_content"
            android:text="密码:"
            android:textsize="20dp"
            android:layout_marginright="20dp"
            android:layout_margintop="3dp"
            />
        <edittext
            android:id="@+id/lpassword"
            android:layout_width="200dp"
            android:layout_height="wrap_content"
            android:hint="请输入你的密码"/>
    </linearlayout>
    <linearlayout
        android:layout_width="wrap_content"
        android:layout_height="wrap_content"
        android:layout_margintop="300dp"
        >
        <button
            android:id="@+id/login"
            android:layout_width="150dp"
            android:layout_height="55dp"
            android:layout_marginleft="30dp"
            android:textsize="20dp"
            android:text="登录"></button>
        <button
            android:id="@+id/register"
            android:onclick="goregister"
            android:layout_width="150dp"
            android:layout_height="55dp"
            android:textsize="20dp"
            android:layout_marginleft="60dp"
            android:text="注册"
            >
        </button>
    </linearlayout>
</linearlayout>
五、创建数据库连接数据库
在活动目录包下创建一个名为mysqliteopenhelper的java类,注意是创建java类不是活动类。并且继承sqliteopenhelper,后续我们在这个类中实现数据库的相关操作。

mysqliteopenhelper.java
package com.example.androidword;
import android.content.context;
import android.database.sqlite.sqlitedatabase;
import android.database.sqlite.sqliteopenhelper;
import androidx.annotation.nullable;
public class mysqliteopenhelper extends sqliteopenhelper {
    //数据库名字
    private static final string db_name = "user.db";
    //创建用户表
    private static final string create_user = "create table user(id integer primary key autoincrement," +
            "username varchar(30)," +
            "password varchar(30)," +
            "phone varchar(30)," +
            "emil varchar(30))";
    //运行程序时,android studio帮你创建数据库,只会执行一次
    public mysqliteopenhelper(@nullable context context) {
        super(context,db_name,null,1);
    }
    //创建数据表
    @override
    public void oncreate(sqlitedatabase sqlitedatabase) {
        sqlitedatabase.execsql(create_user);
    }
    @override
    public void onupgrade(sqlitedatabase sqlitedatabase, int i, int i1) {
    }
}
六、创建实体类实现注册功能
在活动目录包下新建user类,用它当作我们此次项目的实体类,也就是数据库表中的字段。
user.java
package com.example.androidword;
//创建user类,并添加属性和构造方法、get、set方法
public class user {
    public string username;
    public string password;
    public string phone;
    public string emil;
    public user(){}
    public user(string username, string password, string phone, string emil) {
        this.username = username;
        this.password = password;
        this.phone = phone;
        this.emil = emil;
    }
    public string getusername() {
        return username;
    }
    public void setusername(string username) {
        this.username = username;
    }
    public string getpassword() {
        return password;
    }
    public void setpassword(string password) {
        this.password = password;
    }
    public string getphone() {
        return phone;
    }
    public void setphone(string phone) {
        this.phone = phone;
    }
    public string getemil() {
        return emil;
    }
    public void setemil(string emil) {
        this.emil = emil;
    }
}
接着我们去mysqliteopenhelper类中添加注册的方法,即把我们输入的数据保存在数据库中(插入)。
    public long register(user u){
        sqlitedatabase db = getwritabledatabase();
        contentvalues cv = new contentvalues();
        cv.put("username ",u.getusername());
        cv.put("password",u.getpassword());
        cv.put("phone",u.getphone());
        cv.put("emil",u.getemil());
        long users = db.insert("user",null,cv);
        return users;
    }
在registeractivity活动类中我们还要编写相关的后台代码,如获取输入框,注册按钮等。
package com.example.androidword;
import androidx.appcompat.app.appcompatactivity;
import android.content.intent;
import android.os.bundle;
import android.view.view;
import android.widget.button;
import android.widget.edittext;
import android.widget.toast;
public class registeractivity extends appcompatactivity implements view.onclicklistener {
    @override
    protected void oncreate(bundle savedinstancestate) {
        mysqliteopenhelper = new mysqliteopenhelper(this);
        super.oncreate(savedinstancestate);
        setcontentview(r.layout.activity_register);
        //初始化获取的布局元素
        find();
    }
    //获取注册按钮,预先定义,下方输入框同理
    private button register;
    private edittext username,password,phone,emil;
    //使用mysqliteopenhelper类中的方法
    private mysqliteopenhelper mysqliteopenhelper;
    //控制注册按钮点击完后不给点击了
    boolean flag = false;
    //跳转回登录页面
    public void gobak(view view){
        intent gl = new intent(registeractivity.this,loginactivity.class);
        startactivity(gl);
    }
    //初始化获取的布局元素
    public void find(){
        username = findviewbyid(r.id.rusername);
        password = findviewbyid(r.id.rpassword);
        phone = findviewbyid(r.id.rphone);
        emil = findviewbyid(r.id.remil);
        register = findviewbyid(r.id.mregister);
        register.setonclicklistener(this);
    }
    //注册逻辑实现
    public void register(){
        string ru = username.gettext().tostring();
        string rps = password.gettext().tostring();
        string rph = phone.gettext().tostring();
        string rem = emil.gettext().tostring();
        user user = new user(ru,rps,rph,rem);
        if(ru.equals("")){
            toast.maketext(this, "账号不能为空!", toast.length_short).show();
        } else if (rps.equals("")) {
            toast.maketext(this, "密码不能为空!", toast.length_short).show();
        } else if (rph.equals("")) {
            toast.maketext(this, "电话不能为空!", toast.length_short).show();
        }else if(rem.equals("")){
            toast.maketext(this, "邮箱不能为空!", toast.length_short).show();
        }else{
            long r1 = mysqliteopenhelper.register(user);
            register.setenabled(false);
            register.settextcolor(0xffd0efc6);
            if(r1!=-1){
                toast.maketext(this, "注册成功", toast.length_short).show();
            }else{
                toast.maketext(this, "注册失败!", toast.length_short).show();
            }
        }
    }
    //监听按钮点击事件
    @override
    public void onclick(view view) {
        switch (view.getid()){
            case r.id.mregister:
                register();
                break;
        }
    }
    @override
    public void onpointercapturechanged(boolean hascapture) {
        super.onpointercapturechanged(hascapture);
    }
}
运行程序,观察数据库是否成功创建,注册信息能否添加进数据库。


到此注册功能已经基本实现,更多的逻辑判断可以自行添加。接下来实现登录功能。
七、实现登录功能
mysqliteopenhelper类中添加登录的方法和根据用户名找到当前用户的方法。
 //登录方法实现
    public boolean login(string username,string password){
        sqlitedatabase db = getwritabledatabase();
        boolean result = false;
        cursor users = db.query("user", null, "username like?", new string[]{username}, null, null, null);
        if(users!=null){
            while (users.movetonext()){
                @suppresslint("range") string username1 = users.getstring(users.getcolumnindex("username"));
                log.i("users", "login: "+username1);
                string password1 = users.getstring(2);
                log.i("users", "login: "+password1);
                result = password1.equals(password);
                return result;
            }
        }
        return false;
    }
    //根据用户名查找当前登录用户信息
    public user select(string username){
        sqlitedatabase db = getwritabledatabase();
        user selectuser = new user();
        cursor user = db.query("user", new string[]{"username", "phone", "emil"}, "username=?", new string[]{username}, null, null, null);
        while(user.movetonext()){
            @suppresslint("range") string uname =user.getstring(user.getcolumnindex("username"));
            @suppresslint("range") string phone = user.getstring(user.getcolumnindex("phone"));
            @suppresslint("range") string emil = user.getstring(user.getcolumnindex("emil"));
            selectuser.setusername(uname);
            selectuser.setphone(phone);
            selectuser.setemil(emil);
        }
        user.close();
        return selectuser;
    }
接下来同上一步,到loginactivity活动类中找到登录按钮,输入框等布局元素,并实现登录功能。
package com.example.androidword;
import androidx.appcompat.app.appcompatactivity;
import android.content.intent;
import android.os.bundle;
import android.view.view;
import android.widget.button;
import android.widget.edittext;
import android.widget.toast;
public class loginactivity extends appcompatactivity implements view.onclicklistener {
    private button register,login;
    private edittext username,password;
    private mysqliteopenhelper mysqliteopenhelper;
    @override
    protected void oncreate(bundle savedinstancestate) {
        mysqliteopenhelper = new mysqliteopenhelper(this);
        super.oncreate(savedinstancestate);
        setcontentview(r.layout.activity_login);
        find();
    }
    public void find(){
        login = findviewbyid(r.id.login);
        register = findviewbyid(r.id.register);
        username = findviewbyid(r.id.lusername);
        password = findviewbyid(r.id.lpassword);
        login.setonclicklistener(this);
        register.setonclicklistener(this);
    }
    @override
    public void onclick(view view) {
        int id = view.getid();
        switch (id){
            case r.id.login:
                string n = username.gettext().tostring();
                string p = password.gettext().tostring();
                if(n.equals("")){
                    toast.maketext(this, "请输入账号", toast.length_short).show();
                }else if(p.equals("")){
                    toast.maketext(this, "请输入密码", toast.length_short).show();
                }else{
                    boolean login = mysqliteopenhelper.login(n, p);
                    if(login){
                        toast.maketext(this, "登录成功!", toast.length_short).show();
                        user select = mysqliteopenhelper.select(n);
                        intent home = new intent(loginactivity.this,mainactivity.class);
                        bundle bundle = new bundle();
                        bundle.putstring("username",select.username);
                        bundle.putstring("emil",select.emil);
                        bundle.putstring("phone",select.phone);
                        home.putextras(bundle);
                        username.settext("");
                        password.settext("");
                        startactivity(home);
                    }else {
                        toast.maketext(this, "账号或密码错误,请重新输入", toast.length_short).show();
                        password.settext("");
                    }
                }
                break;
            case r.id.register:
                intent re = new intent(loginactivity.this, registeractivity.class);
                startactivity(re);
                break;
        }
    }
    @override
    public void onpointercapturechanged(boolean hascapture) {
        super.onpointercapturechanged(hascapture);
    }
}
重新启动应用,观察登录功能是否已经实现,上述例子中我添加了一个校验通过跳转另一个页面的方法来检验是否登录成功。


到此,我们已经实现了一个简单的注册和登录功能。
八、总结
学习android studio是学习android应用开发的重要一步。下面是一个android studio课程学习的总结:
1. 熟悉界面和基本功能:开始学习之前,熟悉android studio的用户界面和各个功能区域。了解项目结构、编辑器、调试工具等基本功能,掌握常用的快捷键和操作技巧。
2. 学习java或kotlin语言:android studio主要使用java或kotlin语言进行开发。学习java或kotlin的基本语法、面向对象编程概念和常用的api。
3. 掌握android框架和组件:了解android的基本组件和框架,如activity、fragment、intent、布局、资源管理等。学习如何创建和管理这些组件,以及它们之间的交互。
4. 学习布局设计和ui开发:掌握android布局设计,使用xml和代码创建用户界面。了解常用的布局类型(如线性布局、相对布局、帧布局等),并学习如何使用ui控件(如textview、button、imageview等)和样式化组件。
5. 数据存储和处理:学习如何在android应用中存储和处理数据。了解sqlite数据库数据存储技术,以及与网络通信、数据解析和持久化相关的技术。
以上就是android使用sqlite实现登录注册功能流程详解的详细内容,更多关于android sqlite登录注册的资料请关注代码网其它相关文章!


发表评论