正文
我们知道,angular 中因为有 service 和 rxjs 的存在,使得状态管理在 angular,并非必须。
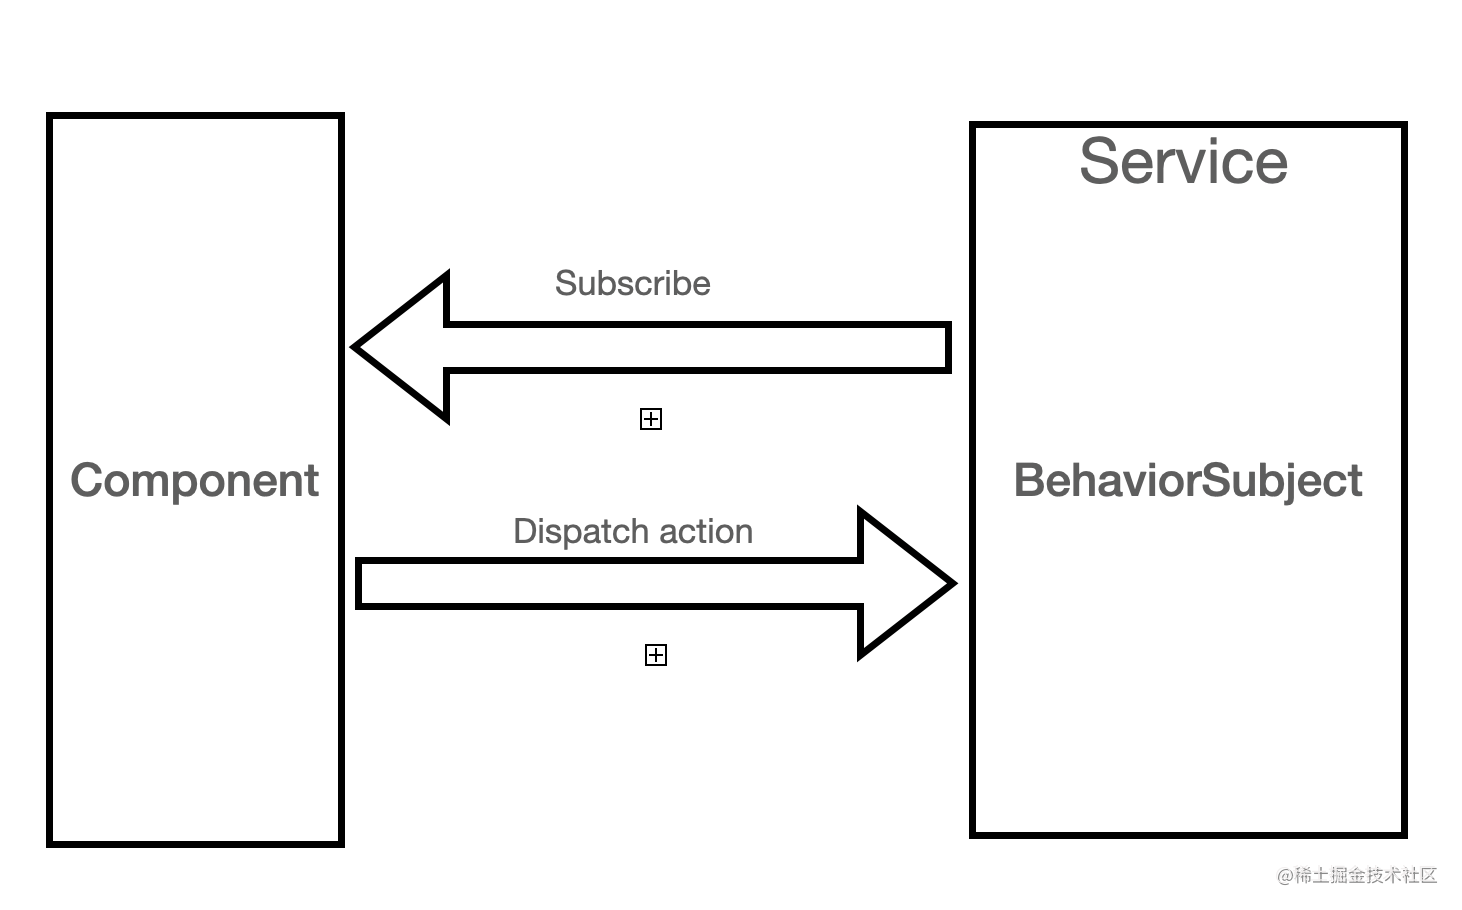
一个 behaviorsubject 就形成了最简单的状态管理:
将逻辑部分分离到 service
使用 rxjs 将 service 中的逻辑部分,拆分为状态和方法。component subscribe state 来更新 view, 调用方法来修改 state。
我们知道,angular 中可以使用 ngrx 提供的 store 来做状态管理。ngrx store 跟 redux 本质上是一样的。多数时候,可能我们都觉得 redux 太重了。而且强行将数据与 view 分离。
除了 ngrx store, ngrx 还提供了另外一种轻量级的状态管理,component store。本质上它跟我们刚刚介绍的状态管理模式是一致的,只是提供了一些接口方便我们使用。 ngrx - @ngrx/component-store

在定位上,可以参考 hooks 与 redux 的区分,ngrx store 用来处理全局状态,component store 用来 component 内局部的状态管理使用。(store 和 component 拥有相同的生命周期)。当然,实际上使用下来,component store 也完全可以用来当作全局的状态管理来处理。
component store 的使用方法
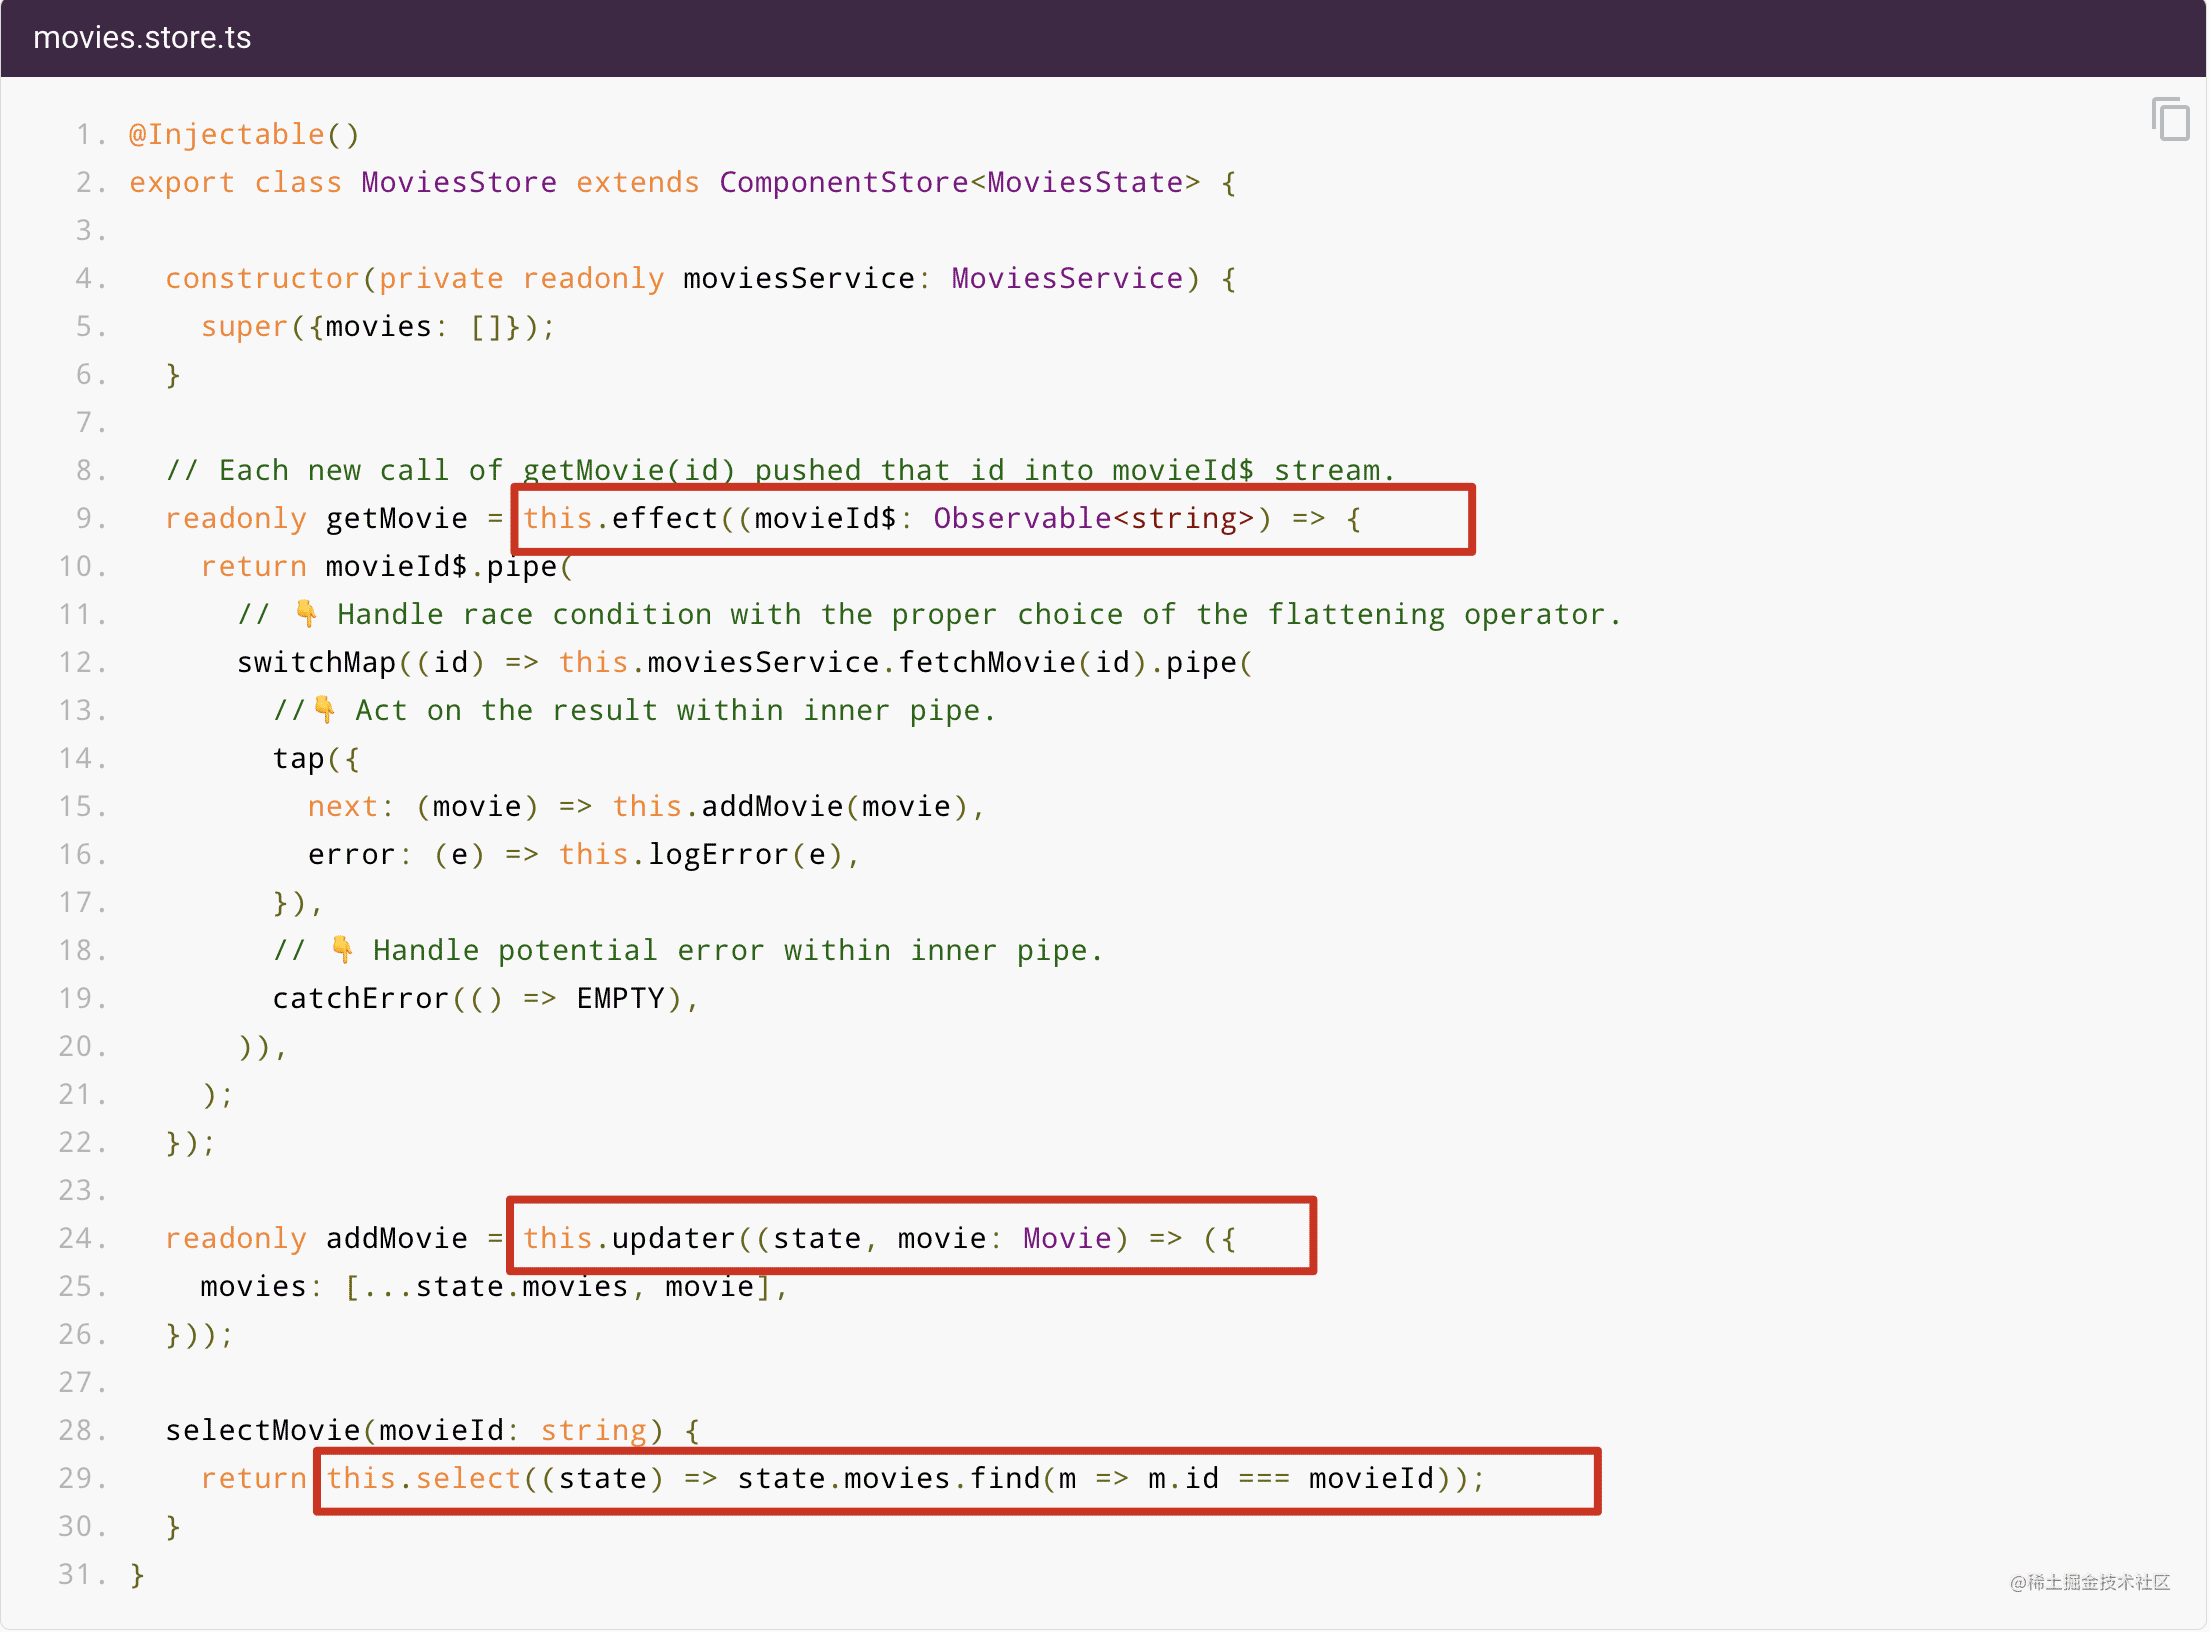
我们可以看到,store 主要提供了三个方法:
- select, 用来拆分 state
- updater, 用来更新 state, 主要是无 effect 的 state 更新。
- effect, 用来处理有 effect 的情况,调用 updater 的方法来更新数据。
我们可以看出来,这样的接口设计跟 mobx 或者 vuex 是比较接近的。区别就是,因为 rxjs 的缘故,它的实现异常简单。几乎只是基于 behaviorsubject 包了一层壳。
有两点还是值得一提的:
updater 和 effect 的方法参数可以同时接受 value 和 observable value, 这使得我们在操作一个 stream 的时候,可以直接将 stream 作为参数。
比如我们现在有一个方法 updateusername: (string | observable<strring>) => void;
使用的时候,我们可以直接调用:updateusername('zhangsan')
有时候我们在 component 里拿到的是一个 stream。
比如 form.valuechanges, 这时候我们就不需要手动 subscribe stream, 而是直接
updateusername(form.valuechanges.pipe(map(form => form.username)))
- updater 和 effect 将 stream 作为参数后会自动 subscribe 并在 store 被销毁的时候 unsubscribe, 这就意味着你不用再写一堆手动 unsubscribe 的逻辑。
在 component 中使用
在 component 中使用也比较简单:
- 将 component 中必要的数据投喂给 store, 一般来说是 input.
- 在 component 中调用 updater 或者 effect 返回的方法修改 state。
- 在 component 中 subscribe state 实现 view 层的渲染。
@component({
  template: `...`,
  // ❗️moviesstore is provided higher up the component tree
})
export class moviecomponent {
  movie$: observable<movie>;
  @input()
  set movieid(value: string) {
    // calls effect with value. 👇 notice it's a single string value.
    this.moviesstore.getmovie(value);
    this.movie$ = this.moviesstore.selectmovie(value);
  }
  constructor(private readonly moviesstore: moviesstore) {}
}
当然,我们也可以做一点优化,比如,尽可能将逻辑放在 store 中 componet 只做简单的调用。将数据之间的联动关系放在 store 的 constructor 中,component 只做调用。
@component({
  template: `...`,
  // ❗️moviesstore is provided higher up the component tree
})
export class moviecomponent {
  movie$: observable<movie>;
  @input()
  set movieid(value: string) {
    this.mobiesstore.patchstate({movieid: value});
  }
  constructor(private readonly moviesstore: moviesstore) {}
}
@injectable()
export class moviesstore extends componentstore<moviesstate> {
  constructor(private readonly moviesservice: moviesservice) {
    super({movieid: string; movies: []});
    this.gemovie(this.movieid$);
  }
  movieid$ = this.select(state => state.movieid);
  movie$ = this.moviesstore.selectmovie(this.movieid$);
  readonly getmovie = this.effect((movieid$: observable<string>) => {
    //....
  });
  readonly addmovie = this.updater((state, movie: movie) => ({
    // ...
  }));
  selectmovie(movieid: string) {
     // ...
  }
}
因为这里的 component store 是针对单个 component 的,也就是通常情况它的使用场景是逻辑较为复杂的 component。一个 component 基于 input 的变化完全可以转化为对于 store 的监听。那么,我们基本上可以将 component 的多数 input 同步到 store 中。
在一段时间的使用过程中,我发现,这是比较费劲的,
- 同一个字段,我需要在 component 和 store state 中声明两次。
- input 必须转写成 set 模式
比如 username 这个字段
原来:
@input username: string;
与 store 同步:
@input
set username(val: string) {
  this.store.patchstate({username: val});
}
如果想在 component 中直接调用 username 就更麻烦了。
private _username: string;
@input
set username(val: string) {
  this._username = val;
  this.store.patchstate({username: val});
}
get username() {
  return this._username;
}
如果字段比较多,简直就是灾难。
最近在尝试一种不同于官网推荐的方法。我们知道,除了 set 我们还有一种更为常规的方法获取 input changes, 那就是 ngchanges。
export function mappropchangestostore<t extends jsonrecord>(this: componentstore<t>, mappedkeys: readonly string[], changes: simplechanges) {
  const state = mappedkeys.reduce((prev: partial<t>, propkey) => {
    // eslint-disable-next-line @typescript-eslint/ban-ts-comment
    // @ts-ignore
    const propvalue = changes?.[propkey];
    if (!propvalue) {
      return prev;
    }
    return ({
      ...prev,
      [propkey]: propvalue.currentvalue,
    });
  }, {});
  if (isempty(state)) {
    return;
  }
  this.patchstate(state);
}
在 component 中对于 store 的使用
import { component, input, onchanges, oninit, simplechanges } from '@angular/core';
import { mappropchangestostore } from '@dashes/ngx-shared';
import { componentinputs, csdemostore } from './cs-demo.store';
@component({
  selector: 'app-cs-demo',
  templateurl: './cs-demo.component.html',
  styleurls: ['./cs-demo.component.css']
})
export class csdemocomponent implements onchanges {
  @input() p1!: string;
  @input() p2!: string;
  @input() p3!: string;
  constructor(public store: csdemostore) { }
  ngonchanges(changes: simplechanges): void {
    mappropchangestostore.bind(this.store)(componentinputs, changes);
  }
}
export const componentinputs = ['p1', 'p2'] as const;
export type state = pick<csdemocomponent, typeof componentinputs[number]>;
这样看起来就会简洁很多。
以上就是angular 与 component store实践示例的详细内容,更多关于angular component store的资料请关注代码网其它相关文章!


发表评论