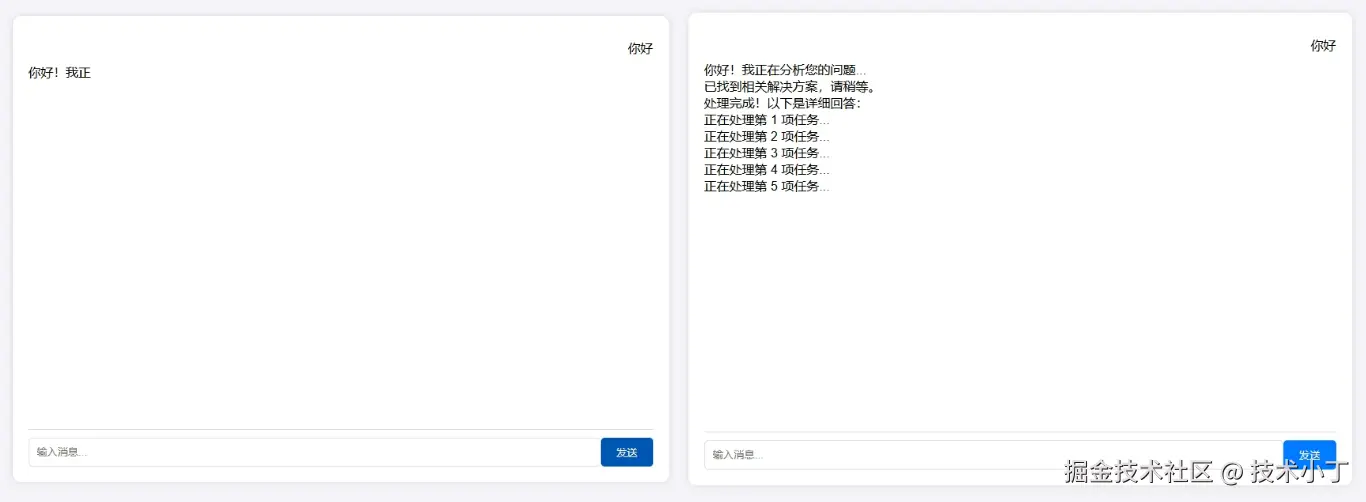
效果演示
后端代码
<?php
// 关闭输出缓冲
ini_set('output_buffering', 'off');
ini_set('zlib.output_compression', false);
while (ob_get_level()) ob_end_clean(); // 清除所有缓冲层

// 设置http头(流式内容类型 + 禁用缓存)
header('content-type: text/plain; charset=utf-8');
header('cache-control: no-cache');
header('x-accel-buffering: no');

// 模拟对话回复内容
$messages = [
    "你好!我正在分析您的问题...\n",
    "已找到相关解决方案,请稍等。\n",
    "处理完成!以下是详细回答:\n"
];

// 流式输出每条消息
foreach ($messages as $msg) {
    // 逐字输出(可选)
    // $length = strlen($msg);
    $length = mb_strlen($msg);
    for ($i=0; $i<$length; $i++) {
        // echo $msg[$i];
        $char = mb_substr($msg, $i, 1, 'utf-8');
        echo $char;
        ob_flush(); // 刷新php缓冲
        flush();    // 刷新web服务器缓冲
        usleep(50000); // 50ms延迟模拟打字效果
    }
}

// 持续生成内容的例子(如从数据库/api获取)
for ($i=1; $i<=5; $i++) {
    echo "正在处理第 {$i} 项任务...\n";
    ob_flush();
    flush();
    sleep(1);
}
前端代码
<!doctype html>
<html lang="en">
<head>
    <meta charset="utf-8">
    <meta name="viewport" content="width=device-width, initial-scale=1.0">
    <title>智能客服系统</title>
    <style>
        body {
            font-family: arial, sans-serif;
            display: flex;
            justify-content: center;
            align-items: center;
            height: 100vh;
            margin: 0;
            background-color: #f4f4f9;
        }
        .chat-container {
            width: 800px;
            background-color: #fff;
            border-radius: 10px;
            box-shadow: 0 0 10px rgba(0, 0, 0, 0.1);
            padding: 20px;
        }
        .messages {
            height: 500px;
            overflow-y: auto;
            border-bottom: 1px solid #ddd;
            padding-bottom: 10px;
        }
        .message {
            margin: 10px 0;
        }
        .user {
            text-align: right;
        }
        .bot {
            text-align: left;
        }
        .input-container {
            display: flex;
            margin-top: 10px;
        }
        .input-container input {
            flex: 1;
            padding: 10px;
            border: 1px solid #ddd;
            border-radius: 5px;
        }
        .input-container button {
            padding: 10px 20px;
            border: none;
            background-color: #007bff;
            color: #fff;
            border-radius: 5px;
            cursor: pointer;
        }
        .input-container button:hover {
            background-color: #0056b3;
        }
    </style>
</head>
<body>
<div class="chat-container">
    <div class="messages" id="messages" style="white-space: pre-wrap;"></div>
    <div class="input-container">
        <input type="text" id="userinput" placeholder="输入消息...">
        <button onclick="sendmessage()">发送</button>
    </div>
</div>

<script>
    function sendmessage() {
        const userinput = document.getelementbyid('userinput').value;
        if (userinput.trim() === '') return;
        document.getelementbyid('userinput').value = '';

        const messagescontainer = document.getelementbyid('messages');
        const usermessage = document.createelement('div');
        usermessage.classname = 'message user';
        usermessage.textcontent = userinput;
        messagescontainer.appendchild(usermessage);


        fetch('stream.php')
            .then(response => {
                const reader = response.body.getreader();
                const decoder = new textdecoder('utf-8');

                const botmessage = document.createelement('div');
                botmessage.classname = 'message bot';
                messagescontainer.appendchild(botmessage);

                function readchunk() {
                    return reader.read().then(({ done, value }) => {
                        if (done) return;
                        // 将二进制数据解码为文本
                        const text = decoder.decode(value);
                        // 实时追加到页面
                        botmessage.innerhtml += text;
                        messagescontainer.scrolltop = messagescontainer.scrollheight;
                        // 继续读取下一块
                        return readchunk();
                    });
                }
                return readchunk();
            })
            .catch(console.error);
    }
</script>
</body>
</html>
运行测试
项目根目录下打开命令行输入以下命令,执行
php -s 127.0.0.1:6789
打开浏览器,输入 127.0.0.1:6789 访问web界面,输入任意内容发送后,即可看到流式输出效果
原理解析
1. 什么是流式输出
流式输出通常指的是在数据生成的同时逐步发送到客户端,而不是等待所有处理完成后再一次性发送。这在实时聊天应用或需要逐步显示结果的场景中很常见。
2. php怎么做到流式输出
php默认是缓冲输出的,也就是说,脚本执行完毕后才会将内容发送到浏览器。所以需要调整输出缓冲的设置。比如调用ob_flush()和flush()来实时发送内容。
3. 前端处理数据的接收和显示
前端监听来自服务器的事件,每次接收到数据就更新页面。本次实践通过fetch读取流式响应体,逐块处理。
到此这篇关于php+html实现流式输出效果的示例详解的文章就介绍到这了,更多相关php html流式输出内容请搜索代码网以前的文章或继续浏览下面的相关文章希望大家以后多多支持代码网!


发表评论