一、socket基础概念与工作流程(图解)
(先理解“打电话”模型,再写代码)
1. socket通信核心模型
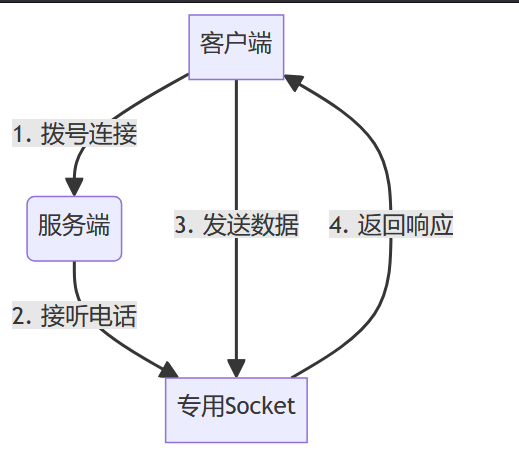
关键角色:
- 客户端:主动发起连接(类似拨打电话)
- 服务端:监听端口,等待连接(类似待机电话)
- socket对象:连接建立后的数据传输通道(通话线路)
2. 核心流程分解
- 服务端:创建
serversocket→ 绑定端口 → 阻塞等待连接(accept()) - 客户端:创建
socket→ 指定服务端ip和端口 → 发起连接 - 双向通信:通过输入流(
inputstream)和输出流(outputstream)收发数据 - 关闭连接:调用
close()释放资源
二、服务端与客户端基础代码分步解析
(每行代码加注释,新手必看)
1. 服务端基础代码(单线程版)
// 步骤1:创建serversocket,绑定端口8080
serversocket serversocket = new serversocket(8080);
system.out.println("服务端启动,等待连接...");
// 步骤2:等待客户端连接(阻塞方法,直到有客户端连接)
socket clientsocket = serversocket.accept();
system.out.println("客户端接入:" + clientsocket.getremotesocketaddress());
// 步骤3:获取输入流(接收客户端数据)
inputstream input = clientsocket.getinputstream();
byte[] buffer = new byte[1024];
int len = input.read(buffer);  // 读取数据到buffer数组
string receiveddata = new string(buffer, 0, len);
system.out.println("收到消息:" + receiveddata);
// 步骤4:发送响应数据
outputstream output = clientsocket.getoutputstream();
output.write("已收到!".getbytes());
// 步骤5:关闭连接(实际开发中需在finally块处理)
clientsocket.close();
serversocket.close();
2. 客户端基础代码
// 步骤1:连接服务端(ip+端口)
socket socket = new socket("127.0.0.1", 8080);
system.out.println("连接服务端成功!");
// 步骤2:发送数据
outputstream output = socket.getoutputstream();
output.write("你好,服务端!".getbytes());
// 步骤3:接收响应
inputstream input = socket.getinputstream();
byte[] buffer = new byte[1024];
int len = input.read(buffer);
string response = new string(buffer, 0, len);
system.out.println("服务端响应:" + response);
// 步骤4:关闭连接
socket.close();
三、超时设置详解(解决卡死问题)
(必学技能,避免程序无限等待)
1. 连接超时(防止无法连接时卡死)
socket socket = new socket();
// 设置连接超时为5秒(单位:毫秒)
socket.connect(new inetsocketaddress("127.0.0.1", 8080), 5000); // - 触发场景:服务端未启动或网络不通
- 异常处理:捕获
sockettimeoutexception提示用户检查网络
2. 读取超时(防止数据未到达时阻塞)
socket.setsotimeout(3000); // 设置读取超时3秒
- 作用范围:
inputstream.read()操作 - 异常处理:超时后抛出
sockettimeoutexception,可重试或终止
3. 完整超时处理示例
try (socket socket = new socket()) {
    // 连接超时5秒
    socket.connect(new inetsocketaddress("127.0.0.1", 8080), 5000);
    // 读取超时3秒
    socket.setsotimeout(3000);
    inputstream input = socket.getinputstream();
    // 读取数据...
} catch (sockettimeoutexception e) {
    system.err.println("操作超时:" + e.getmessage());
} catch (ioexception e) {
    system.err.println("连接失败:" + e.getmessage());
}
四、心跳机制实现(维持长连接)
(防止长时间无数据导致连接断开)
1. 心跳包原理
- 作用:定时发送空数据包,告知对方连接存活
- 实现方式:客户端定时任务 + 服务端超时检测
2. 客户端心跳代码
timer timer = new timer();
timer.schedule(new timertask() {
    @override
    public void run() {
        try {
            outputstream out = socket.getoutputstream();
            out.write(0);  // 发送心跳包(内容可为任意约定标识)
            out.flush();
            system.out.println("心跳发送成功");
        } catch (ioexception e) {
            system.err.println("心跳发送失败,连接已断开");
            timer.cancel();  // 停止定时任务
        }
    }
}, 0, 30000);  // 立即启动,每30秒执行一次
3. 服务端检测心跳
socket.setsotimeout(45000);  // 超时时间略大于心跳间隔
try {
    inputstream in = socket.getinputstream();
    while (true) {
        int data = in.read();  // 阻塞等待数据
        if (data == 0) {
            system.out.println("收到心跳包");
        }
    }
} catch (sockettimeoutexception e) {
    system.err.println("心跳超时,连接断开");
    socket.close();
}
五、完整实战案例:带超时与心跳的echo服务
服务端代码(多线程版)
public class echoserver {
    public static void main(string[] args) throws ioexception {
        executorservice pool = executors.newcachedthreadpool();  // 线程池处理并发
        try (serversocket server = new serversocket(8080)) {
            system.out.println("服务端启动,端口8080");
            while (true) {
                socket client = server.accept();
                client.setsotimeout(45000);  // 设置读取超时45秒
                pool.submit(() -> handleclient(client));
            }
        }
    }
    private static void handleclient(socket client) {
        try (bufferedreader in = new bufferedreader(new inputstreamreader(client.getinputstream()));
             printwriter out = new printwriter(client.getoutputstream(), true)) {
            string input;
            while ((input = in.readline()) != null) {
                if ("heartbeat".equals(input)) {  // 识别心跳包
                    system.out.println("收到心跳包");
                    continue;
                }
                out.println("echo: " + input);  // 回显消息
            }
        } catch (sockettimeoutexception e) {
            system.err.println("客户端超时未响应,连接关闭");
        } catch (ioexception e) {
            e.printstacktrace();
        } finally {
            try { client.close(); } catch (ioexception e) {}
        }
    }
}
客户端代码(带心跳与超时)
public class echoclient {
    public static void main(string[] args) {
        try (socket socket = new socket()) {
            // 连接超时5秒
            socket.connect(new inetsocketaddress("127.0.0.1", 8080), 5000);
            // 读取超时3秒
            socket.setsotimeout(3000);
            // 启动心跳线程(每30秒一次)
            startheartbeat(socket.getoutputstream());
            scanner scanner = new scanner(system.in);
            printwriter out = new printwriter(socket.getoutputstream(), true);
            bufferedreader in = new bufferedreader(new inputstreamreader(socket.getinputstream()));
            while (true) {
                system.out.print("输入消息:");
                string msg = scanner.nextline();
                out.println(msg);  // 发送消息
                system.out.println("服务端响应:" + in.readline());
            }
        } catch (sockettimeoutexception e) {
            system.err.println("操作超时:" + e.getmessage());
        } catch (ioexception e) {
            system.err.println("连接异常:" + e.getmessage());
        }
    }
    private static void startheartbeat(outputstream out) {
        timer timer = new timer();
        timer.schedule(new timertask() {
            @override
            public void run() {
                try {
                    out.write("heartbeat\n".getbytes());  // 发送心跳标识
                    out.flush();
                } catch (ioexception e) {
                    timer.cancel();
                }
            }
        }, 0, 30000);
    }
}
六、常见问题与解决方案速查表
| 问题现象 | 可能原因 | 解决方案 |
|---|---|---|
| connection refused | 服务端未启动或端口错误 | 检查服务端代码是否运行,确认端口一致 |
| read timed out | 网络延迟或服务端未及时响应 | 增加超时时间或优化服务端代码 |
| broken pipe | 连接已关闭仍尝试写数据 | 发送前检查socket.isclosed(),捕获异常后重连 |
| 内存泄漏 | 未关闭socket或流 | 使用try-with-resources自动关闭资源 |
七、java socket核心方法速查表
| 方法名 | 所属类 | 功能描述 | 参数说明 | 返回值 | 常见异常 | 使用示例 |
|---|---|---|---|---|---|---|
| serversocket(int port) | serversocket | 创建服务端socket并绑定指定端口 | port:监听的端口号(0-65535) | 无 | bindexception(端口被占用) | new serversocket(8080); |
| accept() | serversocket | 阻塞等待客户端连接,返回通信用的socket对象 | 无 | socket(客户端连接对象) | ioexception | socket client = serversocket.accept(); |
| close() | serversocket | 关闭服务端socket,释放端口资源 | 无 | 无 | ioexception | serversocket.close(); |
| socket(string host, int port) | socket | 客户端主动连接服务端(构造函数隐式调用connect()) | host:服务端ip;port:服务端端口 | 无 | unknownhostexception, ioexception | socket socket = new socket("127.0.0.1", 8080); |
| connect(socketaddress addr, int timeout) | socket | 显式连接服务端,可设置超时时间 | addr:服务端地址;timeout:超时毫秒 | 无 | sockettimeoutexception | socket.connect(new inetsocketaddress("127.0.0.1", 8080), 5000); |
| getinputstream() | socket | 获取输入流,用于接收数据 | 无 | inputstream | ioexception | inputstream in = socket.getinputstream(); |
| getoutputstream() | socket | 获取输出流,用于发送数据 | 无 | outputstream | ioexception | outputstream out = socket.getoutputstream(); |
| setsotimeout(int timeout) | socket | 设置读取超时时间(单位:毫秒),超时后抛出sockettimeoutexception | timeout:超时时间(0表示无限等待) | 无 | socketexception | socket.setsotimeout(3000); |
| setkeepalive(boolean on) | socket | 启用/禁用tcp保活机制(默认关闭),自动检测连接是否存活 | on:true启用,false禁用 | 无 | socketexception | socket.setkeepalive(true); |
| shutdownoutput() | socket | 关闭输出流(发送fin包),通知对方数据发送完毕,但不关闭socket | 无 | 无 | ioexception | socket.shutdownoutput(); |
| close() | socket | 关闭socket连接,释放资源 | 无 | 无 | ioexception | socket.close(); |
| readint() | datainputstream | 从输入流读取4字节的int值(常用于解析长度头) | 无 | int | eofexception, ioexception | int length = new datainputstream(in).readint(); |
| writeint(int v) | dataoutputstream | 向输出流写入4字节的int值(常用于发送长度头) | v:要写入的整数值 | 无 | ioexception | new dataoutputstream(out).writeint(1024); |
到此这篇关于java socket编程从零到实战详解的文章就介绍到这了,更多相关java socket编程内容请搜索代码网以前的文章或继续浏览下面的相关文章希望大家以后多多支持代码网!


发表评论