一、测试环境准备
| 节点1 | 节点2 | |
|---|---|---|
| ip地址 | 192.168.101.77 | 192.168.101.79 |
| mysql版本 | 8.0.32 | 8.0.32 |
二、主从搭建
1.创建复制用户
节点1执行:
mysql> create user 'repl'@'%' identified  by '123123';
mysql> grant replication slave on *.* to 'repl'@'%';
mysql> flush privileges;
mysql> show master status;
2.创建复制关系
节点2执行
mysql>
change master to
master_host='192.168.101.77',
master_port=3306,
master_user='repl',
master_password='123123' ,
master_auto_position=1;
3.开启复制,确认复制是否成功
开启复制
mysql> start slave;
查看复制状态(下面是正常状态)
root@localhost:(none)>show slave status \g
*************************** 1. row ***************************
               slave_io_state: waiting for source to send event
                  master_host: 192.168.101.77
                  master_user: repl
                  master_port: 3306
                connect_retry: 60
              master_log_file: mysql-bin.000007
          read_master_log_pos: 197
               relay_log_file: localhost-relay-bin.000004
                relay_log_pos: 413
        relay_master_log_file: mysql-bin.000007
             slave_io_running: yes
            slave_sql_running: yes
              replicate_do_db:
          replicate_ignore_db:
           replicate_do_table:
       replicate_ignore_table:
      replicate_wild_do_table:
  replicate_wild_ignore_table:
                   last_errno: 0
                   last_error:
                 skip_counter: 0
          exec_master_log_pos: 197
              relay_log_space: 2098
              until_condition: none
               until_log_file:
                until_log_pos: 0
           master_ssl_allowed: no
           master_ssl_ca_file:
           master_ssl_ca_path:
              master_ssl_cert:
            master_ssl_cipher:
               master_ssl_key:
        seconds_behind_master: 0
master_ssl_verify_server_cert: no
                last_io_errno: 0
                last_io_error:
               last_sql_errno: 0
               last_sql_error:
  replicate_ignore_server_ids:
             master_server_id: 1
                  master_uuid: f6ca767b-2144-11ee-80e4-080027a4fdbc
             master_info_file: mysql.slave_master_info
                    sql_delay: 0
          sql_remaining_delay: null
      slave_sql_running_state: replica has read all relay log; waiting for more updates
           master_retry_count: 86400
                  master_bind:
      last_io_error_timestamp:
     last_sql_error_timestamp:
               master_ssl_crl:
           master_ssl_crlpath:
           retrieved_gtid_set: f6ca767b-2144-11ee-80e4-080027a4fdbc:4-8
            executed_gtid_set: f6ca767b-2144-11ee-80e4-080027a4fdbc:1-8
                auto_position: 1
         replicate_rewrite_db:
                 channel_name:
           master_tls_version:
       master_public_key_path:
        get_master_public_key: 0
            network_namespace:
1 row in set, 1 warning (0.00 sec)

可在节点1插入数据,然后在节点2查询数据是否同步,确定同步是否正常。
4.同步排错
报错1:
last_io_error: error connecting to master 'repl@192.168.101.77:3306' - retry-time: 60 retries: 21 message: authentication plugin 'caching_sha2_password' reported error: authentication requires secure connection.
解决方法:
alter user 'repl'@'%' identified with mysql_native_password by '123123';
报错2:
last_io_error: got fatal error 1236 from master when reading data from binary log: 'cannot replicate because the master purged required binary logs. replicate the missing transactions from elsewhere, or provision a new slave from backup. consider increasing the master's binary log expiration period. the gtid set sent by the slave is '75433121-6a95-11ef-8b71-080027123ed0:1-3', and the missing transactions are 'f6ca767b-2144-11ee-80e4-080027a4fdbc:1-3''
解决方法:
root@localhost:(none)>stop slave;
query ok, 0 rows affected, 1 warning (0.11 sec)

root@localhost:(none)>reset master;
query ok, 0 rows affected (0.10 sec)

root@localhost:(none)>reset slave;
query ok, 0 rows affected, 1 warning (0.20 sec)

root@localhost:(none)>set @@global.gtid_purged='f6ca767b-2144-11ee-80e4-080027a4fdbc:1-3';
query ok, 0 rows affected (0.06 sec)

root@localhost:(none)>start slave;
query ok, 0 rows affected, 1 warning (0.10 sec)
三、双主配置
双主配置也就是将上面的主从操作反向操作一遍。
1.创建复制用户
mysql> create user 'repl1'@'%' identified  by '123123';
mysql> grant replication slave on *.* to 'repl1'@'%';
mysql> flush privileges;
mysql> show master status;
2.创建复制关系
mysql>
change master to
master_host='192.168.101.79',
master_port=3306,
master_user='repl',
master_password='123123' ,
master_auto_position=1;
3.开启复制,确认复制是否成功
mysql> start slave;
mysql>show slave status \g;
4.双主测试
节点1插入数据,节点2查询
节点2插入数据,节点1查询
四、keepalived配置
1.keepalived安装、启停操作
yum -y install keepalived
systemctl status keepalived
systemctl start keepalived
systemctl stop keepalived
2.keepalived配置文件
vi /etc/keepalived/keepalived.conf
! configuration file for keepalived
global_defs {
    notification_email {
      acassen@firewall.loc
     failover@firewall.loc
     sysadmin@firewall.loc
   }
    notification_email_from alexandre.cassen@firewall.loc
   router_id mycat_ha # 定义名称
}
vrrp_script chk_mycat_alive {
    script "/etc/keepalived/mysql_check.sh"    # 返回状态码为0表示正常,检测脚本为true;返回状态码非0表示异常,检测脚本为false
    interval 2                                 # 检测脚本执行的间隔,单位是秒
    weight 20
}
vrrp_instance vi_1 {
      state master     #主节点为master,备节点为backup
      interface enp0s3    #根据实际网卡名配置
      virtual_router_id 88
      priority 100
      advert_int 1
      authentication {
         auth_type pass
         auth_pass qwert
    }
    track_script {
        chk_mycat_alive            # 调用检测脚本
    }
   virtual_ipaddress {
         192.168.101.199/24            # 定义虚拟ip(vip)
    }
}
3.keepalived配置文件
服务状态检查脚本
cat /etc/keepalived/mysql_check.sh
#!/bin/bash
count=`ps -c mysqld --no-heading|wc -l`
time=$(date "+%y-%m-%d %h:%m:%s")
if [ $count = 0 ]; then
    echo "$time : count=$count, mysql is not running..." >> /var/log/keepalived_check.log
    exit 1 # 返回1说明脚本非正常执行,mysql不在运行中
else
    echo "$time : count=$count, mysql is running..." >> /var/log/keepalived_check.log
    exit 0 # 返回0说明脚本正常执行,mysql正在运行中
    fi
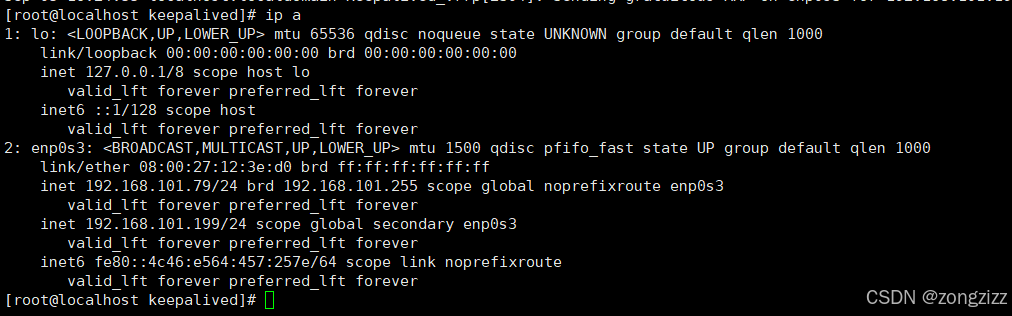
4.keepalived配置成功
配置完成后可在其中一节点上看到虚拟地址,同网段也可以ping通虚拟地址,同时也可以通过虚拟地址连接上数据库。
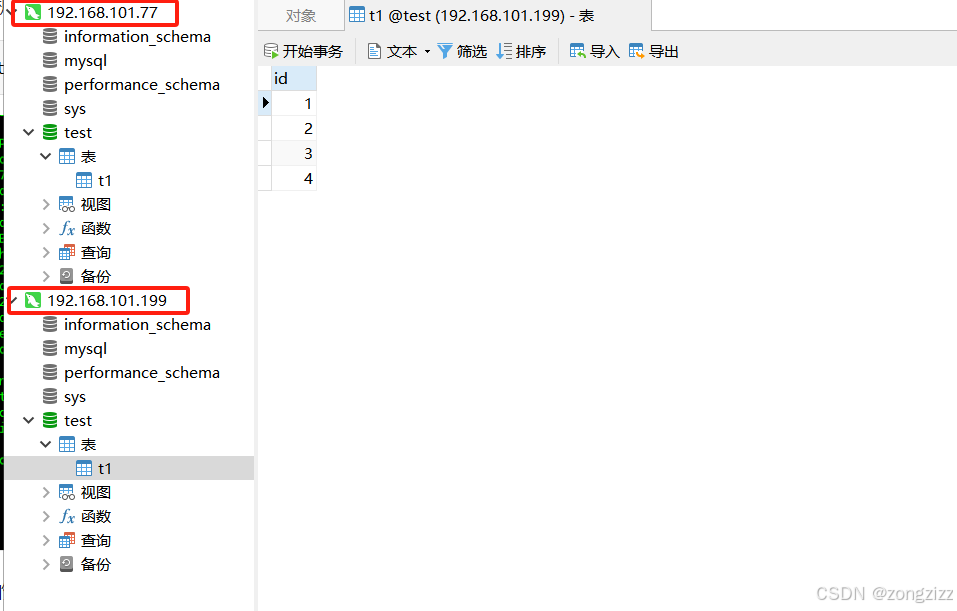
五、集群状态测试
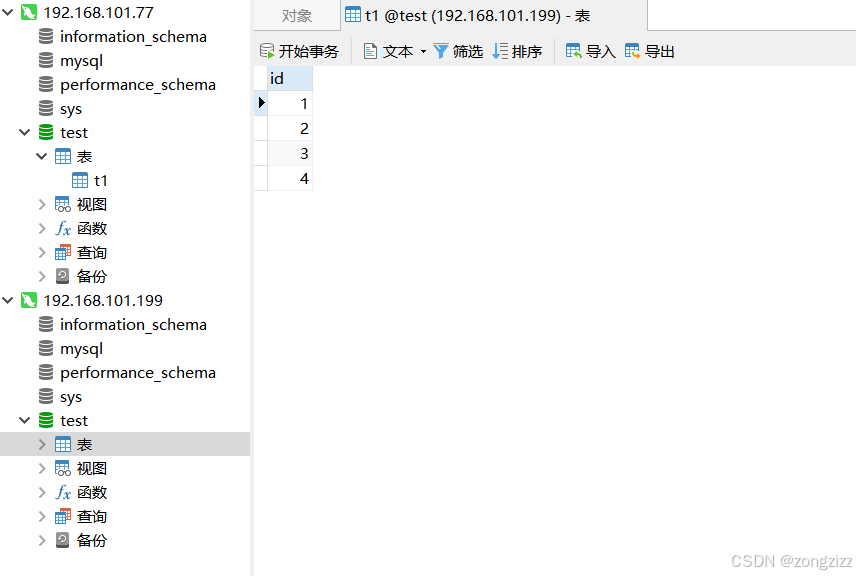
两节点物理地址均可连接数据库,也可通过虚拟地址连接数据库,下面我们测试一下关闭一台服务器(虚拟地址所服务器)测试是否还是可通过虚拟地址连接数据库。

节点2关机后虚拟地址跑到节点1上去了,测试用虚拟地址连接数据库依然可以连接

重新启动节点2后,启动数据库即可拉起双主集群
到此这篇关于mysql双主搭建+keepalived高可用的实现的文章就介绍到这了,更多相关mysql双主搭建+keepalived高可用内容请搜索代码网以前的文章或继续浏览下面的相关文章希望大家以后多多支持代码网!


发表评论