开发环境 : linux系统,语言: python,html, css
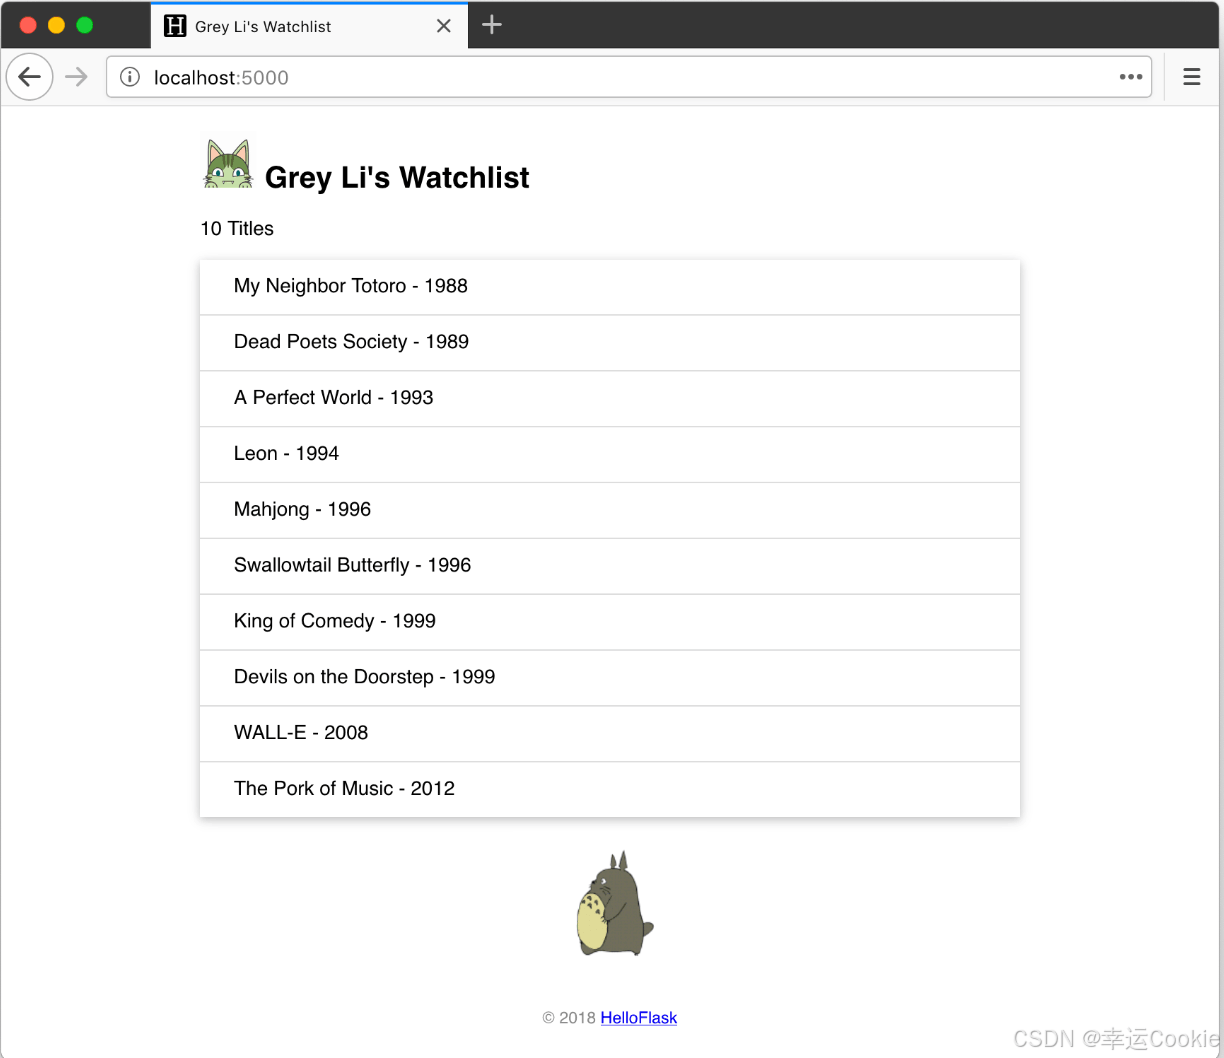
利用flask实现一个watchlist的web程序,部分代码和图片都是来自:flask 入门教程,我在此基础上修改了一下,最后的效果如下:
1. 安装 flask和一些基本插件
pip install flask
pip install flask-sqlalchemy
pip install pymysql
如果安装比较慢的话,可以加上 -i https://pypi.tsinghua.edu.cn/simple
2. 创建项目结构
创建一个文件夹来存放你的项目文件。项目的基本结构如下:
watchlist/{static/images style.css} {template/index.html login.html} app.py3.在watchlist目录下创建虚拟环境并进入虚拟环境
python3 -m venv env
scoure ./env/scripts/activate
4. 编写主应用文件 (app.py)
在 watchlist目录下创建一个名为 app.py 的文件,并编写以下代码:
from flask import flask, render_template, url_for, redirect, request, flash
from flask_sqlalchemy import sqlalchemy
import click

app = flask(__name__)

app.config['sqlalchemy_database_uri'] = 'mysql+pymysql://root:123456@localhost/watchlist'
app.config['sqlalchemy_track_modifications'] = false
app.secret_key = 'your_secret_key'  # 用于闪现消息

db = sqlalchemy(app)

# 创建数据库命令
@app.cli.command()
def forge():
    """generate fake data."""
    db.create_all()

    name = 'brokenofviolet'
    movies = [
        {'title': 'my neighbor totoro', 'year': '1988'},
        {'title': 'dead poets society', 'year': '1989'},
        {'title': 'a perfect world', 'year': '1993'},
        {'title': 'leon', 'year': '1994'},
        {'title': 'mahjong', 'year': '1996'},
        {'title': 'swallowtail butterfly', 'year': '1996'},
        {'title': 'king of comedy', 'year': '1999'},
        {'title': 'devils on the doorstep', 'year': '1999'},
        {'title': 'wall-e', 'year': '2008'},
        {'title': 'the pork of music', 'year': '2012'},
    ]

    user = user(username=name, password='password123')  # 设定一个默认密码
    db.session.add(user)
    for m in movies:
        movie = movie(title=m['title'], year=m['year'])
        db.session.add(movie)

    db.session.commit()
    click.echo('done.')

# 数据库模型
class user(db.model):
    username = db.column(db.string(20), primary_key=true)
    password = db.column(db.string(20))

class movie(db.model):
    id = db.column(db.integer, primary_key=true)
    title = db.column(db.string(60))
    year = db.column(db.string(4))

# 主页路由
@app.route('/')
def index():
    user = user.query.first()  # 修复此处变量名
    movies = movie.query.all()
    return render_template("index.html", user=user, movies=movies)

# 404 错误处理路由
@app.errorhandler(404)
def page_not_found(e):
    user = user.query.first()
    return render_template('404.html', user=user), 404

# 登录路由
@app.route('/login', methods=['get', 'post'])
def login():
    if request.method == 'post':
        username = request.form['username']
        password = request.form['password']
        user = user.query.filter_by(username=username).first()

        # 比对用户输入的密码和数据库中存储的密码
        if user and user.password == password:
            flash('login successful!', 'success')
            return redirect(url_for('index'))  # 假设登录成功后重定向到index
        else:
            flash('invalid username or password.', 'danger')

    return render_template('login.html')

if __name__ == '__main__':
    app.run(debug=true)
5. 创建 html 模板文件
主页templates/index.html
在 templates 目录中创建一个名为 index.html 的文件,编写一个简单的 html 页面:
<!doctype html>
<html lang="en">
<head>
<meta charset="utf-8">
<link rel="stylesheet" href="{{url_for('static',filename='style.css')}}" rel="external nofollow" type="text/css">
<title>{{ name }}'s watchlist</title>
</head>
<body>
<h2>{{ name }}'s watchlist
<img alt="avatar" class="avator" src="{{url_for('static',filename='images/avatar.png')}}">
</h2>
{# 使用 length 过滤器获取 movies 变量的长度 #}
<p>{{ movies|length }} titles</p>
<ul class="movie-list">
{% for movie in movies %} {# 迭代 movies 变量 #}
<li>{{ movie.title }} - {{ movie.year }}</li> {# 等同于 movie['title'] #}
{% endfor %} {# 使用 endfor 标签结束 for 语句 #}
</ul>
<img alt="totoro" class="totoro" src="{{url_for('static',filename='images/totoro.gif')}}"
</body>
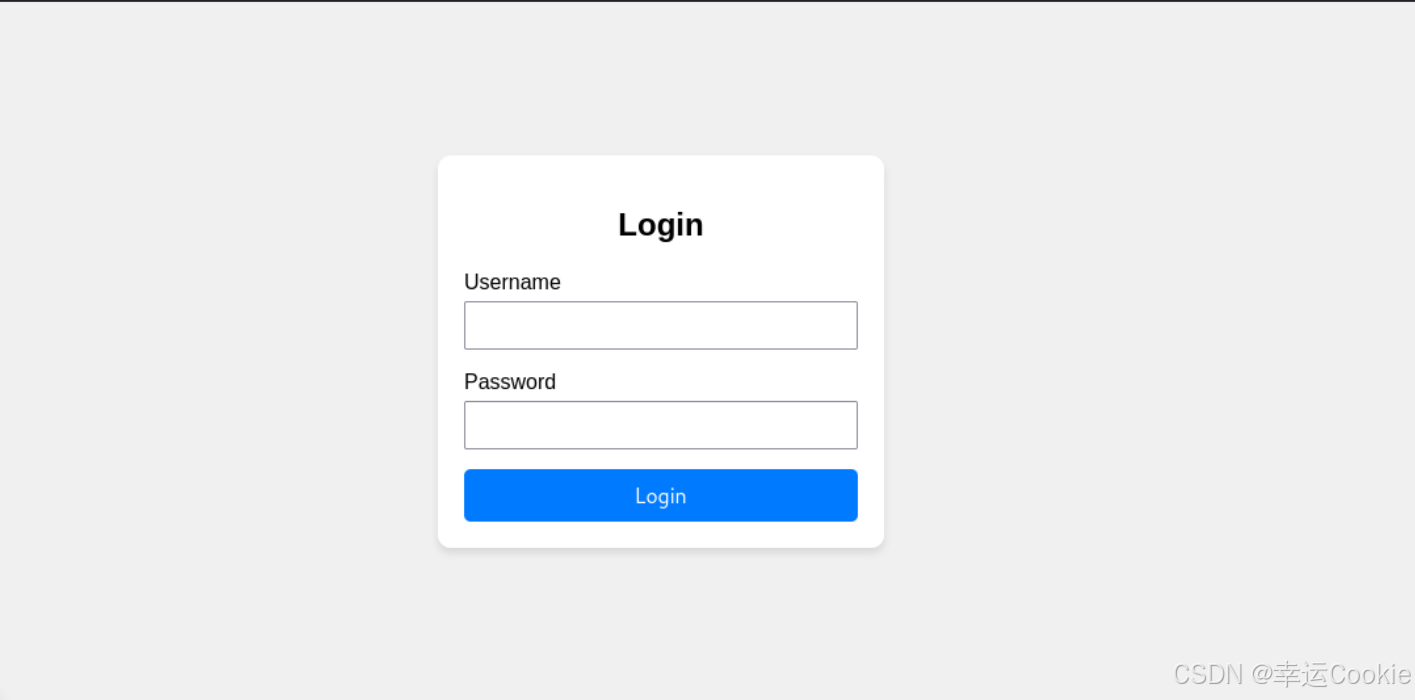
</html>登陆界面templates/login.html
<!doctype html>
<html lang="en">
<head>
    <meta charset="utf-8">
    <meta http-equiv="x-ua-compatible" content="ie=edge">
    <meta name="viewport" content="width=device-width, initial-scale=1.0">
    <title>login</title>
    <link rel="stylesheet" href="{{ url_for('static', filename='style.css') }}" rel="external nofollow" >
</head>
<body>
    <div class="login-container">
        <h2>login</h2>
        {% with messages = get_flashed_messages(with_categories=true) %}
          {% if messages %}
            <ul class="flashes">
              {% for category, message in messages %}
                <li class="{{ category }}">{{ message }}</li>
              {% endfor %}
            </ul>
          {% endif %}
        {% endwith %}
        <form method="post" action="{{ url_for('login') }}">
            <div class="input-group">
                <label for="username">username</label>
                <input type="text" id="username" name="username" required>
            </div>
            <div class="input-group">
                <label for="password">password</label>
                <input type="password" id="password" name="password" required>
            </div>
            <button type="submit">login</button>
        </form>
    </div>
</body>
</html>
6. 创建静态文件 (static/style.css)
在 static 目录中创建一个名为 style.css 的文件,添加一些简单的 css 样式:
/* 页面整体 */
body {
    font-family: arial, sans-serif;
    background-color: #f0f0f0;
    display: flex;
    justify-content: center;
    align-items: center;
    height: 100vh;
    margin: 0;
}

/* 页脚 */
footer {
    color: #888;
    margin-top: 15px;
    text-align: center;
    padding: 10px;
}

/* 头像 */
.avatar {
    width: 40px;
}

/* 电影列表 */
.movie-list {
    list-style-type: none;
    padding: 0;
    margin-bottom: 10px;
    box-shadow: 0 2px 5px 0 rgba(0, 0, 0, 0.16), 0 2px 10px 0 rgba(0, 0, 0, 0.12);
}

.movie-list li {
    padding: 12px 24px;
    border-bottom: 1px solid #ddd;
}

.movie-list li:last-child {
    border-bottom:none;
}

.movie-list li:hover {
    background-color: #f8f9fa;
}

/* 龙猫图片 */
.totoro {
    display: block;
    margin: 0 auto;
    height: 100px;
}

.login-container {
    background-color: white;
    padding: 20px;
    border-radius: 10px;
    box-shadow: 0 4px 6px rgba(0, 0, 0, 0.1);
    width: 300px;
    text-align: center;
}

h2 {
    margin-bottom: 20px;
}

.input-group {
    margin-bottom: 15px;
    text-align: left;
}

.input-group label {
    display: block;
    margin-bottom: 5px;
}

.input-group input {
    width: 100%;
    padding: 8px;
    box-sizing: border-box;
}

button {
    width: 100%;
    padding: 10px;
    background-color: #007bff;
    color: white;
    border: none;
    border-radius: 5px;
    cursor: pointer;
    font-size: 16px;
}

button:hover {
    background-color: #0056b3;
}

.flashes {
    list-style-type: none;
    padding: 0;
}

.flashes li {
    padding: 10px;
    margin-bottom: 10px;
    border-radius: 5px;
}

.flashes li.success {
    background-color: #d4edda;
    color: #155724;
}

.flashes li.danger {
    background-color: #f8d7da;
    color: #721c24;
}
7. 运行应用
在终端中,导航到 watchlist 目录并运行应用。因为在app.py中定义了forge函数用于提交数据,所以进行如下操作:
flask forge
最后直接运行 app.py 或者执行 flask run
总结
到此这篇关于利用flask开发一个web程序的文章就介绍到这了,更多相关flask开发web程序内容请搜索代码网以前的文章或继续浏览下面的相关文章希望大家以后多多支持代码网!


发表评论