引言
在日常开发中,缓存是提高系统性能的重要手段。lru(least recently used)缓存是一种基于“最近最少使用”策略的缓存系统,其目的是在空间受限的情况下保留最新、最常用的数据。当缓存空间不足时,lru 缓存会优先淘汰最久未被使用的数据,从而保持缓存的时效性。本文将详细讲解如何使用 go 语言实现一个 lru 缓存。
lru 缓存的关键特性
- 快速访问缓存内容:
get操作的时间复杂度为 (o(1))。 - 快速插入和更新缓存:
put操作的时间复杂度也为 (o(1))。 - 淘汰最久未使用的数据:当缓存满时,移除最久未访问的数据。
数据结构选型
为了实现 lru 缓存的上述特性,常用的数据结构组合为 哈希表 和 双向链表:
- 哈希表:用于快速访问缓存节点。
- 双向链表:管理节点的访问顺序。每次访问时,将节点移动到链表头部;当缓存满时,移除链表尾部节点(即最久未访问的数据)。
通过这种组合,get 和 put 的时间复杂度均为 (o(1))。
lru 缓存的结构设计
在 lru 缓存的设计中,我们需要以下两个核心组件:
双向链表节点
node:- 存储缓存的
key和value。 - 通过
prev和next指针指向前后节点。
- 存储缓存的
lrucache 缓存结构:
capacity:缓存的容量。cache:使用map[int]*node作为哈希表,存储键值对和链表节点的映射。head和tail:虚拟头尾节点,用于链表的边界处理,避免在插入和删除操作时对边界条件进行额外判断。
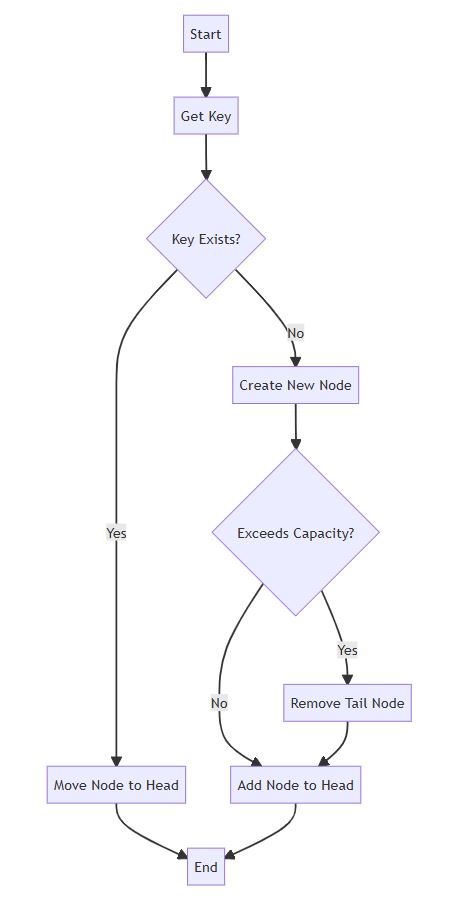
操作流程图
下面是 lru 缓存的整体操作流程概览:
代码实现
1. 定义节点和缓存结构
我们首先定义双向链表节点 node 和 lrucache 结构:
package main

import "fmt"

// 双向链表的节点
type node struct {
	key, value int
	prev, next *node
}

// lrucache 缓存结构
type lrucache struct {
	capacity   int
	cache      map[int]*node // 哈希表,快速定位节点
	head, tail *node         // 虚拟头尾节点
}
2. 初始化 lru 缓存
在 constructor 方法中,初始化缓存容量 capacity 和哈希表 cache,并创建 head 和 tail 虚拟节点。head 和 tail 之间没有数据节点,它们仅用于简化节点插入和删除的边界处理。此时,链表初始状态如下:
head <--> tail
初始化代码如下:
// 构造函数
func constructor(capacity int) lrucache {
	cache := lrucache{
		capacity: capacity,
		cache:    make(map[int]*node),
		head:     &node{},
		tail:     &node{},
	}
	cache.head.next = cache.tail
	cache.tail.prev = cache.head
	return cache
}
3. 获取缓存值(get 方法)
get 方法根据 key 查找缓存中的数据。如果数据存在,则将该节点移到链表头部,标记为“最近使用”;如果数据不存在,则返回 -1。
// 获取缓存中的值
func (this *lrucache) get(key int) int {
	if node, found := this.cache[key]; found {
		this.movetohead(node) // 访问后移至头部
		return node.value
	}
	return -1 // 如果不存在,返回 -1
}
在调用 movetohead 方法时,节点被移动到链表头部。假设我们在链表中有节点顺序:head <-> a <-> b <-> tail,访问 b 后,链表状态变为:
head <--> b <--> a <--> tail
4. 更新或插入值(put 方法)
put 方法根据 key 更新值,或在缓存中插入新的键值对。如果缓存超过容量限制,则移除链表尾部的节点。
// 更新或插入值
func (this *lrucache) put(key int, value int) {
	if node, found := this.cache[key]; found {
		node.value = value
		this.movetohead(node) // 已存在的节点移至头部
	} else {
		// 创建新节点并加入头部
		newnode := &node{key: key, value: value}
		this.cache[key] = newnode
		this.addnode(newnode)

		// 超出容量时,删除尾节点
		if len(this.cache) > this.capacity {
			tail := this.poptail()
			delete(this.cache, tail.key)
		}
	}
}
当缓存满时,poptail 方法删除链表尾部节点。假设链表当前状态为:head <-> b <-> a <-> tail,插入新节点 c 后,链表状态变为:
head <--> c <--> b <--> tail
节点 a 被淘汰,从而控制了缓存的空间限制。
5. 辅助方法
addnode、removenode、movetohead 和 poptail 是缓存核心操作的辅助方法,用于管理链表中节点的插入、删除和移动。
// 添加节点至头部
func (this *lrucache) addnode(node *node) {
	node.prev = this.head
	node.next = this.head.next
	this.head.next.prev = node
	this.head.next = node
}

// 删除节点
func (this *lrucache) removenode(node *node) {
	prev := node.prev
	next := node.next
	prev.next = next
	next.prev = prev
}

// 移动节点到头部
func (this *lrucache) movetohead(node *node) {
	this.removenode(node)
	this.addnode(node)
}

// 弹出尾部节点
func (this *lrucache) poptail() *node {
	tail := this.tail.prev
	this.removenode(tail)
	return tail
}
插入节点到链表头部的图示
addnode 方法的核心步骤如下:假设链表初始状态为 head <-> a <-> b <-> tail,插入新节点 node 到 head 后,链表状态变为:
head <--> node <--> a <--> b <--> tail
6. 单元测试代码
为验证实现正确性,可以使用以下测试:
import "testing"

func testlrucache(t *testing.t) {
	cache := constructor(2)

	cache.put(1, 1)
	cache.put(2, 2)
	if cache.get(1) != 1 {
		t.errorf("expected 1, got %d", cache.get(1))
	}

	cache.put(3, 3) // 淘汰 key 2
	if cache.get(2) != -1 {
		t.errorf("expected -1, got %d", cache.get(2))
	}

	cache.put(4, 4) // 淘汰 key 1
	if cache.get(1) != -1 {
		t.errorf("expected -1, got %d", cache.get(1))
	}
	if cache.get(3) != 3 {
		t.errorf("expected 3, got %d", cache.get(3))
	}
	if cache.get(4) != 4 {
		t.errorf("expected 4, got %d", cache.get(4))
	}
}
总结
通过双向链表和哈希表的结合,实现了一个高效的 lru 缓存,使 get和 put 操作在 o(1) 的时间内完成。双向链表和虚拟节点的设计简化了链表边界的处理,广泛适用于缓存系统中。
以上就是使用go语言实现lru缓存的代码详解的详细内容,更多关于go实现lru缓存的资料请关注代码网其它相关文章!


发表评论